For Abuild Version 1.1.6, June 30, 2011
Copyright © 2007-2011 Jay Berkenbilt, Argon ST
Table of Contents
- Notes For Users of Abuild Version 1.0
- How to Read This Manual
- Acknowledgments
- Notes About Documentation Formatting
- I. Quick Start
- II. Normal Operation
- 4. Build Items and Build Trees
- 5. Target Types, Platform Types, and Platforms
- 6. Build Item Dependencies
- 7. Multiple Build Trees
- 8. Help System
- 9. Telling Abuild What to Build
- 10. Integration with Automated Test Frameworks
- 11. Backing Areas
- 12. Explicit Read-Only and Read/Write Paths
- 13. Command-Line Reference
- 14. Survey of Additional Capabilities
- III. Advanced Functionality
- 15. The
Abuild.confFile - 16. The
Abuild.backingFile - 17. The Abuild Interface System
- 18. The GNU Make backend
- 19. The Groovy Backend
- 19.1. A Crash Course in Groovy
- 19.2. The
Abuild.groovyFile - 19.3. Directory Structure for Java Builds
- 19.4. Class Paths and Class Path Variables
- 19.5. Basic Java Rules Functionality
- 19.6. Advanced Customization of Java Rules
- 19.7. The Abuild Groovy Environment
- 19.8. Using QTest With the Groovy Backend
- 19.9. Groovy Rules
- 19.10. Additional Information for Rule Authors
- 20. Controlling and Processing Abuild's Output
- 21. Shared Libraries
- 22. Build Item Rules and Automatically Generated Code
- 23. Interface Flags
- 24. Cross-Platform Support
- 25. Build Item Visibility
- 26. Linking With Whole Libraries
- 27. Opaque Wrappers
- 28. Optional Dependencies
- 29. Enhancing Abuild with Plugins
- 30. Best Practices
- 31. Monitored Mode
- 32. Sample XSL-T Scripts
- 33. Abuild Internals
- 33.1. Avoiding Recursive Make
- 33.2. Starting Abuild in an Output Directory
- 33.3. Traversal Details
- 33.4. Compatibility Framework
- 33.5. Construction of the Build Set
- 33.6. Construction of the Build Graph
- 33.7. Implementation of the Abuild Interface System
- 33.8. Loading Abuild Interfaces
- 33.9. Parameter Block Implementation
- 15. The
- IV. Appendices
- A. Release Notes
- B. Major Changes from Version 1.0 to Version 1.1
- C. Upgrading from 1.0 to Version 1.1
- D. Known Limitations
- E. Online Help Files
- E.1. abuild --help groovy
- E.2. abuild --help helpfiles
- E.3. abuild --help make
- E.4. abuild --help usage
- E.5. abuild --help vars
- E.6. abuild --help rules rule:empty
- E.7. abuild --help rules rule:groovy
- E.8. abuild --help rules rule:java
- E.9. abuild --help rules rule:autoconf
- E.10. abuild --help rules rule:ccxx
- E.11. abuild --help rules toolchain:gcc
- E.12. abuild --help rules toolchain:mingw
- E.13. abuild --help rules toolchain:msvc
- E.14. abuild --help rules toolchain:unix_compiler
- F.
--dump-dataFormat - G.
--dump-interfacesFormat - H.
--dump-build-graphFormat - I. The
ccxx.mkFile - J. The
java.groovyandgroovy.groovyFiles - K. The Deprecated XML-based Ant Backend
- L. List of Examples
- Index
List of Figures
- 6.1. Build Item Scopes
- 7.1. Top-Level
Abuild.conf - 7.2. Build Trees in
general/reference - 11.1. Shadowed Dependency
- 11.2. Build Trees in
general/task - 11.3. Build Trees in
general/user - 23.1. Private Interface Flag
- 24.1. Multiplatform Pass-through Build Item
- 25.1. Build Item Visibility
- 30.1. Hidden Circular Dependency
- 30.2. Shared Include Directory
- 30.3. Separate Include Directories
List of Tables
This manual is written for abuild version 1.1. If you are a user of abuild version 1.0 and are just looking for a summary of what changed, please see Appendix B, Major Changes from Version 1.0 to Version 1.1. The material there includes a summary of a change along with cross references to relevant sections of documentation.
Please note that, with a small handful of exceptions, abuild version 1.1 is be able to build software that used abuild 1.0 with few if any modifications. The section on changes in version 1.1 (Appendix B, Major Changes from Version 1.0 to Version 1.1) includes a detailed list of things to watch out for during upgrading and when running in 1.0-compatibility mode.
Welcome to the abuild manual! You may always find the latest copy of this manual on abuild's website. This manual is designed to get you up and running with abuild quickly: the most essential and common topics are presented first so that you can just start at the beginning and stop reading when you feel that you've seen enough to get going. Then, when you are ready, you can come back for documentation on the full depth of abuild's functionality. If you come across something in the first reading that you don't understand, it's probably safe to skip it and come back when you're more comfortable. As each new concept is presented, it is enhanced with examples. A list of all the examples in the document can be found in Appendix L, List of Examples. If you are just looking for changes from previous versions of abuild, please see Appendix A, Release Notes and Appendix B, Major Changes from Version 1.0 to Version 1.1.
This manual is divided into four parts. Each part of the document draws on material introduced in the earlier parts. Although earlier parts of the documentation are intended to be understandable without the material from the later parts, they contain forward cross references where appropriate.
In Part I, “Quick Start”, we cover basic information that should help you come up to speed on using abuild for day-to-day work. It is geared toward people who are working on an existing software baseline that uses abuild. In Part I, you will learn about what abuild is and the types of problems it was designed to solve, be introduced to some basic terminology, and see a few examples of how to perform some simple build operations. This part of the manual is very short and is designed to be readable in one sitting. Casual users of abuild may have no need to read past Part I.
In Part II, “Normal Operation”, we introduce the most common features of abuild. All the basic features are covered, and a few advanced features are covered. All the information you need for simple projects has been presented by the end of Part II.
In Part III, “Advanced Functionality”, we introduce advanced topics. By the end of Part III, you will have been exposed to every feature of abuild.
Part IV, “Appendices” consists of a small handful of appendices.
For those wishing to go still deeper, the abuild source code is heavily commented, and the software comes with a thorough automated test suite that covers every feature of the software and many error conditions as well.
The creation of abuild would not have been possible without the enthusiastic support of my employer, Argon ST. Argon not only recognized the important role of a strong build tool in contributing to the overall quality and reliability of its software, but saw the value of releasing it to the open source community in hopes of making an even broader contribution.
There are many people within Argon who helped take abuild to where it is now, but among these, a handful of people deserve special mention:
Brian Reid, who first introduced me to Groovy, the language that is at the heart of abuild version 1.1's significantly improved Java support, and who kept the momentum going for making abuild's Groovy-based Java framework a reality
Brian Reid, Joe Schettino, Kathleen Friesen, and Brandon Barlow who met with me many times to help hammer out and test early versions of the Groovy-based Java framework
Brandon Barlow for tirelessly testing numerous builds with abuild 1.1 during its alpha period.
Cass Dalton, who has frequently served as a sounding board as I think about new abuild capabilities, and who has played a significant role in helping to ensure that abuild is as stable and widely usable as possible
Chris Costa, who served as a sounding board and contributed numerous ideas throughout the entire development process of abuild, including conducting a thorough review of the abuild 1.0 documentation
Andrew Hayden, who spent many hours reviewing and critiquing the entire manual prior to the release of version 1.0 and who contributed many feature ideas designed to ease implementation of an abuild Eclipse plugin
Joe Davidson, the first abuild evangelist who has been invaluable in getting abuild to become as widely accepted within Argon ST as it is
Gavin Mulligan, who has consistently taken the time to report any problem, no matter how small, and who probably reported more issues than everyone else combined during abuild's pre-1.0 alpha period
Bob Tamaru, who in addition to being a mentor and supporter for most of my career, provided considerable assistance to me as I presented the case to Argon ST to allow me to release abuild as an open source project
This manual is written in docbook. The PDF version of the manual was generated with Apache fop, which as of this writing, is still incomplete. There are a few known issues with the PDF version of the documentation. Hopefully these issues will all be addressed as fop matures.
There are many bad line breaks. Sometimes words are incorrectly hyphenated, and line breaks also occur between two dashes in command line options and even between the two
+characters of “C++”.In many of the example listings, there are lines that would be longer than the shaded boxes in the PDF output. We wrap those lines and place a backslash (
\) character just before and after the extra line breaks. This is done for both the HTML and the PDF output even though the long lines are only a problem for the PDF output.Some paragraphs appear to have extra indentation. This is because the formatting software generates a hard space whenever we have an index term marker in the text.
There are no bookmarks. It would be good if we could create bookmarks to the chapter headings, but as of this writing, the documented procedure for doing this does not appear to work.
The material contained in this part is geared toward new and casual users of abuild. Without going into excessive detail, this part gives you a quick tour of abuild's functionality and presents a few examples of routine build operations. By the end of this part, you should be able to use abuild for simple build operations, and you should have begun to get a feel for the basic configuration files.
Table of Contents
Table of Contents
Abuild is a system designed to build large software projects or related families of software projects that are divided into a potentially large number of components. It is specifically designed for software projects that are continually evolving and that may span multiple languages and platforms. The basic idea behind abuild is simple: when building a single component (module, unit, etc.) of a software package, the developer should be able to focus on that component exclusively. Abuild requires each component developer to declare, by name, the list of other components on which his or her component depends. It is then abuild's responsibility to provide whatever is needed to the build environment to make other required items visible.
You might want to think of abuild as an object-oriented build system. When working with abuild, the fundamental unit is the build item. A build item is essentially a single collection of code, usually contained within one directory, that is built as a unit. A build item may produce one or more products (libraries, executables, JAR files, etc.) that other build items may want to use. It is the responsibility of each build item to provide information about its products that may be used by other items that depend on it. This information is provided by a build item in its abuild interface. In this way, knowledge about how to use a build item is encapsulated within that build item rather than being spread around throughout the other components of a system.
To implement this core functionality, abuild provides its own system for managing build items as well as the dependencies and relationships among them. It also provides various build rules implemented with underlying tools, specifically GNU Make and Apache Ant accessed using the Groovy programming language, to perform the actual build steps. We refer to these underlying tools as backends. Although the bulk of the functionality and sophistication of abuild comes from its own core capabilities rather than the build rules, the rules have rich functionality as well. Abuild is intended to be your build system. It is not intended, as some other tools are, to wrap around your existing build system. [1]
Support for compilation in multiple programming languages and on
multiple platforms, including embedded platforms, is central to
abuild's design. Abuild is designed to allow build items to
be built on multiple platforms simultaneously. An important way
in which abuild achieves this functionality is to do all of its
work inside of an output directory. When
abuild performs the actual build, it always creates an output
directory named
abuild-.
When abuild invokes make, it does so
in that directory. By actually invoking the backend in the
output directory, abuild avoids the situation of temporary
files conflicting with each other on multiple simultaneous builds
of a given build item on multiple platforms. For ant-based
builds (using either the supported Groovy backend or the
deprecated xml-based ant backend), each build is given a private
ant platformProject object whose
basedir is set to the output directory.
Abuild is designed to never create or remove any output files
outside of its output directories. This enables abuild's
cleanup operation to simply remove all output directories created
by any instance of abuild, and also reduces the likelihood of
unintentionally mixing generated products with version-controlled
sources.
The following list shows the font conventions used throughout this document for the names of different kinds of items.
literal text |
replaceable text |
build items and build item
scope names
|
| Abuild.conf keys, flags, and traits |
Abuild.interface variables, java
properties, and make variables
|
Abuild.interface keywords
|
| commands and build targets |
command line options and build
sets
|
environment variables
|
file names and make/Groovy rule
sets
|
| platforms, platform types, and target types |
This section describes what you can expect in terms of abuild version numbers and non-compatible changes.
Each abuild release is assigned a version number. For abuild releases, we use the following version numbering convention:
major.minor.prerelease-or-update
The major field of the version number
indicates the major version number. It changes whenever a major
release is made. A new major release of abuild represents a
wholesale change in the way abuild works. Major release are
expected to be very infrequent.
The minor field of the version number
indicates the minor version number. It changes whenever a minor
release is made. A minor release is an incremental release that
may introduce significant new features, fix bugs, or change the
way some things work, but it will not fundamentally shift the
way abuild works. We impose tight restrictions on the
introduction of non-backward-compatible changes in minor
releases as discussed below.
The prerelease-or-update field can
indicate either a prerelease version or an update release of a
specific minor version. A prerelease is an alpha or beta
release or a release candidate that precedes a regular release.
An update release may contain bug fixes or new features as long
as no non-compatible changes are made to existing functionality.
Allowing new non-breaking features to be introduced in an update
release makes it possible to add features to abuild
incrementally while still guaranteeing as much compatibility as
possible. There is no support for a prerelease of an update to
a specific minor version (like 1.1.1.b1).
Before a regular major or minor release, there may be a series
of alpha releases, beta releases, and release candidates. In
those cases, the prerelease-or-update
field of the version number is either
“a”,
“b”, or
“rc” followed by a number. The
prerelease version numbers clearly indicate which regular
release the prerelease applies to. For example, version
1.3.a4 would be the fourth alpha release
preceding the release of version 1.3.0.
After any major or minor release, it is possible that a small
problem may be corrected in a bug-fix release. In such a
release, the prerelease-or-update
field contains a number that indicates which bug-fix release
this is. For example, version 1.2.1 would be
a bug-fix release to version 1.2.0.
Historical note: the first release of abuild 1.0 was just version 1.0, not version 1.0.0. The use of “x.y.0” was introduced with version 1.1.0 so that “abuild x.y” could unambiguously refer to all update releases of minor version x.y rather than just the first.
In a new major release of abuild (e.g., version 2.0.0), there is no promise that changes will be backward compatible, nor is there any expectation that configuration files from older abuild releases will work with the new version. When possible, care will be taken to mitigate any inconvenience such as providing upgrade scripts.
In each new minor release of abuild, there may be new features
and backward-compatible changes. In minor releases, we adopt a
stricter policy regarding non-backward-compatible changes.
Specifically, non-backward-compatible changes may be introduced
only if the changed construct generated a deprecation warning in
the previous minor release. In other words, if particular
construct in version 1.3 is going to be
dropped or changed in a non-compatible way, the change can't be
made until version 1.5. In version
1.4, the new way may work, but use of the
deprecated construct must still work and must generate a
warning. The old way can be dropped entirely in version
1.5 once users have had a chance to adjust
their configuration files. In that way, users who take every
minor release upgrade can be guaranteed that they will not
experience surprise non-compatible changes, and they will not
have to update their configuration files at the same time that
they upgrade abuild.
With alpha releases, there is no commitment to avoiding non-compatible changes. In particular, a feature that was introduced into abuild during an alpha testing period may be modified in non-compatible ways or dropped entirely during the course of alpha testing. During beta testing, every effort will be made to avoid non-compatible changes, but they are still allowed. No non-compatible changes will be made from the first release candidate through the next minor release.
Specific exceptions may be made to any of the above rules, but any such exceptions will be clearly stated in the release notes or the documentation. It may happen, for example, that a particular new feature is still in development when a release is made. In that case, the release notes may declare that feature to still be alpha, in which case non-compatible changes can be introduced in the next release.
We'll clarify with some concrete examples. Suppose a new
feature is planned for version 1.4 of
abuild. It would be okay if the first implementation of that
feature appeared in version 1.4.a2 and if the
feature were changed in a non-compatible way in
1.4.a6. However, after version
1.4.0 was released, the next non-compatible
change would not be permitted until version
1.5.a1, and even then, the feature as it
worked in version 1.4.0 would still have to
work, though a deprecation warning would be issued. The old
version 1.4.x way of doing things could stop
working altogether in version 1.6.a1. It is
also okay to add a new feature within a
minor release. For example, it's okay if
1.0.3 adds some feature that wasn't there in
1.0.2 as long as everything that worked in
1.0.2 works the same way in
1.0.3. In other words, although everything
that worked in 1.0.2 must work in
1.0.3 , there's no expectation that
everything that works in 1.0.3 must have
worked in 1.0.2.
This section describes many of the principles upon which abuild was designed. Understanding this material is not critical to being able to use abuild just to do simple compiles, but knowing these things will help you use abuild better and will provide a context for understanding what it does.
- Build Integrity
Abuild puts the integrity of the build over all other concerns. Abuild includes several rigorously enforced integrity checks throughout its implementation in order to prevent many of the most common causes of build integrity problems.
- Strict Dependency Management
Build items must explicitly declare dependencies on other build items. These dependencies are declared by name, not by path. The same mechanism within abuild that is used to declare a dependency is also used to provide visibility to the dependent build item. (A build item reads the interfaces of only those build items on which it directly or indirectly depends.) In this way, it is impossible to accidentally become dependent on something by unwittingly using files that it provides. Abuild guarantees that there are no circular dependencies among build items and also provides a fundamental guarantee that all build items in a dependency chain resolve names to paths in a consistent way within the dependency tree.
- Directory Structure Neutrality
Build items refer to each other only by name and never by path. Abuild resolves build item names to paths internally and provides path information at runtime as needed. This makes any specific abuild installation agnostic about directory structure and makes it possible to move things around without changing any build rules. In this way, abuild stays out of the way when it's time to reorganize your project.
- Focus on One Item at a Time
When using abuild, you are generally able to focus on building just the item you are working on without having to worry about the details of the items it depends on. Abuild does all the work of figuring out what your environment has to look like to give you access to your dependencies. It can then start a local build from anywhere and pass the right information to that local build. This is achieved through encapsulation of knowledge about a build item's products inside the build item itself and making that knowledge available to its users through an abuild-specific interface.
- Environment Independence
Abuild does not require you to have any project-specific or source tree-specific environment variables set, be using any particular shell or operating system, or have the abuild software itself installed in any particular location. Abuild is designed so that having the abuild command in your path is sufficient for doing a build. This keeps abuild independent from any specific source tree or project. Abuild can be used to build a single-source-file, stand-alone program or an elaborate product line consisting of hundreds or thousands of components. It can be also used for multiple projects on the same system at the same time. No special path settings or environment variable settings are required to use abuild, other than ensuring that the external tools that your build requires (GNU Make, compilers, etc.) are available and in your path.
- Support for Parallel and Distributed Builds
When building multiple items, abuild creates a build set consisting of all the items to be built. It computes the directories in which it needs to build and invokes the build iteratively in those directories. Abuild automatically figures out what can be built in parallel and what the build order should be by inspecting the dependency graph. Abuild avoids many of the pitfalls that get in the way of parallel and distributed operation including recursive execution, shell-based loops for iteration, file system-based traversal, and writing files to the source directory.
- Support for Multiple Platforms
Abuild was designed to work on multiple platforms. It includes a structure for referring to platforms and for encapsulating platform-specific knowledge. This makes it easier to create portable build structures for portable code.
- Efficiency
Abuild aims to be as efficient as possible without compromising build integrity. Abuild calculates as much as possible up front when it is first invoked, and it passes that information to backend build programs through automatically-generated files created inside its own output directories. By computing the information one time, abuild significantly reduces the degree to which its backend build programs' rules have to use external helper applications to compute information they need. Abuild's configuration files and build tree traversal steps are designed in such a way that abuild never has to perform unbounded searches of a build tree. This enables startup to be fast even on build trees containing thousands of build items.
- Encapsulation
Build items encapsulate knowledge about what is required by their users in order to make use of them at build time. The user may also create build items with restricted scope, thus allowing private things to be kept private. This makes it possible to refactor or reorganize individual components of a system without affecting the build files of other build items that depend on them.
- Declarative Build Files
The majority of build item configuration files are declarative: they contain descriptions of what needs to be done, rather than information about how to do it. Most end user configuration files contain nothing but variable settings or key/value pairs and are independent of the platform or compiler used to build the item. For those cases in which a declarative system is insufficient to express what needs to do be done, abuild provides several mechanisms for specific steps to be defined and made available to the items that need them.
- Support for Multiple Backends
The parts of abuild that manage dependencies and build integrity are distinct from the parts of abuild that actually perform builds. Abuild current uses either GNU Make or Apache Ant, accessed through a Groovy language front end, to perform builds. [2] The internal integration between abuild and its backend build programs is fairly loose, and adding additional backends requires relatively minor and localized code changes. In addition, abuild requires only the backends that a particular build tree uses to be present on your system when you are performing a build. That is, if you are building only Java code, you don't need GNU Make, and if you're building only C and C++ code, you don't need a Java or ant environment.
[1] Abuild can, however, interoperate with other build systems as needed, which may be useful while transitioning a software development effort to using abuild.
[2] There is also support for ant using xml files. This was the primary mechanism for using ant in abuild 1.0, but it is deprecated in version 1.1 in favor of the much more flexible and capable Groovy-based backend. Throughout this document, we refer to it as the “deprecated xml-based ant” framework.
Table of Contents
You may always find the latest version of abuild by following the links on abuild's website. To use abuild, the following items must be available on your system:
GNU Make version 3.81 or higher is required if you are building any build items that use GNU Make as a backend. This would include platform-independent code and C/C++ code, but not Java code.
A Java 5 or newer Java SDK is required if you are going to use abuild to build Java code. Abuild is known to work with OpenJDK 1.6.
Apache Ant version 1.7.0 or newer is required if you are building any Java code. If you are using abuild's deprecated xml-based ant framework, then you also need ant-contrib version 1.0.b3 or later installed in either ant's or abuild's lib directory.
Perl version 5.8 or newer is required if you are performing any GNU Make-based builds.
Perl version 5.8 or newer and qtest version 1.0 or newer are required if you are using the qtest automated test framework. Abuild's own test suite uses qtest. Note also that qtest requires GNU diffutils. Any version should do.
In order to use abuild's autoconf support, you need autoconf version 2.59 or newer, automake version 1.9 or newer. These are also required for abuild's test suite to pass since the test suite exercises its autoconf support.
If you are planning on building any GNU Make-based build items on Windows, Cygwin is required. For a Java-only abuild installation on Windows, Cygwin and Perl are not required. It is hoped that a future version of abuild will not require Cygwin. For details on using Cygwin with abuild, please see Section 2.4, “Additional Requirements for Windows Environments”.
To build abuild, you must also have version 1.35 or newer of boost. Abuild uses several boost libraries, including regex, thread, system, filesystem, and date_time as well as several header-only libraries such as asio, bind, and function. Abuild is known to buildable by gcc and Microsoft Visual C++ (7.1 or newer), but it should be buildable by any compiler that supports boost 1.35. In order for shared library support to work properly with gcc, gcc must be configured to use the GNU linker. [3] Abuild itself contains C++ code and Java code, so all the runtime requirements for both systems are required to build abuild.
In order to build abuild's Java code, which is required if you are doing any Java-based builds, you must have at least version 1.5.7 of Groovy. It is recommended that you have at least version 1.6.0. It is not required that you have Groovy to run abuild because abuild includes an embedded version of the Groovy environment, but a full installation of Groovy is required in order to do the initial bootstrapping build of abuild's Java code. [4]
As of abuild version 1.1.0, abuild is known to work with Groovy versions 1.6.7 and 1.7-RC-1, which were the latest available versions at the time of the release. Upgrading abuild's embedded version of Groovy is as simple as just replacing the embeddable Groovy JAR file inside of abuild's lib directory. Just delete the old one and copy the new one in. abuild will automatically find it even though its name will have changed to include the later version number. Ideally, you should also rebuild abuild's java support from source and rerun abuild's test suite just to be sure abuild still works properly with the latest Groovy.
Since abuild determines where it is being run from when it is
invoked, a binary distribution of abuild is not tied to a
particular installation path. It finds the root of its
installation directory by walking up the path from the abuild
executable until it finds a directory that contains
make/abuild.mk. This makes it easy to have
multiple versions of abuild installed simultaneously, and it
also makes it easy to create relocatable binary distributions of
abuild.
Abuild itself does not require any environment variables to be
set, but ant and/or the Java
development environment may. If you have the
JAVA_HOME and ANT_HOME environment
variables set, abuild will honor them when selecting which copy
of java to run and where to find the ant JAR files. Otherwise,
it will run java and
ant from your path to make those
determinations. Although abuild is explicitly tested to work
without either ANT_HOME or
JAVA_HOME set, if any Java builds are being done,
abuild will start up a little more quickly if they are set. As
many other applications expect these to be set, it is recommended
that you set JAVA_HOME and
ANT_HOME. When abuild invokes Java for any of
the Java-based backends, it will automatically add all the JAR
files in $ANT_HOME/lib to the classpath as
well as all JAR files in abuild's own lib
directory. Abuild includes a copy of Groovy's embeddable JAR
in its own lib directory. You can copy
additional JAR files into lib as well, but
if you do so, just remember that those JAR files will not
automatically be available to users whose abuild installations
do not include them.
As you begin using abuild, you may find yourself generating a
collection of useful utility build items for things like specific
third-party libraries, external compilers, documentation
generators, or test frameworks. There is a small collection of
contributed build items in the
abuild-contrib package, which is available
at abuild's web
site. These may have additional requirements. For
details, please see the information about
abuild-contrib on the website.
Abuild is self-hosting: it can be built with itself, or for
bootstrapping, it can be built with a GNU Makefile that uses
abuild's internal GNU Make support.
To build abuild's Java code, you also need
Groovy, Apache
Ant and a Java development environment. Please see
the file src/README.build in the source
distribution for instructions on building abuild.
If you are creating a binary distribution or installing from
source, please see the file src/README.build
in the source directory. If you are installing from a pre-built
binary distribution, simply extract the binary distribution in
any directory. Abuild imposes no requirements on where the
directory should be or what it should be called as long as its
contents remain in the correct relative locations. You may make
a symbolic link to the actual bin/abuild
executable from a directory in your path. Abuild will follow
this link when attempting to discover the path of its
installation directory. You may also add the abuild
distribution's bin directory to your path,
or invoke abuild by the full path to its executable.
[5]
To build abuild and use it in a Windows environment for make-based builds, certain pieces of the Cygwin environment are required. [6] Note that abuild is able to build with and be built by Visual C++ on Windows. It uses Cygwin only for its development tools. Cygwin is not required to run executables built by abuild in a Windows environment, including abuild itself. However, Cygwin is required to supply make and perl to abuild. The following parts of Cygwin are required:
- Devel
autoconf automake make - System
rebase - Util
diffutils
Perl is required, but appears to be installed by default in recent Cygwin installations.
Note that rebaseall (from the rebase package) may need to be run
in order for fork to work from perl with
certain modules. (Although abuild itself doesn't call
fork from perl,
qtest, which is used for abuild's
test suite, does.)
Other modules may also be desirable. In particular,
libxml2 from the Text
section is required in order to run certain parts of abuild's
test suite, though the test suite will just issue a warning and
skip those tests without failing if it can't find
xmllint.
If you intend to use autoconf from Windows and you have Rational
Rose installed, you may need to create
/usr/bin/hostinfo (inside of the Cygwin
environment) as
#!/bin/false
so that ./configure's running of hostinfo doesn't run hostinfo from Rational Rose.
In order to use Visual C++ with abuild, you must have your environment set up to invoke Visual C++ command line tools. This can be achieved by running the shortcut supplied with Visual Studio, or you can create a batch file on your own. The following batch file would enable you to run abuild from a Cygwin environment with the environment set up for running Visual C++ from Visual Studio 7.1 (.NET 2003):
@echo off
call "%VS71COMNTOOLS%"\vsvars32.bat
C:\cygwin\cygwin.bat
Adjust as needed if your Cygwin is installed other than in
C:\cygwin or you have a different version of
Visual C++ installed.
In order to use qtest with abuild under Windows, the Cygwin version of Perl must be the first perl in your path.
Abuild creates output directories in the source directory, and
all generated files are created inside of these
abuild-generated directories. All output directories are named
abuild-*. It is recommended that you
configure hooks or triggers in your version control system to
prevent these directories or their contents from being
accidentally checked in. It may also be useful to prevent
Abuild.backing from being checked in since
this file always contains information about the local
configuration rather than something that would be CM controlled.
If it is your policy to allow these to be checked in, they should
be prevented from appearing in shared areas such as the trunk.
[7]
[3] The only reason for the GNU linker requirement is that abuild currently knows about -fPIC. It would be better to have a more robust way of configuring flags for position-independent-code, but it's not clear how to do this without replicating all the knowledge built into libtool or having some autoconf-like method of configuring abuild at runtime.
[4] Besides, every Java programmer should have a copy of Groovy installed!
[5]
If abuild is not invoked as an absolute path, it will iterate
through the directories in your PATH trying to
find itself. Therefore, abuild may fail to work properly if
you invoke it programmatically, pass
\“abuild” to it as
argv[0], and do not have the copy of
abuild you are invoking in your path before any other copy of
abuild. This limitation should never impact users who are
invoking abuild normally from the command line or through a
shell or other program that searches the path.
[6] This may cease to be true in a future version of abuild.
[7]
Note, however, that the abuild test suite contains
Abuild.backing files, so any CM system
that contains abuild must have an exception for abuild
itself. It's conceivable that other tools could also have
reasons to have checked in Abuild.backing
files in test suites or as templates.
Table of Contents
In this chapter, we will describe the basics of running abuild
on a few simple build items, and we will describe how those build
items are constructed. We will gloss over many details that will
be covered later in the documentation. The goal of this chapter
is to give you enough information to work on simple build items
that belong to existing build trees. Definitions of
build item and build
tree appear below. More detailed information on them
can be found in Chapter 4, Build Items and Build Trees. The
examples we refer to in this chapter can be found in
doc/example/basic in your abuild source or
binary distribution.
Abuild imposes few system-based restrictions on how you set it up and use it, but here are a few important things to keep in mind:
Avoid putting spaces in path names wherever possible. Although abuild tries to behave properly with respect to spaces in path names and is known to handle many cases correctly, make is notoriously bad at it. If you try to use spaces in path names, it is very likely that you will eventually run into problems as they generally cause trouble in a command-line environment.
Be careful about the lengths of path names. Although abuild itself imposes no limits on this, you may run up against operating system limits if your paths are too long. In particular, Windows has a maximum path name length of 260 characters. If you have a build tree whose root already has a long path and you then have Java classes that are buried deep within a package-based directory structure, you can bump into the 260-character limit faster than you'd think. On Windows, it is recommended that you keep your build tree roots as close to the root of the drive as possible. On any modern UNIX system, you should not run into any path name length issues.
Here are a few basic terms you'll need to get started:
- build item
A build item is the most basic item that is built by abuild. It usually consists of a directory that contains files that are built. Any directory that contains an
Abuild.conffile is a build item. We refer to the build item whoseAbuild.confresides in the current directory as the current build item.- build tree
A build tree is a collection of build items arranged hierarchically in the file system. All build items in a build tree may refer to each other by name. Each build item knows the locations of its children within the file system hierarchy and the names of the build items on which it depends.
- build forest
A build forest is a collection of build trees. If there are multiple build trees in a forest, there may be one-way visibility relationships among the trees, which are declared similarly to dependency relationships among build items. We will return to this concept later in the documentation.
- target
A target is some specific product to be built. The term “target” means exactly the same thing with abuild as it does with other build systems such as make or ant. In fact, with the exception of a small handful of “special” targets, abuild simply passes any targets given to it onto the backend build system for processing. The most common targets are all and clean. For a more complete discussion of targets, see Section 9.1, “Build Targets”. Be careful not to confuse target with target type, defined in Section 5.1, “Platform Structure”.
For a more complete description of build items, build trees, and build forests, please see Chapter 4, Build Items and Build Trees.
Full details on compiler support and compiler selection are
covered in Section 24.1, “Platform Selection”. To get
started, on Linux systems, abuild will build with
gcc by default. On Windows, if you
run abuild from a shell that is appropriately set up to run
Microsoft Visual C++ (as by following the command prompt shortcut
provided as part of your Visual C++ implementation), abuild
will automatically use Visual C++. If you have cygwin installed
with gcc and the mingw runtime environment, abuild will attempt
to use gcc -mno-cygwin to build as long as you
set the MINGW environment variable to
1, though bear in mind that abuild's mingw
support is not entirely complete.
The directory cxx-library under
doc/example/basic contains a simple C++
library. Our library is called
basic-library. It implements the single C++
class called BasicLibrary using the header
file BasicLibrary.hh and the source file
BasicLibrary.cc. Here are the contents of
those files:
basic/cxx-library/BasicLibrary.hh
#ifndef __BASICLIBRARY_HH__
#define __BASICLIBRARY_HH__

class BasicLibrary
{
  public:
    BasicLibrary(int);
    void hello();

  private:
    int n;
};

#endif // __BASICLIBRARY_HH__
basic/cxx-library/BasicLibrary.cc
#include "BasicLibrary.hh"
#include <iostream>

BasicLibrary::BasicLibrary(int n) :
    n(n)
{
}

void
BasicLibrary::hello()
{
    std::cout << "Hello.  This is BasicLibrary(" << n << ")." << std::endl;
}
Building this library is quite straightforward. Abuild's build
files are generally declarative in nature: they describe what
needs to be done rather than how it is done. Building a C or C++
library is a simple matter of creating an
Abuild.mk file that describes what the names
of the library targets are and what each library's sources are,
and then tells abuild to build the targets using the C and C++
rules. Here is this library's Abuild.mk
file:
basic/cxx-library/Abuild.mk
TARGETS_lib := basic-library
SRCS_lib_basic-library := BasicLibrary.cc
RULES := ccxx
The string ccxx as the value of the
RULES variable indicates that this is C or C++
code (“c” or “cxx”). In order for
abuild to actually build this item, we also need to create an
Abuild.conf file for it. The existence of
this file is what makes this into a build item. We present the
file here:
basic/cxx-library/Abuild.conf
name: cxx-library
platform-types: native
In this file, the name key is used to
specify the name of the build item and the
platform-types key is used to help abuild
figure out on which platforms it should attempt to build this
item. Finally, we want this build item to be able to make the
resulting library and header file available to other build items.
This is done in its Abuild.interface file:
basic/cxx-library/Abuild.interface
INCLUDES = .
LIBDIRS = $(ABUILD_OUTPUT_DIR)
LIBS = basic-library
This tells abuild to add the directory containing this file to
the include path, the output directory in which the generated
targets were created to the library path, and the
basic-library library to the list of
libraries to be linked with. Notice that the name of the library
assigned to the LIBS variable is the same as
the value assigned to the TARGETS_lib variable
in the Abuild.mk file, and that the
abuild-provided variable
$(ABUILD_OUTPUT_DIR) is used as the library
directory. All relative paths specified in the
Abuild.interface file are relative to the
directory that contains the Abuild.interface
file. They are automatically converted internally by abuild to
absolute paths, which helps to keep build items
location-independent.
To build this item, you would run the command
abuild in the
basic/cxx-library directory. Abuild will
create an output directory whose name would start with
abuild- and be based on the platform or
platforms on which abuild was building this item. This is the
directory to which the variable
$(ABUILD_OUTPUT_DIR) refers in the
Abuild.interface file.
There is a lot of capability hiding beneath the surface here and quite a bit of flexibility in the exact way in which this can be done, but this is the basic pattern you will observe for the majority of C and C++ library build items.
The directory basic/cxx-program contains a
simple C++ program. This program links against the library
created in our previous example. Here is the main body of our
program:
basic/cxx-program/program.cc
#include <BasicLibrary.hh>

int main()
{
    BasicLibrary b(5);
    b.hello();
    return 0;
}
This program includes the BasicLibrary.hh
header file from the cxx-library build
item. Here is the Abuild.mk for this build
item:
basic/cxx-program/Abuild.mk
TARGETS_bin := cxx-program
SRCS_bin_cxx-program := program.cc
RULES := ccxx
Notice that this is very similar to the
Abuild.mk from the library build item. The
only real difference is that the TARGETS and
SRCS variables contain the word
bin instead of lib. This
tells abuild that these are executable targets rather than
library targets. Notice the conspicuous lack of any references to
the library build item or the location of the headers or libraries
that it makes available. A principal feature of abuild is that
this program build item does not need to know that information.
Instead, it merely declares a dependency on the
cxx-library build item by name. This is
done in its Abuild.conf:
basic/cxx-program/Abuild.conf
name: cxx-program
platform-types: native
deps: cxx-library
Notice the addition of the deps key in this
file. This tells abuild that our program build item
depends on the library build item. When
abuild sees this, it automatically makes all the information in
cxx-library's
Abuild.interface available to
cxx-program's build, alleviating the need
for the cxx-program build item to know the
locations of these files. This will also tell abuild that
cxx-library must be built before we can
build cxx-program.
To build this item, we just run the abuild
command as we did for cxx-library. This
will automatically build dependency
cxx-library before building
cxx-program. In this way, you can can
start a build from any build item and let abuild automatically
take care of building all of its dependencies in the correct
order.
The output of running abuild in the
cxx-program directory when starting from a
clean build is shown below. Your actual output will differ
slightly from this. In particular, the output below has the
string --topdir-- in place of the path to
doc/example, and the string
<native> in place of your native
platform.
[8]
Notice that abuild builds
cxx-library first and then
cxx-program:
basic-cxx-program.out
abuild: build starting
abuild: cxx-library (abuild-<native>): all
make: Entering directory `--topdir--/basic/cxx-library/abuild-<native>'
Compiling ../BasicLibrary.cc as C++
Creating basic-library library
make: Leaving directory `--topdir--/basic/cxx-library/abuild-<native>'
abuild: cxx-program (abuild-<native>): all
make: Entering directory `--topdir--/basic/cxx-program/abuild-<native>'
Compiling ../program.cc as C++
Creating cxx-program executable
make: Leaving directory `--topdir--/basic/cxx-program/abuild-<native>'
abuild: build complete
To remove all of the files that abuild created in any build item's directory, you can run abuild clean in that directory. To clean everything in the build tree, run abuild --clean=all. More details of how to specify what to build and what to clean can be found in Chapter 9, Telling Abuild What to Build.
In our next example, we'll demonstrate how to build a simple Java
library. You will find the Java example in
basic/java-library. The files here are
analogous to those in our C++ library example. First, here is a
Java implementation of our BasicLibrary
class:
basic/java-library/src/java/com/example/basic/BasicLibrary.java
package com.example.basic;

public class BasicLibrary
{
    private int n;

    public BasicLibrary(int n)
    {
        this.n = n;
    }

    public void hello()
    {
        System.out.println("Hello.  This is BasicLibrary(" + n + ").");
    }
}
Next, look at Abuild.conf:
basic/java-library/Abuild.conf
name: java-library
platform-types: java
This is essentially identical to our C++ library except that the
platform-types key has the value
java instead of the value
native. This is always true for Java build
items. Next, we'll look at the
Abuild.groovy file:
basic/java-library/Abuild.groovy
parameters {
    java.jarName = 'java-library.jar'
    abuild.rules = 'java'
}
Java build items have this file instead of
Abuild.mk. The contents are very similar.
The Abuild.groovy file contains Groovy code
that is executed inside a particular context provided by
abuild. Most Abuild.groovy files will
simply set parameters that describe what
will be built. In this file, we set the
java.jarName parameter to the name of the JAR
file we are creating, and we set the
abuild.rules parameter to the value
'java' to indicate that we are using the
java rules. For Java build items, we don't
explicitly list the source files. Instead abuild automatically
finds sources in a source directory which is, by default,
src/java. There are many more parameters
that can be set, and you have considerable flexibility about how
to arrange things and how to get files into your Java archives.
Abuild aims to allow you to build by
convention, but it gives you the flexibility to do
things your own way when you want to. We provide detailed
information about the directory structure for Java builds in
Section 19.3, “Directory Structure for Java Builds”.
Finally, look at the Abuild.interface file.
This file provides information to other build items about what
they should add to their classpaths in order to make use of the
JAR file created by this build item:
basic/java-library/Abuild.interface
declare java-library.archiveName string = java-library.jar
declare java-library.archivePath filename = \
   $(ABUILD_OUTPUT_DIR)/dist/$(java-library.archiveName)
abuild.classpath = $(java-library.archivePath)
abuild.classpath.manifest = $(java-library.archivePath)
You'll notice here that we are actually setting four different
variables. Not all of these are required, but the pattern here
is one that you may well wish to adopt, especially if you are
working in a Java Enterprise environment. The first statement in
the interface file declares a variable called
java-library.archiveName as a string and
initializes it to the value java-library.jar.
This syntax of declaring and initializing an interface variable
was introduced into abuild with version 1.1. Here we adopt a
convention of using the build item name as the first field of the
variable name, and the literal string
archiveName as the second field. By including
the name of the build item in the name of the interface variable,
we reduce the possibility of creating a name clash. By providing
a variable to hold the name of the archive provided by this build
item, we allow other build items to refer to this JAR file by
name without having to know what it is called. The second
interface variable, java-library.archivePath,
contains the full path to the archive. (Notice that abuild
puts the JAR file in the dist subdirectory
of the abuild output directory.) This enables other build
items to refer to this archive by path without knowing any
details beyond this naming convention and the name of the
providing build item. Making this type of information available
in this way is not necessarily a straight Java “SE”
environment, but it can be very useful in a Java “EE”
environment where build items that create EAR files may have to
reach into other build items to package their artifacts in higher
level archives. Experience has shown that adopting a convention
like this and following it consistently will pay dividends in the
end.
After setting these two build-item-specific variables, we assign
to two built-in variables: abuild.classpath,
and abuild.classpath.manifest. Most simple
JAR-providing build items will do this. Abuild actually
provides multiple classpath variables, each of which is intended
to be used in a particular way. For a discussion, please see
Section 17.5.3, “Interface Variables for Java Items”.
As with the C++ library, it is possible to build this item by
running abuild from the
basic/java-library directory.
In Java, there is no deep distinction between a
“library” and a “program” except that a
JAR file that provides a program must have a
main method. If a JAR file contains a main
method, it can be executed, though it can also be used as a
library. Here are the relevant files for the program example:
basic/java-program/src/java/com/example/basic/BasicProgram.java
package com.example.basic;

import com.example.basic.BasicLibrary;

public class BasicProgram
{
    public static void main(String[] args)
    {
        BasicLibrary l = new BasicLibrary(10);
        l.hello();
    }
};
basic/java-program/Abuild.conf
name: java-program
platform-types: java
deps: java-library
basic/java-program/Abuild.groovy
parameters {
    java.jarName = 'java-program.jar'
    java.mainClass = 'com.example.basic.BasicProgram'
    java.wrapperName = 'java-program'
    abuild.rules = 'java'
}
A JAR file's manifest file may identify a class that contains a
main method. Abuild adds the
Main-Class attribute to the manifest file
when the java.mainClass parameter is set in
the Abuild.groovy. In addition, abuild
will create a wrapper script if the
java.wrapperName parameter is set. The
wrapper script that abuild creates may be useful for casual
execution of the Java program for testing purposes, but it is
generally not a substitution for having your own deployment
mechanism. In particular, the wrapper script references items
from your classpath by their paths within the build structure,
and additionally, abuild's wrapper scripts are not as portable
as the Java code that they help to invoke.
[9]
Here is the output of running abuild in this
directory. As in the C++ program example, the output has been
modified slightly: in addition to the
--topdir-- substitution, we have also filtered
out time stamps and other strings that could potentially differ
between platforms:
basic-java-program.out
abuild: build starting
abuild: java-library (abuild-java): all
    [mkdir] Created dir: --topdir--/basic/java-library/abuild-java/classes
    [javac] Compiling 1 source file to --topdir--/basic/java-library/abu\
\ild-java/classes
    [mkdir] Created dir: --topdir--/basic/java-library/abuild-java/dist
      [jar] Building jar: --topdir--/basic/java-library/abuild-java/dist\
\/java-library.jar
abuild: java-program (abuild-java): all
    [mkdir] Created dir: --topdir--/basic/java-program/abuild-java/classes
    [javac] Compiling 1 source file to --topdir--/basic/java-program/abu\
\ild-java/classes
    [mkdir] Created dir: --topdir--/basic/java-program/abuild-java/dist
      [jar] Building jar: --topdir--/basic/java-program/abuild-java/dist\
\/java-program.jar
abuild: build complete
[8] All example output in this document is normalized this way since it all comes directly from abuild's test suite. Testing all the examples in the test suite guarantees the accuracy of the examples and ensures that they work as advertised on all platforms for which abuild is released. Should you wish to study abuild's test suite with the examples, be aware that the bold italicized text preceding each block of example output is the name of the expected output file from the test suite.
[9] Specifically, abuild generates different wrapper scripts depending on whether you're running on Windows or not. Although it would work to build Java code on UNIX and run it on Windows, or vice versa, wrapper scripts generated on one platform are not portable to the other.
In this part of the manual, we discuss the standard features of abuild. For most ordinary build problems, these chapters provide all the information you will need. A few advanced topics are presented here. Where appropriate, they include cross references to later parts of the document where functionality is covered in more depth. By the end of this part, you should have a reasonably complete understanding of the structure of abuild's build trees, and a fairly complete picture of abuild's overall functionality. You will know enough about abuild to be able to use it for tasks of moderate complexity.
Table of Contents
- 4. Build Items and Build Trees
- 5. Target Types, Platform Types, and Platforms
- 6. Build Item Dependencies
- 7. Multiple Build Trees
- 8. Help System
- 9. Telling Abuild What to Build
- 10. Integration with Automated Test Frameworks
- 11. Backing Areas
- 12. Explicit Read-Only and Read/Write Paths
- 13. Command-Line Reference
- 14. Survey of Additional Capabilities
Table of Contents
Now that we've had a chance to see abuild in action for a simple case, it's time to go into more detail about how things fit together. In Section 3.2, “Basic Terminology”, we briefly defined the terms build item, build tree, and build forest. In this chapter, we will describe them in bit more detail and briefly introduce a number of concepts that apply to them.
A precise definition of build item would
state that a build item is any directory that contains an
Abuild.conf. Perhaps a more useful
definition would say that a build item is the basic object that
participates in abuild's object-oriented view of a software
build. A build item provides some service
within a build tree. Most build items build some kind of code:
most often a library, executable, or Java archive. Build items
may provide other kinds of services as well. For example, a
build item may implement a code generator, support for a new
compiler, or the ability to make use of a third-party software
library. In addition, a build item may have certain attributes
including a list of dependencies, a list
of supported flags, information about what
types of platforms the build item may be built on, a list of
traits, and other non-dependency
relationships to other build items. Each of these concepts is
explored in more depth later in the document.
All build items that provide a service are required to have a name. Build item names must be unique within their build tree and all other build trees accessible to their build tree since the build item name is how abuild addresses a build item. Build item names consist of period-separated segments. Each segment may contain mixed case alphanumeric characters, underscores, and dashes. Build item names are case-sensitive.
The primary mechanism for describing build items is the
Abuild.conf file. This file consists of
colon-separated key/value pairs. A complete description of the
Abuild.conf file may be found in Chapter 15, The Abuild.conf File. In the mean time, we will
introduce keys as they become relevant to our discussion.
Although every build item has an Abuild.conf
file, there are various other files that a build item may have.
We defer a complete list and detailed discussion these files for
later in the document, but we touch briefly upon a few of the
common ones here.
Abuild.confThis is the most basic of the build item files, and it is the only file that must be present for every build item. We sometimes refer to this as the build item configuration file.
Abuild.mk,Abuild.groovyThese are the files that direct abuild what to actually build in a given build item. Each build file is associated with a specific backend. Exactly one of these files must be present in order for abuild to attempt to build a build item. As such, these files are known as build files. When we say that a build item has or does not have a build file, we are specifically talking about one of these files. In particular, it is important to note that
Abuild.confandAbuild.interfaceare not considered build files. [10]Abuild.interfaceThe
Abuild.interfacefile is present for every build item that wants to make some product of its build accessible to other build items. We refer to this as the build item's interface file. There has been some confusion among some abuild users about the term interface. Please understand that abuild interfaces are distinct from Java interfaces, C++ header files, and so forth, though they serve essentially the same function. If you view a build item as an object, the abuild interface contains information about what services that object provides. It exposes the interfaces through which other build items will access a given build item's products.
A build tree, as defined before, is a collection of build items
arranged hierarchically in the file system. Like build items,
build trees have names, and are only referred to from other build
trees by name. The root of a build tree is a build item whose
Abuild.conf contains the
tree-name key. We refer to this item as the
tree's root build item.
A build tree is formed as a result of the items it contains
holding references to the locations of their children within the
file system hierarchy. These locations are named as relative
paths in the child-dirs keys of the items'
Abuild.conf files. It is customary to have
the value of child-dirs contain single path
elements (i.e.just a directory without any
subdirectories), but this is also not a requirement:
child-dirs entries may contain multiple path
elements as long as there are no Abuild.conf
files in any of the intermediate directories. If a build item's
child contains its own tree-name key, that
child build item is the root of a separate build tree that is
part of the same forest, defined below. Otherwise, the child
build item is part of the same tree as its parent.
In addition to containing build items, build trees can contain
other attributes. Among these are references to other build
trees, a list of supported traits, and a
list of plugins. We will discuss these
topics later in the document. These attributes are defined using
keys in the root build item's Abuild.conf
file.
A build forest is a collection of build trees that are connected
to each other by virtue of one tree's root build item being
referenced as a child of a build item in another tree in the
forest. When abuild starts up, it looks for an
Abuild.conf in the current directory. It
then walks up the file system one directory at a time looking for
additional Abuild.conf files. Eventually,
it will either find the topmost Abuild.conf
file, or it will find an Abuild.conf file
that is not listed as a child of the next higher one. Whichever
of these cases is found first, the resulting
Abuild.conf file is the root of the build
forest. The forest then consists of all the trees encountered by
following all the child-dirs pointers from
the forest root.
Note that, unlike with build items and trees, forests do not have names. Note also that, unlike with trees, there is no explicit marker of the root of a build forest. This is very important as it allows you to extend a forest from above without modifying the forest itself. For a more in-depth discussion, see Chapter 7, Multiple Build Trees.
Note that the hierarchy defined by the layout of build items in the file system is a file system hierarchy and nothing more. It doesn't have to have any bearing at all on the dependency relationships among the build items. That said, it is sensible to organize build items in a manner that relates to the architecture of the system, and this in turn usually has implications about dependencies. Still, it is important to keep in mind that abuild is not file-system driven but rather is dependency driven.
In further describing build items and their attributes, it is useful to classify build items into several types. Most build items serve the purpose of providing code to be compiled. There are a number of special types of build items that serve other purposes. We discuss these here:
- root
The root build item of a build tree is the topmost item in that tree. It has a tree-name key that gives the name of the build tree. It is often the case that the root build item serves no purpose other than to hold onto tree-wide attributes. It is therefore permissible for a root build item to lack a name key. (See below for a discussion of unnamed build items.) Keys that define attributes of the build tree may appear only in the root build item's
Abuild.conf.- unnamed
In order to refer to one build item from another, both build items must have names. Abuild requires that every named build item in a build forest be named uniquely within that forest. A name is given to a build item by setting the name key in its
Abuild.conf. Sometimes, a build item exists for the sole purpose of bridging its parent with its children in the file system. Such items do not need to be referenced by other build items, so they do not need names. The only use of an unnamed build item is to serve as an intermediary during traversal of the file system. Such a build item'sAbuild.confmay only contain the child-dirs key. Abuild doesn't retain any information about these build items. It simply traverses through them when locating build items at startup time. Unnamed build items are the only types of build items that don't have to belong to any particular build tree. It is common for the root of a forest to be an unnamed build item whose children are all roots of build trees.- interface-only
Interface-only build items are build items that contain (in addition to
Abuild.conf) anAbuild.interfacefile. They do not build anything and therefore do not contain build files (such asAbuild.mkorAbuild.groovy). Since they have nothing to build, abuild never actually invokes a backend on them. They are, however, included in all dependency and integrity checks. A typical use of interface-only build items would be to add the locations of external libraries to the include and library paths (or to the classpaths for Java items). There may also be some interface-only build items that consist solely of static files (templated C++ classes, lists of constants, etc.). Interface-only build items may also be used to declare interface variables that are used by other build items.- pass-through
Pass-through build items are useful for solving certain advanced abuild problems. As such, there are aspects of this definition that may not be clear on the first reading. Pass-through build items contain no build or interface files, but they are named and have dependencies. This makes pass-through build items useful as top-level facades for hiding more complicated build item structures. This could include build items that have private names relative to the pass-through item, and it could also include structures containing build items that cross language and platform boundaries. Several examples in the documentation use pass-through build items to hide private build item names. For further discussion of using pass-through build items in a cross-platform environment, please see Section 24.4, “Dependencies and Pass-through Build Items”.
- plugin
Plugins are capable of extending the functionality of abuild beyond what can be accomplished in regular build items. Plugins must be named and not have any dependencies. No other build items may depend on them. Plugins are a topic in their own right. They are discussed in depth in Chapter 29, Enhancing Abuild with Plugins.
Virtually every software development project has some need to
integrate with third-party software libraries. In a traditional
build system, you might list the include paths, libraries, and
library directories right in your Makefile,
build.xml, or configuration file for
whatever build system you are using. With abuild, the best way
to integrate with a third-party library is to use a build item
whose sole purpose is to export that library's information using
an Abuild.interface file. In the simplest
cases, a third-party library build item might be an interface
only build item (described above) that just includes the
appropriate library directives in a static
Abuild.interface file. For example, a build
item that provides access to the PCRE (Perl-compatible regular
expression) libraries on a Linux distribution that has them
installed in the system's standard include path might just
include an Abuild.interface with the
following contents:
LIBS = pcrecpp pcre
For Java build items, a third-party JAR build item would
typically append the path to the JAR file to the
abuild.classpath.external interface variable.
(For a discussion of the various classpath variables, see Section 17.5.3, “Interface Variables for Java Items”.)
Sometimes, the process may be more involved. For example, on a
UNIX system, it is often desirable to use
autoconf to determine what interface
is required for a particular library. We present an example of
using autoconf with abuild in Section 18.3, “Autoconf Example”. Still other libraries may use
pkg-config. For those libraries, it
may make sense to create a simple set of build rules that
automatically generate an Abuild.interface
after-build file (also discussed in Section 18.3, “Autoconf Example”) by running the
pkg-config command. An example
pkg-config build item may be found in
the abuild-contrib package available at
abuild's web site.
Whichever way you do it for a given package, the idea is that you should always create a build item whose job it is to provide the glue between abuild and the third-party library. Other build items that need to use the third-party library can then just declare a dependency on the build item that provides the third-party library's interface. This simplifies the process of using third-party libraries and makes it possible to create a uniform standard for doing so within any specific abuild build tree. It also alleviates the need to duplicate information about the third-party library throughout your source tree. Whenever you are duplicating knowledge about the path of some entity, you would probably be better off creating a separate build item to encapsulate that knowledge.
[10]
Additionally, the files
Abuild-ant.properties and
Abuild-ant.xml are recognized as build
files, associated with the deprecated xml-based ant backend.
Abuild was designed with multiplatform operation in mind from the beginning. Up to this point, we have largely glossed over how abuild deals with multiple platforms. In this chapter, we will cover this aspect of abuild's operation in detail.
Abuild classifies platforms into a three-level hierarchy. The three levels are described by the following terms:
- target type
A target type encompasses the overall kind of targets that are being built. A target type essentially encapsulates a build paradigm. Abuild understands three target types: platform-independent for truly platform-independent products like scripts and documentation, object-code for compiled object code like C and C++, and java for Java byte code and related products. One could argue that Java code is platform-independent, but since Java code has its own build paradigm, abuild considers it to be a separate target type. Be careful not to confuse target type with target, defined in Section 3.2, “Basic Terminology”.
- platform type
A platform type essentially defines a grouping of platforms. Platform types belong to target types and contain platforms. When configuring build items, developers assign build items to platform types rather than to platforms or target types. The platform-independent target type has only platform type: indep. The java target type has only one platform type: java. [11] Platform types are most useful in the object-code target type. Abuild has only one built-in platform type in the object-code target type: native. The native platform type applies to build items that are expected to be able to be built and run on the host platform. Additional platform types to support embedded platforms or cross compilers can be added in plugins (see Section 29.3, “Adding Platform Types and Platforms”).
- platform
The abuild platform is the lowest level of detail in describing the environment in which a target is intended to be used. The expectation is that compiled products (object files, libraries, binary executables, java class files, etc.) produced for one platform are always compatible with other products produced for that platform but are not necessarily compatible with products produced for a different platform. If two different versions of a compiler generate incompatible object code (because of incompatible runtime library versions or different C++ name mangling conventions, for example), then a host running one compiler may generate output belonging to a different platform from the same host running a different version of the compiler. For the indep platform type in the platform-independent target type, there is only one platform, which has the same name as the platform type: indep. For the java platform type in the java target type, there is also only one platform, which also shares its name with the platform type: java. Platforms become interesting within the object-code target type. When we refer to platforms, we are almost always talking about object-code platforms.
This table (Table 5.1, “Built-in Platforms, Platform Types, and Target Types”) shows the target types along with the built-in platform types and platforms that belong to them.
Table 5.1. Built-in Platforms, Platform Types, and Target Types
| Target Type | Platform Type | Platform |
|---|---|---|
| object-code | native | based on available tools |
| java | java | java |
| platform-independent | indep | indep |
When a build item is defined with multiple platform types, they must all belong to the same target type. (Since the only target type that has more than one platform type is object-code, this means the target type of a build item with multiple platform types will always be object-code.) Some interface variables are also based on target type. For example, it may be permissible for a java build item to depend on a C++ build item if the C++ build item exports native code or provides an executable code generator, but it would never make sense for a java build item to have an include path or library path in the sense of a C/C++ build item. When one build item depends on another, the platforms on which the two build items are being built come into play. We discuss this in Chapter 24, Cross-Platform Support.
For target type object-code, platform identifiers are of the form os.cpu.toolset.compiler[.option], described below. In all cases, each field of the platform identifier must consist only of lower-case letters, numbers, dash, or underscore. The fields of the platform identifier are as follows:
- os
A broad description of the operating system, such as linux, solaris, windows, cygwin, or vxworks
- cpu
A CPU type identifier such as ix86, x86_64, ppc, ppc64, or sparc.
- toolset
A user-defined label for a collection of tools. This is a convenience field to separate things like different versions of compilers or runtime libraries. It can be set to any string, at which point the user is responsible for ensuring that it does in fact define a meaningful collection of tools. By default, abuild will create a toolset name based on the operating system distribution or similar factors. Examples include rhel4 on a Red Hat Enterprise Linux 4 system, or deb5 on a Debian GNU/Linux 5.x system. [12]
- compiler
An identifier for the compiler C/C++ compiler toolchain to be used. Abuild has built-in support for gcc on UNIX systems and for Microsoft Visual C++ and mingw on Windows systems. Users can provide their own compiler toolchains in addition to these. The mechanism for adding new compilers is described in Section 29.3, “Adding Platform Types and Platforms”.
- option
An optional field that is used to pass additional information to the GNU Make code that implements support for the compiler. Typical uses for options would be to define different debugging, profiling, or optimization levels.
All of the fields of the platform identifier are made available
in separate variables within the interface parsing system. In
addition, for object-code build items, the make
variable $(CCXX_TOOLCHAIN) is set to the value
of the compiler field. Here are some example platform
identifiers:
| linux.ppc64.proj1default.gcc |
| linux.ppc64.proj1default.gcc.release |
| linux.ppc64.proj1default.gcc.debug |
| linux.x86.fc5.gcc |
| linux.x86.fc5.gcc.release |
| linux.x86.fc5.gcc.debug |
| windows.ix86.nt5.msvc |
| windows.ix86.cygwin-nt5.mingw |
| vxworks.pc604.windriver.vxgcc |
When abuild builds an item, it creates an output directory
under that item's directory for every platform on which that item
is built. The output directory is of the form
abuild-.
Abuild itself and all abuild-supplied rules create files only
inside of abuild output directories.
[13]
platform-name
When abuild invokes make, it always does so from an output directory. This is true even for platform-independent build items. In this way, even temporary files created by compilers or other build systems will not appear in the build item's local directory. This makes it possible to build a specific item for multiple platforms in parallel without having to be concerned about the separate builds overwriting each other's files.
When abuild builds items using the Groovy backend (and also
using the deprecated xml-based ant backend), it performs those
builds inside a single Java virtual machine instance. As such,
it does not change its working directory to the output directory.
(Java does not support changing current directories, and besides,
there could be multiple builds going on simultaneously in
different threads.) However, each Java-based build has its own
private ant Project whose
basedir property is set to the output
directory. As such, all well-behaved ant tasks will only create
files in the output directory.
[11] At one time, it was planned for abuild to support different platform types for different versions of Java byte code. Although this would have been useful for build trees that had complex requirements for mixing JDKs of different versions, this capability would have added a lot of complexity to support a practice that is unusual and largely undesirable.
[12]
At present, it is possible to add new toolsets easily with
plugins, but the only way to override
the built-in default toolset would be to edit
private/bin/get_native_platform_data,
the perl script abuild uses to determine this information
at startup. This may be addressed in a future version of
abuild.
[13]
Abuild considers any directory whose name starts with
abuild- and which contains a file named
.abuild to be an output directory.
Table of Contents
Management of dependencies among build items is central to abuild's functionality. We have already gotten a taste of this capability in the basic examples included in Chapter 3, Basic Operation. In this chapter, we will examine dependencies in more depth.
The sole mechanism for declaring dependencies among build items
in abuild is the deps key in a build
item's Abuild.conf. Suppose build item
A declares build item
B as a dependency. The following line
would appear in A's
Abuild.conf:
deps: B
This declaration causes two things to happen:
It ensures that
Bwill be built beforeA.It enables
Ato see all of the variable declarations and assignments inB'sAbuild.interfacefile.
We illustrate both of these principles later in this chapter. For an in-depth discussion of build ordering and dependency-aware builds, see Chapter 9, Telling Abuild What to Build. For an in-depth discussion of abuild's interface system, see Chapter 17, The Abuild Interface System.
Another very important point about dependencies in abuild is
that they are transitive. In other words,
if A depends on B
and B depends on C,
then A also implicitly depends on
C. This means that the conditions above
apply to A and C.
That is, C is built before
A (which it would be anyway since it is
built before B and
B is built before
A), and A sees
C's interface in addition to seeing
B's interface.
[14]
Assuming that
A does not explicitly list
C in its deps key, we
would call B a direct
dependency of A and
C an indirect
dependency of A. We also say
that build item dependencies are inherited
when we wish to refer to the fact that build ordering and
interface visibility are influenced by both direct and indirect
dependencies.
Abuild performs various validations on dependencies. The most
important of these is that no cyclic dependencies are permitted.
[15]
In other words, if A depends on
B either directly or indirectly, then
B cannot depend on
A directly or indirectly. There are other
dependency validations which are discussed in various places
throughout this document.
By default, any build item can depend on any other build item by name. Abuild offers two mechanisms to restrict which items can depend on which other items. One mechanism is through build item name scoping rules, discussed below. The other mechanism is through use of multiple build trees, discussed in Chapter 7, Multiple Build Trees.
Abuild makes no specific commitments about the order in which
items will be built except that no item is ever built before its
dependencies are built. The exact order in which build items are
built, other than that dependencies are built before items that
depend on them, should be considered an implementation detail and
not relied upon. When abuild is invoked in with multiple
threads (using the --jobs option, as discussed
in Chapter 13, Command-Line Reference), it may build multiple
items in parallel. Even in this mode, abuild will never start
building one build item until all of its dependencies have been
built successfully.
In this section, we discuss build item name scoping rules. Build item name scoping is one mechanism that can be used to restrict which build items may directly depend on which other build items.
Build item names consist of period-separated segments. The
period separator in a build item's name is a namespace scope
delimiter that is used to determine which build items may
directly refer to which other build items in their
Abuild.conf files. It is a useful mechanism
for allowing a build item to hide the fact that it is composed of
lower-level build items by blocking others from accessing those
lower-level items directly.
Each build item belongs to a namespace scope equal to the name of
the build item after removing the last period and everything
following it. For example, the build item
“A.B.C.D” is in the scope
called “A.B.C”. We would
consider “A.B” and
“A” to be ancestor
scopes. The build item name itself also defines a
scope. In this case, the scope
“A.B.C.D” would contain
“A.B.C.D.E”. Any build item
name scope that starts with
“A.B.C.D.” (including the
period) would be a descendant scope to
“A.B.C.D”. Any build item
whose name does not contain a period is considered to belong to
the global scope and is accessible by all build items.
One build item is allowed to access another build item by name if the referenced build item belongs to the accessing build item's scope or any of its ancestor scopes. Figure 6.1, “Build Item Scopes”, shows a number of build items arranged by scope. In this figure, each build item defines a scope whose members appear in a gray box at the end of a semicircular arrowhead originating from the defining build item. Each build item in this figure can see the build items that are direct members of the scope that it defines, the build items that are siblings to it in its own scope, and the build items inside of any of its ancestor scopes. You may wish to study the figure while you follow along with the text below.
Figure 6.1. Build Item Scopes
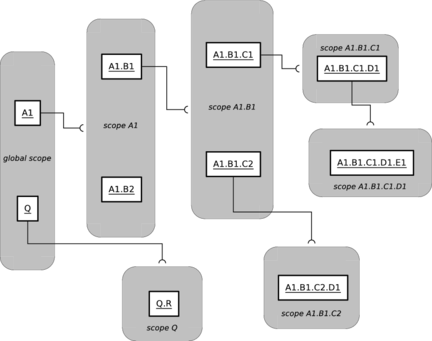
Build items are shown here grouped by scope. Each build item is connected to the scope that it defines.
To illustrate, we will consider item
A1.B1.C1. The build item
A1.B1.C1 can access the following items
for the following reasons:
A1.B1.C1.D1because it belongs to the scope thatA1.B1.C1defines:A1.B1.C1A1.B1.C2because it is in the same scope asA1.B1.C1:A1.B1A1.B1andA1.B2because they belong to an ancestor scope:A1A1andQbecause they are global
It cannot access these items:
A1.B1.C1.D1.E1because it is hidden in scopeA1.B1.C1.D1A1.B1.C2.D1because it is hidden in scopeA1.B1.C2Q.Rbecause it is hidden in scopeQ
The item A1.B1.C1 can be
accessed by the following items:
A1.B1because it is its parentA1.B1.C2because it is its siblingA1.B1.C1.D1andA1.B1.C1.D1.E1because they are its descendantsA1.B1.C2.D1because it can seeA1.B1.C1as a member of its ancestor scopeA1.B1
It cannot be accessed by these items:
A1.B2,A1,Q, andQ.R, none of which can see inside ofA1.B1
To give a more concrete example, suppose you have a globally
accessible build item called networking that
was internally divided into private build items
networking.src and
networking.test. A separate build item
called logger would be permitted to declare a
dependency on networking but not on
networking.src or
networking.test. Assuming that it did not
create any circular dependencies,
networking.test would also be allowed to
depend on logger.
Note that these restrictions apply only to explicitly declared
dependencies. It is common practice to implement a
“public” build item as multiple “private”
build items. The public build item itself would not have an
Abuild.interface file, but would instead
depend on whichever of its own private build items contain
interfaces it wants to export. It would, in fact, be a
pass-through build item. Because dependencies are inherited,
items that depend on the public build item will see the
interfaces of those private build items even though they would
not be able to depend on them directly. In this way, the public
build item becomes a facade for the private build items that
actually do the work. For example, the build item
networking would most likely not have its
own Abuild.interface or
Abuild.mk files. Instead, it might depend
on networking.src which would have those
files. It would probably not depend on
networking.test since
networking.test doesn't have to be built
in order to use networking.
[16]
This means that it would be okay for
networking.test to depend on
networking since doing so would not create
any circular dependencies. Then, any build items that depend on
networking indirectly depend on
networking.src and would see
networking.src's
Abuild.interface.
There is nothing that a build item can do to allow itself to
declare a direct dependency on another build item that is hidden
within another scope: the only way to gain direct access to a
build item is to be its ancestor or to be a descendant of its
parent. (There are no restrictions on indirect access.) There
are times, however, when it is desirable for a build item to
allow itself to be seen by build items who
would ordinarily not have access to it. This is accomplished by
using the visible-to key in
Abuild.conf. We defer discussion of this
feature until later; see Chapter 25, Build Item Visibility.
Now that the topic of build items and build trees has been
explored in somewhat more depth, let's take a look at a simple
but complete build tree. The build tree in
doc/example/general/reference/common
illustrates many of the concepts described above.
The first file to look at is the Abuild.conf
belonging to this tree's root build item:
general/reference/common/Abuild.conf
tree-name: common
child-dirs: lib1 lib2 lib3
supported-traits: tester
This is a root build item configuration file, as you can see by
the presence of the tree-name key. Notice
that it lacks a name key, as is often the
case with the root build item. This
Abuild.conf contains the names of some child
directories and also a build tree attribute:
supported-traits, which lists the traits
that are allowed in the build tree. We will return to the topic
of traits in Section 9.5, “Traits”. In the mean time, we
will direct our focus to the child build items.
The first child of the root build item of this tree is in the
lib1 directory. We examine its
Abuild.conf:
general/reference/common/lib1/Abuild.conf
name: common-lib1
child-dirs: src test
deps: common-lib1.src
This build item is called common-lib1.
Notice that the name of the build item is not the same as the
name of the directory, but it is based on the name of the
directory. This is a typical strategy for naming build items.
Abuild doesn't care how you name build items as long as they
conform to the syntactic restrictions and are unique within a
build tree. Coming up with a naming structure that parallels
your system's architecture is a good way to help ensure that you
do not create conflicting build item names. However, you should
avoid creating build item names that slavishly follow your
directory structure since doing so will make it needlessly
difficult for you to move things around. A major feature of
abuild is that nothing cares where a build item is located, so
don't set a trap for yourself in which you have to rename a build
item when you move it!
This build item does not have any build or interface files. It is
a pass-through build item. It declares a
single dependency: common-lib1.src, and two
child directories: src and
test.
Next, look at the common-lib1.src build
item's Abuild.conf in the
common/lib1/src directory:
general/reference/common/lib1/src/Abuild.conf
name: common-lib1.src
platform-types: native
The first thing to notice is this build item's name. It contains
a period and is therefore private to the
common-lib1 scope. That means that it is
not accessible to build items whose names are not also under that
scope. In particular, a build item called
common-lib2 would not be able to depend
directly on common-lib1.src. It would
instead depend on common-lib1 and would
inherit the dependency on common-lib1.src
indirectly.
This build item doesn't list any child directories and, as such,
is a leaf in the file system hierarchy. It also happens not to
declare any dependencies, so it is also a leaf in the dependency
tree, though one does not imply the other. This build item
configuration file contains the
platform-types key, as is required for all
build items that contain build or interface files. In addition
to the Abuild.conf file, we have an
Abuild.mk file and an
Abuild.interface file:
general/reference/common/lib1/src/Abuild.mk
TARGETS_lib := common-lib1
SRCS_lib_common-lib1 := CommonLib1.cpp
RULES := ccxx
general/reference/common/lib1/src/Abuild.interface
INCLUDES = ../include
LIBDIRS = $(ABUILD_OUTPUT_DIR)
LIBS = common-lib1
There is nothing in these files that is fundamentally different
from the basic C++ library example shown in Section 3.4, “Building a C++ Library”. We can observe,
however, that the INCLUDES variable in
Abuild.interface actually points to
../include rather than the current
directory. This simply illustrates that abuild doesn't impose
any restrictions on how you might want to lay out your build
items, though it is recommended that you pick a consistent way
and stick with it for any given build tree. You should also
avoid paths that point into other build items. Instead, depend
on the other item and put the variable there. As a rule, if you
ever have two interface variables or assignments that resolve to
the same path, you are probably doing something wrong: a
significant feature of abuild is that allows you to encapsulate
the location of any given thing in only one place. Instead,
figure out who owns a given file or
directory and export it from that build item's interface. We
will not study the source and header files in this example here,
but you are encouraged to go to the
doc/example/general/reference/common
directory in your abuild source tree or installation directory
to study the files further on your own.
Next, look at the test directory. Here is
its Abuild.conf:
general/reference/common/lib1/test/Abuild.conf
name: common-lib1.test
platform-types: native
deps: common-lib1
traits: tester -item=common-lib1.src
Notice that it declares a dependency on
common-lib1. Since its name is also
private to the common-lib1 scope, it would
have been okay for it to declare a dependency directly on
common-lib1.src. Declaring its dependency
on common-lib1 instead means that this
test code is guaranteed to see the same interfaces as would be
seen by any outside user of common-lib1.
This may be appropriate in some cases and not in others, but it
demonstrates that it is okay for a build item that is inside of a
particular namespace scope to depend on its parent in the
namespace hierarchy. This build item also declares a trait, but
we will revisit this when we discuss traits later in the document
(see Section 9.5, “Traits”).
In addition to the lib1 directory, we also
have lib2 and lib3.
These are set up analogously to lib1, so we
will not inspect every file. We will draw your attention to one
file in particular: observe that the
common-lib2.src build item in
reference/common/lib2/src declares a dependency
on common-lib3:
general/reference/common/lib2/src/Abuild.conf
name: common-lib2.src
platform-types: native
deps: common-lib3
We will return to this build tree later to study build sets, traits, and examples of various ways to run builds.
[14]
In fact, since B depends on
C, C's interface
is effectively included as part of B's
interface. This makes C's interface
visible to all build items that depend on
B. The exact mechanism by which this
works is described in Chapter 17, The Abuild Interface System.
[15] Stated formally, abuild requires that build item dependencies form a directed acyclic graph.
[16]
Although networking doesn't have to
depend on networking.test, you might be
tempted to put the dependency in so that when you run the
check target for all dependencies of
networking, you would get the test suite
implemented in networking.test. Rather
than using a dependency for this purpose, you can use a trait
instead. For information about traits, see Section 9.5, “Traits”. A specific example of using traits for
this purpose appears in that section.
In large development environments, it is common to have collections of code that may be shared across multiple projects, and it's also common to have multiple development efforts being worked in parallel with the intention of integrating them at a later date. Ideally, such collections of shared code should be accessible by multiple projects but should not be able to access code from the those projects, and parallel development efforts should be kept independent to the maximum possible extent. In order to support this distributed and parallel style of software development, abuild allows you to divide your work up into multiple build trees, which coexist in a build forest. These trees can remain completely independent from each other, and you can also establish one-way dependency relationships among trees.
We define the following additional terms:
- local build tree
The local build tree is the build tree that contains the current directory.
- tree dependency
A tree dependency is a separate build tree whose items can supplement the local build tree. Build items in the local build tree can resolve the names of build items in the tree named as a tree dependency, but build items in the dependency cannot see items in the dependent (local) build tree.
- top-level
Abuild.conf The top-level Abuild.conf is an
Abuild.conffile that is higher in th file system than any otherAbuild.conffile in the build forest. If you are building a single tree, the top-levelAbuild.conffile is typically the root build item of that tree. If you are building multiple trees, you have to create a higher-levelAbuild.conffile that can reach the roots of all the trees you are going to use, directly or indirectly, through its child-dirs key.
Even when abuild knows about multiple trees, it still won't
allow items in one build tree to refer to items in other trees
without an explicit instruction to do so. This makes it possible
to ensure that items in one tree are not
accidentally modified to depend on items in
a tree that is supposed to be unrelated. When you want items in
one tree to be able to use items in another tree, you declare a
tree dependency of one tree on another.
This creates a one-way relationship between the two trees such
that items in the dependent tree (the one
that declares the dependency) can see items in the tree on which
it depends, but no visibility is possible in the other direction.
To declare a tree dependency, you list the name of the tree
dependency in the tree-deps key of the
dependent tree's Abuild.conf file. As with
item dependencies listed in deps, abuild
requires that there are no cycles among tree dependencies.
There is nothing special about a build tree that makes it able to be the target of a tree dependency: any tree can depend on any other tree as long as no dependency cycles are created.
Once you set up another tree as a tree dependency of your tree,
all build items defined in the tree named by the tree dependency
are available to you (subject to normal scoping rules) as if they
were in your local build tree. Since any tree can potentially
have a dependency relationship with any other, abuild enforces
that none of the build items in any build tree may have the same
name as any build item in any tree in the forest. In order to
avoid build item name clashes, it's a good idea to pick a naming
convention for your build items that includes some kind of
tree-based prefix, as we have done with names like
common-lib1.
When you declare another tree as a tree dependency of your tree,
you declare your dependency on the other tree by mentioning its
name in the tree-deps of your tree's root
Abuild.conf. In order for this dependency
to work, abuild must know where to find the tree. Abuild
finds items and trees in the same way: it traverses the build
forest from the top down and creates a table mapping names to
paths. If the tree your tree depends on is
inside of your tree, this poses no problem.
But what if it is an external tree that is not inside your tree?
In this instance, you must place the external tree somewhere
within your overall build area, such as in another subdirectory
of the parent of your own tree's root. Then you must create an
Abuild.conf file in that common parent
directory that knows about the root directories of the two
trees. This is illustrated in Figure 7.1, “Top-Level Abuild.conf”.
Figure 7.1. Top-Level Abuild.conf
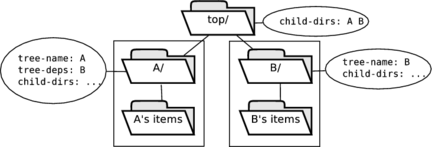
Tree A declares a tree dependency on
tree B. In order for
A to find B, an
Abuild.conf file that points to both
trees' locations must be created in a common ancestor
directory. The ovals show the contents of each directory's
Abuild.conf files.
The tree named B has an
Abuild.conf that that declares no tree
dependencies. It is a self-contained tree. However,
A's Abuild.conf file
mentions B by name.
How does A find B?
When you start abuild, it walks up the tree to find the
highest-level Abuild.conf (or the highest
level one not referenced as a child of the next higher
Abuild.conf) and traverses downward from
there. In this case, the Abuild.conf in
A's parent directory knows the locations of
both A and B. In this
way, abuild has figured out where to find
B when A declares the
tree dependency. This is illustrated with a concrete example
below.
In order for abuild to use multiple trees, it must be able to
find the roots of all the trees when it traverses the file system
looking for Abuild.conf files. As described
earlier, abuild locates the root of the forest by looking up
toward the root of the file system for other
Abuild.conf files that list previous
Abuild.conf directories in their
child-dirs key. The parent directory of our
previous example contains (see Section 6.4, “Simple Build Tree Example”) the following
Abuild.conf file:
general/reference/Abuild.conf
child-dirs: common project derived
This is an unnamed build item containing only a
child-dirs key. The
child-dirs key lists not only the
common directory, which is the root of the
common tree, but also two other directories:
project and derived,
each of which we will discuss below. These directories contain
additional build tree root build items, thus making them known to
any abuild invocation that builds common.
It is also okay to create one build tree underneath another named
tree. As with build items, having one tree physically located
beneath another doesn't have any implications about the dependency
relationships among the trees.
We will examine a new build tree that declares the build tree
from our previous example as an dependency. This new tree, which
we will call the project build tree, can be found at
doc/example/general/reference/project. The
first file we examine is the new build tree's root build item's
Abuild.conf:
general/reference/project/Abuild.conf
tree-name: project
tree-deps: common
child-dirs: main lib
This build item configuration file, in addition to having the
tree-name key (indicating that it is a root
build item), also has a tree-deps key, whose
value is the word common, which is the name
of the tree whose items we want to use. Note that, as with build
items, abuild never requires you to know the location of a
build tree.
Inside the project build tree, the
project-lib build item is defined inside
the lib directory. It is set up exactly the
same way as common-lib1 and the other
libraries in the common tree. Here is its
Abuild.conf:
general/reference/project/lib/Abuild.conf
name: project-lib
child-dirs: src test
deps: project-lib.src
Now look at project-lib.src's
Abuild.conf:
general/reference/project/lib/src/Abuild.conf
name: project-lib.src
platform-types: native
deps: common-lib1
Notice that it declares a dependency on
common-lib1, which is defined in the
common tree. This works because abuild
automatically makes available to you all the build items in any
build trees your depends on.
This build tree also includes a main program, but we will not go through the rest of the files in depth. You are encouraged to study the files on your own. There are also examples of traits in this build tree. We will return to this build tree during our discussion of traits (see Section 9.5, “Traits”).
When you declare another build tree as a tree dependency, you
automatically inherit any tree dependencies that
that tree declared, so like item
dependencies, tree dependencies are transitive. If this were not
the case, abuild would not be able to resolve dependencies
declared in the other tree if those dependencies were resolved in
one of its tree dependencies. To illustrate
this, we have a third build tree located in
doc/example/general/reference/derived. This
build tree is for a second project that is derived from the first
project. This build tree declares project
as an tree dependency as you can see in its root
Abuild.conf file:
general/reference/derived/Abuild.conf
tree-name: derived
tree-deps: project
child-dirs: main
For a diagram of the entire
general/reference collection of build tress,
see Figure 7.2, “Build Trees in general/reference”.
Figure 7.2. Build Trees in general/reference
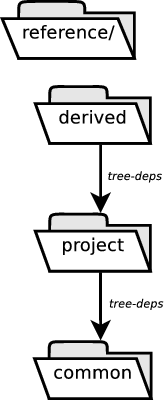
The derived build tree declares a
dependency on the project build tree.
The project build tree declares a
dependency on the common build tree.
The derived build tree contains a
derived-main build item structured
identically to the C++ program build items we've seen earlier.
Here at the main program's Abuild.conf:
general/reference/derived/main/src/Abuild.conf
name: derived-main.src
platform-types: native
deps: common-lib2 project-lib
traits: tester -item=derived-main.src
In this file, you can see that
derived-main.src depends on
project-lib from the
project build tree and also
common-lib2 which is found in
project's dependency,
common. We will return to this build tree
in the examples at the end of Chapter 9, Telling Abuild What to Build.
Abuild has a built-in help system, introduced in version 1.1, that makes it easier for users to get help for abuild itself and also for available rules, both built-in and user-supplied. All help text that is part of the abuild distribution can also be seen in Appendix E, Online Help Files.
The starting point to abuild's help system is the command abuild --help. Help is available on a variety of general topics including the help system and command invocation. You can also get help on rules. You can see information about what kinds of help is available on rules by running abuild --help rules.
The rules help facility offers three major capabilities. By
running abuild --help rules list, you can see
the list of compiler toolchains and also the list of available
rules that you can assign to RULES (make) or
abuild.rules (Groovy). In addition to telling
you what's offered overall, this will tell you what target types
the rules apply to, and whether the rules are available to you
through your dependency chain. That way, if you need to make use
of a rule that is provided by some build item that you don't
depend on, you can know which item you need to add a dependency on
to gain access to the rule. Once you know which toolchain or rule
you want help on, you can use abuild --help rules
toolchain:toolchain-name or
abuild --help rules
rule:rule-name to get
available help for that toolchain or rule.
Creating help files is very straightforward. For any toolchain
support file or rule file, in the same directory, create a text
file called
toolchain-name-help.txtrule-name-help.txt#” are ignored, which makes it
possible for you to include notes to people who might be
maintaining the help file. Also, abuild normalizes line
terminators, displaying the help with whatever the platform's
native line terminator is.
We present examples of help files in this manual as we present information about adding rules and toolchain support files. You can also run abuild --help helpfiles for a reminder about the help file format. (This text is also available in Section E.2, “abuild --help helpfiles”.) To see an example of rule help, see Section 22.2, “Code Generator Example for Make”. To see an example of toolchain help, see Section 29.5.3, “Platforms and Platform Type Plugins”.
Table of Contents
Up to this point, we have seen only simple invocations of abuild to build a single item with all of its dependencies. Abuild offers several ways of creating sets of build items to build or clean. These are known as build sets. In addition, abuild's list of items to build can be expanded or restricted based on traits that are assigned to build items.
As defined in Section 3.2, “Basic Terminology”, the term target refers to a specific build product. In most cases, abuild passes any targets specified on the command line to the backend build system. Abuild provides several standard targets (see Chapter 13, Command-Line Reference). We have already encountered all and clean in earlier examples. It is also possible to add new targets through mechanisms that are covered later in the document. For now, you really only need to know a few things about targets:
Different targets tell abuild to build different things.
The all target is abuild's default target. When abuild builds a build item in order to satisfy a dependency, building the all target is required to be sufficient to satisfy the needs of items that depend on it. This means that the all target is responsible for building all parts of a build item that are potentially needed by any of its dependencies. This may seem significant, but it's a detail that takes care of itself most of the time.
With the exception of two special targets, abuild doesn't do anything itself with targets other than pass them onto the backend build tool.
Abuild defines two special targets: clean and no-op. These targets are special in two ways: abuild does not allow them to be combined with other targets, and abuild handles them itself without passing them to a backend.
The clean target is used to remove the artifacts that are built by the other targets. Abuild implements the clean target by simply removing all abuild-generated output directories (see Section 5.3, “Output Directories”). When abuild processes the clean target, it ignores any dependency relationships among build items. Since it ignores dependencies and performs the cleanup itself without invoking a backend, running the clean target or cleaning multiple items using a clean set (described below) is very fast.
Note that, starting with version 1.0.3, abuild cleans all build items, not just those with build files. There are several reasons for this:
In certain debugging modes, such as interface debugging mode, abuild may create output directories for items that don't build anything.
You might change a build item from an item that builds something to an interface-only build item. In this case, you will want a subsequent clean to remove the no-longer-needed output directories.
Although it is not necessarily recommended, there are some use cases in which build items may “push” files into the output directory of an interface-only build item. Some people may choose to implement installers that work this way. Having abuild clean interface-only build items makes it easier to clean up in those cases.
The no-op target is used primarily for
debugging build tree problems. When abuild is invoked with the
no-op target, it goes through all the motions
of performing a build except that it does not read any
Abuild.interface files or invoke any
backends. It does, however, perform full validation of
Abuild.conf files including dependency and
integrity checking. This makes abuild no-op,
especially with a build set (described below), very useful for
taking a quick look at what items would be built on what
platforms and in what order. We make heavy use of the
no-op target in the examples at the end of
this chapter so that we can illustrate certain aspects of build
ordering without being concerned about the actual compilation
steps.
We have already seen that, by default, abuild will build all of
the build items on which the current item depends (directly or
indirectly) in addition to building the current item. Now we
generalize on this concept by introducing build
sets. A build set is a collection of build items
defined by certain criteria. Build sets can be used both to tell
abuild which items to build and also to tell it which items to
clean.
[17]
When abuild is invoked with no build set specified, its default
behavior is to build all of the current item's dependencies as
well as the current item. Sometimes, you may wish to assume all
the dependencies are up to date and just build the current build
item without building any of its
dependencies. To do this, you may invoke abuild with the
--no-deps option. This will generally only work
if all dependencies are up to date. Using
--no-deps is most convenient when you are in the
midst of the edit/compile/test cycle on a single build item and
you want to save the time of checking whether a potentially long
chain of dependencies is already up to date.
[18]
To instruct abuild to build all the items in a specific build
set, run abuild
--build=set-name (or
abuild -b
set-name). To instruct
abuild to clean all the items in a specific build set, run
abuild
--clean=set-name (or
abuild -c
set-name). When building a
build set, abuild will also automatically build any items that
are direct or indirect dependencies of any items in the build
set. However, if you specify any explicit targets on the command
line, abuild will not, by default, apply those targets to items
that it only added to the build set to satisfy dependencies; it
will build those items with the all target
instead. This is important as it enables you to add custom
targets to a build item without necessarily having those targets
be defined for build items it depends on. If you want abuild
to build dependencies with explicitly named targets as well, use
the --apply-targets-to-deps option. When
cleaning with a build set, abuild does not ordinarily also
clean the dependencies of the items in the set. To apply the
clean target to all the dependencies as well,
we also use the --apply-targets-to-deps option.
This is a bit subtle, so we present several examples below.
The following build sets are defined:
currentthe current build item (i.e., the build item whose
Abuild.confis in the current directory); abuild's default behavior is identical to--build=currentdepsall direct and indirect dependencies of the current build item but not the item itself
descall build items located at or below the current directory (items that are descendants of the current directory)
descendingalias for
descdownalias for
desclocalall items in the build tree containing the item in the current directory; i.e., the local build tree without any of its trees dependencies, noting that items in tree dependencies may, as always, still to be built to satisfy item dependencies
deptreesall items in the build tree containing the item in the current directory as well as all items in any of its tree dependencies [19]
descdeptreesall build items that are located at or below the current directory and are either in the current build tree or one of its dependencies—effectively the intersection between
descanddeptrees[20]allall items in all known build trees, including those items in trees that are not related to the current build tree
name:item-name[,item-name,...]all build items whose names are listed
pattern:regular-expressionall build items whose names match the given perl-compatible regular expression
Ordinarily, when you invoke abuild clean or
abuild
--clean=set-name, abuild
will remove all output directories for any affected build items.
You may also restrict abuild to remove only specified output
directories. There are two ways to do this. One way is to run
abuild clean from inside an output directory.
In that case, abuild will remove all the files in the output
directory.
[21]
The other way is to use the --clean-platforms
option, which may be followed by a shell-style regular expression
that is matched against the platform portion of the output
directory name. Examples are shown below.
- abuild
builds the all target for all dependencies of the current directory's build item and for the current directory; equivalent to abuild --build=current
- abuild --no-deps
builds the current directory without building any of its dependencies
- abuild check (or abuild --build=current check)
builds the check target for the current build item and the all target for all of its direct and indirect dependencies
- abuild --apply-targets-to-deps check
builds the check target for the current build item and all of its direct and indirect dependencies
- abuild --build=local check
builds the check target for all build items in the local build tree and the all target for any dependencies of any local items that may be satisfied in other trees
- abuild --build=deptrees check
builds the check target for all build items in the local build tree and all of its tree dependencies
- abuild --clean=current (or abuild clean)
removes all output directories for the current build item but not for any of its dependencies
- abuild --clean=desc
removes all output directories for all build items at or below the current directory but not any of its dependencies
- abuild --clean=all --clean-platforms java --clean-platforms '*.ix86.*'
for all build items, removes all
abuild-javaoutput directories and all output directories for platforms containing the string “.ix86.”- abuild --clean=current --apply-targets-to-deps
removes all output directories for the current build item and everything it depends on; useful when you want to try a completely clean build of a particular item
- abuild --apply-targets-to-deps --clean=desc
removes all output directories for all build items at or below the current directory and all of their direct or indirect dependencies, including those that are not located at or below the current directory
- abuild --build=name:lib1,lib2 xyz
builds the custom xyz target for the
lib1andlib2build items and the all target for their direct or indirect dependencies- abuild --build=pattern:'.*\.test'
builds the all target for any item whose name ends with
.testand any of those items' direct or indirect dependencies- abuild -b all
builds the all target for all build items in all known trees in the forest
- abuild -c all
removes all output directories in all the build trees in the forest
Starting with abuild version 1.0.3, it is possible to list
other build items in the build-also key of
any named build item's Abuild.conf file.
Starting with abuild version 1.1.4,
build-also keys can list entire trees and
also add options to include tree dependencies or other items at
or below the item's directory. When abuild adds any build item
to the build set, if that build item has a
build-also key, then any build items listed
there are also added to the build set. The operation of
expanding initial build set membership using the
build-also key is applied iteratively until
no more build items are added. The principal intended use of
this feature is to aid with setting up virtual
“top-level” build items. For example, if your system
consisted of multiple, independent subsystems and you wanted to
build all of them, you could create a build item that lists the
main items for each subsystem in a
build-also key.
Arguments to build-also may be as follows:
-
[
item:]item-name[-desc] Add
item-nameto the build set. The literalitem:prefix may be omitted for backward compatibility.If the
-descoption is given, all items at or below the directory containingitem-nameare also added to the build set. This is equivalent to running abuild --build=desc fromitem-name's directory.-
tree:tree-name[-desc] [-with-tree-deps] If
tree:tree-nameis specified by itself, all items in the build tree namedtree-nameare added to the build set. This is equivalent to running abuild --build=local somewhere in that tree.If
-descappears as an option by itself, all items at or below the directory containing the root oftree-nameare added to the build set. This is equivalent to running abuild --build=desc from the directory containing the root of the tree.If
-with-tree-depsappears as an option by itself, all items in all trees thattree-namespecifies as tree dependencies are added to the build set in addition to all items intree-nameitself. This is equivalent to running abuild --build=deptrees somewhere in that tree.If
-with-tree-depsand-descare both specified, the result is to add the items that are in the intersection of the two options specified individually. In other words, all items that are in any dependent tree and are at or below the directory containing the root of the tree are added to the build set. This is equivalent to running abuild --build=descdeptrees at the root of the build tree. Note that if you want the union of-descand-with-tree-depsinstead of the intersection, you simply have to specify bothtree:tree-name-descandtree:tree-name-with-tree-depsin the build-also key.
In older versions of abuild, the only way to force building of one build item to build another item was to declare dependencies or tree dependencies. This had several disadvantages, including the following:
Adding unnecessary dependencies puts needless constraints on build ordering and parallelism.
Using dependencies for this purpose is clumsy if there are multiple target types involved. It would require you to use a platform-specific dependency, which in turn could interfere with proper use of platform selectors.
Otherwise harmless interface variable name clashes or assignment issues could cause problems as a result of having two interfaces that were supposed to be independent being loaded together.
Whenever you want building of one build item to result in building of another build item and the first item doesn't need to use anything from the items it causes to be built, it is appropriate to use build-also instead of a dependency.
Starting with abuild version 1.1, it is possible to use the
--with-rdeps flag to instruct abuild to expand
the build set by adding all reverse
dependencies of any build item initially in the build
set. When combined with --repeat-expansion,
this process is applied iteratively so that all forward and
reverse dependencies of every item in the build set will also be
in the build set.
[22]
This can be especially useful if you are changing a widely used
item and you want to make sure your change didn't break any build
items that use your item. For additional details on how the
build set is constructed, see Section 33.5, “Construction of the Build Set”..
In abuild, it is possible to assign certain traits to a build item. Traits are a very powerful feature of abuild. This material is somewhat more complicated than anything introduced up to this point, so don't worry if you have to read this section more than once.
Traits are used for two main purposes. Throughout this material, we will refer back to the two purposes. We will also provide clarifying examples later in the chapter.
The first purpose of traits is creation of semantically defined groups of build items. In this case, a trait corresponding to the grouping criteria would be applied to a build item directly. For example, all build items that can be deployed could be assigned the deployable trait.
A second purpose of traits is to create specific relationships among build items. These relationships may or may not correspond to dependencies among build items. These traits may be applied to a build item by itself or in reference to other build items. For example, the tester trait may be applied to a general system test build item by itself and may be applied to every test suite build item with a reference to the specific item being tested.
Traits are used to assist in the construction of build sets. In particular, you can narrow a build set by removing all items that don't have all of a specified list of traits. You can also expand a build set to add any build items that relate to any items already in the set by referring to them through all of a specified list of traits. This makes it possible to say things like “run the deploy target for every build item that has the deployable trait,” or “run the test target for every item that tests my local build item or anything it depends on.”
Since traits are visible in abuild's --dump-data
output (see Appendix F, --dump-data Format), they are available
to scripts or front ends to abuild. They may also be used for
purely informational purposes such as specifying the
classification level of a build item or applying a uniform label
to all build items that belong to some group. Trait names are
subject to the same constraints as build item names: they are
case-sensitive and may consist of mixed case alphanumeric
characters, numbers, underscores, dashes, and periods. Unlike
with build items, the period does not have any semantic meaning
when used in a trait name.
Starting with abuild 1.1.6, a build item that uses either the
GNU Make backend or the Groovy backend (but not the deprecated
xml-based ant backend) may also get access to the list of traits
that are declared in its Abuild.conf file.
For the GNU Make backend, the variable
ABUILD_TRAITS contains a list of traits
separated by spaces. For the Groovy backend, the variable
abuild.traits contains a groovy list of traits
represented as strings. In both cases, any information about
referent build items is excluded; only the list of declared
traits is provided. Possible uses for this information would
include having a custom rule check to make sure a given trait is
specified before providing a particular target, having it give an
error if a particular trait is not defined, or even having it
change behavior on the basis of a trait.
Any named build item may include a traits
key that lists one or more of the traits that are supported in
its build tree. The list of traits supported in a build tree is
given as the value of the supported-traits
key in the root build item's Abuild.conf.
The list of supported traits is inherited through tree
dependencies, so any trait declared as valid in any trees your
tree depends on are also available. The set of traits that can
be specified on the command line is the union of all traits
allowed by all known trees.
Traits listed in the traits key can be made
referent to other build items by listing the other build items
in an -item option. For example, the following
Abuild.conf fragment declares that the
potato.test build item is deployable,
unclassified, and a tester for the
potato.lib and
potato.bin build items:
this: potato.test
traits: deployable tester -item=potato.lib -item=potato.bin unclassified
To modify the build set or clean set based on traits, use the
--only-with-traits and
--related-by-traits command-line options to
abuild. These options must be combined with the specification
of a build set. They correspond to the two purposes of traits
discussed above.
To build all build items that have all of a specified list of
traits, run abuild
--build=set --only-with-traits
trait[,trait,...].
This is particularly useful when semantically grouped build
items share a common custom target. For example, if all the
deployable build items had a special deploy
target, you could run the deploy target for
all deployable items in the local build tree with the command
abuild --build=local --only-with-traits deployable deploy
If multiple traits are specified at once, only build items with all of the specified traits are included.
Once a build set has been constructed, you may want to add
additional items to the set based on traits. Specifically, you
may want to add all items related by a trait to items already in
the build set. To expand a build set in this way, run
abuild --build=set
--related-by-traits
trait[,trait,...]
For example, if you wanted to run the test
target for all build items that are declared as testers (using
the tester trait) of your build item or any
of its dependencies, you could run the command
abuild --build=current --related-by-traits=tester test
As above, if multiple traits are specified at once, only build
items that are related by all of the specified traits are
included. Note that the same trait may be used referent to
another build item or in isolation. The
--related-by-traits option only applies to
traits used in reference to other build items. For example, if
a build item had the tester trait not
referent to any build item, it would not be picked up by the
above command. The --only-with-traits option
picks up all build items that have the named traits either in
isolation or referent to other build items.
It is also possible to combine these options. In that case, the
build set is first restricted using
--only-with-traits and then expanded using the
--related-by-traits as shown in examples below.
The order of the arguments has no effect on this behavior.
Ordinarily, when a specific target is specified as an argument to abuild (as in abuild test or abuild deploy rather than just abuild), abuild runs that target for every item initially in the build set (before dependency expansion). When the build set is expanded or restricted based on traits, any explicitly specified targets are run only for build items that have the specified traits. This is important because it enables you to use traits to group build items that define specific custom targets.
If --related-by-traits and
--only-with-traits are both specified, any
explicit targets are applied only to traits named in
--related-by-traits as the effect of that
option is applied last. All other build items are built with
the all target. Note that the
--apply-targets-to-deps option will cause any
explicit targets to be applied to all build items, as always.
Later in this chapter, we review the exact rules that abuild
uses to decide which targets to apply to which build items.
The --list-traits flag provides information
about which traits can be used on the command line. To see more
detailed information about which traits were made available in
which build trees, you can examine the output of abuild
--dump-data (see Appendix F, --dump-data Format).
For more detailed information about how build sets are constructed with respect to traits, please see Section 33.5, “Construction of the Build Set”.
- abuild --build=desc --only-with-traits deployable deploy
Run the deploy target for all items at or below the current directory that have the deployable trait, and run the all target for all items that they depend on.
- abuild --build=current --related-by-traits tester test
Build the current build item and all of its dependencies with the all target, and run the test target for any build items that declared themselves as a tester for any of those items. Any additional dependencies of the testers would also be built with the all target.
- abuild --build=local --only-with-traits deployable,tester deploy test
Run both the deploy and the test targets for any build items in the local build tree (the current build item's tree excluding its tree dependencies) that have both the deployable and the tester traits either specified alone or in reference to other build items. Run the all target for their dependencies.
- abuild --build=all --only-with-traits requires-hw --related-by-traits tester hwtest
Run the all target for all items that have the requires-hw trait as well as any of their dependencies, and run the hwtest target for all items that test any of them. Additional dependencies of the testers would also be built with the all target.
Although we have described how various options affect which
build items are built with which targets, we summarize that
information here so that it all appears in one place. Put
simply, the default behavior is that abuild applies any
explicitly named targets to all build items that directly match
the criteria for belonging to the named build set. Any build
items that abuild is building just to satisfy dependencies are
built with the all target. This behavior is
overridden by specifying
--apply-targets-to-deps, which causes abuild
to build all build items with the explicit targets. The exact
rules are described in the list below. These rules apply only
when a build set is specified with --build or
-b. There are several mutually exclusive
cases:
The
--apply-targets-to-depsoption was specified or the explicit target is no-op. In this case, any explicitly named targets are applied to all items in the build set.The
--apply-targets-to-depsoption was not specified, the target is notno-op, and no trait arguments were specified. In this case, all items that were initially added to the build set, along with any build items specified by any of their build-also keys (with the build-also relationship applied recursively) are built with any explicitly specified targets. Any other build items added to the build set to satisfy dependencies are built with the all target.The
--apply-targets-to-depsoption was not specified, the target is notno-op,--only-with-traitswas specified, and--related-by-traitswas not specified. In this case, all items belonging to the original build set (including build-also expansion) and having all of the named traits are built with the explicit targets. Other items (dependencies of build items with the named traits but that do not have the named traits themselves) are built with the all target.The
--apply-targets-to-depsoption was not specified, the target is notno-op, and--related-by-traitswas specified. In this case, the build set is first constructed normally and then restricted to any items that have all the traits specified in the--only-with-traitsoption, if any. Then it is expanded to include any build item related to one of the original build set members by all the traits named in--related-by-traits. These related items are built with the explicit targets. Other items, including additional dependencies of related items, are built with the all target.
For more detailed information on how the build set is constructed, please see Section 33.5, “Construction of the Build Set”.
Now that we've seen the topics of build sets and traits, we're ready to revisit our previous examples. This time, we will talk about how traits are used in a build tree, and we will demonstrate the results of running abuild with different build sets. We will also make use of the special target no-op which can be useful for debugging your build trees.
Any arguments to abuild that are not command-line options are
interpreted as targets. By default, abuild uses the
all target to build each build item in the
build set. If targets are named explicitly, for the build items
to which they apply, they are passed directly to the backend.
There are two exceptions to this rule: the special targets
clean and no-op are
trapped by abuild and handled separately without invocation of
the backend. We have already seen the clean
target: it just removes any abuild output directories in the
build item directory. The special no-op
target causes abuild to go through all the motions of building
except for actually invoking the backend. The
no-op command is useful for seeing what build
items would be built on what platforms in a particular
invocation of abuild. It does all the same validation on
Abuild.conf files as a regular build, but
it doesn't look at Abuild.interface files
or build files (Abuild.mk, etc.).
We return now to the reference/common
directory to demonstrate both the no-op
target and some build sets. From the
reference/common directory, we can run
abuild --build=local no-op to tell abuild
to run the special no-op target for every
build item in the local build tree. Since this tree has no tree
dependencies, there is no chance that there are any dependencies
that are satisfied outside of the local build tree. Running
this command produces the following results (with the native
platform again replaced by the string
<native>):
reference-common-no-op.out
abuild: build starting
abuild: common-lib1.src (abuild-<native>): no-op
abuild: common-lib1.test (abuild-<native>): no-op
abuild: common-lib3.src (abuild-<native>): no-op
abuild: common-lib2.src (abuild-<native>): no-op
abuild: common-lib2.test (abuild-<native>): no-op
abuild: common-lib3.test (abuild-<native>): no-op
abuild: build complete
Of particular interest here is the order in which abuild
visited the items. Abuild makes no specific commitments about
the order in which items will be built except that no item is
ever built before its dependencies are built.
[23]
Since common-lib2.src depends on
common-lib3.src (indirectly through its
dependency on common-lib3), abuild
automatically builds common-lib3.src
before it builds common-lib2.src. On the
other hand, since common-lib2.test has no
dependency on common-lib3.test, no
specific ordering is necessary in that case. If you were to run
abuild --clean=local from this directory, you
would not observe the same ordering of build items since
abuild does not pay any attention to dependencies when it is
running the clean target, as shown:
reference-common-clean-local.out
abuild: cleaning common-lib1 in lib1
abuild: cleaning common-lib1.src in lib1/src
abuild: cleaning common-lib1.test in lib1/test
abuild: cleaning common-lib2 in lib2
abuild: cleaning common-lib2.src in lib2/src
abuild: cleaning common-lib2.test in lib2/test
abuild: cleaning common-lib3 in lib3
abuild: cleaning common-lib3.src in lib3/src
abuild: cleaning common-lib3.test in lib3/test
Note also that only the build items that have
Abuild.mk files are cleaned. Abuild
knows that there is nothing to build in items without
Abuild.mk files and skips them when it is
building or cleaning multiple items.
If you are following along, then go to the
reference/common directory and run
abuild --build=desc check. This will build
and run the test suites for all build items at or below that
directory, which in this case, is the same collection of build
items as the local build set.
[24]
This produces the following output, again with some
system-specific strings replaced with generic values:
reference-common-check.out
abuild: build starting
abuild: common-lib1.src (abuild-<native>): check
make: Entering directory `--topdir--/general/reference/common/lib1/src/a\
\build-<native>'
Compiling ../CommonLib1.cpp as C++
Creating common-lib1 library
make: Leaving directory `--topdir--/general/reference/common/lib1/src/ab\
\uild-<native>'
abuild: common-lib1.test (abuild-<native>): check
make: Entering directory `--topdir--/general/reference/common/lib1/test/\
\abuild-<native>'
Compiling ../main.cpp as C++
Creating lib1_test executable

*********************************
STARTING TESTS on ---timestamp---
*********************************


Running ../qtest/lib1.test
lib1  1 (test lib1 class)                                      ... PASSED

Overall test suite                                             ... PASSED

TESTS COMPLETE.  Summary:

Total tests: 1
Passes: 1
Failures: 0
Unexpected Passes: 0
Expected Failures: 0
Missing Tests: 0
Extra Tests: 0

make: Leaving directory `--topdir--/general/reference/common/lib1/test/a\
\build-<native>'
abuild: common-lib3.src (abuild-<native>): check
make: Entering directory `--topdir--/general/reference/common/lib3/src/a\
\build-<native>'
Compiling ../CommonLib3.cpp as C++
Creating common-lib3 library
make: Leaving directory `--topdir--/general/reference/common/lib3/src/ab\
\uild-<native>'
abuild: common-lib2.src (abuild-<native>): check
make: Entering directory `--topdir--/general/reference/common/lib2/src/a\
\build-<native>'
Compiling ../CommonLib2.cpp as C++
Creating common-lib2 library
make: Leaving directory `--topdir--/general/reference/common/lib2/src/ab\
\uild-<native>'
abuild: common-lib2.test (abuild-<native>): check
make: Entering directory `--topdir--/general/reference/common/lib2/test/\
\abuild-<native>'
Compiling ../main.cpp as C++
Creating lib2_test executable

*********************************
STARTING TESTS on ---timestamp---
*********************************


Running ../qtest/lib2.test
lib2  1 (test lib2 class)                                      ... PASSED

Overall test suite                                             ... PASSED

TESTS COMPLETE.  Summary:

Total tests: 1
Passes: 1
Failures: 0
Unexpected Passes: 0
Expected Failures: 0
Missing Tests: 0
Extra Tests: 0

make: Leaving directory `--topdir--/general/reference/common/lib2/test/a\
\build-<native>'
abuild: common-lib3.test (abuild-<native>): check
make: Entering directory `--topdir--/general/reference/common/lib3/test/\
\abuild-<native>'
Compiling ../main.cpp as C++
Creating lib3_test executable

*********************************
STARTING TESTS on ---timestamp---
*********************************


Running ../qtest/lib3.test
lib3  1 (test lib3 class)                                      ... PASSED

Overall test suite                                             ... PASSED

TESTS COMPLETE.  Summary:

Total tests: 1
Passes: 1
Failures: 0
Unexpected Passes: 0
Expected Failures: 0
Missing Tests: 0
Extra Tests: 0

make: Leaving directory `--topdir--/general/reference/common/lib3/test/a\
\build-<native>'
abuild: build complete
This example includes the output of qtest test suites. QTest is a simple and robust automated test framework that is integrated with abuild and used for abuild's own test suite. For information, see Section 10.2, “Integration with QTest”.
By default, when abuild builds multiple build items using a
build set, it will stop after the first build failure.
Sometimes, particularly when building a large build tree, you
may want abuild to try to build as many build items as it can,
continuing on failure. In this case, you may pass the
-k option to abuild. When run with the
-k option, abuild will continue building
other items after one item fails. It will also exit with an
abnormal exit status after it builds everything that it can, and
it will provide a summary of what failed. When run with
-k, abuild also passes the corresponding
flags to the backends so that they will try to build as much as
they can without stopping on the first error. Both the
make and
Groovy backends behave similarly to
abuild: they will keep going on failure, skip any targets that
depend on failed targets, and exit abnormally if any failures
are detected.
Ordinarily, if one build item fails, abuild will not attempt
to build any other items that depend on the failed item even
when run with -k. If you specify the
--no-dep-failures option along with
-k, then abuild will not only continue after
the first failure but will also attempt to build items even when
one or more of their dependencies have failed. Use of this
option may result in cascading errors since the build of one
item is likely to fail as a result of failures in its
dependencies. There are, however, several cases in which this
option may still be useful. For example, if building a large
build tree with known problems in it, it may be useful to first
tell abuild to build everything it possibly can. Then you can
go back and try to clean up the error conditions without having
to wait for the compilation of files that would have been
buildable before. Another case in which this option may be
useful is when running test suites: in many cases, we may wish
to attempt to run test suites for items even if some of the test
suites of their dependencies have failed. Essentially, running
-k --no-dep-failures allows abuild to attempt
to build everything that the backends will allow it to build.
Returning to the project area, we demonstrate how item
dependencies may be satisfied in trees named as tree
dependencies and the effect this has on the build set. Under
reference/project, we have just two public
build items called project-main and
project-lib. The
project-lib build item is structured like
the libraries in the common area. The
project-main build item has a
src directory that builds an executable and
has its own test suite. We have already seen that
reference/project/Abuild.conf has a
tree-deps key that lists
common and that items from the
project tree depend on build items from
common. Specifically,
project-lib depends on
common-lib1 and
project-main depends on
common-lib2 which in turn depends on
common-lib3.
If we go to reference/project/main/src and
run abuild no-op, we see the following
output:
reference-project-main-no-op.out
abuild: build starting
abuild: common-lib1.src (abuild-<native>): no-op
abuild: common-lib3.src (abuild-<native>): no-op
abuild: common-lib2.src (abuild-<native>): no-op
abuild: project-lib.src (abuild-<native>): no-op
abuild: project-main.src (abuild-<native>): no-op
abuild: build complete
Notice here that abuild only built the build items whose names
end with .src, that it built the items in
dependency order, and that it built all the items from
common before any of the items in
project. We can also run abuild
--apply-targets-to-deps check to run the
check target for each of these build items.
This generates the following output:
reference-project-main-check.out
abuild: build starting
abuild: common-lib1.src (abuild-<native>): check
abuild: common-lib3.src (abuild-<native>): check
abuild: common-lib2.src (abuild-<native>): check
abuild: project-lib.src (abuild-<native>): check
make: Entering directory `--topdir--/general/reference/project/lib/src/a\
\build-<native>'
Compiling ../ProjectLib.cpp as C++
Creating project-lib library
make: Leaving directory `--topdir--/general/reference/project/lib/src/ab\
\uild-<native>'
abuild: project-main.src (abuild-<native>): check
make: Entering directory `--topdir--/general/reference/project/main/src/\
\abuild-<native>'
Compiling ../main.cpp as C++
Creating main executable

*********************************
STARTING TESTS on ---timestamp---
*********************************


Running ../qtest/main.test
main  1 (testing project-main)                                 ... PASSED

Overall test suite                                             ... PASSED

TESTS COMPLETE.  Summary:

Total tests: 1
Passes: 1
Failures: 0
Unexpected Passes: 0
Expected Failures: 0
Missing Tests: 0
Extra Tests: 0

make: Leaving directory `--topdir--/general/reference/project/main/src/a\
\build-<native>'
abuild: build complete
The presence of the --apply-target-to-deps flag
caused the check target will be run for our
dependencies as well as the current build item. In this case,
there were no actions performed building the files in
common because they were already built. If
individual files had been modified in any of these build items,
the appropriate targets would have been rebuilt subject to the
ordinary file-based dependency management performed by make or
ant.
In our previous example, we saw the check
target run for each item (that has a build file). Since the
items other than project-main don't
contain their own test suites, we see the test suite only for
project-main. Sometimes we might like to
run all the test suites of all the build items we depend on,
even if we don't depend on their test suites directly. We can
do this using traits, assuming our build tree has been set up to
use traits for this purpose. Recall from earlier that our
common build tree declared the
tester trait in its root build item's
Abuild.conf. Here is that file again:
general/reference/common/Abuild.conf
tree-name: common
child-dirs: lib1 lib2 lib3
supported-traits: tester
Also, recall that all the test suites declared themselves as
testers of the items that they tested. Here again is
common-lib1.test's
Abuild.conf, which declares
common-lib1.test to be a tester of
common-lib1.src:
general/reference/common/lib1/test/Abuild.conf
name: common-lib1.test
platform-types: native
deps: common-lib1
traits: tester -item=common-lib1.src
Given that all of our build items are set up in this way, we can instruct abuild to run the test suites for everything that we depend on. We do this by running abuild --related-by-traits tester check. This runs the check target for every item that declares itself as a tester of the current build item or any of its dependencies, and the all target for everything else, including any additional dependencies of any of those test suites. That command generates the following output:
reference-project-main-trait-test.out
abuild: build starting
abuild: common-lib1.src (abuild-<native>): all
abuild: common-lib1.test (abuild-<native>): check
make: Entering directory `--topdir--/general/reference/common/lib1/test/\
\abuild-<native>'

*********************************
STARTING TESTS on ---timestamp---
*********************************


Running ../qtest/lib1.test
lib1  1 (test lib1 class)                                      ... PASSED

Overall test suite                                             ... PASSED

TESTS COMPLETE.  Summary:

Total tests: 1
Passes: 1
Failures: 0
Unexpected Passes: 0
Expected Failures: 0
Missing Tests: 0
Extra Tests: 0

make: Leaving directory `--topdir--/general/reference/common/lib1/test/a\
\build-<native>'
abuild: common-lib3.src (abuild-<native>): all
abuild: common-lib2.src (abuild-<native>): all
abuild: common-lib2.test (abuild-<native>): check
make: Entering directory `--topdir--/general/reference/common/lib2/test/\
\abuild-<native>'

*********************************
STARTING TESTS on ---timestamp---
*********************************


Running ../qtest/lib2.test
lib2  1 (test lib2 class)                                      ... PASSED

Overall test suite                                             ... PASSED

TESTS COMPLETE.  Summary:

Total tests: 1
Passes: 1
Failures: 0
Unexpected Passes: 0
Expected Failures: 0
Missing Tests: 0
Extra Tests: 0

make: Leaving directory `--topdir--/general/reference/common/lib2/test/a\
\build-<native>'
abuild: common-lib3.test (abuild-<native>): check
make: Entering directory `--topdir--/general/reference/common/lib3/test/\
\abuild-<native>'

*********************************
STARTING TESTS on ---timestamp---
*********************************


Running ../qtest/lib3.test
lib3  1 (test lib3 class)                                      ... PASSED

Overall test suite                                             ... PASSED

TESTS COMPLETE.  Summary:

Total tests: 1
Passes: 1
Failures: 0
Unexpected Passes: 0
Expected Failures: 0
Missing Tests: 0
Extra Tests: 0

make: Leaving directory `--topdir--/general/reference/common/lib3/test/a\
\build-<native>'
abuild: project-lib.src (abuild-<native>): all
abuild: project-lib.test (abuild-<native>): check
make: Entering directory `--topdir--/general/reference/project/lib/test/\
\abuild-<native>'
Compiling ../main.cpp as C++
Creating lib_test executable

*********************************
STARTING TESTS on ---timestamp---
*********************************


Running ../qtest/lib.test
lib  1 (test lib class)                                        ... PASSED

Overall test suite                                             ... PASSED

TESTS COMPLETE.  Summary:

Total tests: 1
Passes: 1
Failures: 0
Unexpected Passes: 0
Expected Failures: 0
Missing Tests: 0
Extra Tests: 0

make: Leaving directory `--topdir--/general/reference/project/lib/test/a\
\build-<native>'
abuild: project-main.src (abuild-<native>): check
make: Entering directory `--topdir--/general/reference/project/main/src/\
\abuild-<native>'

*********************************
STARTING TESTS on ---timestamp---
*********************************


Running ../qtest/main.test
main  1 (testing project-main)                                 ... PASSED

Overall test suite                                             ... PASSED

TESTS COMPLETE.  Summary:

Total tests: 1
Passes: 1
Failures: 0
Unexpected Passes: 0
Expected Failures: 0
Missing Tests: 0
Extra Tests: 0

make: Leaving directory `--topdir--/general/reference/project/main/src/a\
\build-<native>'
abuild: build complete
Observe that the previously unbuilt
project-lib.test build item was built
using the check target by this command, and
that all the test suites were run. If your development area has
good test suites, you are encouraged to use a trait to indicate
which items they test as we have done here using the
tester trait. This enables you to run the
test suites of items in your dependency chain. This can give
you significant assurance that everything you depend on is
working the way it is supposed to be each time you start a
development or debugging session.
Suppose you have made a modification to a particular build item,
and you want to make sure the modification doesn't break anyone
who depends on that build item, whether the dependent item is in
the modified item's tree or not. In order to do this, you can
specify the --with-rdeps flag when building the
modified item. This will cause abuild to add all of that
item's reverse dependencies to the build set. For example, this
is the output of running abuild --with-rdeps
in the general/reference/common/lib2/src
directory:
reference-common-lib2-rdeps.out
abuild: build starting
abuild: common-lib1.src (abuild-<native>): no-op
abuild: common-lib3.src (abuild-<native>): no-op
abuild: common-lib2.src (abuild-<native>): no-op
abuild: common-lib2.test (abuild-<native>): no-op
abuild: common-lib3.test (abuild-<native>): no-op
abuild: project-lib.src (abuild-<native>): no-op
abuild: project-main.src (abuild-<native>): no-op
abuild: derived-main.src (abuild-<native>): no-op
abuild: build complete
This includes all direct and indirect reverse dependencies of
common-lib2.src. If you really want to be
make sure that everything that is related to this build item by
dependency in any way is rebuilt, you can use the
--repeat-expansion option as well. This will
repeat the reverse dependency expansion after adding the other
dependencies of your reverse dependencies, and will continue
repeating the expansion until no more items are added. If we
run abuild --with-rdeps --repeat-expansion
no-op from here, we get this output:
reference-common-lib2-rdeps-repeated.out
abuild: build starting
abuild: common-lib1.src (abuild-<native>): no-op
abuild: common-lib1.test (abuild-<native>): no-op
abuild: common-lib3.src (abuild-<native>): no-op
abuild: common-lib2.src (abuild-<native>): no-op
abuild: common-lib2.test (abuild-<native>): no-op
abuild: common-lib3.test (abuild-<native>): no-op
abuild: project-lib.src (abuild-<native>): no-op
abuild: project-lib.test (abuild-<native>): no-op
abuild: project-main.src (abuild-<native>): no-op
abuild: derived-main.src (abuild-<native>): no-op
abuild: build complete
Observe the addition of common-lib1.test
and project-lib.test, which are reverse
dependencies of libraries added to satisfy the dependencies of
some of common-lib2's dependencies! If
that seems confusing, then you probably don't need to worry
about ever using --repeat-expansion! Using
--repeat-expansion with
--with-rdeps will usually a lot of build items
to the build set. In this example, it actually adds every build
item in the forest to the build set. The only build items that
would not be added would be completely independent sets of build
items that happen to exist in the same forest.
Finally, we return to our derived project build tree in
reference/derived. This build tree
declares project as a tree dependency. As
pointed out before, although derived does
not declare common as a tree dependency, it
can still use build items in common because
tree dependencies are transitive. If we run abuild
--build=desc check from
reference/derived, we will see all our
dependencies in common and
project being built (though all are up to
date at this point) before our own test suite is run, and we
will also see that all the items in common
build first, followed by the items in
project, finally followed by the items in
derived. This is the case even though they
are not all descendants of the current directory. This again
illustrates how abuild adds additional items to the build set
as required to satisfy dependencies:
reference-derived-check.out
abuild: build starting
abuild: common-lib1.src (abuild-<native>): all
abuild: common-lib3.src (abuild-<native>): all
abuild: common-lib2.src (abuild-<native>): all
abuild: project-lib.src (abuild-<native>): all
abuild: derived-main.src (abuild-<native>): check
make: Entering directory `--topdir--/general/reference/derived/main/src/\
\abuild-<native>'
Compiling ../main.cpp as C++
Creating main executable

*********************************
STARTING TESTS on ---timestamp---
*********************************


Running ../qtest/main.test
main  1 (testing derived-main)                                 ... PASSED

Overall test suite                                             ... PASSED

TESTS COMPLETE.  Summary:

Total tests: 1
Passes: 1
Failures: 0
Unexpected Passes: 0
Expected Failures: 0
Missing Tests: 0
Extra Tests: 0

make: Leaving directory `--topdir--/general/reference/derived/main/src/a\
\build-<native>'
abuild: build complete
We can also observe that we do not see this behavior with the
special clean target. Both abuild
--clean=desc and abuild
--clean=local produce this output when run from
reference/derived:
reference-derived-clean-local.out
abuild: cleaning derived-main in main
abuild: cleaning derived-main.src in main/src
As another demonstration of the transitive nature of tree
dependencies, run abuild --clean=all from the
root of the derived build tree. That
generates this output:
reference-derived-clean.out
abuild: cleaning common-lib1 in ../common/lib1
abuild: cleaning common-lib1.src in ../common/lib1/src
abuild: cleaning common-lib1.test in ../common/lib1/test
abuild: cleaning common-lib2 in ../common/lib2
abuild: cleaning common-lib2.src in ../common/lib2/src
abuild: cleaning common-lib2.test in ../common/lib2/test
abuild: cleaning common-lib3 in ../common/lib3
abuild: cleaning common-lib3.src in ../common/lib3/src
abuild: cleaning common-lib3.test in ../common/lib3/test
abuild: cleaning derived-main in main
abuild: cleaning derived-main.src in main/src
abuild: cleaning project-lib in ../project/lib
abuild: cleaning project-lib.src in ../project/lib/src
abuild: cleaning project-lib.test in ../project/lib/test
abuild: cleaning project-main in ../project/main
abuild: cleaning project-main.src in ../project/main/src
Here are a few things to notice:
We clean all build items in
commonandprojectas well as inderived.Even build items that don't contain build files are visited.
Build items are cleaned in an order that completely disregards any dependencies that may exist among them.
[17] In retrospect, the term build item set would probably have been a better name for this. Just keep in mind that build sets can be used for both building and cleaning, and that when we use build sets for cleaning, we sometimes call them clean sets instead.
[18]
In abuild 1.0, this was the default behavior, and the
--with-deps option was required in order to
tell abuild to build the dependencies.
[19] This is what the [all] build set did in abuild 1.0. In abuild 1.1, [all] may be more expansive since abuild now actually knows about all trees in the forest, not just those referenced by the current tree.
[20] This is what the [desc] build set did in abuild 1.0. In abuild 1.1, [desc] includes all build items at or below the current directory, but in abuild 1.0, abuild didn't know about those not in the dependency chain of the current tree. This build set is provided so there is an equivalent in abuild 1.1 to every build set from abuild 1.0. There are relatively few reasons to ever use it.
[21] In abuild 1.0, abuild actually passed the clean target to the backend, but abuild version 1.1 handles this clean invocation internally as it does for other clean invocations.
[22]
Stated formally, when abuild is invoked with both
--with-rdeps and
--repeat-expansion, the build set is closed
with respect to forward and reverse dependencies.
[23] In fact, when abuild creates a build order, it starts with a lexically sorted list of build trees and re-orders it as needed so that trees appear in dependency order. Then, within each tree, it does the same with items. The effect is that items build by tree with most referenced trees building earlier and, with each tree, most referenced items building earlier. Ties are resolved by lexical ordering. That said, the exact order of build items, other than that dependencies are built before items that depend on them, should be considered an implementation detail and not relied upon. Also, keep in mind that, in a multithreaded build, the order is not deterministic, other than that no item's build is started before all its dependencies' builds have completed.
[24] The test suites in this example are implemented with QTest, which therefore must be installed for you to run them. See Chapter 10, Integration with Automated Test Frameworks.
Table of Contents
Abuild is integrated with two automated test frameworks: QTest, and JUnit. Additional integrations can be performed with plugins or build item rules or hooks.
Abuild defines three built-in targets for running test suites: check, test, and test-only. The check and test targets are synonyms. Both targets first ensure that a build item is built (by depending on the all target) and then run the build item's test suites, if any. The test-only target also runs a build item's test suite, but it does not depend on all. This means that it will almost certainly fail when run on a clean build tree. The test-only target is useful for times when you know that a build item is already built and you want to run the test suite on what is there now. One case in which you might want to do this would be if you had just started editing some source files and decided you wanted to rerun the test suite on the existing executables before rebuilding them. Another case in which this could be useful is if you had just built a build tree and then wanted to immediately go back and run all the test suites without having to pay the time penalty of checking to make sure each build is up to date. In this case, you could run abuild --build=all test-only immediately after the build was completed. Such a usage style might be appropriate for autobuilders or other systems that build and test a build tree in a controlled environment.
Abuild is integrated with the QTest test framework. The
QTest framework is a perl-based test framework intended to
support a design for testability testing
mentality. Abuild's own test suite is implemented using QTest.
When using either the make or the
Groovy backends, if a directory called
qtest exists, then the
test and check targets will
invoke qtest-driver to run qtest-based test
suites. If a single file with the .testcov
extension exists in the build item directory, abuild will
invoke qtest-driver so that it can find the
test coverage file and activate test coverage support. Note that
abuild runs qtest-driver from the output
directory, so the coverage output files as well as
qtest.log and
qtest-results.xml will appear in that
directory. If you wish to have a qtest-based test suite be
runnable on multiple platforms simultaneously, it's best to avoid
creating temporary files in the qtest
directory. If you wish to use the abuild output directory for
your temporary files, you can retrieve the full path to this
directory by calling the get_start_dir
method of the qtest TestDriver object.
In order to use test coverage, you must add source files to the
TC_SRCS variable in your
Abuild.mk or
Abuild.groovy file. Abuild automatically
exports this into the environment. If you wish to specify a
specific set of tests to run using the TESTS
environment variable, you can pass it to abuild on the command
line as a variable definition (as in abuild check
TESTS=some-test), and abuild will automatically
export it to the environment for qtest.
When performing ant-based builds using
the Groovy framework, if the
java.junitTestsuite property is set to the
name of a class, then the test and
check targets will attempt to run a
JUnit-based test suite. You can also set
java.junitBatchIncludes to a pattern that
matches a list of class files, in which case JUnit tests will be
run from all matching classes. JUnit is not bundled with
abuild, so it is the responsibility of the build tree
maintainer to supply the required JUnit JARs to abuild. The
easiest way to do this is to create a plugin that adds the JUnit
JARs to abuild.classpath.external in a
plugin.interface file. (For more details on
plugins, please see Chapter 29, Enhancing Abuild with Plugins.) You can also
copy the JAR file for a suitable version of JUnit into either
ant's or abuild's lib directory, as any JAR
files in those two locations are automatically added to the
classpath.
Adding support for your additional test frameworks is straightforward and can be done by creating a plugin that adds the appropriate code to the appropriate targets. For make-based items, you must make sure that your tests are run by the check, test, and test-only targets. You also must ensure that your check and test targets depend on all and that your test-only target does not depend on all. For Groovy-based items, you must make sure that your tests are run by the test-only target, and abuild will take care of making sure it is run by the test and check targets. For details on plugins, see Chapter 29, Enhancing Abuild with Plugins. For details on writing make rules, see Section 30.2, “Guidelines for Make Rule Authors”. For details on writing rules for the Groovy backend, see Section 30.3, “Guidelines for Groovy Target Authors”.
Table of Contents
In a large development environment, it is very common for a developer to have a local work area that contains only the parts of the system that he or she is actually working on. Any additional parts of the software that are required in order to satisfy dependencies would be resolved through some kind of outside, read-only reference area. Abuild provides this functionality through the use of backing areas.
Backing areas operate at the build forest level. Any build forest can act as a backing area. If abuild needs to reference a build item that is found in the local forest, it will use that copy of the build item. If abuild can't find an item in the local forest, it will use the backing area to resolve that build item. Since abuild never attempts to build or otherwise modify an item in a backing area, backing areas must always be fully built on all platforms for which they will be used as backing areas. (For additional details on platforms, please see Chapter 5, Target Types, Platform Types, and Platforms.)
A build forest may declare multiple backing areas. To specify
the location of your backing areas, create a file called
Abuild.backing in the root directory of your
build forest. As with the Abuild.conf file,
the Abuild.backing file consists of
colon-separated key/value pairs. The
backing-areas key is followed by a
space-separated list of paths to your backing areas. Backing
area paths may be specified as either absolute or relative paths.
The path you declare as a backing area may point anywhere into
the forest that you wish to use as the backing area. It doesn't
have to point to the root of the forest, and it doesn't have to
point to a place in the forest that corresponds to the root of
your forest.
When one forest declares another forest as a backing area, we say
that the forest backs to its backing area.
Creation and maintenance of backing areas is generally a function
performed by the people who are in charge of maintaining the
overall software baselines. Most developers will just set up
their backing areas according to whatever instructions they are
given. Having an external tool to create your
Abuild.backing file is also reasonable.
Note that Abuild.backing files should not
generally be controlled in a version control system since they
are a property of the developer's work area rather than of the
software baseline. If they are controlled, they should generally
not be visible outside of the developer's work area.
Note
Changing backing area configuration should generally be followed by a clean build. This is also true when a build item is removed from a local build tree and therefore causes the build item with that name to resolve to the copy in backing area. The reason is that changing the location of a build item changes the actual files on which the build target depends. If those dependencies are older than the last build time, even if they were newer than the files they replaced, make and ant will not notice because they use modification time-based dependencies. In other words, any operation that can replace one file with another file in such a way that the new file is not more recent than the last build should be followed by a clean build.
In this section, we will discuss backing areas from a functionality standpoint. This section presents a somewhat simplified view of how backing areas actually work, but it is good enough to cover the normal cases. To understand the exact mechanism that abuild uses to handle backing areas with enough detail to fully understand the subtleties of how they work, please see Section 33.3, “Traversal Details”.
The purpose of a backing area is to enable a developer to create a partially populated build tree and to fall back to a more complete area for build items that are omitted in the local build tree. A build forest may have any number of backing areas, and backing areas may in turn have additional backing areas. There are a few restrictions, however. As with item and tree dependencies, there may be no cycles among backing area relationships. Additionally, if two unrelated backing areas supply items or trees with the same name, this creates an ambiguity, which abuild will consider an error. [25]
When you have one or more backing areas, any reference to a build item or build tree that is not found locally can be resolved in the backing area. What abuild essentially does is to maintain a list of available item and tree names, which it internally maps to locations in the file system. When you using a backing area, abuild uses the backing areas' lookup tables in addition to that from your own forest to resolve items and trees. [26] When a build item or tree is defined in a backing area and is also defined in your local forest, your local forest is said to shadow the item or tree. This is not an error. It is a normal case that happens when you are using backing areas. In most cases, your build forest will contain items that either exist now in the backing area or will exist there at some future point. This is because the backing area generally represents a more stable version of whatever project you are working on.
Note that since abuild refers to build items and trees by name
and not by path, there are no restrictions about the location of
build items in the local forest relative to where they appear in
the backing area. This makes it possible for you to reorganize
the build items or even the build trees in your local area
without having to simultaneously change the backing area. There
is only way in which use of backing areas affects how abuild
resolves paths: if a directory named in a
child-dirs key in some
Abuild.conf does not exist and the forest
has a backing area, abuild will ignore the non-existence of the
child directory. (If you run with --verbose, it
will mention that it is ignoring the directory, but otherwise,
you won't be bothered with this detail.) This enables you to
create sparsely populated build items without having to edit
Abuild.conf files of the parents of the
directories you have chosen to omit.
If this seems confusing, the best way to think about it is in terms of how this all interacts with a version control system. Typically, there is some master copy of the source code of a project in a version control system. There may be some stable trunk or branch in the version control system that is expected to be self-contained and operational. This is what would typically be checked out into a forest that would be fully built and used by others as a backing area. Then, individual developers would just check out the pieces of the system that they are working on, and set their backing area to point to the stable area. Since their checkouts would be sparse, there may be child directories that don't exist, but it wouldn't matter; once they check in their changes and the stable area from which the backing area is created gets updated, everything should be normal.
One side effect of this is that if you remove the directory
containing a build item or tree from your local forest while
using a backing area that still contains that item or tree, the
thing you removed doesn't really go away from abuild's
perspective. Instead, it just “moves” from the local
build tree to the backing area. If it is actually your intention
to remove the build item so that its name is
not known to other build items in your build tree, you can do
this by adding the name of the build item to the
deleted-items key or the build tree to the
deleted-trees key of your
Abuild.backing file. This effectively
blocks abuild from resolving items or trees with those names
from the backing area. Most users will probably never use this
feature and don't even need to know it exists, but it can be very
useful under certain circumstances. When you tell abuild to
ignore a tree in this way, it actually blocks abuild from
seeing any items defined in the deleted tree. If you wanted to,
you could create a new tree locally with the same name as the
deleted tree, and the new tree and the old tree would be
completely separate from each other. We present an example that
illustrates the use of the deleted-item key
in Section 11.5, “Deleted Build Item”.
In plain English, abuild guarantees that if
A depends on B and
B depends on C,
A and B see the
same copy of C. To be more precise,
abuild checks to make sure that no build item in a backing area
references as a dependency or plugin an item that is shadowed in
the local forest. (Plugins are covered in Chapter 29, Enhancing Abuild with Plugins.)
We illustrate this in Figure 11.1, “Shadowed Dependency”.
Suppose that build items A,
B, and C are
defined in build tree T2 and that
A depends on B and
B depends on C.
Now suppose you have a local build tree called
T1 that has T2 as its
backing area, and that you have build items
A and C copied
locally into T1, but that
B is resolved in the backing area.
Figure 11.1. Shadowed Dependency
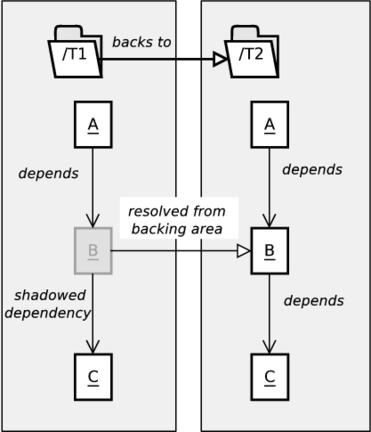
A in /T1 sees
B in /T2 and
C in /T1, but
B in /T2 sees
C in /T2. This
means A in /T1
builds with two different copies of C.
If you were to attempt to build A,
A would refer to files in
B, which comes from a backing area.
B would therefore already be built, and it
would have been built with the copy of C
from the backing area. A, on the other
hand, would see C in the local build tree.
That means that A is indirectly using two
different copies of C. Depending on what
changes were made to C in the local build
tree, this would likely cause the build of
A to be unreproducible at best and
completely broken at worst. The situation of
B coming from a backing area and depending
on C, which is shadowed locally, is what
we mean when we say that B has shadowed
dependencies. If you attempt to build in this situation,
abuild will provide a detailed error message telling you which
build items are shadowed and which other build items depend on
them. One way to resolve this would be to copy the shadowed
build items into your local build tree. In this case, that would
mean copying B into
T1. Another way to resolve it would be to
remove C from your local area and allow
that to be resolved in the backing area as well. This solution
would obviously only be suitable if you were not working on
C anymore.
In this example, we'll demonstrate a task branch. Suppose our
task branch makes changes to project but not
to common or derived.
We can set up a new build forest in which to do our work. We
would populate this build forest with whatever parts of
project we wanted to modify. We have set up
this forest in doc/example/general/task.
Additionally, we have set this forest's backing area to
../reference so that it would resolve any
missing build items or trees to that location:
general/task/Abuild.backing
backing-areas: ../reference
Note that, although we used a relative path for our backing area
in this example, we would ordinarily set our backing area to an
absolute path. We use a relative path here only so that the
examples can remain independent of the location of
doc/example. Since we are not making
modifications to any build items in common
or derived, we don't have to include those
build trees in our task branch. Note that our forest root
Abuild.conf still lists
common and derived as
children, since it is just a copy of the root
Abuild.conf from reference:
general/task/Abuild.conf
child-dirs: common project derived
Since this forest has a backing area, abuild ignores the fact
that the common and
derived directories do not exist. For a
diagram of the task branch build trees, see Figure 11.2, “Build Trees in general/task”.
Figure 11.2. Build Trees in general/task
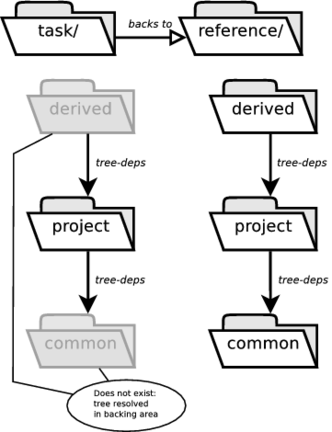
The derived build tree declares a tree
dependency on the project build tree.
The project build tree declares a tree
dependency on the common build tree.
Since the common and
derived build trees are not shadowed in
the task branch, those trees are
resolved in the backing area, reference,
instead.
As always, for this example to work properly, our
backing area must be fully built. If you are following along, to
make sure this is the case, you should run abuild
--build=all in reference/derived.
Next run abuild --build=deptrees no-op in
task/project. This generates the following
output:
task-project-no-op.out
abuild: build starting
abuild: project-lib.src (abuild-<native>): no-op
abuild: project-lib.test (abuild-<native>): no-op
abuild: project-main.src (abuild-<native>): no-op
abuild: build complete
This includes only items in our task branch. No items in our backing area are included because abuild never attempts to build or modify build items in backing areas.
If you study include/ProjectLib.hpp and
src/ProjectLib.cpp in
task/project/lib in comparison to their
counterparts in reference/project/lib, you'll
notice that the only change we made in this task branch is the
addition of an optional parameter to
ProjectLib's constructor. We also updated the
test suite to pass a different argument to
ProjectLib. This new value comes from a new
build item we added: project-lib.extra. To
add the new build item, we created
task/project/lib/extra/Abuild.conf:
and also added the extra directory in
task/project/lib/Abuild.conf:
general/task/project/lib/extra/Abuild.conf
name: project-lib.extra
platform-types: native
general/task/project/lib/Abuild.conf
name: project-lib
child-dirs: src test extra
deps: project-lib.src
We didn't modify anything under
task/project/main at all, but we included it
in our task branch so we could run its test suite. Remember that
abuild won't try to build the copy of
project-main there, and even if it did,
that copy of project-main would not see
our local copy of project-lib: it would
see the copy in its own local build tree, which we have shadowed.
This is an example of a shadowed dependency as described in Section 11.3, “Integrity Checks”. This is the output we see when
running abuild --build=deptrees check from
task/project:
task-project-check.out
abuild: build starting
abuild: project-lib.src (abuild-<native>): check
make: Entering directory `--topdir--/general/task/project/lib/src/abuild\
\-<native>'
Compiling ../ProjectLib.cpp as C++
Creating project-lib library
make: Leaving directory `--topdir--/general/task/project/lib/src/abuild-\
\<native>'
abuild: project-lib.test (abuild-<native>): check
make: Entering directory `--topdir--/general/task/project/lib/test/abuil\
\d-<native>'
Compiling ../main.cpp as C++
Creating lib_test executable

*********************************
STARTING TESTS on ---timestamp---
*********************************


Running ../qtest/lib.test
lib  1 (test lib class)                                        ... PASSED

Overall test suite                                             ... PASSED

TESTS COMPLETE.  Summary:

Total tests: 1
Passes: 1
Failures: 0
Unexpected Passes: 0
Expected Failures: 0
Missing Tests: 0
Extra Tests: 0

make: Leaving directory `--topdir--/general/task/project/lib/test/abuild\
\-<native>'
abuild: project-main.src (abuild-<native>): check
make: Entering directory `--topdir--/general/task/project/main/src/abuil\
\d-<native>'
Compiling ../main.cpp as C++
Creating main executable

*********************************
STARTING TESTS on ---timestamp---
*********************************


Running ../qtest/main.test
main  1 (testing project-main)                                 ... PASSED

Overall test suite                                             ... PASSED

TESTS COMPLETE.  Summary:

Total tests: 1
Passes: 1
Failures: 0
Unexpected Passes: 0
Expected Failures: 0
Missing Tests: 0
Extra Tests: 0

make: Leaving directory `--topdir--/general/task/project/main/src/abuild\
\-<native>'
abuild: build complete
As with the no-op build, we only see output relating to local build items, not to build items in our backing areas as they are assumed to be already built.
Here we present a new forest located under
doc/example/general/user. This forest backs
to the task forest from the previous
example. We will use this forest to illustrate the use of the
deleted-item key in the
Abuild.backing.
Suppose we have a user who is working on changes that are related
in some way to the task branch. We want to create a user branch
that backs to the task branch. Our user branch contains all
three trees: common,
project, and derived.
We will ignore derived for the moment and
focus only common and
project. For a diagram of the user build
trees, see Figure 11.3, “Build Trees in general/user”.
Figure 11.3. Build Trees in general/user
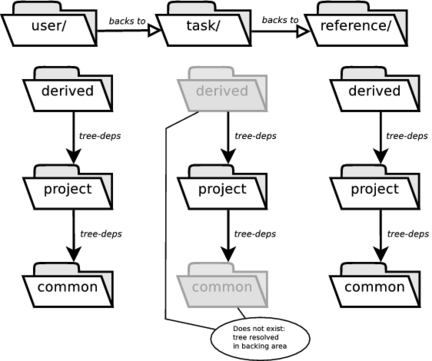
The user forest backs to the
task forest. All trees are present, so
they all resolve locally.
Observe that common contains only the
lib1 directory and that
project contains only the
lib directory. We make a gratuitous change
to a source file in common-lib1.src just
as another example of shadowing a build item from our backing
area.
In project, we have made changes to
project-lib to make use of private
interfaces, which we discuss in Chapter 23, Interface Flags and will ignore for the moment.
We have also deleted the new build item
project-lib.extra that we added in the
task branch. To delete the build item, we removed the
extra directory from
project/lib and from the
child-dirs key in
project/lib/Abuild.conf:
general/user/project/lib/Abuild.conf
name: project-lib
child-dirs: src test
deps: project-lib.src
That in itself was not sufficient since, even though the
extra directory is no longer present in the
child-dirs key of
project-lib's
Abuild.conf, we would just inherit
project-lib.extra from our backing area.
To really delete the build item, we also had to add a
deleted-item key in
user/Abuild.backing:
general/user/Abuild.backing
backing-areas: ../task
deleted-items: project-lib.extra
This has effectively prevented abuild from looking for
project-lib.extra in the backing area. If
any build item in the local tree references
project-lib.extra, an error will be
reported because abuild now considers that to be an unknown
build item.
Although we don't present any examples of using deleted-tree, it works in a very similar fashion. Ordinarily, any build tree you do not have locally will be inherited from the backing area. If your intention is to change the code so that it no longer uses a particular tree, and you want to make sure that that tree is not available at all in your local area, you can delete it using deleted-tree. However, if you simply remove it from all your tree-deps directives, there is no risk of your using its items by accident. As such, most people will probably never need to use the deleted-tree feature.
[25]
What do we mean by “unrelated” backing areas? If
your build forest declares A and
B to be backing areas and
A backs to B,
abuild will notice this relationship and will ignore your
mention of B as a backing area. You will
still inherit items from B, but you will
do so through A instead of getting them
directly. Abuild doesn't consider this to be an error or
even a warning since, for all you know, A
and B may be independent, and
A may be using B on a
temporary or experimental basis. However, if you really want
to know, abuild will tell you that it is ignoring
B when you run it with the
--verbose flag.
[26] The actual implementation differs from this description, but the effect is the same. For the real story, see Section 33.3, “Traversal Details”.
One of the significant defining features of abuild is that it will automatically build items to satisfy dependencies. Most of the time, this is useful and helpful behavior, but there are certain cases in which it can actually get in the way. For example, you may have one build tree that provides common code, which you may want to build manually in advance of building everything else. Then you may want to kick off parallel builds of separate dependent trees on multiple platforms simultaneously and be able to be sure that they won't step on each other by all trying to build the shared tree at the same time. In cases like this, you might want to tell abuild to assume the shared tree is built and to treat it as read-only.
To support this and similar scenarios, abuild allows you to
explicitly designate specific paths as read-only on the command
line.
[27]
Most of the time, specifying a read-only path is as simple as
invoking abuild with the
--ro-path=
option for the directory you want to treat as read-only. There
may cases, however, where you want a much more specific degree of
control. When you need it, it's there. Here we describe the
exact behavior of the directory--ro-path and
--rw-path options.
Both
--ro-path=anddir--rw-path=may appear multiple times.dirIf neither option appears, all build items are writable. (Except those in backing areas; backing areas are always read-only.)
If only
--ro-pathappears, build items are writable by default, and only those located under any specified read-only path are read-only.If only
--rw-pathappears, build items are read-only by default, and only build items located under a directory specified with--rw-pathare writable.If both
--ro-pathand--rw-pathare specified:Either every
--ro-pathmust be a path under some--rw-path, in which case build items are read-only by default,or every
--rw-pathmust be path under some--ro-path, in which case build items are writable by default.
In this case, the writability of items is determined by the lowest directory actually specified (start with the item's directory and walk up the file system until you find a directory explicitly mentioned), using the default of none is found.
This seems more complicated than it really is, so let's look at a
simple example. Suppose you have the directory structure
a/b/c/d. If you specified
--ro-path=a/b --rw-path=a/b/c, all read/write
paths are under some read only path, so build items are writable
by default. Everything under a/b/c is
writable, and everything under a/b that is
not under a/b/c is
read-only. Use of --ro-path and
--rw-path together basically lets you make a
particular area read only and then give exceptions. Likewise, you
can make everything read-only by default, and then make only a
specific directory read-write, again make exceptions to that.
These rules make it possible to unambiguously create any combination of read-only/writable build items without having the order of the arguments matter. If you're sufficiently determined, you can use this mechanism to precisely control which items should be read-only and which should be writable.
Paths specified may be absolute or relative. Relative paths are
resolved relative to the starting directory of abuild. They are
converted internally to absolute paths after any -C
option is
evaluated.
start-directory
[27] In abuild 1.0, we had a different mechanism for addressing this need: read-only externals. There were several problems with read-only externals, though: they were ambiguous since whether a tree was read-only or not would depend on how abuild came to know about it through other trees, they were not granular as you could only control this at the tree level, and they were inflexible: you might set them up to address the needs of a particular build, and then have them get in the way of other builds. When externals were replaced by named trees and tree dependencies, we dropped support for read-only externals and replaced them with read-only paths, which are much more flexible and which make the decision a function of the specific build rather than of the build trees, as it always should have been.
Table of Contents
This chapter presents full detail about how to invoke abuild from the command line. Some of functionality described here is explained in the chapters of Part III, “Advanced Functionality”.
When running abuild, the basic invocation syntax is as follows:
abuild [options] [definitions] [targets]
Options, definitions, and targets may appear in any order. Any
argument that starts with a dash
(“-”) is treated as an option. Any
option of the form VAR=value is considered to be
a definition. Anything else is considered to be a target.
Arguments of the form VAR=value are variable or
parameter definitions. Variables defined in this way are made
available to all backends. These can be used to override the
value of interface variables or variables set in backend build
files.
For the make backend, these variable definitions are just passed along to make.
For the Groovy backend, these
variables are stored in a manner such that
abuild.resolve will give them precedence
over normal parameters or interface variables. They are also
defined as properties in the ant project.
For the deprecated xml-based ant framework, these definitions are made available as ant properties that are defined prior to reading any generated or user-provided files.
These options print information and exit without building anything.
- --dump-build-graph
Dump to standard output the complete build graph consisting of items and platforms. This is primarily useful for debugging abuild or diagnosing unusual problems relating to which items are built in which order. The build graph output data conforms to a DTD which can be found in
doc/build_graph.dtdin the abuild distribution. The contents of the DTD can also be found in Appendix H,--dump-build-graphFormat. Although nothing is built when this option is specified, abuild still performs complete validation including reading of all the interface files. The build graph is discussed in Section 33.6, “Construction of the Build Graph”. For additional ways to use the build graph output, see also Chapter 32, Sample XSL-T Scripts.- --dump-data
Dump to standard output all information computed by abuild. Useful for debugging or for tools that need in-depth information about what abuild knows.
--dump-datais mutually exclusive with running any targets. If you need to see--dump-dataoutput and build targets at the same time, use--monitoredinstead (see Chapter 31, Monitored Mode). For details about the format generated by--dump-data, please see Appendix F,--dump-dataFormat. For additional ways to use the build graph output, see also Chapter 32, Sample XSL-T Scripts.- --find item-name
Print the name of the tree that contains item
item-name, and also print its location.- --find=tree:tree-name
Print the location of the root build item of build tree
tree-name.- --help|-H
Print a brief introduction to abuild's help system. For additional details, see Chapter 8, Help System. For the text of all help files that are provided with abuild, see Appendix E, Online Help Files.
- --list-platforms
Print the names of all object-code platforms categorized by platform type and build tree, and indicate which ones would be built by default. Note that abuild may build on additional platforms beyond those selected by default in order to satisfy dependencies from other items.
- --list-traits
Print the names of all traits known in the local build tree, its tree dependencies, and its backing areas. This is the list of traits that are available for use on the command line with the
--only-with-traitsand--related-by-traitsoptions.- --print-abuild-top
Print the path to the top of abuild's installation.
- -V|--version
Print the version number of abuild.
These options change some aspect of how abuild starts or runs.
- -C start-directory
Change directories to the given directory before building.
- --clean-platforms=pattern
Specify a pattern that restricts which platform directories are removed by any abuild clean operation. This argument may be repeated any number of times. The
patterngiven can be any valid shell-style wild-card expression. Any output directory belonging to any pattern that matches any of the given clean patterns will be removed. All other output directories will be left alone. This can be useful for removing only output directories for platforms we no longer care about or for other selective cleanup operations.- --compat-level=version
Set abuild's compatibility level to the specified version, which may be either
1.0or1.1. You may also place the compatibility level version in theABUILD_COMPAT_LEVELenvironment variable. By default, early pre-release versions of abuild attempt to detect deprecated constructs from older versions and issue warnings about their use, while final versions operate with deprecation support disabled by default. Setting the compatibility level to a given version causes abuild to not recognize constructs deprecated by that version at all. For example, in compatibility level1.1, use of the this key inAbuild.confwould result in an error about an unknown key rather than being treated as if it were name, and the make variableBUILD_ITEM_RULESwould be treated like any ordinary variable and would not influence the build in any way. See also--deprecation-is-error.- --deprecation-is-error
Ordinarily, abuild detects deprecated constructs, issues warnings about them, and continues operating by mapping deprecated constructs into their intended replacements. When this option is specified, any use of deprecated constructs are detected and reported as errors instead of warnings. Note that this is subtly different from specifying
--compat-levelwith the current major and minor versions of abuild. For example, if--deprecation-is-erroris specified, use of the make variableBUILD_ITEM_RULESwill result in an error message, while if--compat-level=1.1is specified, the variable will simply be ignored. A good upgrade strategy is to use--deprecation-is-errorto first test to make sure you've successfully eliminated all deprecated constructs, and then to use--compat-level(or to set theABUILD_COMPAT_LEVELenvironment variable) to turn off abuild's backward compatibility support, if desired.- -e | --emacs
Tell ant to run in emacs mode by passing the
-eflag to it and also setting the propertyabuild.private.emacs-mode. Ant targets can use this information to pass to programs whose output may need to be dependent upon whether or not emacs mode is in effect.- --find-conf
Locates the first directory at or above the current directory that contains an
Abuild.conffile, and changes directories to that location before building.- --full-integrity
Performs abuild's integrity checks for all items in the local tree, tree dependencies, and backing areas. Ordinarily, abuild performs its integrity check only for items that are being built in the current build. The
--full-integrityflag would generally be useful only for people who are maintaining backing areas that are used by other people. For detailed information about abuild's integrity checks, please see Section 11.3, “Integrity Checks”.- -jn| --jobs=n
Build up to n build items in parallel by invoking up to n simultaneous instances of the backend. Does not cause the backend to run multiple jobs in parallel. See also
--make-jobs.- --jvm-append-args ... --end-jvm-args
Appends any arguments between
--jvm-append-argsand--end-jvm-argsto the list of extra arguments that abuild passes to the JVM when it invokes the java builder backend. This option is intended for use in debugging abuild. If you have to use it to make your build work, please report this as a bug.- --jvm-replace-args ... --end-jvm-args
Replaces abuild's internal list of extra JVM arguments with any arguments between
--jvm-replace-argsand--end-jvm-args. This option is intended for use in debugging abuild. If you have to use it to make your build work, please report this as a bug.- -k | --keep-going
Don't stop the build after the first failed build item, but instead continue building additional build items that don't depend on any failed items. Also tells backend to continue after its first failure. Even with
-k, abuild will never try to build an item if any of its dependencies failed. This behavior may be changed by also specifying--no-dep-failures.- --make
Terminate argument parsing and pass all remaining arguments to make. Intended primarily for debugging.
- --make-jobs[=n]
Allow make to run up to n jobs in parallel. Omit n to allow make to run as many jobs as it wants. Be aware that if this option is used in combination with
--jobs, the total number of threads could potentially be the product of the two numerical arguments.Note that certain types of make rules and certain may cause problems for parallel builds. For example, if your build involves invoking a compiler or other tool that writes poorly named temporary files, it's possible that two simultaneous invocations of that tool may interfere with each other. Starting with abuild 1.1, it is possible to place attributes: serial in a make-based build item's
Abuild.conffile to prevent--make-jobsfrom applying to that specific item. This will force serial compilation of items that you know don't build properly in parallel. This can be useful for build items that use theautoconfrules, which are known to sometimes cause trouble for parallel builds.- --monitored
Run in monitored mode. For details, see Chapter 31, Monitored Mode.
- -n
Have the backend print what it would do without actually doing it.
- --no-dep-failures
Must be combined with
-k. By default, abuild does not attempt to build any items whose dependencies have failed even if-kis specified. When the--no-dep-failuresoption is specified along with-k, abuild will attempt to build items even if one or more of their dependencies have failed. Using-kand--no-dep-failurestogether enables abuild to attempt to build everything that the backends will allow. Note that cascading errors (i.e., errors resulting from earlier errors) are likely when this option is used.- --platform-selector=selector | -p selector
Specify a platform selector. This argument may be repeated any number of times. Later instances supersede earlier ones when they specify selection criteria for the same platform type. When two selectors refer to different platform types, both selectors are used. Platform selectors may also be given in the
ABUILD_PLATFORM_SELECTORSenvironment variable. For details on platform selectors, see Section 24.1, “Platform Selection”.- --ro-path=path
Indicate that
pathis to be treated as read-only by abuild during build or clean operations. For details on using explicitly read-only and read/write paths, see Chapter 12, Explicit Read-Only and Read/Write Paths.- --rw-path=path
Indicate that
pathis to be treated as read-write by abuild during build or clean operations. For details on using explicitly read-only and read/write paths, see Chapter 12, Explicit Read-Only and Read/Write Paths.
These options change the type of output that abuild generates.
- --buffered-output
Cause abuild to buffer the output produced by each individual item's build and display it contiguously after that build completes. For additional details, see Chapter 20, Controlling and Processing Abuild's Output.
- --error-prefix=prefix
Prepend the given prefix string to every error message generated by abuild and to every line written to standard error by any program abuild invokes. See also
--output-prefix. For additional details, see Chapter 20, Controlling and Processing Abuild's Output.- --interleaved-output
In a multithreaded build, cause abuild to prepend each line of output (normal or error) with an indicator of the build item that was responsible for producing it. Starting in abuild version 1.1.3, this is the default for multithreaded builds. For additional details, see Chapter 20, Controlling and Processing Abuild's Output.
- --output-prefix=prefix
Prepend the given prefix string to every line of non-error output generated by abuild and to every line written to standard output by any program abuild invokes. See also
--error-prefix. For additional details, see Chapter 20, Controlling and Processing Abuild's Output.- --raw-output
Prevent abuild from doing any kind of capture or filtering of the output produced by any item's build. This option also makes abuild's standard input available to any program that abuild invokes. This is the default for single-threaded builds and was the behavior for all builds prior to abuild version 1.1.3. For additional details, see Chapter 20, Controlling and Processing Abuild's Output.
- --silent
Suppress most non-error output. Also tells the backend build tools to generate less output.
- --verbose
Generate more verbose output. Also tells the backend build tools to generate more output.
These options tell abuild what to build and what targets to apply to items being built.
- --apply-targets-to-deps
Ordinarily, any explicitly specified targets are applied only to items that were directly selected for inclusion in the build set. With this flag, they are applied to all items being built, including recursively expanded dependencies. When used with a clean set, this option causes the clean set to expanded to include dependencies, which is otherwise not done. For detailed information about target selection, please see Chapter 9, Telling Abuild What to Build.
- --build=set | -b set
Specify which build items should be built. The default is to use the build set
current, which builds the current item and all of its dependencies. For additional details including a list of valid values forset, see Chapter 9, Telling Abuild What to Build.- --clean=set | -c set
Run abuild clean in all items in the build set. The same build sets are defined as with the
--buildoption. Unlike build sets, clean sets are not expanded to include dependencies (unless--apply-targets-to-depsis specified), and build items are not cleaned in dependency order. No targets may be specified in conjunction with this option. For additional details including a list of valid values forset, see Chapter 9, Telling Abuild What to Build. See also the description of the--clean-platforms(in Section 13.4, “Control Options”) to learn about restricting which platform directories are removed.- --dump-interfaces
Cause abuild to create interface dump files in the output directories of every writable build item, including those that don't build anything. This option can be useful for tracking down problems with interface variables. For more information, see Section 17.6, “Debugging Interface Issues”.
- --no-deps
Prevent abuild from attempting to build any dependencies of the current build item before building the item itself. The
--no-depsoption may not be combined with a build set.- --only-with-traits=trait[,trait,...]
Exclude from the initial build set any items that do not contain all of the named traits. As always, all dependencies of any item in the reduced build set will remain in the build set regardless of what traits they have. If not accompanied by the
--related-by-traitsoption, any explicitly named targets will be applied only to items that have all of the named traits. Other items (those they depend on) will be built with the default all target. If accompanied by the--related-by-traitsoption, the--related-by-traitsoption's behavior with respect to explicit targets takes precedence. For more information about traits, see Section 9.5, “Traits”.- --related-by-traits=trait[,trait,...]
Expand the build set with items that have all of the named traits relative to any item already in the build set. Specifying this option also causes any explicitly specified targets to be run only for those items. The default target all is run for all other build items in the build set. For more information about traits, see Section 9.5, “Traits”. When combined with
--repeat-expansion, this process is repeated until no more items are added.- --repeat-expansion
Instruct abuild to apply build set expansion based on traits (
--related-by-traits) or or reverse dependencies (--with-rdeps) repeatedly after adding dependencies of newly added items until no further expansion of the build set results.- --with-rdeps
Expand the build set by adding all reverse dependencies of any item already in the build set. As always, any additional dependencies of newly added items are also added. When specified with
--repeat-expansion, addition of reverse dependencies is repeated (after adding additional dependencies) until no further expansion of the build set results.
Abuild's backends define several targets that are available for use from the command line, so you can rely on these targets being defined. [28]
- all
This is the default target. It is used to build all products that are intended for use by the end user or by other build items.
- check
This target ensures that the local build item is built and then runs its automated test suite, if any. For this to do anything, the build item must have a test suite implemented with a test framework that is integrated with abuild or that is made available with a plugin. Abuild is integrated with QTest and, for Java-based build items, also with JUnit. The check target is not automatically run by the default target; it must be requested specifically.
- clean
This target removes any output directories that abuild thinks it created. (Output directories are discussed in Section 5.3, “Output Directories”.) Well-behaved abuild rules, including all the rules that are a standard part of abuild, won't create any files or directories outside of these locations. See also the description of the
--clean-platforms(in Section 13.4, “Control Options”) to learn about restricting which platform directories are removed.- doc
This target is provided for building documentation that is extracted from source code. The doc target is not automatically run by the default target; it must be requested explicitly. It depends on the all target. There is no internal support for document generation in the make backend, so this capability must be provided by a plugin. For Groovy/ant builds, there is built-in support for javadoc, but it is minimal and will likely have to be supplemented for any major documentation effort. A contributed plugins to support doxygen is available in
abuild-contrib, which is released separately from abuild.- no-op
This target does nothing other than printing the name and platform of each build item in the build set, but using it still causes abuild to perform all the same validations it would perform if it were going to build something. The no-op target can be used to get a complete list of all the items and platforms that would be built if building a given build set and will also verify that there are no errors in any
Abuild.conffiles. Note thatAbuild.interfacefiles are not read when invoking the no-op target.- test
This target is a synonym for check.
- test-only
This target runs any automated test suites but does not first try to build. In other words, the test-only target does not depend on the all target like the check and test targets do. This can be useful for running a test suite on a build item without first rebuilding it or for running all the test suites on a build tree that you know is up to date because you just built it.
[28]
When the Abuild-ant.xml build file is used
with the deprecated xml-based ant backend, it is up to the
author of the build file to provide these targets, and all bets
are off.
By now, you should have a pretty good feel for what abuild can do and how to use it in several situations. The remaining chapters of this document cover advanced topics and present examples for solving a wide variety of problems. Although later chapters sometimes build on information presented in earlier chapters, many of the remaining chapters and examples can probably be understood on their own. It should therefore be safe to focus your attention on the material that is of interest or potential use to you.
Part III, “Advanced Functionality” opens with detailed descriptions of abuild's configuration files and interface subsystem. It then continues with explorations of several specific problems. We present here a brief list of problems that are addressed in the remaining chapters:
- Controlling and Processing Abuild's Output
Abuild's output is primary intended to be useful to human readers, but there are a number of capabilities (introduced in version 1.1.3) that can make it easier to programmatically parse abuild's output or to help make it easier to look at the output of a large build. In Chapter 20, Controlling and Processing Abuild's Output, we discuss ways to distinguish normal output from error messages and ways to clearly associate each line of abuild's output with the build item whose build produced it.
- Shared Libraries
Abuild includes support for creating shared libraries on UNIX platforms and DLLs on Windows platforms. In Chapter 21, Shared Libraries, we describe the process and explore some of the other concerns you have to consider when using shared libraries with abuild.
- Build Item Rules and Code Generators
Abuild allows build items to supply custom rules, most often for supporting automatic code generation. In Chapter 22, Build Item Rules and Automatically Generated Code , we discuss code generators for make-based and Groovy-based builds.
- Private Interfaces
In general, abuild is designed such that all build item interfaces automatically inherit through the dependency chain. There are some cases when it may be desirable for a build item to have an expanded interface that is available to certain build items upon request. In Chapter 23, Interface Flags, we introduce a feature of abuild designed to solve this problem and present an example of using it to implement private interfaces.
- Cross-Platform Development
Abuild's platform system is designed to make building on multiple platforms as easy as possible. If a build item can be built on multiple platforms, abuild will generally sort out all the details of which build of one item another item should depend on. There are times, however, when it is necessary to take control over this behavior. We discuss this problem in Chapter 24, Cross-Platform Support.
- Mixed Classification Development
We all know that security is increasingly important in the software community. In some cases, it may be necessary to create collections of software that are only allowed to run or even exist in secure environments. In Chapter 25, Build Item Visibility, we describe how to use abuild's build item visibility feature along with tree dependencies to create a mixed classification development environment, and we present an example that illustrates one implementation strategy.
- Whole Library Support
Ordinarily, when an application links with a library, only functions that are actually called are linked into the executable. On platforms that support this, abuild allows you to specify that the entire contents of a library archive should be included in an executable. In Chapter 26, Linking With Whole Libraries, we describe why you might want to do this and how to do it.
- Opaque Wrappers
Some development problems require one interface to be created that opaquely hides another interface. Since abuild's default behavior is to make all interfaces inherit through the dependency chain, special constructs are required to implement opaque wrappers. In Chapter 27, Opaque Wrappers, we present the mechanisms required to make this work.
- Optional Dependencies
The goal of loose integration between software components can often be best served by allowing different components to make themselves known to the system at runtime. However, there are instances in which a tighter, compile-time integration may be required with optional components. In Chapter 28, Optional Dependencies, will illustrate how abuild allows you to declare tree and item dependencies as optional and then create code that is conditional upon whether the optional dependency is satisfied.
- Plugins
There are certain tasks that go beyond simply building targets and making them available. Examples include adding support for new compilers and performing extra validations that go beyond what can be easily expressed using abuild's built-in mechanisms. In Chapter 29, Enhancing Abuild with Plugins, we present a plugin framework that can be used to extend abuild in certain ways.
In addition to the above topics, we explore some details of how abuild works behind the scenes and present guidelines for how to use abuild in the safest and most effective way. The table of contents at the beginning of Part III, “Advanced Functionality” includes a complete list of chapters, and each chapter starts with some introductory text that describes the material it covers.
In this part of the manual, we cover the remaining information about abuild's features in detail. This part contains complete reference guides to abuild's configuration files, discussions of more advanced topics, and numerous examples to illustrate how to solve specific build problems with abuild. By the end of this part, you should be able to use abuild for a wide range of build problems.
Table of Contents
- 15. The
Abuild.confFile - 16. The
Abuild.backingFile - 17. The Abuild Interface System
- 18. The GNU Make backend
- 19. The Groovy Backend
- 19.1. A Crash Course in Groovy
- 19.2. The
Abuild.groovyFile - 19.3. Directory Structure for Java Builds
- 19.4. Class Paths and Class Path Variables
- 19.5. Basic Java Rules Functionality
- 19.6. Advanced Customization of Java Rules
- 19.7. The Abuild Groovy Environment
- 19.8. Using QTest With the Groovy Backend
- 19.9. Groovy Rules
- 19.10. Additional Information for Rule Authors
- 20. Controlling and Processing Abuild's Output
- 21. Shared Libraries
- 22. Build Item Rules and Automatically Generated Code
- 23. Interface Flags
- 24. Cross-Platform Support
- 25. Build Item Visibility
- 26. Linking With Whole Libraries
- 27. Opaque Wrappers
- 28. Optional Dependencies
- 29. Enhancing Abuild with Plugins
- 30. Best Practices
- 31. Monitored Mode
- 32. Sample XSL-T Scripts
- 33. Abuild Internals
- 33.1. Avoiding Recursive Make
- 33.2. Starting Abuild in an Output Directory
- 33.3. Traversal Details
- 33.4. Compatibility Framework
- 33.5. Construction of the Build Set
- 33.6. Construction of the Build Graph
- 33.7. Implementation of the Abuild Interface System
- 33.8. Loading Abuild Interfaces
- 33.9. Parameter Block Implementation
Table of Contents
The Abuild.conf file is the fundamental
configuration file that describes each build item and the
relationships between build items. It contains information about
dependencies, file system locations, and platform support. It
explicitly does not contain any information about how to build a
particular build item or what targets are built.
Every build item must contain Abuild.conf.
The Abuild.conf file is a simple text file
consisting of colon-separated key/value pairs. Blank lines and
lines that start with # are ignored. Long
lines may be continued to the next line by ending them with a
backslash character (\). Certain keys are
permitted for some kinds of build items and not for others. For a
discussion of different types of build items, please see Section 4.5, “Special Types of Build Items”.
The following keys are supported in
Abuild.conf:
- attributes
This is a “catch-all” key whose value is a list of white-space separate keywords that assign certain specific attributes to a build item. The following attributes are supported:
serial: valid only for build items that are built using the make backend, where it prevents the
--make-jobsoption from applying to that build item, effectively forcing it to build serially
- build-also
This key contains a list of whitespace-separated build items. Whenever abuild adds a given item to a build set, it also adds any items listed in its build-also key to the build set. No dependency relationship or any other relationship is implied. This is useful for creating pseudo-top-level build items that serve as starting points for multiple builds.
- child-dirs
This key is used to specify all subdirectories of this item that contain additional
Abuild.conffiles. The value is a whitespace-separated list of relative paths, each of which must point down in the file system.A child directory may be followed by the
-optionalflag, in which case abuild will not complain if the directory doesn't exist. This can be especially useful for high-levelAbuild.conffiles whose children may correspond to optional dependencies, optional build trees, or self-contained trees that may or may not be included in a particular configuration.If a child directory contains more than one path element, the intermediate directories may not contain their own
Abuild.conffiles. (In other words, you can't skip over a directory that has anAbuild.conffile in it.)- deps
This key's value is a whitespace-separated list of the names of build items on which this build item depends. This is the sole mechanism within abuild to specify inter-build-item dependencies. Any dependency in this list may be optionally followed by one or more
-flag=arguments. This causes theinterface-flaginterface-flaginterface flag to be set when this build item reads the interface of the dependency (see Chapter 23, Interface Flags). It is also possible to specify a-platform=option to a dependency to specify which of the dependency's platforms applies to this dependency (see Section 24.3, “Explicit Cross-Platform Dependencies”). Dependencies may be specified as optional by following the dependency name with theselector-optionalflag (see Chapter 28, Optional Dependencies).- description
This key can be used to add an information description to the build item. Description information is intended to be human readable. If present, it will be included in the output to abuild --dump-data. Providing a description here rather than just by using a comment in the
Abuild.conffile can be useful to other programs that provide additional visualization of build items. For adding information that you may wish to categorize items for build purposes, use traits instead (see Section 9.5, “Traits”). The description field is only permitted for named build items, though comments may appear in anyAbuild.conffile.- name
This key is used to set the name of the build item. Build item names consist of period-delimited segments. Each segment consists of one or more alphanumeric characters, dashes, or underscores. Some
Abuild.conffiles exist just to connect parent directories with child directories in the file system. In those cases, the name key may be omitted. The name key is also optional for root build items that don't build anything themselves.- platform-types
This key is used to specify which platform types a given build item is expected to work on. It includes a whitespace-separated list of platform types. For details about platform types, see Chapter 5, Target Types, Platform Types, and Platforms. If a build item has a build file or an interface file, the platform-types key is mandatory. Otherwise, it must not be present. Note that a build item may have multiple platform types, but all platform types for a given build item must belong to the same target type.
- plugins
This key is valid only in a root build item. It is used to specify the list of build items that are treated plugins by this tree. For information about plugins, see Chapter 29, Enhancing Abuild with Plugins. A plugin name may be followed by the option
-globalwhich makes it apply to all build trees in the forest. Use this feature very sparingly. For details, see Section 29.2, “Global Plugins”.- supported-flags
This key contains a list of whitespace-separated flags that are supported by this build item. When a flag is listed here, it becomes available to this item's
Abuild.interfacefile for flag-specific variable assignments. Other items can specify that this flag should be turned on when they depend on this item by using the-flag=option in their deps key. For more information, see Chapter 23, Interface Flags.interface-flag- supported-traits
This key is allowed only in a root build item. It contains a list of whitespace-separated traits that are supported by build items in the build tree. For more information about traits, see Section 9.5, “Traits”.
- traits
This key contains a list of whitespace-separated traits that apply to this build item. A trait may be referent to one or more additional build items. To name a referent build item, follow the trait with the
-item=option. For more information about traits, see Section 9.5, “Traits”.build-item- tree-deps
This key is valid only in a root build item. It contains a list of the names of trees on which this tree depends. For information about tree dependencies, see Chapter 7, Multiple Build Trees. Tree dependencies may be declared optional by following the name of the dependency with
-optional(see Chapter 28, Optional Dependencies).- tree-name
The presence of this key establish a build item as a root build item. This key's value is the name of the build tree. Build trees must be named uniquely in a forest. Build tree names may consist of alphanumeric characters, underscore, dash, and period. Unlike with build item names, there is no hierarchical or scoping structure implied by any of the characters in the names of build trees.
- visible-to
This key's value is an indicator of the scope at which this build item is visible. If present, it allows build items in the named scope to access this build item directly when they would ordinarily be prevented from doing so by normal scoping rules. For information about build item name scopes and build item visibility, see Section 6.3, “Build Item Name Scoping”. For a discussion of the visible-to key in particular, see Chapter 25, Build Item Visibility
Note that the child-dirs keys is the only key that deals with paths rather than names.
The Abuild.backing file may appear at the
root of a build forest. It specifies the locations of one or more
backing areas and, optionally, provides a list of build items a
trees that should not be inherited from the backing areas. For
details about backing areas, see Chapter 11, Backing Areas.
The syntax of the Abuild.backing file is
identical to that of the Abuild.conf file: it
contains a list of colon-separated key/value pairs. Blank lines
and lines beginning with the # character are
ignored.
The following keys are defined:
- backing-areas
This key's value is a space-separated list of relative or absolute paths to other build forests that are to be used as a backing area to the current forest. It is the only required key in the
Abuild.backingfile.- deleted-items
This key's value is a space-separated list of build items that should not be inherited from the backing area. Any build item listed here is treated as an unknown build item in the local forest.
- deleted-trees
This key's value is a space-separated list of build trees that should be inherited from the backing area. Any build item in any build tree listed here will not be made available from the backing area, and the build tree will not be considered a member of the local forest. Note that, unlike with deleted items, it is permissible to create a new build tree locally with the same name as a deleted tree. The new tree is not related to the old tree in any way, and the new tree will not inherit build items from an instance of the deleted tree in the backing areas.
Table of Contents
The abuild interface system is the mechanism through which
abuild provides encapsulation. Its purpose is to allow build
items to provide information about the products they provide to
other build items. Build items provide their interfaces with the
Abuild.interface file. This chapter
describes the interface system and provides details about the
syntax and semantics of Abuild.interface and
other abuild interface files.
This section contains a prose description of the interface
system's functionality and presents the basic syntax of
Abuild.Interface without providing all of
the details. This material provides the basis for understanding
how the interface functionality works. In the next section, we
go over the details.
The Abuild.interface file has a fairly
simple syntax that supports variable declarations, variable
assignments, and conditionals. Interface files are rigorously
validated. Any errors detected in an interface file are
considered build failures which, as such, will prevent abuild
from attempting to build the item with the incorrect interface
and any items that depend on it. Most
Abuild.interface files will just set
existing variables to provide specific information about that
item's include and library information, classpath information, or
whatever other standard information may be needed depending upon
the type of item it is. For casual users, a full understanding
of this material is not essential, but for anyone trying to debug
interface issues or create support within abuild for more
complex cases, it will be important to understand how abuild
reads Abuild.interface files.
The basic purpose of Abuild.interface is to
set variables that are ultimately used by a build item to access
its dependencies. The basic model is that an item effectively
reads the Abuild.interface files of all its
dependencies in dependency order. (This is not exactly what
happens. For the full story, see Section 33.7, “Implementation of the Abuild Interface System”.) As each file is read,
it adds information to the lists of include paths, libraries,
library directories, compiler flags, classpath, etc. All
variables referenced by Abuild.interface are
global variables, even if they are declared inside the body of a
conditional, much as is the case with shell scripts or makefiles.
Although this is not literally what happens, the best way to
think about how abuild reads interface files is to imagine
that, for each build item, all of the interface files for its
dependencies along with its own interface file are concatenated
in dependency order and that the results of that concatenation
are processed from top to bottom, skipping over any blocks inside
of false conditional statements.
Once abuild parses the Abuild.interface
files of all of a build item's dependencies and that of the build
item itself, the names and values of the resulting variables are
passed to the backends by writing them to the abuild
dynamic output file, which is called
.ab-dynamic.mk for
make-based builds and
.ab-dynamic.groovy for
Groovy/ant-based builds. The dynamic
output file is created in the output directory. Although users
running abuild don't even have to know this file exists,
peeking at it is a useful way to see the results of parsing all
the Abuild.interface files in a build item's
dependency chain.
The Abuild.interface file contains the
following items:
Comments
Variable declarations
Variable assignments
After-build file specifications
Target type restrictions
Conditionals
Similar to make or shell script syntax, each statement is
terminated by the end of the line. Whitespace characters (spaces
or tabs) are used to separate words. A backslash
(\) as the last character of the line may be
used to continue long statements onto the next line of the file,
in which case the newline is treated as a word delimiter like any
other whitespace.
[29]
Any line that starts with a # character
optionally preceded by whitespace is ignored entirely. Comment
lines have no effect on line continuation. In other words, if
line one ends with a continuation character and line two is a
comment, line one is continued on line three. This makes it
possible to embed comments in multiline lists of values. In this
example, the value of ODDS would be
one three:
ODDS = \
  one \
# odd numbers only, please
  # two \
  three
Characters that have special meanings (space, comma, equal, etc.) may be quoted by preceding them by a backslash. For consistency, a backslash followed by any character is treated as that character. This way, the semantics of backslash quoting won't change if additional special characters are added in the future.
All variables must be declared, though most
Abuild.interface files will be assigning to
variables that have already been declared in other interface
files. There are no variable scoping rules: all variables are
global, even if declared inside a conditional block. Variable
names may contain alphanumeric characters, dash, underscore, and
period. By convention, make-based rules use all uppercase
letters in variable names. This convention also has the
advantage of avoiding potential conflict with reserved
statements. Java-based rules typically use lower-case
period-separated properties. Ultimately abuild interface
variables become make variables or
ant properties and keys in parameter
tables for Groovy, which is the basis
for these conventions. Note, however, that variables of both
naming styles may be used by either backend, and some of
abuild's predefined interface variables that are available to
both make and
Groovy/ant are of the all upper-case
variety.
Once declared, a variable may be assigned to or referenced. A
variable is referenced by enclosing its name with parentheses and
preceding it by a dollar sign (as in
$(VARIABLE)), much like with standard make
syntax, except that there is no special case for single-character
variable names. Other than using the backslash character to
quote single characters, there is no quoting syntax: the single
and double quote characters are treated as ordinary characters
with no special meanings.
Environment variables may be referenced using the syntax
$(ENV:VARIABLE). Unlike many other systems
which treat undefined environment variables as the empty string,
abuild will trigger an error condition if the environment
variable does not exist unless a default value is provided. A
default value can be provided using the syntax
$(ENV:VARIABLE:default-value). The
default-value portion of the string
may not contain spaces, tabs, or parentheses.
[30]
Although it can sometimes be useful to have abuild interface
files initialize interface variables from the environment, this
feature should be used sparingly as it is possible to make a
build become overly dependent on the environment in this way.
(Even without this feature, there are other ways to fall into
this trap that are even worse.) Note that environment variables
are not abuild variables. They are expanded as strings and can
be used in the interface file wherever ordinary strings can be
used.
In addition, starting in version 1.1.1, abuild can access
command-line parameters of the form
VAR=val from interface files. This
works identically to environment variables. Parameter references
are of the form $(PARAM:PARAMETER) or
$(PARAM:PARMETER:default-value). As with
environment variable references, accessing an unspecified
parameter without a default is an error, and parameter expansions
are treated as strings by the interface parser. This feature
should also be used sparingly as it can create plenty of
opportunity for unpredictable builds. The main valid use case
for accessing parameters from an interface file would be to allow
special debugging changes that allow modifying build behavior
from the command-line for particular circumstances. Keep in mind
that changing parameters on the command line has no impact on
dependencies, so gratuitous and careless use of this feature can
lead to unreproducible builds. That said, this feature does not
make abuild inherently less safe since it has always been
possible to access parameters and the environment directly from
make code.
Variables may contain single scalar values or they may contain
lists of values of one of the three supported types:
boolean, string, or
filename.
Boolean variables are simple true/false values. The values
1 and true are
interpreted interchangeably as true, and the values
0 and false are
interpreted interchangeably as false. Regardless of whether the
word or numeric value is used to assign to boolean variables, the
normalized values of 0 and
1 are passed to the backend build system.
(For simplicity and consistency, this is true even for the Groovy
backend, which could handle actual boolean values instead.)
String variables just contain arbitrary text. It is possible to
embed spaces in string variables by quoting them with a
backslash, but keep in mind that not all backends handle spaces
in single-word variable values cleanly. For example, dealing
with embedded spaces in variable names in GNU Make is impractical
since it uses space as a word delimiter and offers no specific
quoting mechanisms. The values of filename variables are
interpreted to be path names. Path names may be specified with
either forward slashes or backslashes on any platform. Relative
paths (those that do not start with a path separator character
or, on Windows, also a drive letter) are interpreted as
relative to the file in which they are
assigned, not the file in which they are referenced as
is the case with make. This means
that build items can export information about their local files
using relative paths without having to use any special variables
that point to their own local directories. Although this is
different from how make works, it is the only sensible semantic
for files that are referenced from multiple locations, and it is
one of the most important and useful features of the abuild
interface system.
List variables may contain multiple space-separated words.
Assignments to list variables may span multiple lines by using a
trailing backslash to indicate continuation to the next line.
Each element of a list must be the same type. Lists can be made
of any of the supported scalar types. (Lists of boolean values
are supported, though they are essentially useless.) List
variables must be declared as either append or
prepend, depending upon whether successive
assignments are appended or prepended to the value of the list.
This is described in more depth when we discuss variable
assignment below.
Scalar variables may be assigned to in one of three ways: normal, override, and fallback. A normal assignment to a scalar variable fails if the variable already has a value. An override assignment initializes a previously uninitialized variable and replaces any previously assigned value. A fallback assignment sets the value of the variable only if it has not previously been initialized. Uninitialized variables are passed to the backend as empty strings. It is legal to initialize a string variable to the empty string, and doing this is distinct from not initializing it.
List variables work differently from anything you're likely to
have encountered in other environments, but they offer
functionality that is particularly useful when building software.
List variables may be assigned to multiple times. The value in
each individual assignment may contain zero or more words.
Depending on whether the variable was declared as
append or prepend, the
values are appended to or prepended to the list in the order in
which they appear in the specific assignment. An example is
provided below.
Scalar and list variables can both be reset using the
reset statement. This resets the variable back
to its initial state, which is uninitialized for scalars and
empty for lists.
Any variable assignment statement can be made conditional upon the presence of a given interface flag. Interface flags are introduced in Chapter 23, Interface Flags, and the details of how to use them in interface files are discussed later in this chapter.
Abuild supports nested conditionals, each of which may contain
an if clause, zero or more
elseif clauses, and an optional
else clause. The abuild interface syntax
supports no relational operators: all conditionals are expressed
in terms of function calls, the details of which are provided
below.
In addition to supporting variables and conditionals, it is
possible to specify that certain variables are relevant only to
build items of a specific target type. A target type restriction
applies until the next target-type directive
or until the end of the current file and all the files it loads
as after-build files. By default,
declarations in an Abuild.interface file
apply to all target types. The vast majority of interface files
will not have to include any target type restrictions.
It is possible for a build item to contain interface information
that is intended for items that depend on it but not intended for
the item itself. Typical uses cases would include when some of
this information is a product of the build or when a build item
needs to modify interface information provided by a dependency
after it has finished using the information itself. To support
this, an Abuild.interface file may specify
additional interface files that are not to be read until after
the item is built. The values in any such files are not
available to the build item itself, but they are available to any
items that depend on the build item that exports this interface.
Such files may be dynamically generated (such as with
autoconf; see Section 18.3, “Autoconf Example”), or they may be hand-generated
files that are just intended not to apply to the build of the
current build item (see Section 27.1, “Opaque Wrapper Example”).
By default, once a variable is declared and assigned to in a
build item's Abuild.interface, the
declaration and assignments are automatically visible to all
build items that depend on the item that made the declaration or
assignment. In this sense, abuild variables are said to be
recursive. It is also possible to declare
a variable as non-recursive, in which case
assignments to the variable are only visible in the item itself
and in items that depend directly on the
item that makes the assignment. Declarations inherit normally.
[31]
It is also possible to declare an interface variable as
local. When a variable is declared as
local, the declaration and assignment are not visible to any
other build items. This can be useful for providing values only
to the current build item or for using variables to hold
temporary values within the Abuild.interface
file and any after-build files that it may explicitly reference.
In this section, we provide the syntactic details for each of the
capabilities described in the previous section. There are some
aspects of how Abuild.interface files are
interpreted that are different from other systems you have likely
encountered. If you are already familiar with the basics of how
these files work, this section can serve as a quick reference.
Note
If you only read one thing, read about list assignment.
Assignment to list variables is probably different for
Abuild.interface files than for any other
variable assignment system you're likely to have encountered.
It is specifically designed to support building up lists
gradually by interpreting multiple files in a specific order.
- comment
Any line beginning with a
#optionally preceded by whitespace is treated as a comment. Comments are completely ignored and, as such, have no effect on line continuation. Note that the#does not have any special meaning when it appears in another context. There is no syntax for including comments within a line that contains other content.- variable declaration
A scalar variable declaration takes the form
declare
variable[scope]type[ =value]where
variableis the name of the variable andtypeis one of boolean, string, or filename. If specified,scopemay be one of non-recursive or local. The declaration may also be followed optionally be an initialization, which takes the same form as assignment, described below. Example scalar variable declarations:declare CODEGEN filename declare HAS_CLASS boolean declare _dist local filename = $(ABUILD_OUTPUT_DIR)/dist
A list variable declaration takes the form
declare
variable[scope] listtypeappend-type[ =value]where
variableis the name of the variable,typeis one of boolean, string, or filename, andappend-typeis one of append or prepend. The optionalscopespecification is the same as for scalar variables (non-recursive or local), and as with scalar variables, an optional initialization may be provided. Example list variable declarations:declare QFLAGS list string append declare QPATHS list filename prepend = qfiles private-qfiles declare DEPWORDS non-recursive list string append
Scalar variables start off uninitialized. List variables start off containing zero items.
- scalar variable assignment
Scalar variables may be assigned in one of three ways: normal, override, or default. A normal assignment looks like this:
variable=valuewhere
variableis the variable name andvalueis a single word (leading and trailing space ignored). Extra whitespace is permitted around the=sign.Override assignments look like this:
override
variable=valueFallback assignments look like this:
fallback
variable=valueExample scalar variable assignments:
fallback CODEGEN = gen_code.pl
HAS_CLASS = 0
override HAS_CLASS = 1
- list variable assignment
List variables are assigned using a simple
=operator:list-variable=valuewhere
valueconsists of zero or more words, and the semantics of the assignment depend on how the list was declared. For append lists, the assignment operator appends the words to the existing list in the order in which they appear. For prepend lists, the assignment operator prepends the words to the existing value of list in the order in which they appear. For example, if the variablesLIBSis declared as a prepend list of strings, these two statements would result inLIBScontaining the valuelib3 lib4 lib1 lib2:LIBS = lib1 lib2 LIBS = lib3 lib4
The distinction of whether a list is declared as append or prepend generally doesn't matter to the user, but there are cases in a build environment in which it is important to prepend to a list. One notable example is the list of libraries that are linked into an application: if one library calls functions from another library, the dependent library must come before the library on which it depends in the link command. Since abuild reads the dependency's interface file first, the depending library must prepend itself to the list of libraries. Note that multiple assignments to a single list variable would ordinarily not occur in the same
Abuild.interfacefile, but would instead occur over successive files. It is perfectly valid to assign multiple times in the same file, however. One instance in which this would typically occur would be with private interfaces, as illustrated in Section 23.3, “Private Interface Example”. Another common case would be with conditional assignments.- variable reset
List and scalar variables can both be reset. After a variable is reset, its value becomes uninitialized (for scalars) or empty (for lists) just as if it had just been declared. The syntax for resetting a variable is
reset
variableIt is also possible to reset all variables with
reset-all
A reset of a specific variable, either by an explicit
resetor areset-all, can be blocked within the scope of a singleAbuild.interfacefile or any files it loads withafter-build. To block a variable from being reset, useno-reset
variableAny
no-resetcommands will apply to the nextresetorreset-allthat appears in the current file or files it explicitly loads. (Although there would be no real reason to useno-resetbefore a specificresetof a specific variable, abuild does support this construct.)Variable reset operations are used fairly infrequently, but there are use cases that justify all of the various reset operations. For examples of using them, please see Section 24.3, “Explicit Cross-Platform Dependencies” and Chapter 27, Opaque Wrappers.
There are some subtleties about the effect of a variable reset when interface files are loaded. For details, see Section 33.7, “Implementation of the Abuild Interface System”.
- flag-based variable assignment
An
Abuild.interfacefile may prefix any variable assignment (normal,override,fallback, scalar, or list) with aflagstatement. This indicates that that particular assignment will be ignored by build items that don't request the particular flag through the-flag=syntax in theirinterface-flagAbuild.conffiles. A flag-based assignment looks like this:flag
interface-flagassignment-statementAbuild enforces that a build item's
Abuild.interfaceand anyafter-buildfiles that it reads may only use theflagstatement for a flag declared in the build item's supported-flags key in its ownAbuild.conf. For an example of using flag-based assignment, see Section 23.3, “Private Interface Example”.- after-build file specification
Abuild allows you to specify the name of an additional interface file with the same syntax as
Abuild.interfacethat is loaded immediately after the current item has been built, before any items that depend on this item are built. Because the file is loaded after the build has been completed, any directives in this file will be visible to items that depend on this item but not by this item itself. To specify the name of such a file, useafter-build
filenamewhere
filenameis the path to the file to be loaded. A relative path is interpreted as relative to the originalAbuild.interfacefile. Note that files loaded byafter-buildmay themselves not includeafter-builddirectives. It is also not permitted to haveafter-buildstatements in interface files belonging to plugins or build items that have no build files. (Having them would be meaningless since such build items are not built.)Since interface statements in
after-buildfiles are visible to items that depend on this build item but not to the item itself, this mechanism is useful for changing interface variables for the item's reverse dependencies without changing what the build item itself sees. The Opaque Wrapper example (Section 27.1, “Opaque Wrapper Example”) does this. It also makes this construct useful for automatically generated interface data. For an example of that use, see Section 18.3, “Autoconf Example”.- target type restriction
To specify the target type to which subsequent variable declarations belong, use
target-type
typewhere
typeis the name of the target type. For information about target types, see Chapter 5, Target Types, Platform Types, and Platforms. In addition to the built-in target types, the special type all may be used to indicate that variables should be made available to all target types. In practice, there is little reason to ever restrict a variable to a particular target type, though many of the abuild predefined variables are restricted. Restricting the target type of a variable only determines whether that variable is passed to the backend, so the only reason to restrict a variable to a specific target type would be to reduce the number of unneeded variables that were passed to the backend. It has no impact on variable scope, visibility, or even availability for use in otherAbuild.interfacefiles.- conditional
Conditionals in
Abuild.interfacetake the following form:if (
condition) ...valid code... elseif (condition) ...valid code... elseif (condition) ...valid code... else ...valid code... endifAn
ifblock may contain zero or moreelseifclauses and an optionalelseclause. Any validAbuild.interfacecode, including nested conditionals, is permitted inside a conditional block. Recall that all variables have global scope including variables declared inside of conditional blocks. Code inside of conditions that are not satisfied is ignored but must be syntactically valid.The
conditions specified above may be of one of the following forms:$(
variable)where
variableis a boolean variable, orfunction(arg,arg, ...)where
functionis a validAbuild.interfaceconditional function and eachargconsists of one or more words. Only variables declared as boolean and specific conditional functions, described in the next section, are permitted in conditionals. There are no relational operators, and variables of other types whose values happen to be valid boolean values are not allowed in conditionals.
A single Abuild.interface conditional must
appear in parentheses after an if or
elseif statement. The conditional may be a
simple boolean variable reference, or it may be a call to any of
the provided conditional functions, each of which returns a
boolean value. Conditional functions may be nested as needed.
Any boolean argument described below may a be function call or a
simple boolean variable reference, thus allowing function calls
to nest. The following functions are defined:
and(bool1,bool2)Returns true if both expressions are true and false otherwise.
or(bool1,bool2)Returns true if either value is true.
not(bool)Returns true if the given value is false, or false otherwise.
equals(scalar1,scalar2)Returns true if the two scalars contain the same contents. The two values must be the same type. The
equalsfunction may not be used to compare lists.matches(string,regex)Returns true if the string value matches the given Perl-compatible regular expression. Regular expression matches may be applied only to strings. Note that
matchesreturns true if the regular expression matches the whole string. If you need to do a partial match, you must add.*at the beginning and/or end of the expression.contains(list,scalar)Returns true if the given list contains the given scalar value. The scalar must have the same type as the list.
containsmatch(string-list,regex)Returns true if the given list contains any elements that match the given Perl-compatible regular expression. The list must be a list of strings. As with
matches, the regular expression must match the entirety of some member of the list.
Abuild maintains a single variable symbol table. All variables are global, and all variables are visible to interface code of any item regardless of target type. Variables may be declared to apply to a specific target type. By default, they apply to all target types. When interface variables are passed to the backend, only variables declared in either the special target type all or in the item's own target type are made available.
In general, end users will not have to be concerned about which
target types a variable applies to. A build item could, in
principle, assign to both INCLUDES and
abuild.classpath without having to care that
only object-code items will see
INCLUDES and only java items will
see abuild.classpath.
Before abuild reads any Abuild.interface
files, it provides certain predefined variables. We divide them
into categories based on target type.
The variables mentioned here, along with any additional variables
that are declared in Abuild.interface files,
are made available to the backends in the form of identically
named make variables or Groovy framework definitions and ant
properties.
The following interface variables are available to build items of all target types:
- ABUILD_ITEM_NAME
The name of the current build item
- ABUILD_OUTPUT_DIR
The output directory in which this item's products are generated for this platform. This is the most often referenced abuild interface variable as it is normal practice to expand this variable when setting the names of library directories, classpaths, or anything else that references generated targets.
- ABUILD_PLATFORM
The name of the platform on behalf of which this interface is being read. This variable is not used very often. When referring to the output directory, always use
$(ABUILD_OUTPUT_DIR)instead of writing something in terms of this variable.- ABUILD_PLATFORM_TYPE
The platform type of the platform on behalf of which this interface is being read
- ABUILD_STDOUT_IS_TTY
A Boolean variable indicate whether abuild's standard output is a terminal. It can be useful to know this so that this information can be passed to other programs invoked by backends, particularly those (like ant) which redirect output through a pipe that ultimately goes to abuild's standard output.
- ABUILD_TARGET_TYPE
The target type of the current build item
- ABUILD_THIS
The obsolete variable
ABUILD_THIScontains the name of the current build item. It would have been deprecated in abuild version 1.1, but there is no reliable way to deprecate an interface variable since abuild can't detect its use in backend build files. New code should not useABUILD_THIS, but should useABUILD_ITEM_NAMEinstead.- ABUILD_TREE_NAME
The name of the current build item's tree
The following interface variables are available for object-code build items:
- ABUILD_PLATFORM_COMPILER
For object-code items, this variable contains the
COMPILERfield of the platform (see Section 5.2, “Object-Code Platforms”).- ABUILD_PLATFORM_CPU
For object-code items, this variable contains the
CPUfield of the platform (see Section 5.2, “Object-Code Platforms”).- ABUILD_PLATFORM_OPTION
For object-code items, this variable contains the
OPTIONfield of the platform if present or the empty string otherwise (see Section 5.2, “Object-Code Platforms”).- ABUILD_PLATFORM_OS
For object-code items, this variable contains the
OSfield of the platform (see Section 5.2, “Object-Code Platforms”).- ABUILD_PLATFORM_TOOLSET
For object-code items, this variable contains the
TOOLSETfield of the platform (see Section 5.2, “Object-Code Platforms”).- INCLUDES
This variable is to contain directories that users of this build item should add to their include paths.
- LIBDIRS
This variable is to contain directories that users linking with this build item's libraries should add to their library search paths. Typically, this is just set to
$(ABUILD_OUTPUT_DIR)since this is where abuild creates library files.- LIBS
This variable is to contain the names of libraries (without any prefixes, suffixes, or command-line flags) that this build item provides.
- XCFLAGS
This variable is to contain additional flags, beyond those in
$(XCPPFLAGS)to be passed to the compiler when compiling C code. This variable will be used very infrequently.- XCPPFLAGS
This variable is to contain additional preprocessor flags that must be added when using this item. This flag should be used very sparingly as changing the value of this variable does not cause things to automatically recompile. It is here primarily to support third-party libraries that only work if a certain flag is defined. If you are using this to change the configuration of a build item, please consider using another method instead, such as defining symbols in a header file or using runtime configuration. For an example of how to do this based on the value of a variable, see Section 22.5, “Dependency on a Make Variable”.
- XCXXFLAGS
This variable is to contain additional flags, beyond those in
$(XCFLAGS)and$(XCPPFLAGS)to be passed to the compiler when compiling C++ code. This variable will be used very infrequently.- XLINKFLAGS
This variable is to contain additional flags to be added to the command-line when linking. The most common use for this would be to pass flags to the linker that are other than libraries or library paths. For linking with libraries, whether they are your own libraries or third-party libraries, you are better off using
$(LIBDIRS)and$(LIBS)instead.- SYSTEM_INCLUDES
This variable, introduced in abuild 1.1.6, may contain a list of directories that contain system include files. For compilers that support this, any directory mentioned in the
INCLUDESdirectory that starts with any of the paths mentioned in theSYSTEM_INCLUDESdirectory will be specified to the compiler using a flag that indicates that it's a system include directory. Some compilers treat system include directories differently, such as suppressing most compiler warnings. For gcc, this causes-isystemto be used rather than-Iwhen specifying the include directory. Note that directories must still be added toINCLUDESto be searched. A typical use of this would be for build items that are providing interfaces to third-party libraries. Those build items'Abuild.interfacefiles may add the directory to bothINCLUDESandSYSTEM_INCLUDESto prevent users from having to look at warning messages generated by incorrect code in the third-party library.
Warning
Although abuild allows you to do so, it is strongly
recommended that you avoid using these variables to configure
your build items by passing preprocessor symbol definitions on
the command line. There are some times when passing
preprocessor symbols on the command line is okay, such as when
you're passing a parameter required by a third-party library or
passing in some truly static value such as the name of the
operating system, but passing dynamic configuration information
this way is dangerous. A significant reason for this is that
make's entire dependency system is
based on file modification times. If you change a preprocessor
symbol in an Abuild.mk or
Abuild.interface file, there is nothing
that triggers anything to get rebuilt. The result is that you
can end up with items that build inconsistently with respect to
that symbol. Furthermore, abuild has no way to perform its
integrity checks relative to the values of compiler flags in
build and interface files. If you need to have
preprocessor-based static configuration of your code, a better
way to handle it is by creating a header file and putting your
#defines there. That way, when you modify
the header file, anything that depends upon that file will
rebuild automatically.
Note that the various FLAGS variables above
can also be set (or, more likely, appended to) in
Abuild.mk files, as can additional
variables to control flags on a per-file basis. Please run
abuild rules-help in a C/C++ build item or
see Section 18.2.1, “C and C++: ccxx Rules” for details.
The following variables are used by java build items, described here from the context of the item assigning to them:
- abuild.classpath
This variable is to contain generated JAR files to add to the compile-time classpath and to include by default in higher level archives. Most ordinary Java build items that create JAR files will assign to this variable. Its value will typically be
$(ABUILD_DIR_OUTPUT)/dist/, whereJarFile.jarJarFile.jaris the name of the JAR file you placed in thejava.jarNameproperty in yourAbuild.groovyfile. See alsoabuild.classpath.manifestbelow.- abuild.classpath.manifest
This variable is to contain JAR files whose names should be listed in the Class-Path key of the manifest of JAR files that depend on it directly. In most cases, anything that is assigned to
abuild.classpathmust also be assigned toabuild.classpath.manifest. Theabuild.classpath.manifestvariable is declared as non-recursive, so assignments made to it are visible only to items that depend directly on the item making the assignment. This is appropriate because Java handles indirect dependencies on its own.- abuild.classpath.external
This variable is to contain externally supplied JAR files to add to the compile-time classpath. Unlike JARs added to
abuild.classpath, JAR files placed here will not be included in higher level archives by default. Whether you assign a JAR toabuild.classpathorabuild.classpath.externaldepends on the nature of your runtime environment. Java SE applications probably don't need to use this variable at all. Java EE applications should use this primarily for JAR files that are required at compile time by are provided by default by the application server or runtime environment. As withabuild.classpath, Values assigned toabuild.classpath.externalwill usually also have to be assigned toabuild.classpath.manifest.
For additional discussion of how these are used by the Groovy backend, please see Section 19.4, “Class Paths and Class Path Variables”. In that section, we discuss the variables from the context of the item that is using them rather than the item that is assigning to them.
Although most Abuild.interface files are
reasonably simple and have easily understandable consequences,
there will inevitably be situations in which some interface
variable has a value that you don't understand. For example, you
might see an assignment in one
Abuild.interface file that appears to have
no effect, or you may wonder which of a very long list of
dependencies was responsible for a particular variable assignment
or declaration.
Starting with abuild version 1.0.3, you can have abuild dump
everything it knows about a build item's interface variables into
an XML file. Do this by passing the
--dump-interfaces flag to any abuild command
that builds something. Doing so will cause abuild to create
interface dump files for every build item including those that
don't build anything and even those that have no
Abuild.interface files themselves.
For build items that do not have build files, abuild creates a
file called .ab-interface-dump.xml in the
output directory for every platform on which that build item
exists. This file contains information about all interface
variables that are known to that item. For build items that have
build files, abuild creates two files:
.ab-interface-dump.before-build.xml and
.ab-interface-dump.after-build.xml. If a
build has no Abuild.interface or the item's
Abuild.interface has no after-build files,
the two files are identical and are analogous to
.ab-interface-dump.xml files of build items
that don't have build files. Otherwise, the
.ab-interface-dump.before-build.xml file
reflects the interface as seen by the build item itself (before
any after-build files are loaded), and the
.ab-interface-dump.after-build.xml shows
what interface this build item provides to items that depend on
it.
Note that the interface dump files contain not just a list of
variables with their values but a complete list of everything
abuild knows about each variable. This includes its type,
where it was declared, every assignment that was made to it,
every reset of every variable, etc. When you reference an
interface variable, abuild computes the value on the fly,
sometimes influenced by interface flags that may be in effect.
To get maximum benefit from the information in the interface dump
files, you must understand how this works. For those details,
please refer to Section 33.7, “Implementation of the Abuild Interface System”.
The format of the interface dump file is described in Appendix G, --dump-interfaces Format.
[29] In this way, abuild's handles line continuation like GNU Make and the C shell. This is different from how the Bourne shell and the C programming language treat line continuation characters: in those environments, a quoted newline disappears entirely. The only time this matters is if there are no spaces at the beginning of a line following a line continuation character. For abuild, make, and the C shell it doesn't matter whether or not space is present at the beginning of a line following a line continuation character, but for C and the Bourne shell, it does.
[30] This syntax restriction is somewhat arbitrary, but it makes it less likely that syntax errors in specifying environment variable references will create hard-to-solve parsing errors in interface files. If this restriction is in your way, you're probably abusing this feature and may need to rethink why you're accessing environment variables to begin with.
[31] The rationale behind using the terms recursive and non-recursive have to do with how these variables are used. Conceptually, when you reference an interface variable, you see all assignments made to it by any of your recursively expanded list of dependencies, i.e., your direct and indirect dependencies. When a variable is declared to be non-recursive, you only assignments made by your direct dependencies. Other terms, such as indirect or non-inheriting would be technically incorrect or slightly misleading. Although there's nothing specifically recursive or non-recursive about how interface variables are used, we feel that this choice of terminology is a reasonable reflection of the semantics achieved.
Table of Contents
The GNU Make backend is used to build
items that contain an Abuild.mk file. In
this chapter, we describe how to set up your
Abuild.mk file and provide details specific
to the rule sets provided by the abuild GNU
Make backend.
The Abuild.mk file is read by GNU Make and is
a GNU Make fragment. It therefore has GNU Make syntax. The
Abuild.mk file is intended to contain only
variable settings. It contains no make rules or include
directives. Abuild automatically includes your
Abuild.mk file at the appropriate time and in
the appropriate context.
The most important line in Abuild.mk is the
setting of the RULES variable. Its purpose is
to tell abuild which rule set should be used to generate
targets from sources. Most of the remaining variables that are
set are dependent upon which rules are being used. It is always
possible to use abuild's help system to get detailed
rule-specific help about what variables you are expected to
define in your Abuild.mk for a specific set
of rules. Run abuild --help help for
additional information. Abuild provides some built-in rules.
Additional rules may provided my plugins or items that you depend
on. You can always run abuild --help rules
list to get a list of rules that are available to your
build item.
In rare instances, it may be necessary to create local rules for
a specific build item. Examples may include one-off,
special-purpose code generators that are specific to a particular
build item. To use local rules, place a list of files that
contain definitions of your rules in the
LOCAL_RULES variable. Files listed there are
resolved relative to the Abuild.mk. They
may contain any valid GNU Make code.
If you have written the same local rule in more than one or two
places, you are probably doing something wrong and should be
using build-item-specific rules (Chapter 22, Build Item Rules and Automatically Generated Code ) or plugins (Chapter 29, Enhancing Abuild with Plugins) instead.
Please note that local rules are run from the context of the
output directory—you must keep this in mind when using
relative paths from your local rules. The make variable
SRCDIR is always set to a relative path to the
directory that contains the Abuild.mk file.
Also, local rules should avoid creating files outside of the
output directory since these files will not be removed by the
clean target.
The following sections describe the make-based rule sets provided by abuild.
Rules for compiling C and C++ code are provided by the
ccxx rules. These rules also include
support for flex, bison, and Sun RPC. It is possible for a
single build item to build multiple targets including any
mixture of static library, shared library, and executable
targets.
A note about flex and bison before we get to the main event: the
flex and bison rules can take advantage of abuild's
codegen-wrapper utility. If you set the
variable FLEX_CACHE, abuild will cache
generated flex output files and input file checksums making it
possible for your flex code to be used on systems that don't
have flex. The variable BISON_CACHE serves
the same function for code generated with bison. Abuild's own
build uses this functionality. To use this facility, set
FLEX_CACHE and/or
BISON_CACHE to directories relative to our
source directory. Abuild will copy files to or from this
directory during its build. These directories are relative to
your source directory, not your output directory. As such, the
resulting files are likely to be controlled in your version
control system. This is an exception to the ordinary rule of
abuild not creating files outside of the output directory, but
it's an appropriate exception as the intention is to control
these automatically generated files so that they could be
available for users who didn't have flex or bison. For
information about using the codegen-wrapper
utility with your own builds, see Section 22.6, “Caching Generated Files”.
When building C and C++ code, you must define at least one of
TARGETS_lib or
TARGETS_bin. These variables contain a list
of library and executable targets respectively. Targets should
be specified without any operating system-specific prefixes or
suffixes. For example, the library target
moo might generate
libmoo.a on a UNIX system or
moo.lib on a Windows system. Likewise, the
executable target quack might generate
quack on a UNIX system and
quack.exe on a Windows system.
For each target target listed in
TARGETS_lib, you must define the variable
SRCS_lib_
to contain a list of source files used to build the library.
Likewise, for each binary target in
targetTARGETS_bin, you must define
SRCS_bin_.
These variables can contain any mixture of C and C++ files. The
source files listed in these variables are typically located in
the same directory as the targetAbuild.mk, but
they may also refer to automatically source files that will
actually appear in the output directory.
[32]
There are variables that can be used to control the creation of
shared libraries. For details, see Section 21.1, “Building Shared Libraries”. Files whose names
end with .c are treated as C code. Files
whose names end with either .cc or
.cpp are considered to be C++ code.
Although you can have any mixture of binary and library targets
in a build item, no single source file should be listed in more
than one target. Additionally, abuild will automatically
include any library targets at the beginning of the library list
when linking any binary targets in the build item. All targets
are created directly in the abuild output directory.
In addition to the standard targets, the
ccxx rules provide a special target
ccxx_debug. This target prints the current
include and library path as well as the list of libraries that
we are linking against. This can be a useful debugging tool for
solving dependency declaration problems.
It is also possible to add additional preprocessor, compiler, or
linker flags globally or on a per-file basis and to specifically
override debug, optimization, or warning flags globally or on a
per-file basis. This is done by setting the values of certain
make variables, some of which may also be set in
Abuild.interface. Details about these
variables may be obtained by running abuild
rules-help from any C/C++ build item. The following
variables are available:
- XCPPFLAGS
additional flags passed to the preprocessor, C compiler, and C++ compiler (but not the linker)
- XCFLAGS
additional flags passed to the C compiler, C++ compiler, and linker
- XCXXFLAGS
additional flags passed to the C++ compiler and linker
- XLINKFLAGS
additional flags passed to the linker—usually not used for libraries
- DFLAGS
debug flags passed to the processor, compilers, and linker
- OFLAGS
optimization flags passed to the processor, compilers, and linker
- WFLAGS
warning flags passed to the processor, compilers, and linker
Note that the XCPPFLAGS,
XCFLAGS, XCXXFLAGS, and
XLINKFLAGS variables may be set in
Abuild.interface as well. Therefore,
although you assign to them normally with =
in Abuild.interface, when assigning to them
in Abuild.mk, it is generally better to
append to these variables (using +=) rather
than to set them outright. Also, keep in mind that flags are
often compiler-specific. It may often make sense to set certain
flags conditionally upon the value of the
$(ABUILD_PLATFORM_COMPILER) variable or other
platform field variables. This can be done using regular
GNU Make conditional syntax.
Each of the above variables also has a file-specific version.
For the X*FLAGS variables, the file-specific
values are added to the general values. For example, setting
XCPPFLAGS_File.cc will cause the value of
that variable to be added to the preprocessor, C compiler and
C++ compiler invocations for File.cc.
File-specific versions of XCPPFLAGS,
XCFLAGS, and XCXXFLAGS are
used only for compilation and, if appropriate, preprocessing of
those specific files. They are not used at link time.
The file-specific versions of DFLAGS,
OFLAGS, and WFLAGS
override the default values rather than
supplementing them. This makes it possible to completely change
debugging flags, optimization flags, or warning flags for
specific source files. For example, if
Hardware.cc absolutely cannot be compiled
with any optimization, you could set
OFLAGS_Hardware.cc to the empty string to
suppress optimization on that file regardless of the value of
OFLAGS. Similarly, if autogen.c were an
automatically generated file with lots of warnings, you could
explicitly set WFLAGS_autogen.c to the empty
string or to a flag that suppresses warnings. This would
suppress warnings for that file without affecting other files.
If you wish to append to the default flags instead of replacing
them, include the regular variable name in the value, as in
WFLAGS_File.cc := $(WFLAGS) -Wextra or even
WFLAGS_File.cc := $(filter-out
      -Wall,$(WFLAGS))
.
The ccxx rules provide a mechanism for you
to generate preprocessed output for any C or C++ file. For
file.cfile.ccfile.cppfile.i.
This will generate
file.i
When invoking abuild to build C or C++ executables or shared
libraries, it is possible to set the make variable
LINKWRAPPER to the name of a program that
should wrap the link command. This makes it possible to use
programs such as Purify or
Quantify that wrap the link step in
this fashion.
Ordinarily, abuild uses a C++ compiler or linker to link all
executables and shared libraries. If you are writing straight C
code that doesn't make any calls to C++ functions including
those in external libraries and you want to link your program as
a C program to avoid runtime dependencies on the C++ standard
libraries, set the variable LINK_AS_C to some
non-empty value in your Abuild.mk. This
applies to all shared libraries and executables in the build
item.
Most of the time, abuild manages all the dependencies of the
source and object files (as opposed to inter-build-item
dependencies) automatically, but there are some rare instances
in which you may have to create such dependencies on your own,
such as when an object file depends on an automatically generate
header file that is generated in the same build item. For an
example of this, see Section 22.5, “Dependency on a Make Variable”. To make it possible
to express such dependencies in a portable fashion, the
ccxx rules provide the variables
LOBJ and OBJ which are set
to the object file suffixes for library object files and
non-library object files respectively. For example, if you have
a source file called File.cc that is part
of a library, the name of the object file will be
File., and the
file will be created inside the abuild output directory. If
$(LOBJ)File.cc were part of an executable instead,
the object file would be
File. instead.
[34]
$(OBJ)
As is the case for any rule set, you can run abuild --help rules rule:ccxx for additional information. This help text is also included in Section E.10, “abuild --help rules rule:ccxx”.
There is a lot more to abuild's C and C++ generation than is
discussed here. For a complete understanding of how it works,
you are encouraged to read
rules/object-code/ccxx.mk in the abuild
distribution (Appendix I, The ccxx.mk File). There you will
find copious comments and a lot of pretty hairy GNU
Make code.
Abuild includes built-in support for Microsoft's Visual C++ compiler on Windows. There are three MSVC-specific variables that can be set:
MSVC_RUNTIME_FLAGS: set to/MDby default, which causes the executable to dependent on Microsoft runtime DLLs. By setting this to/MT, it is possible to create executables that statically link with the runtime environment. A trailing “d” is automatically appended when building debugging executables or libraries.MSVC_MANAGEMENT_FLAGS: set to/EHscby default, which enables synchronous exception handling and assumes “C” functions do not throw exceptions. By setting this to/clr, it is possible to build programs that work with the .NET framework.MSVC_GLOBAL_FLAGS: contains flags that are passed globally to all compilation commands. Users will seldom have to modify this. For details, see comments inmake/toolchains/msvc.mk.
The autoconf rules provide rules for
including autoconf fragments for a build item.
[35]
Rather than having a monolithic autoconf-based component in a
source tree, it is recommended that individual build items use
autoconf for only those things they need. This reduces the
likelihood that something may fail to build due to lack of
support for something it doesn't need (but that is checked for
by a monolithic autoconf component). The only caveat to doing
this is that, if you use autoconf-generated header files, you
may find that the same symbols are defined in more than one
place. You will have to experiment and come up with appropriate
standards for your project.
The autoconf rules don't supply any special
targets. A reasonably complete example of using autoconf
follows in Section 18.3, “Autoconf Example”. You may also
run abuild --help rules rule:autoconf for
full information on using these rules. This help text is also
included in Section E.9, “abuild --help rules rule:autoconf”.
Some of the tools run by autoconf create
temporary files that may cause problems when running parallel
builds. It is therefore recommended that you place
attributes: serial in the
Abuild.conf file of build items that use
autoconf rules.
Autoconf properly honors your C/C++ toolchain and runs
configure with the proper C/C++ compilation
environment defined. The usual approach for autoconf-based
build items is that, if make variables need to be defined based
on the results of running configure,
configure.ac generates a file called
autoconf.interface which is specified as an
after-build file in
Abuild.interface. This means that the
autoconf-based build item itself may not include code that is
conditional upon the results of running autoconf. It is okay,
however, for build items that depend on an autoconf-based build
item to include conditional code in their
Abuild.interface and
Abuild.mk files based on variables defined
in its autoconf.interface should this be
required.
In some rare cases, it may be desirable to create an
Abuild.mk file that does nothing. One
reason for doing this would be if you had a library that
contained some code that should only exist on certain platforms.
You might want to create an Abuild.mk file
that was conditional upon some value of the
ABUILD_PLATFORM_OS variable, for example.
Since abuild requires that you set at least one of
RULES or LOCAL_RULES, you
can set the RULES variable to the value
empty. Abuild will still attempt to
build the item in this case, but the build will not do anything.
The empty rule set is available for build
items of any target type.
This example demonstrates how to use autoconf and also shows one
use of the after-build statement within
Abuild.interface. In this example, we
create a stub library that replaces functionality from an
external library if that library is not available. Our example
is somewhat contrived, but it demonstrates the core functionality
and patterns required to do this. Our example resides in
doc/example/general/user/derived/world-peace.
Notice that the Abuild.conf in the
world-peace directory itself defines a
pass-through build item (see Section 4.5, “Special Types of Build Items”) that depends on the
world-peace.stub build item:
general/user/derived/world-peace/Abuild.conf
name: world-peace
child-dirs: autoconf stub
deps: world-peace.stub
The world-peace.stub build
item, in turn, depends on the
world-peace.autoconf build item:
general/user/derived/world-peace/stub/Abuild.conf
name: world-peace.stub
platform-types: native
deps: world-peace.autoconf
The world-peace.autoconf build item's
Abuild.interface file adds its output
directory to the INCLUDES variable since this
where the autoconf-generated header file will go. Then it
declares autoconf.interface in its output
directory as an after-build file using the
after-build statement:
general/user/derived/world-peace/autoconf/Abuild.interface
# $(ABUILD_OUTPUT_DIR) contains the autoconf-generated header.
INCLUDES = $(ABUILD_OUTPUT_DIR)

after-build $(ABUILD_OUTPUT_DIR)/autoconf.interface
This means that the autoconf.interface file
won't be included when this build item is built but will be
included when other build items that depend on this one are
built. This is important since the file won't actually exist yet
when this build item is being built from a clean state.
Next, look at the autoconf/Abuild.mk file:
general/user/derived/world-peace/autoconf/Abuild.mk
AUTOFILES := autoconf.interface
AUTOCONFIGH := world-peace-config.h
RULES := autoconf
Here, we set the variables that the autoconf
rules require. The AUTOFILES variable is set
to the value autoconf.interface, which is
the same as the file name used as the
after-build file in the
Abuild.interface file. Additionally, we set
the variable AUTOCONFIGH to the name of the
header file that we will be generating.
Here is the autoconf/configure.ac file:
general/user/derived/world-peace/autoconf/configure.ac
AC_PREREQ(2.59)
AC_INIT(world-peace,1.0)
AC_CONFIG_HEADERS([world-peace-config.h])
AC_CONFIG_FILES([autoconf.interface])

AC_PROG_CXX
AC_LANG(C++)
AC_SUBST(HAVE_PRINTF)
AC_CHECK_FUNCS(printf, [HAVE_PRINTF=1], [HAVE_PRINTF=0])
AC_SUBST(HAVE_CREATE_WORLD_PEACE)
AC_CHECK_FUNCS(create_world_peace, [HAVE_CREATE_WORLD_PEACE=1],
                                   [HAVE_CREATE_WORLD_PEACE=0])

AC_OUTPUT
This contains normal autoconf macros. There are two important
things to notice here. The first is the
AC_CONFIG_FILES macro, which tells autoconf
to generate the autoconf.interface file from
autoconf.interface.in. The second is the
AC_CONFIG_HEADERS call, which takes name of
the file set as the value of the AUTOCONFIGH
variable in Abuild.mk. The header file
template is generated automatically using
autoheader. The need to duplicate this
information is unfortunate, and this may be improved in a future
version of abuild. Note that the autoconf macros don't have
any knowledge of the abuild output directory. This works
because we actually run autoconf inside the output directory with
copies of the input files.
Use of AC_CONFIG_HEADERS and
AUTOCONFIGH are optional. If you omit one,
you should omit both. If you decide to use an autoconf-generated
header, you should be aware of the possibility that you may have
duplicated preprocessor symbols defined by different
autoconf-based build items. There are several ways to avoid
this. One way would be to create your own header file template
and generate it using AC_CONFIG_FILES rather
than AC_CONFIG_HEADER. Another way would be
to structure your build so that you combine functionality that
requires use of preprocessor symbols into a single build item,
using separate build items only for cases that can be handled
through interface variables. It may also be possible to set
XCPPFLAGS in an after-build file based on
interface variables initialized by a file generated with
autoconf. The most important thing is that you pick a way to do
it and use it consistently.
Next, we examine the autoconf.interface.in
file:
general/user/derived/world-peace/autoconf/autoconf.interface.in
declare HAVE_PRINTF boolean
HAVE_PRINTF=@HAVE_PRINTF@

declare HAVE_CREATE_WORLD_PEACE boolean
HAVE_CREATE_WORLD_PEACE=@HAVE_CREATE_WORLD_PEACE@

if ($(HAVE_CREATE_WORLD_PEACE))
  LIBS = world_peace
endif
This is just like any other file generated by autoconf: it contains substitution tokens surrounded by @ signs. Since it is an abuild interface file, it has abuild interface syntax.
In our example, our configure.ac file checks
to see whether we have two functions: printf
and create_world_peace. Unfortunately, only
the first of these two functions is defined on most systems. Our
autoconf.interface.in file will set abuild
boolean variables to the values determined by autoconf. Then, if
the create_world_peace function is
available, we will add its library (which, in a real case, you
would know or test for explicitly in
configure.ac) to the library path. If the
library were not installed in the default library and include
paths, it probably would also have add something to the
LIBDIRS and INCLUDES
variables.
Now we turn our attention to the stub
directory. This directory contains our stub implementation of
create_world_peace. It is a poor substitute
for the real thing, but it will at least allow our software to
compile. The implementation protects the definition of the
function with the HAVE_CREATE_WORLD_PEACE
preprocessor symbol as generated by autoconf. It also makes use
of printf and checks to make sure it's
there, just to demonstrate how you might do such a thing:
general/user/derived/world-peace/stub/stub.cc
#include <world_peace.hh>
#include <stdio.h>

// Provide a stub version of create_world_peace if we don't have one.

#ifndef HAVE_CREATE_WORLD_PEACE
void create_world_peace()
{
    // Silly example: make this conditional upon whether we have
    // printf.  This is just to illustrate a case that's true as well
    // as a case that's false.
#ifdef HAVE_PRINTF
    printf("I don't know how to create world peace.\n");
    printf("How about visualizing whirled peas?\n");
#else
# error "Can't do this without printf."
#endif
}
#endif
The stub implementation provides a header file called
world_peace.hh, which is presumably the same
as the name of the header provided by the real implementation and
which would have been made available by the
world-peace.autoconf build item if the
library were found:
general/user/derived/world-peace/stub/world_peace.hh
#ifndef __WORLD_PEACE_HH
#define __WORLD_PEACE_HH

#include <world-peace-config.h>

#ifndef HAVE_CREATE_WORLD_PEACE
extern void create_world_peace();
#endif

#endif // __WORLD_PEACE_HH
The Abuild.interface file in the
stub directory actually adds
world-peace to the list of libraries only if
the HAVE_CREATE_WORLD_PEACE variable, as
provided by world-peace.autoconf's
autoconf.interface file, is false. That
way, if we had a real create_world_peace
function (whose library would have presumably also been made
available to us in world-piece.autoconf's
autoconf.interface file), we wouldn't
provide information about our stub library:
general/user/derived/world-peace/stub/Abuild.interface
INCLUDES = .
if (not($(HAVE_CREATE_WORLD_PEACE)))
   LIBS = world-peace-stub
   LIBDIRS = $(ABUILD_OUTPUT_DIR)
endif
Note that users of the world-peace build
item actually don't even have to know whether they are using the
stub library or the real library—those details are all
completely hidden inside of its private build items. Declaring a
dependency on world-peace will make sure
that you have the appropriate interfaces available. You can see
an example of this by looking at main.cpp in
user/derived/main/src:
general/user/derived/main/src/main.cpp
#include <ProjectLib.hpp>
#include <CommonLib2.hpp>
#include <iostream>
#include <world_peace.hh>
#include "auto.h"

int main(int argc, char* argv[])
{
    std::cout << "This is derived-main." << std::endl;
    ProjectLib l;
    l.hello();
    CommonLib2 cl2(6);
    cl2.talkAbout();
    cl2.count();
    std::cout << "Number is " << getNumber() << "." << std::endl;
    // We don't have to know or care whether this is the stub
    // implementation or the real implementation.
    create_world_peace();
    return 0;
}
[32]
For example, if you have a local rule that generates
autogen.cc in the output directory, you
can simply list autogen.cc in one of your
SRCS variables, and abuild will find it
anyway. This is because abuild's make code uses
GNU Make's
vpath feature. We provide an example of
this construct in Section 22.2, “Code Generator Example for Make”.
[33]
The .i suffix is a traditional UNIX
suffix for preprocessed C code and was created as an
intermediate file by some compilers. GCC recognizes this as
preprocessed C code and also recognizes
.ii as a suffix for preprocessed C++
code. When abuild is given a .i file
as a suffix, its make rules use a pattern-based rule to run
the preprocessor over the file, it never uses the resulting
files as input to the compiler. Abuild uses the original
suffix of the file (.c,
.cc, or .cpp) to
determine whether the file is a C or C++ source file and does
not therefore need to distinguish between
.i and .ii.
[34]
LOBJ and OBJ usually
have the same value as each other, and the value is usually
“o” on UNIX systems and
“obj” on Windows systems.
However, there are some circumstances under which either of
these conditions may not be true, so it is best to use
LOBJ or OBJ explicitly
as required.
Table of Contents
- 19.1. A Crash Course in Groovy
- 19.2. The
Abuild.groovyFile - 19.3. Directory Structure for Java Builds
- 19.4. Class Paths and Class Path Variables
- 19.5. Basic Java Rules Functionality
- 19.6. Advanced Customization of Java Rules
- 19.7. The Abuild Groovy Environment
- 19.8. Using QTest With the Groovy Backend
- 19.9. Groovy Rules
- 19.10. Additional Information for Rule Authors
Note
This part of the manual is not as narrative and thorough as it
ideally should be. However, between this chapter and the
material in abuild's help system, all the basic information is
presented, even if in an overly terse format. As a supplement to
this chapter, please refer to the help text for the
java rules in Section E.8, “abuild --help rules rule:java”. You can also refer to the
complete code for the java rules in Appendix J, The java.groovy and groovy.groovy Files.
A Groovy-based backend, primarily intended for building Java-based software, was introduced in abuild version 1.1. This framework replaces the older, now deprecated, xml-based ant framework that was present in abuild version 1.0. [36] The old ant framework was extremely limited in capability in comparison to abuild's make backend, and it was always considered tentative. Abuild's groovy backend is at least as powerful as its make backend offers comparable functionality across the board. As of abuild 1.1, the specific rules provided for building Java code lack the maturity of the C/C++ rules provided as part of abuild's make backend, but they still represent a significant improvement over what was available in abuild 1.0.
You might wonder why you should consider using abuild's Groovy backend when other Groovy/ant-based build systems, such as Gant and Gradle are available. You may wonder why you should use abuild for Java at all when you could get transitive dependency management with Ivy or Maven. Surely those tools may be the right tools in some environments, particularly for Java-only projects, but, at least at their current stage of development, they lack the same cross-platform/cross-language interoperability support offered by abuild, even as they offer more mature rules for building Java code and better integration with other “standard” Java build environments. But this is the abuild manual, not a comparison of various Java build options, so, without further delay, we'll continue with our description of abuild's Groovy backend.
Although you don't really have to understand Groovy to use the above-described features of the Groovy backend, if you want to get the most out of abuild's Groovy backend, it helps to have a decent understanding of the Groovy language, and you will certainly need to understand at least some basic Groovy to take advantage of more advanced customization or to write your own rules. If you are already comfortable with Groovy, feel free to skip this section.
Providing a tutorial on Groovy would be out of scope for this manual. However, there are a few Groovy idioms that abuild (as well as many other Groovy-based systems) make heavy use of, and understanding at least that much, particularly if you are already a Java programmer, will certainly help you to make sense of what is going on here.
- Closures
A closure is an anonymous block of code that is treated as an object. When a closure is run, variables and functions that it uses are generally resolved in the context in which the closure was defined rather than in the context in which it is run. You can't get very far in Groovy without having a basic understanding of closures. You don't have to understand closures to use abuild's Groovy backend, but you certainly have to understand them, at least at some level, when you get to the point of writing custom rules.
Although a closure is often written as a literal block of code enclosed in curly braces, Groovy allows you to treat any function as a closure. In particular, Groovy allows you take a particular method call of a specific instance of an object and treat that method call as a closure. This feature is sometimes known as bound methods and is present in many modern programming languages. The syntax for creating a closure from a method in Groovy is
object.&methodName. Abuild's Groovy backend uses this construct heavily in its rule code.- Automatic Bean Formation
In Groovy, calling
object.fieldis just “syntactic sugar” forobject.getField(). In other words, if an object has a method calledgetField, then accessingobject.fieldis exactly the same as callingobject.getField(). It is important to understand this when looking at Groovy code that is interfacing with the Java standard library. For example,object.class.nameis the same asobject.getClass().getName(), which may not be obvious to a Java programmer with no prior Groovy experience.- List and Map Literals
Groovy supports lists and maps that are similar to those in Java. However, Groovy has a syntax for list and map literals that can appear directly in code. We make heavy use of these in the abuild Groovy backend, and in fact, you will find heavy use of these in just about any Groovy code.
The syntax for a list literal is
[val1, val2, val3,
        ...]
. The syntax for a map literal is['key1': value1, 'key2': value2, ...].-
The
<<Operator Groovy overloads the left-shift operator (
<<) for appending to lists. For example, this code:def var = [] var << 1 var << 2
would result in a list whose value is
[1,
        2]
. The<<operator, like all operators in Groovy, is just a shortcut for calling a specific corresponding method. This method returns the object being appended. So the above code could also have been written asdef var = [] var << 1 << 2
We use this syntax sometimes to append maps to lists of maps as it's a little cleaner (in the author's opinion) than explicitly coding lists of maps.
- Named Parameters
Under the covers, Groovy runs on top of the Java virtual machine. As such, Groovy function calls are really just like Java function calls: a function may take a specific number of arguments that appear in a specific order. The Java language doesn't support named parameters, so there is no encoding of them in Java byte code. Yet Groovy appears to support named parameters, so how does this work?
With Groovy, you often see function calls that look like they have named parameters. For example, the following would be a valid function call in Groovy:
f('param1': value1, other, 'param2': value2)You can even mix what look like named parameters with regular parameters as in the above example. What Groovy does when it sees named parameters is that it gathers them all up in a single map and then passes that map to the function as the first argument. As such, the above call is exactly equivalent to the following:
f(['param1': value1, 'param2': value2], other)
- Trailing Closures
In Groovy, it is common to see something that looks like a function call, or even bare function name, followed by a block of code in curly braces. In fact, this construct is used in virtually every
Abuild.groovyfile. This points to another special bit of Groovy syntax surrounding function calls. Specifically, if a function call is immediately followed by one or more closures, those closures are passed to the function at the end of its parameter list. Additionally, if a function is being called with no arguments prior to the trailing closure, the parentheses can be omitted. So the following blocks of code are exactly equivalent:f({println 'hello'}) f() { println 'hello' } f { println 'hello' }In all three cases, the function
fis being called with a single argument, and that argument is a closure that, when run, prints the stringhellofollowed by a newline.- Closure-based Iteration
Iteration over lists and maps is so common that Groovy provides convenience methods for calling a closure on each element of a list or map. In Groovy, a closure with one parameter can access the single parameter anonymously with through the variable
it. If there are multiple parameters (or zero parameters), they have to be named and followed by->to separate them from the body of the closure.If you have a list in a variable called
items, the following code:items.each { f(it) }would call the function
ffor each argument of the list. If have a map in a variable calledtable, this code:table.each { k, v -> f(k, v) }would call the function
fon each key and value in the map. All that's happening here is that Groovy is calling theeachmethod of the list and map objects with a closure passed to it as the last argument, which should hopefully be clear now that you've seen the trailing closure feature.- Safe Dereference
How often have you found yourself writing code where you first check whether a variable is null and, only if it isn't null, access it? Groovy offers a shortcut for this. This code:
obj?.method()
is the same as
if (obj != null)
{
    obj.method()
}
but it's a lot easier to write!
These features are often combined. In fact, this is extremely
common when using Groovy's AntBuilder,
which abuild uses very heavily. So if you see something like
this:
ant.javac('destdir': classesDir, 'classpath': classPath) {
    srcdirs.each { dir -> src('path' : dir) }
    compilerargs?.each { arg -> compilerarg('value' : arg) }
    includes?.each { include('name' : it) }
    excludes?.each { exclude('name' : it) }
}
you may be able to a little bit better of an idea of what's going on!
There's a lot more to Groovy than in this tiny crash course. You are encouraged to seek out Groovy documentation or get a good book on the language. But hopefully this should be enough to get you through the examples in this documentation.
To use abuild's Groovy backend, you must create a build file
called Abuild.groovy. We've already seen a
few examples of Abuild.groovy files in Section 3.6, “Building a Java Library” and Section 3.7, “Building a Java Program”.
Abuild's Groovy backend loads each build item's
Abuild.groovy file in a private context such
that no two build items' build files can interfere with each
other. Although the Abuild.groovy file is a
full-fledged Groovy script which could, in principle, run
arbitrary Groovy code, the intent is that your
Abuild.groovy file do nothing other than set
abuild parameters. Abuild parameters are similar to make
variables or ant properties. Unlike make variables or ant
parameters, they are a construct implemented by abuild's Groovy
backend itself rather than being something more fundamental to
Groovy.
[37]
Parameters look like ant or Java properties, but unlike ant
properties, their values can be modified. Parameter names are
typically divided into period-separated components, like
abuild.rules or
java.dir.dist.
The most common way to set abuild parameters is by assigning to
them inside of a parameters block. A
parameters block in Abuild.groovy looks
something like this:
parameters {
    java.jarName = 'example.jar'
    abuild.rules = ['java', 'groovy']
}
Within a parameters block, things that look like variables are
treated as abuild parameters instead. (For a discussion of
how this works, see Section 33.9, “Parameter Block Implementation”.) On the left
hand side of an assignment, abuild automatically treats the
assignment as an assignment to a parameter. On the right hand
side, you have to wrap the parameter name in a call to
resolve. You can also pass the names of
interface variables to resolve. For
example, the following would give the parameter
item.name the value of the interface variable
ABUILD_ITEM_NAME:
parameters {
    item.name = resolve(ABUILD_ITEM_NAME)
}
If the interface variable contains characters that make it invalid as a Groovy identifier, you can quote it, as in the following:
parameters {
    item.parameter = resolve('some-build-item.archive-name')
}
In addition to assigning to parameters, you can append to them
by using the << operator, which is the
same operator Groovy uses to append to lists. The following
three parameter blocks are equivalent:
parameters {
    abuild.rules = ['java', 'groovy']
}
parameters {
    abuild.rules << 'java' << 'groovy'
}
parameters {
    abuild.rules << 'java'
    abuild.rules << 'groovy'
}
It is even possible to delete parameters like this:
parameters {
    delete some.parameter
}
though there should seldom if ever be a need to do this.
Most of the time, working with parameters and parameter blocks is straightforward, but there are some subtleties that may pop up in rare instances. For a full discussion, refer to Section 19.7.3, “Parameters, Interface Variables, and Definitions”.
In a typical Abuild.groovy file, you will
be assigning to some rule-specific parameters and to at least
one the two parameters provided directly by abuild. The two
abuild parameters are abuild.rules and
abuild.localRules. The parameter
abuild.rules contains a list of rule sets
that will be providing code to generate targets from sources.
The vast majority of Groovy-based build items will set the
abuild.rules parameter. In rare instances, a
build item may need to provide additional rules for some one-off
purpose. In this case, the parameter
abuild.localRules may be set to a list of
files, relative to the directory containing the
Abuild.groovy file, that implement the
local rules. Note that abuild.rules contains
the names of rule set implementations while
abuild.localRules contains the names of
files that contain rule implements. (This
makes these parameters consistent with the variables
RULES and LOCAL_RULES used
by the make backend.) Abuild requires that at least one of
abuild.rules and
abuild.localRules be set in every
Abuild.groovy file.
Abuild's Groovy backend provides a default directory structure that it uses by convention when performing Java builds. It is possible to override all of these paths by setting specific parameters as described in Section 19.6, “Advanced Customization of Java Rules”. In this section, we just provide a quick overview of the default paths.
All paths are relative to the build item directory. Note that
abuild-java is the abuild output directory
for Java builds. All directories under
abuild-java are created automatically if
needed. All other directories are optional: abuild will use
them if they exist but will not complain if they are missing.
Note that the clean target removes the entire
abuild output directory.
Table 19.1. Default Java Directory Structure
| Directory | Purpose |
|---|---|
src | |
—/java | hand-coded Java sources |
—/resources |
hand-created additional files to be packaged into the root of
the item's JAR or EAR files or into the
WEB-INF/classes directories of the
item's WAR files
|
—/conf |
not used directly by abuild; a good place to put other
configuration files such as
application.xml, that are referenced by
specific parameters
|
—/—/META-INF |
hand-created files to go into the item's archives'
META-INF directories
|
—/web | |
—/—/content | hand-created content to go into the root of the item's WAR files |
—/—/WEB-INF |
hand-created content to go into the item's WAR files'
WEB-INF directories
|
abuild-java | the abuild output directory; all contents below here are generated |
—/src | |
—/—/java |
generated Java sources; treated identically to
src/java
|
—/—/resources |
generated additional files; treated identically to
src/resources
|
—/—/conf |
not used directly by abuild; a good place to put generated
versions of whatever you would put in
src/conf
|
—/—/—/META-INF |
generated META-INF files; treated identically to
src/conf/META-INF
|
—/—/web | |
—/—/—/content |
generated web content; treated identically to
src/web/content
|
—/—/—/WEB-INF |
generated WEB-INF; treated identically to
src/web/WEB-INF
|
—/dist | the location where abuild places generated archives |
—/doc | the location where abuild places Javadoc documentation |
—/junit | the location where abuild writes JUnit test results |
—/—/html | the location where abuild writes HTML reports generated from JUnit test results |
In Section 17.5.3, “Interface Variables for Java Items”, we discuss the three classpath interface variables. These are as follows, described here from the perspective of the item that is using them:
abuild.classpath: archives your item compiles with and probably packages in higher-level archivesabuild.classpath.external: archives your item compiles with but probably doesn't package in higher-level archivesabuild.classpath.manifest: archives that should go in the your the manifest classpath of archives you generate
Within the context of a Java build, there are four different types of classpath-like entities. We describe them here and show how they are related to the three classpath interface variables:
Compile-time classpath: used as the classpath attribute to the javac task. Its default value is the combination of the values of
abuild.classpathandabuild.classpath.external.Manifest classpath: used as Manifest-Classpath attribute in the manifest of any JAR files that you create. Its default value is the value of
abuild.classpath.manifest.Archive to package: the list of archives that get included in higher-level archives such as EAR files. Its default value is the value of
abuild.classpath.Runtime class path: the classpath used by wrapper scripts and test drivers. Its default value is the values of
abuild.classpathandabuild.classpath.externalplus any JAR files created by the current build item.
Each of the above classpaths is computed inside abuild's
java rules. In each case, the computed
value is used as a default value for attributes to the various
targets that use them.
To override the value of one of these classpaths for a specific
build item, there are two approaches. One is to effectively
replace the interface variable with a parameter. Since abuild
uses resolve internally to retrieve these
values, constructs such as this:
parameters {
    abuild.classpath.manifest << 'something-else.jar'
}
or
parameters {
    abuild.classpath.manifest =
        resolve(abuild.classpath.manifest).grep {
            it != 'something-else.jar'
        }
}
can be used to change the underlying variables used to construct the various class paths. To understand why this works, please refer to Section 19.7.3, “Parameters, Interface Variables, and Definitions”.
The other way these can be overridden is to specifically override the classpath that is used by each target. This can be done by using control parameters, as discussed in Section 19.6, “Advanced Customization of Java Rules”. Each target's attributes map contains a key that can be set to supply a new value for whichever classpaths need to be changed.
Virtually all Java-based build items will set the
abuild.rules parameter to the value
'java' or to a list that includes that value.
The java rules are quite flexible and give
you considerable leeway on how things should work. In this
section, we will describe only the most basic use of the
java rules. When using the rules in this
way, you control everything that you are going to build by
setting a few simple parameters, and you set up your build item's
directory structure according to abuild's conventions. In
later sections, we will discuss other more general ways to
customize or override abuild's default behavior.
The java rules perform a variety of
functions, most of which must be enabled by setting one or more
parameters. With appropriate parameters, the
java rules can perform the following tasks:
Compiling Java source code into class files
Generating Javadoc documentation
Creating JAR files populated by class files and other arbitrary contents
Creating simple wrapper scripts that run executable JAR files in the context of the source tree; these wrapper scripts are useful for testing within the source tree, but not for installation or deployment
Creating WAR files that contain locally produced files as well as signed JAR files or other content
Producing higher-level JAR-like archives, such as RAR files, that may contain other JAR files
Creating EAR files that may contain locally produced files including other archives as well as other content
We will discuss each of these briefly in turn. In the discussions below, we describe the default behavior of each of these capabilities. Keep in mind that virtually every aspect of them, including all the default paths and file locations, can be customized. We will be describing how to customize and override the default behavior in later sections.
The sections below include prose descriptions of the default locations of files. To see all this presented in one place, please refer to Section 19.3, “Directory Structure for Java Builds”.
Note
At this time, this manual does not include any examples of creating high-level archives or signed JAR files. To see examples, you may refer to abuild's test suite, which fully exercises all available functionality. The most comprehensive example that uses the Groovy framework is the code generator example (Section 22.3, “Code Generator Example for Groovy”), which also illustrates a few other aspects of the Groovy framework.
By default, Java compilation involves compiling with
javac every .java file
found in src/java and writing the output
files into abuild-java/classes. In
addition to src/java, abuild also looks
for Java sources in abuild-java/src/java,
which is where automatic code generators are expected to put
generated Java sources. You may add additional directories in
which abuild will search for .java files
to compile by adding the names of the directories to the
java.dir.extraSrc parameter.
By default, abuild invokes javac with
debug and deprecation turned
on and with the additional arguments -Xlint and
-Xlint:-path.
You may customize Java compilation in several ways including changing the locations in which abuild finds source files or writes output files, changing the compile-time classpath, or changing the attributes passed to the ant javac task. For details, see Section 19.6, “Advanced Customization of Java Rules”.
If the java.jarName parameter is set,
abuild will create a JAR file with the indicated name. For an
example of this, see Section 3.6, “Building a Java Library”. By default, you are
expected to put any hand-created files other than class files in
src/resources. Build items that
automatically generate additional files to include in the JAR
file should place those files in
abuild-java/src/resources. All files in
src/resources,
abuild-java/classes, and
abuild-java/src/resources, subject to the
usual ant exclusions (version control directories, editor backup
files, etc.), will be included in the JAR file. You may specify
additional directories whose contents should be included by
appending the names of the directories to the parameter
java.dir.extraResources. Additionally, any
files in the src/conf/META-INF and
abuild-java/src/conf/META-INF directories
will be included in the META-INF directory
of the JAR file. You can specify additional META-INF
directories by setting the parameter
java.dir.extraMetainf.
As always, all default path names may be overridden. It is also
possible to provide additional arguments to the
jar task, to set additional keys in the
manifest, and to create multiple JAR
targets. For details, see Section 19.6, “Advanced Customization of Java Rules”.
If the java.wrapperName and
java.mainClass parameters are set in addition
to the java.jarName parameter, abuild will
generate a simple wrapper script that will invoke
java on the JAR file using the specified main
class and with the calculated or specified runtime class path.
For an example of this, see Section 3.7, “Building a Java Program”. The wrapper script
is placed directly in the abuild output directory.
It is possible to have abuild generate multiple wrapper
scripts that invoke the application using different
main classes. For details, see Section 19.6, “Advanced Customization of Java Rules”. For an example, see
(Section 22.4, “Multiple Wrapper Scripts”).
If you have implemented JUnit tests suites, you can run them
using either the test or
batchtest nested tasks of the
junit ant task. If you have a single test
suite that you want to run, you can set the
java.junitTestsuite parameter to the name of
the class that implements the test suite. If you want to run
multiple test suites using the batchtest
task, you can set the parameter
java.junitBatchIncludes and optionally also
java.junitBatchExcludes to patterns that will
be matched against the classes in
abuild-java/classes. You may provide
values for all of these if you wish, in which case abuild will
run all test specified. Abuild will write XML test output to
the abuild-java/junit directory and,
whether the tests pass or fail, will also generate an HTML
report in abuild-java/junit/html. By
default, if the test fails, the “build” of the
test target for the item will fail. This and
other behavior can be overridden; see Section 19.6, “Advanced Customization of Java Rules”.
When creating WAR files, EAR files, or other high-level archives
that may contain other JAR files, JAR signing is available by
default. In order for abuild to sign any JAR files, you must
set the java.sign.alias and
java.sign.storepass parameters, which
correspond to the mandatory alias and
storepass attributes of the
signjar ant task. You will usually also want
to set the java.sign.keystore and
java.sign.keypass parameters, corresponding
to the keystore and keypass
attributes to the signjar task. In most
cases, you will set these parameters in one place. This place
can be either a plugin or a single build item that all build
items that sign JARs will depend on. It's okay to put these in
a plugin if all JARs in your project will be signed in the same
way.
Setting the above parameters is necessary in order to have any
JARs be signed, but it is not sufficient; you must also indicate
which JARs are to be signed, which you will generally do in the
higher-level archive build item that actually does the signing.
The usual way to do this is to set the
java.jarsToSign parameter to a list of paths
to JAR files that should be signed. Although these JARs are
typically created by other build items, you should never have
your build item's Abuild.groovy file refer
to JARs created by other build items directly by path even using
a relative path. Instead, you should always have the build item
that creates the JAR file provide the path to the JAR file with
an abuild interface variable, and you should add that to the
java.jarsToSign parameter by calling
abuild.resolve on the interface variable.
This way, your build item will continue to work even if the one
that provides the JAR file moves or is resolved in a backing
area.
It is also possible to arrange for JARs to be signed by having
them appear in the abuild-java/signed-jars
directory. This case can be useful if the same build item that
is signing the JAR files is also creating them, either because
it is actually compiling Java code itself or because it is
repackaging other JAR files. However, if you find yourself
writing code that just copies other JAR files into
abuild-java/signed-jars, then you should
probably be assigning the paths to the those JAR files to the
java.jarsToSign parameter instead.
Whichever method you use, or even if you use both methods
together, the signed JARs will be placed in the
abuild-java/signed-jars directory. Since
abuild will sign unsigned JARs in that directory, abuild
invokes the signjar task with lazy JAR
signing by default. If it didn't, then every time you invoked
abuild, it would re-sign all JAR files in that directory even
if they were already signed. Lazy JAR signing allows abuild
to avoid repeatedly signing the same JARs, which makes it
possible to have abuild do nothing if invoked on an area that
is fully built. (In other words, this allows builds to be
idempotent.) If you have a reason not to
use lazy JAR signing, it is possible to disable it and override
the JAR signing behavior to avoid re-signing the JARs, but this
should seldom if ever be required. For details on the full
range of customization opportunities available, please see Section 19.6, “Advanced Customization of Java Rules”.
If you wish to build a WAR file, you must set the
java.warname parameter to the name of the WAR
file and the java.webxml parameter to the
path to the web.xml file for that WAR. The
java.webxml parameter may be set to a
relative path, in which case it is resolved relative to the
build item's top-level directory (the directory containing
Abuild.groovy). By default, abuild will
package into WEB-INF/classes the contents
of src/resources,
abuild-java/classes,
abuild-java/src/resources and any
additional directories named in
java.dir.extraResources. It will also
package at the root of the WAR file any files in
src/web/content,
abuild-java/src/web/content, and any
directories named in
java.dir.extraWebContent. It will populate
META-INF exactly as it does for JAR files.
The WEB-INF directory will be populated
from src/web/WEB-INF,
abuild-java/src/web/WEB-INF, and any
directories named in java.dir.extraWebinf.
For additional information about creating WAR files, please see
Section 19.6, “Advanced Customization of Java Rules”.
Abuild includes default rules for creation of high-level
archives, in addition to WAR and EAR files, that may contain
other JAR files, including signed JARs. To create a JAR-like
high-level archive, set the parameter
java.highLevelArchiveName to the name of the
archive to be created. By default, the archive is populated
exactly as a regular JAR file is, including pulling files from
all the same places. In addition, by default, high-level
archives contain all archives in the package class path at the
root of the archive. The list of additional files to package in
the high-level archive can be customized along with all the
things that can be customized for regular JAR files. For
details, see Section 19.6, “Advanced Customization of Java Rules”.
To create an EAR file, you must set the
java.earName and
java.appxml parameters. EAR files are
populated with the same files from the same places as high-level
JAR-like archives, including packaging all items from the
package class path at the root of the EAR file,
except that they to not contain files from
abuild-java/classes. For additional
information about customizing creation of EAR files, see Section 19.6, “Advanced Customization of Java Rules”.
Abuild's Java rules can be customized using a layered approach. At the most basic level, you can set specific parameters that tell abuild how to run its normal rules. As you need more advanced functionality, you can override the locations that abuild uses for various types of files, pass additional arguments to various underlying ant tasks, cause targets to be run multiple times, or even supply your own Groovy closures to be run for specific tasks. This is also described in abuild's built-in help for the Java rules. The help text is included in this document as well; see Section E.8, “abuild --help rules rule:java”.
The Abuild.groovy file along with all rules
implementation files are loaded as scripts by the Groovy backend.
We have already discussed the parameters
closure that is available within the
Abuild.groovy file. This closure is
provided by being included in the binding,
which is a mechanism used by Groovy to communicate with embedded
scripts. Here we discuss the remainder of the Groovy environment
used by abuild
There are three variables provided through the binding to any Groovy script that abuild loads:
-
abuild An instance of the
org.abuild.groovy.BuildStateobject, which holds onto all information about the state of the current build. This includes information about parameters, targets, and other things as well. We discuss the interface of this object in Section 19.10.1, “Interface to theabuildObject”, though most build items that don't implement any of their own rules will find their interaction with it limited to callingabuild.resolveif they have any interaction with it at all.-
ant An instance of a Groovy
AntBuilderobject set up with an antProjectspecific for abuild. We discuss the ant project in more detail in Section 19.7.2, “The Ant Project”.-
parameters A closure that provides an environment for convenient setting of parameters. We discussed this above in Section 19.2.1, “Parameter Blocks”.
Abuild creates a fresh ant project for each build item that it builds. No information is passed between build items through the ant project. The only mechanism for passing information between abuild build items is the interface system. This barrier is critical to abuild's scalability. It also results in using the same mechanism to pass information between build items regardless of whether the build items use the same backend, which is important for support true cross-language development.
The primary mechanism for passing information between a build
item and the rules used to build it is through setting and
resolving parameters, but abuild also provides some
information through ant properties. Specifically, when you
define a variable on abuild's command line, that variable
becomes available as an ant property in addition to being
visible to resolve in abuild's parameter
blocks (or to abuild.resolve from anywhere
in the abuild Groovy environment).
[38]
Additionally, abuild will set the project's logger and log
level based on how it was invoked, and abuild will also set
the basedir property to the output directory
of the current build item. Note that since all Java builds are
running in one JVM, abuild cannot change the current
directory. All well-behaved ant tasks are supposed to resolve
relative paths to basedir anyway though, so
this should generally not matter. If you find builds failing
with odd messages about missing files or directories below where
you happened to start abuild, it may be because of relative
paths being passed to incorrectly implemented ant tasks. In
this case, you can usually just prepend
${basedir}/ to the relative path you are
providing as an attribute.
Note that, although abuild makes full use of ant tasks through the ant project and the ant builder, abuild does not use ant's target facility. Instead, it defines its own with target bodies being provided by Groovy closures. This provides much greater flexibility and ease of implementation.
We have discussed how to set and resolve parameters within an
Abuild.groovy file, but we have only just
glossed over interface variables and variable definitions passed
on abuild's command line. Most of the time, you don't have to
be concerned about the distinction, but sometimes it might be
important. If the explanation in this section doesn't make
sense to you, just skip it for now. You may never need to
understand the distinctions made here, but if something isn't
working the way you expect, you can always refer back to this
section.
Abuild's groovy backend actually maintains three separate
namespaces of variables: parameters, interface variables, and
definitions. Of these, the only ones you can actually modify
from an Abuild.groovy file are parameters,
so any assignment made in a parameter block affects a parameter.
However, calls to resolve have access to
interface variables and definitions. As a reminder, parameters
are set explicitly in parameters blocks. Interface variables
come from abuild's interface system and are set in
Abuild.interface files. Definitions are
passed on abuild's command line through arguments of the form
VAR=value. When you resolve a variable with
resolve, here is exactly what happens:
If there is a definition of that variable that was passed on abuild's command line, return that value.
Otherwise, if there is a parameter by the name, return the value of the parameter.
Otherwise, if there is an interface variable by that name, return that value
Otherwise, return null
When you append to a parameter in a parameter block (or by
calling abuild.appendParameter), if there
is no parameter with the name of the variable that you are
appending to, abuild will first try to initialize the
parameter by calling resolve. This means
that if you initialize something as an interface variable and
then append to it in a parameter block,
resolve will return a value that is the
interface variable's value appended with the changes made in
your parameter block. However, since definitions take
precedence over both interface variables and parameters, if you
specify the value of a variable on the command line, the affect
of modifying a parameter by the same name will be ignored by
future calls to resolve. What this all
means is that variables defined on the command line effectively
override any values specified in the interface or build files.
This is equivalent to the behavior you would see with make or
ant.
[39]
If the above explanation didn't make a lot of sense, don't worry
about it. It's set up so that the Right Thing happens most of
the time without your having to worry about it.
For simple QTest-based test suites, nothing unusual is required:
just create your .test files in the
qtest directory as always. If you are using
QTest's coverage system, you can assign the names of the source
files containing coverage calls to the TC_SRCS
parameter, which abuild will automatically export to the
environment. Abuild also automatically exports
TESTS, so you can pass it on the
abuild command line (e.g. abuild
TESTS="one two" to run one.test
and two.test) if you want to run a subset of
your tests.
The easiest way to pass information from your build into your
test suite is through environment variables. For example, you
may need to pass in the path of a configuration file or JAR file
so that your test suite can find it. To do this, you can create
parameters containing those values and then append the names of
the parameters to the qtest.export parameter.
For each value in qtest.export, an upper-case
version of the variable name is exported to the environment with
the value returned by calling resolveAsString
on that parameter. For example, if you had the following
parameter block in your Abuild.conf:
parameters {
    TEST_CONFIG = 'test_config.xml'
    qtest.export << 'TEST_CONFIG'
    // other standard parameters ...
}
your test suites would be able to reference
$ENV{'TEST_CONFIG'} to retrieve the value
test-config.xml.
The groovy rule set, available by setting
abuild.rules to ['java',
'groovy'], adds the ability to build Groovy code to the
functionality of the java rules. The basic
functionality is that all .groovy files in
the src/groovy and
abuild-java/src/groovy directories are
compiled to .class files and written to the
abuild-java/classes directory. The order in
which Java and Groovy sources are compiled is determined by the
order in which java and
groovy are added to
abuild.rules, but you must include
java if you include
groovy. If you have a build item that
builds both Java and Groovy code, you should avoid having
circular dependencies between your Java and Groovy code. If your
Groovy classes make calls into your Java code, list
java in your abuild.rules
parameter first. If your Java code makes calls to your Groovy
code, then include groovy first. For
additional information on how to customize compilation of Groovy
code, refer to abuild's online help for the
groovy rules. This help text is included in
Section E.7, “abuild --help rules rule:groovy”.
The following sections describe Groovy interfaces of objects that are available to rule programmers.
The abuild variable, provided in the Groovy
binding to all scripts run in abuild, is the primary object
that you will interact with. Here we describe its intended
public interface.
[40]
These methods are used to access the values of definitions,
parameters, and interface variables. They can be used either
in Abuild.groovy files or in custom rule
code.
-
resolve('name',defaultValue) If
namerepresents a definition (specified withVAR=valon the command line), return the definition value. Otherwise, if a parameter namednameis a parameter, return the parameter value. Otherwise, ifnameis an interface variable, return the value of the interface value. Otherwise, returndefaultValue.The implementation of this method is what is responsible for implementing the effect of command-line definitions overriding parameter settings and interface variables, which gives the Groovy backend the same behavior as make and ant.
-
resolve('name') calls
resolve('name', null)-
resolveAsString('name', defaultValue) If
resolve('name', defaultValue)returns other than null or a string, fail. Otherwise, return value as type String.-
resolveAsString('name') calls
resolveAsString('name', null)-
resolveAsList('name', defaultValue) If
resolve('name', defaultValue)returns a list, return that value. Otherwise, return a list containing that value. This makes it convenient to deal with parameters whose values may contain a single value or a list of values without having to handle the special case in the target.
Most of the time, you will set and modify parameters inside a parameter block (Section 19.2.1, “Parameter Blocks”). Setting and modifying parameters inside a parameter block is essentially just “syntactic sugar” for the underlying interface, which is described here. This interface is available if you need to modify parameters from somewhere other than a parameter block.
-
setParameter('name', value) Sets parameter
nametovalue, replacing any previous value that may have been set.-
appendParameter('name', value) If parameter
namehas been previously set withsetParameter(and not subsequently deleted), this is an error. Otherwise, makes the value of the parameter a list and appendsvalueto it.-
deleteParameter('name') Removes any previous value for parameter
name. Note that if an interface variable by the same name exists, deleting the parameter will re-expose the value of the interface variable to calls toresolve.
The following methods supply information about the build
environment. These are most often used from within rule code,
but they can also be useful in
Abuild.groovy for setting parameter
values.
-
buildDirectory A
Fileobject containing the build directory (the abuild output directory)-
sourceDirectory A
Fileobject containing the source directory (the build item directory)-
itemPaths[item] Contains The full path to the given build item. This is intended primarily for rule code to get the location of the build item providing the rule code (i.e., for build items to get their own paths) or, in some cases, paths of items they directly control or contain. Paths are only available for items in the dependency chain of the current build item.
Warning
You should not use
itemPathsto find the location of arbitrary build items. If you need information about where something is in a build item, the build item in question should provide that information through an interface variable.
These methods are used to create or modify targets. You would
call these methods from custom rule code. They would not be
called from Abuild.groovy.
-
configureTarget('name', named parameters) { closure } Registers target
name; i.e., causes it to exist if it does not already exist.If a closure is provided, adds it to the list of closures for target
name.If the
depsnamed parameter is specified, its value must be a string or a list of strings representing dependencies. Each dependency is added as a dependency of targetname.If the
replaceClosuresnamed parameter is specified, its value must be a boolean. Iftrue, any previous closures associated withnameare removed before adding any newly specified closure.-
configureTarget('name') Calls the three-argument
configureTargetwith no named parameters or closure body; i.e., just causes the target to exist.-
addTarget('name') Synonym for
configureTarget('name')-
configureTarget('name', named parameters) Calls the three-argument
configureTargetwith no closure body-
addTargetDependencies('name', ['dep1', 'dep2']) Calls
configureTarget('name', 'deps': ['dep1',
          'dep2'])
; i.e., creates the target and adds to its dependency list-
configureTarget('name') { closure } Calls three-argument
configureTargetwith no named parameters-
addTargetClosure('name') { closure } Synonym for
configureTarget('name') { closure }
The following methods are provided for use in custom rules.
-
runActions(String targetParameter, Closure defaultAction, Map defaultAttributes) targetParameteris the name of a parameter that, if defined, resolves to a list whose elements are either maps or closures. If not defined, it is treated as if its value were a list containing an empty map.For each element in the resulting list, if it is a closure, call it. If it is a map, then expand the map by copying entries from defaultAttributes for keys that are not present in the map. Then call
defaultAttributeson the resulting map.For an example of
runActions, see Section 22.3, “Code Generator Example for Groovy”.-
fail(String message) Causes the build to fail immediately by throwing an instance of
AbuildBuildFailure.-
error(String message) Issues an error message and continues to the end of the closure. After the closure finishes, the build is considered to have failed, so unless
-khas been specified, no additional closures will be called.-
runTarget(target) If
targethas not yet been run, runstargetpreceded by its full dependency chain. No target is ever run more than once.It is seldom necessary to call
runTarget. It is generally better to let targets get run automatically through the dependency chain, though there are some instances in which it might make sense to use this method. For example, abuild uses it internally to have the check and test targets depend on all and call test-only, making it possible for test-only to provide test functionality without have any of its own dependencies. Without this facility, it would be necessary to implement the test functionality multiple times as is the case with the make backend. TherunTargetmethod gives this Groovy-based build framework capability beyond what can be done with make's target framework.-
runTargets([target, ...]) Runs each target specified in the order given subject to the constraints that no target is run more than once and that no target is run before all of its dependencies have been run.
The org.abuild.groovy.Util class provides
a small number of static methods and fields that may be useful
to rule authors. You can gain access to this class by importing
it in your Groovy code.
absToRel(path, basedir): convertpathinto a path relative tobasedir. Most of the time, you need absolute paths, which you can easily get from theFileobject, but sometimes you explicitly need a relative path, such as when generating relative links. This method can help you with that task.inWindows: a field whose value is true if you are in a Windows environment. You should use this very sparingly as it is possible to create platform-dependent output files in what is supposed to be a platform-independent directory. (See Chapter 30, Best Practices for a discussion.) However, sometimes when you are executing external programs, it becomes necessary to do it different on a Windows system from a UNIX system. This field can help you in those cases.
[36] For limited documentation on the old framework, see Appendix K, The Deprecated XML-based Ant Backend.
[37] In fact, abuild parameters are nothing more than keys in a map of parameter values.
[38] Truth be told, the primary reason for this is that the same ant project is passed to the Groovy backend as to the deprecated xml-based ant backend, for which properties are the only useful way of sending in information. However, setting these properties certainly doesn't hurt, and it might even help, so we will continue to do it.
[39]
It is possible to get at the interface, definitions, and
parameters directly through the abuild
object, but you shouldn't do it. If you are in a situation
where you are depending on that behavior, you're probably
doing something wrong.
[40] Groovy 1.x does not enforce access control on method or field invocations.
Table of Contents
When examining the output of a large build, it is desirable to be able to scan the output of the build to look for errors and warnings, and even to be able to associate specific lines of output with the build items that produced them. In versions of abuild prior to 1.1.3, the output of a multithreaded build would consist of outputs from the builds of multiple build items all interleaved with each other in arbitrary ways. This would make the output virtually impossible to parse programmatically and even tricky for a human reader to fully understand. This chapter introduces features that help to improve the usability of abuild's output. They are most useful for multithreaded builds, but in some cases, they can help with single-threaded builds as well.
When abuild is used to perform a build, the overall build
process consists of several phases: a
check phase, a build phase, and a summary phase. In the check
phase, abuild reads and validates
Abuild.conf files, performs integrity
checks, and so forth. In the build phase, abuild walks through
the dependency graph and invokes backend processes to perform the
actual build steps. After the build phase is complete, the
summary phase includes a summary of any failures as well as an
indication of elapsed time.
During the build phase, abuild invokes various backend programs to individually build each item on each of its platforms. For purposes of discussion, we refer to those individual builds as jobs. A job always corresponds to a specific build item being built on a specific platform.
When abuild invokes backend processes to do the actual build steps, it may either capture the output of the backend processes or it may let the backend processes inherit standard input, standard output, and standard error from abuild itself. We refer to the way in which abuild handles the output of its backend programs as its output mode.
Each line of abuild's output can come from one of two sources: either abuild can generate the output itself, or the output can come from one of the backends invoked on behalf of the individual job. The backend output would include output from programs like make or ant or from anything they may invoke, such as compilers. Abuild can either capture and process output from its backends, or it can just let the backends use the same standard input, output, and error as abuild itself. We refer to what abuild does with its output as its output mode.
Abuild has three output modes: raw mode,
interleaved mode, and buffered
mode. In interleaved and buffered modes, each job is
run with standard input connected to the null device
(/dev/null in UNIX environments and
NUL in Windows environments) and with
standard output and standard error redirected to two separate
pipes. Abuild reads from each job's output and error pipes and
process the results with its own logging facility.
In raw mode, abuild invokes backend processes without capturing
their output. The backend processes just write to the same
standard output and standard error as abuild itself uses.
Additionally, each backend has access to abuild's standard
input, which makes it possible for builds to prompt the user for
input. For single-threaded builds, abuild's default behavior
is to run in the raw mode. This was the only output mode
available in versions of abuild prior to 1.1.3. To explicitly
tell abuild to use raw output mode, specify the
--raw-output flag when invoking abuild.
In interleaved mode, every job is assigned a specific job prefix, which is a fixed-length (possibly zero-filled) number enclosed in square brackets. Every line of output generated by abuild itself, as well as every complete line generated by the backend, is prefixed with the job prefix and then written to abuild's standard output or standard error as appropriate. Messages generated by abuild are written immediately, and lines generated by the jobs' backends are written as soon as they are received through the pipes. By using the job prefix, it is possible to unambiguously associate each line of abuild's output with the job (build item/platform) that generated it while still having each line of output written as soon as it is generated.
For multithreaded builds, abuild runs in interleaved mode by
default. Interleaved mode may be specifically requested by
passing the --interleaved-output flag to
abuild. If --interleaved-output is specified
for a single-threaded build, abuild still runs the backend
through pipes and disconnected from standard input, but it does
not prepend each line with a job prefix.
In buffered mode, rather than prefixing lines with a job prefix
and outputting them as soon as they are available, abuild saves
up (buffers) all the output from a particular job and outputs it
all at once when the job completes. This ensures that, even for
a multithreaded build, there is no interleaving of output from
the builds of different build items. To enable buffered output,
invoke abuild with the --buffered-output flag.
When abuild invokes a backend, anything that the backend writes to its standard error will ultimately be written to abuild's standard error, and likewise, anything the backend writes to standard output will end up on abuild's standard output. This makes it possible to use shell redirection for standard output and standard error even when using interleaved or buffered output modes. However, separation of standard output from standard error removes needed context from error messages, so it's very useful to be able to distinguish output lines from error lines when looking at the complete output of a build.
This can be achieved by setting a specific prefix to be prepended
to all normal output lines and/or all error output lines. To
specify a prefix to be prepended to non-error output lines, use
the
--output-prefix=
option. To specify a prefix to be prefix to error lines, use
prefix--error-prefix=.
If either of these options is specified and no output mode has
been explicitly selected, abuild will use interleaved output
mode, even for single-threaded builds. If raw output mode is
explicitly selected, then any output or error prefix
specifications will be ignored.
prefix
To make programmatic distinction of output lines from error lines
in abuild's output, it is recommended that you specify output
and error prefixes of the same length. To make error messages
stand out, you could run abuild with
--error-prefix=
(setting the output prefix to a number of spaces equal in length
to the size of the error prefix). This way, you could be sure
that all lines as originally created by abuild or its backends
would start in the same column of the prefixed output, and that
the first column of the prefixed output would contain
'E '
--output-prefix=' 'E for any error or warning. Another way to
make error messages stand out would be to omit the error prefix
entirely and to specify an output prefix consisting of several
space characters. This would cause all output lines to be
indented, making it easy to visually scan the build output for
error messages. Note that this approach is not unambiguous
because you can't tell output lines from error lines that happen
to start with several spaces. But for a human reader, it may be
more to your preference.
A principal goal of adding output capture modes, output prefixes, and error prefixes to abuild was to make it easier to programmatically parse abuild's output. By combining these features, it is possible to run abuild in batch mode and to then unambiguously associate each line of abuild's output with the specific platform build of the specific build item that was responsible for producing that line of output.
This section describes how such a parser could be implemented.
You can also find an example parser implementation in
misc/parse-build-output relative to the top
of your abuild distribution. (You can always find the top of
the abuild distribution by running abuild
--print-abuild-top.) Since a Perl script is worth a
thousand words (as they say), and since the
parse-build-output script is actually tested
in abuild's test suite, it can serve as a tool for helping you
understand the details of abuild's output as well as being a
great starting point for writing your own parser.
When abuild performs a build, the overall build consists of a
check phase, a build phase, and a summary phase. In the check
phase, abuild reads and validates
Abuild.conf files, performs integrity
checks, and so forth. Under normal conditions, the check phase
doesn't produce any output. If everything is in order at the end
of the check phase, the build phase begins. Immediately before
beginning the build phase, abuild always outputs the line
abuild: build starting
Immediately following the build phase, abuild outputs the line
abuild: build complete
After the build phase is complete, abuild will output a summary
of any failures that may have occurred as well as a report of the
total duration of the build. Parsers may use the build
starting and build complete lines as
shown above to demarcate the build phase.
Within the build phase, output can be associated with a build item/platform pair (referred to here as a job) in the following way:
If output/error prefixes are specified, they always precede any job prefixes generated in interleaved mode. Strip them from the beginning of each line. For this to work unambiguously, it is easiest if you use output and error prefixes of the same length.
In interleaved mode, all lines of output that are part of a build start with a number enclosed in square brackets and followed by a single space. It is possible for some lines not to start this way, but such cases indicate an unusual error or failure condition and are discussed later in this section.
The first line of output from a build of a given item on a given platform will always start with
abuild:
item-name(abuild-output-directory)possibly followed by other text or punctuation. This will always be at the beginning of the line, after removing any output, error, or job prefixes.
In interleaved mode, the above can be parsed the first time a line appears with a given job prefix to associate the job prefix with the job.
In buffered mode, if a line that matches the above pattern is the first line to mention a specific item/platform pair, it marks the beginning of output for that job, and all subsequent lines until a line that indicates the start of a different job or the end of the build phase belong to that job.
There are a few exceptions to the above rules, but they only
happen in cases of serious errors, and most parsers can safely
ignore them, as long as they treat unexpected input as general
error conditions. (The sample parser actually does take these
cases into consideration.) Specifically, in both buffered and
interleaved mode, certain major errors from the java builder
process, such as abnormal termination or “rogue
output” from the java backend, can result in asynchronous
output from the java builder.
[41]
In interleaved builds with multiple threads, this output is
prefixed with the string
“[JavaBuilder] ”. In
buffered builds, it is not marked in any way, but will always
appear between the uninterrupted outputs from individual jobs.
Most parsers would probably end up associating such output with
the job that had most recently completed, which would probably be
wrong, but again, this is a very rare case. In a single-threaded
build, any rogue output from the java builder process would have
to be related to the job that is in progress, so the fact that it
is unmarked doesn't pose any problems.
In any case, any line of output that doesn't conform to the output that the parser expects should just be treated as a general error from abuild. Such a line either indicates a serious problem with abuild itself (such as an assertion failure or abnormal termination, probably indicating a bug in abuild or a system error) or a bug in the parser. Either way, the output should be preserved.
When abuild is running in one of the output capture modes (interleaved or buffered), it sends the outputs of any backend build commands through a pair of pipes (one for standard output and one for standard error), reads from those pipes, and sends the results through its own logging facility. This is usually harmless, but there are several minor issues that can result:
By default, standard output is usually block-buffered when output is written to a pipe, while standard error is usually unbuffered. This means that, unless a program takes explicit action to flush (or unbuffer) its output, error messages could appear in the output earlier than they otherwise would.
In practice, this is not expected to be a real problem. The reason is that it is extremely common to run builds with output redirected to pipes or files—virtually all continuous integration packages or automated build scripts do this. As such, virtually every commonly used build program already unbuffers its output. If you have been previously running abuild with its output going to a pipe or into a file and haven't noticed any re-ordering of output and error, then this issue is not likely to affect you.
Even if the program that abuild invokes unbuffers its output, there's still a possibility that an individual error line may appear earlier or later by a small distance than it would under ordinary conditions. The reason for this is that abuild runs with standard output and standard error redirected through two separate pipes, which opens up the possibility of a race condition. If, as abuild reads data from the two pipes, both pipes have data ready to be readb at the same time, it is possible that abuild may read them in a different order from the order in which the pipes were written. There is no solution to this problem as the information about when the pipes were written is simply not available. This is a necessary cost of being able to distinguish standard output from standard error. In practice, it doesn't usually pose any real problems—the misplaced error line will still be unambiguously associated with a specific job.
As abuild reads the output and error pipes of the programs it invokes, it sends them to abuild's output or error streams a line at a time. Although it is rare for a program to interleave standard output and standard error within a single line, if it does, abuild will end up separating the text onto separate lines. This is an inevitable consequence of the fact that abuild uses separate pipes for standard output and standard error, and it may actually be desirable in some instances.
If the last line of output (or error) from a program that abuild invokes does not end with a newline, abuild will append the string
[no newline]followed by a newline to the line. This way all lines output by abuild end with a newline. This ensures that abuild's own output is always anchored to the beginning of a line.If you interrupt abuild abnormally, for example, by hitting CTRL-C, abuild will let the operating system terminate it in the usual way. This means that any partially read output from a pipe will be lost. In interleaved mode, any lost output would generally be less than one line of output, though it could be more in the (unlikely )case of unbuffered pipes. In buffered mode, all the output from any partially completed job will be lost. Note that no output is ever lost if abuild is allowed to terminate on its own, unless it terminates as a result of an internal error or assertion failure, which would never occur during routine operation. (An error in a specific build would never cause that to happen.)
In buffered mode, since abuild doesn't output anything for a given item's build until that item's build is completed, it is possible that abuild could sit for a long time without generating any output. Abuild gives no indication of in-progress builds in buffered mode. If you need continuous feedback, use interleaved mode instead. (This is the main reason that interleaved mode is the default for multithreaded builds even though buffered output is a little easier to read.) Note that monitored mode (Chapter 31, Monitored Mode) can be combined with interleaved or buffered mode, and that any output generated by monitored mode will be interleaved between item builds when abuild is running in buffered mode. The sample parser makes no provisions for handling monitored mode output.
[41] The java builder process may run multiple ant jobs in separate threads. It separates the output of different projects by creating each ant thread in a separate thread group and associating a job identifier with the thread group. There are two ways the java builder process could create rogue output: one is for an ant task to create a thread in a separate thread group and to have that thread write something to standard output or standard error, and the other is for the java builder process itself to generate output. The former case is very unlikely, and the latter case would indicate a bug in the java builder process, or a severe error such as failure of the JVM. Additionally, if the java builder process crashes, abuild will generate a message that indicates this, and that message would not be associated with any build.
Table of Contents
In most cases, development efforts consisting of large amounts of dynamic and evolving code will be best served by sticking with static libraries. Sometimes, however, it may be desirable or necessary to create shared library object files. Abuild provides support for creating shared libraries on UNIX-based systems and DLLs on Windows systems. Note that there are many ancillary concerns one must keep in mind when using shared libraries such as binary interface compatibility. We touch lightly on these topics here, but a full discussion is out of scope for this document.
Building shared libraries with abuild is essentially identical
to building static libraries. You still set up your shared
library targets using TARGETS_lib in
Abuild.mk just as you would for static
libraries. In order to tell abuild that a library should be
created as a shared library, you must set the additional variable
SHLIB_ where
libnamelibname is the name of the library
target. The value of this variable consists of up to three
numbers: major version, minor
version, and revision. These values
tell potential users of your library when the library has
changed. In general, you should only modify these values when
you are releasing versions of your library. During development,
it's best to just leave them alone or else your version numbers
will get very large and you will lose all the advantages of using
shared libraries because of the need to relink everything all the
time. Before a release, the major version number should be
incremented if the shared library has had interfaces removed or
modified since the last release as those operations would make
old binaries that linked with the shared library fail to work
with the new version. The minor version should be incremented if
no interfaces were changed or removed but new interfaces were
added. This indicates that old binaries would work with new
libraries but new binaries may not work with old libraries. The
revision number should be incremented if any changes were made to
the shared library code that did not affect the interfaces. This
just tells the user that the library has changed relative to
another version that may be installed. Abuild will build
executables that link against shared libraries in such a way that
they will fail to locate shared libraries whose major version
numbers do not match what they linked against. On UNIX
platforms, the unversioned .so file and the
.so file with only the major version will be
symbolic links to the fully versioned file name. (For example,
if the actual shared library file were
libmoo.so.1.2.3, both
libmoo.so and
libmoo.so.1 would be symbolic links to it.)
On Windows, the DLL will contain the major version in its name
(e.g., moo1.dll) while the companion static
library remains unversioned.
Note that all the version number parameters are optional.
Although they should always be used when creating actual shared
libraries that you intend to link programs against, they may be
omitted in some other cases. For example, if you are building a
shared library object file that will be loaded at runtime or used
as a plugin (such as with Java native code), then it may be
appropriate to omit the version numbers altogether. Even if the
SHLIB_
variable is set to an empty string, abuild will still make a
shared library instead of a static library. There is no way to
create both a shared and a static version of the same library at
the same time, but it is possible to create a shared library that
links against a static library, which can be used to achieve the
same effect in many circumstances.
libname
When abuild builds shared libraries, it links them with any
libraries in the LIBS variable. Although this
is generally the correct behavior for systems that support
linking of shared libraries, it can cause unpleasant side effects
if you mix shared libraries with static libraries. When mixing
shared libraries and static libraries, you should make sure that
you don't include two copies of the same symbols in more than one
place (two shared libraries or a shared library and an
executable). Some systems handle this case acceptably, and
others don't. Even in the best case, doing this is wasteful and
potentially confusing. If you need to prevent abuild from
linking certain static libraries into shared libraries, you may
manually manipulate the contents of the LIBS
variable in your Abuild.mk file. However,
if you find that you need to do this, you should probably rethink
how you have your build configured. If you have static libraries
that are intended to be linked into shared libraries and then not
used again for other purposes, you should reset the value of
LIBS in an after-build file that is included
by your shared library build item's
Abuild.interface file. This is discussed in
Section 21.2, “Shared Library Example”.
[42]
Abuild allows you to mix executables, shared libraries, and
static libraries in the same build item. If you do this, all
executable targets will link with all shared and all static
library targets, and all shared library targets will link with
all static library targets. The shared library targets will not
link with each other. There are few, if any, good reasons to mix
shared and static library targets in the same build item, as
doing so can only lead to confusion. When they are mixed, it is
probably appropriate to avoid adding the static libraries to
LIBS in the
Abuild.interface file.
In order to allow static libraries to be linked into shared
libraries, abuild compiles all library object files as
position-independent code. In some extremely rare cases, you may
wish to avoid doing this as there is a very minor performance
cost to do it. If you wish to prevent a specific source file
from being compiled as position-independent code, set the
variable
NOPIC_ to
filename1 where filename is
the name of the source file. For example, the code
NOPIC_File.cc := 1 in your
Abuild.mk file would prevent
File.cc from being compiled as
position-independent code. Note that abuild does not check to
make sure that code compiled in this way is not eventually linked
into a shared library. If you try to link
non-position-independent code into a shared library, it may not
link at all, or it may cause undefined and hard-to-trace
behavior. Use of this feature is not recommended unless
absolutely needed to fix some specific problem.
In order to run a program that is linked with shared libraries,
the operating system will have to know where to find the shared
library. Abuild does not include library run path information
in the executables as doing so is inherently dangerous and
non-portable. Even if abuild were to ignore this danger and
include run path information, doing so would potentially preclude
the ability to swap out shared libraries at runtime, which is
often the main reason for wanting to use them in the first place.
[43]
Instead, you will need to make sure that, one way or another, the
shared libraries you need are located in a directory that is in
your shared library path. On most UNIX systems, you can set the
LD_LIBRARY_PATH environment variable or install
the shared libraries into certain system-defined locations. On
some systems (like Linux), you can also add directories to
/etc/ld.so.conf. On Windows, you can
colocate the DLL files with the executables, or you can add the
directories containing the DLL files to your path. When building
DLLs and executables with MSVC versions greater than or equal to
.NET 2005, abuild automatically embeds the manifest file in the
DLL or executable with the mt command.
In doc/example/shared-library, you will find
an example of using shared libraries. This example contains an
executable program and two implementations of the same interface,
both provided in shared libraries. In the
shared-library/prog directory, you will find
a simple program. Here is its Abuild.conf
file:
shared-library/prog/Abuild.conf
name: prog
platform-types: native
deps: shared
All it does is depend on the build item
shared. This program doesn't have to do
anything special in order to link against the shared library.
Here is the shared build item's
Abuild.conf:
shared-library/shared/Abuild.conf
name: shared
child-dirs: include impl1 impl2
deps: shared.impl1
This is a pass-through build item that depends upon
shared.impl1. Here is that build item's
Abuild.conf:
shared-library/shared/impl1/Abuild.conf
name: shared.impl1
platform-types: native
deps: shared.include
This build item depends on an item called
shared.include. Although, in general,
putting your header files in a separate build item is risky (see
Chapter 30, Best Practices for a discussion), in this
case, we want to do this so that we can have two separate
implementations of this interface that reside in two different
shared libraries. By making this build item private to the
shared build item name scope (see Section 6.3, “Build Item Name Scoping”), we effectively
prevent outside build items from depending on it directly.
Here is the first implementation's Abuild.mk
file:
shared-library/shared/impl1/Abuild.mk
TARGETS_lib := shared
SRCS_lib_shared := Shared.cc
SHLIB_shared := 1 2 3
RULES := ccxx
What we have here is a normal library
Abuild.mk file except that we have set the
variable SHLIB_shared to the value 1
2 3. This tells abuild to build the
shared library target as a shared library
instead of a static library using the version information
provided. On Windows, abuild will create
shared1.dll along with
shared1.exp and
shared.lib. On UNIX, it will create
libshared.so.1.2.3 and will make
libshared.so and
libshared.so.1 symbolic links to it. UNIX
executables that link with -lshared will
need to find libshared.so.1 in their library
paths at runtime. Windows executables that link with
-lshared will need to find
shared1.dll in their executable paths at
runtime.
This shared library consists of a single file called
Shared.cc. Here is the header file
Shared.hh:
shared-library/shared/include/Shared.hh
#ifndef __SHARED_HH__
#define __SHARED_HH__

class Shared
{
  public:
#ifdef _WIN32
    __declspec(dllexport)
#endif
    static void hello();
};

#endif // __SHARED_HH__
This is the implementation of the interface:
shared-library/shared/impl1/Shared.cc
#include <Shared.hh>
#include <iostream>

void
Shared::hello()
{
    std::cout << "This is Shared implementation 1." << std::endl;
}
Notice the __declspec(dllexport) line that is
there for Windows only. This is necessary to make Windows export
the function to a DLL. No such mechanism is required in a UNIX
environment. Our Abuild.interface file
looks like a normal Abuild.interface file
for libraries except that it omits an INCLUDES
variable and declares a special mutex
variable:
shared-library/shared/impl1/Abuild.interface
# Declare this "mutex" variable to prevent multiple implementations of
# the "shared" interface from being in a build item's dependency chain
# at the same time.
declare shared_MUTEX boolean

LIBDIRS = $(ABUILD_OUTPUT_DIR)
LIBS = shared
The INCLUDES variable is set in the
shared.include build item's
Abuild.interface instead:
shared-library/shared/include/Abuild.interface
INCLUDES = .
The mutex variable is a normal interface variable. We declare
the same variable in the Abuild.interface
file for shared.impl2. Since abuild
won't allow any interface variable to declared in more than one
place, this effectively prevents any one build item from
simultaneously depending on both
shared.impl1 and
shared.impl2. Please note that we have
included the name of the public item,
“shared” in the name of the
mutex variable “shared_MUTEX“ to
avoid namespace collisions with other unrelated build items.
Our second implementation is not in the dependency chain of our
program. It resides in the impl2 directory.
Here are its Abuild.conf and
Abuild.mk:
shared-library/shared/impl2/Abuild.conf
name: shared.impl2
child-dirs: static
platform-types: native
deps: shared.include shared.impl2.static
shared-library/shared/impl2/Abuild.mk
TARGETS_lib := shared
SRCS_lib_shared := Shared.cc
SHLIB_shared := 1 2 4
RULES := ccxx
You will notice in this case that this build item depends on a
static library that its private to its own build item name scope.
This static library provides additional functions that are used
within the shared library. Since the static
library is linked into the shared library and is not intended to
provide any public interfaces, we want to avoid having the static
library appear on the link statement for executables that link
with this shared library. To do that, we have to do some extra
work in our Abuild.interface file. Here are
that file and the after-build file that it
loads:
shared-library/shared/impl2/Abuild.interface
# Declare this "mutex" variable to prevent multiple implementations of
# the "shared" interface from being in a build item's dependency chain
# at the same time.
declare shared_MUTEX boolean

LIBDIRS = $(ABUILD_OUTPUT_DIR)
after-build after.interface
shared-library/shared/impl2/after.interface
reset LIBS
LIBS = shared
Notice that we reset the LIBS variable and add
our own library to it after the build has completed. This
effectively replaces everything that was previously in the
LIBS variable with our library for items that
depend on us. In this case, the
shared.impl2.static build item had added
static to LIBS in its
Abuild.interface file:
shared-library/shared/impl2/static/Abuild.interface
INCLUDES = .
LIBDIRS = $(ABUILD_OUTPUT_DIR)
LIBS = static
The effect of our reset that the static
library added to LIBS there is available to
shared.impl2 during its linking but not
available to those who depend on
shared.impl2.
[44]
Finally, we can run our program. Remember that in order to run
the program, you must explicitly add the directory containing the
shared library whose implementation you want to use to your
LD_LIBRARY_PATH on UNIX or your
PATH on Windows. If you set this variable to
include the output directory for
shared.impl1, you will see this output:
shared-library-prog-impl1.out
This is Shared implementation 1.
If you set it to the shared.impl2 build
item's directory, you will see this instead:
shared-library-prog-impl2.out
This is Shared implementation 2.
This is a private static library inside implementation 2.
Note that we could have made shared depend
on shared.impl2 instead of
shared.impl1 and gotten the same results.
Hiding the actual shared library implementation behind a
pass-through build item provides a useful device for allowing you
to reconfigure the system later on, including replacing
place-holder shared library-based stub implementations with
static library implementations later in the development process.
With careful planning, this type of technique could be used to
provide a shared-library based stub system that could be swapped
out later with very little effect on the overall build system.
[42] Versions of abuild prior to 1.0.3 behaved somewhat differently with respect to linking of shared libraries. See the changes for version 1.0.3 in the release notes for details.
[43] The way the runtime loader behaves when shared library location information is compiled into an executable (as run path data) varies from system to system. In most systems, if the shared library doesn't exist at the compiled-in location, the system will fall back to its standard rules for locating shared libraries. In some systems, if the shared library does exist in the compiled-in location, that copy of the shared library will be used with no way to override it. This may have undesired implications. For example, suppose you were to create an executable that linked with a shared library and included run path information to the development version of the shared library. If you installed that executable and shared library in standard locations on a system without a copy of the development environment, everything would work fine. Then suppose you put a development environment on that system and built a newer version of the same shared library. Your installed executable would actually use the new development copy of the library because it still has that path compiled into it! This is almost certainly not what would be intended. Abuild avoids this issue entirely but not including support for specifying run path data.
For another approach to using shared libraries, look at libtool. The libtool program gets around this problem by creating wrappers around executables and shared libraries in the development tree. Although abuild is not integrated with libtool, such an integration would be possible. The possibility of including support for libtool is actually one of the motivations behind allowing library object files and non-library object files to have different extensions.
[44]
What is going on here is a bit subtle. At first, resetting
LIBS may seem quite drastic, but it really
isn't. The reset statement only resets the state of
LIBS as it was at the time that this
Abuild.interface file was processed. Any
build item that depends on this item will still have all the
other items that were added to LIBS by
other build items. To really understand how this works, please
see Section 33.7, “Implementation of the Abuild Interface System”.
Table of Contents
In this chapter, we show how to use abuild with custom rules provided by build items. The most common application of build item-supplied rules is to support automatic code generation. Examples are presented for both the GNU Make backend and the Groovy/ant as the mechanisms are very similar.
The most important thing to realize about code generators in abuild is that code generation can be viewed as a just another service that a build item can offer, just like libraries or header files. In many build systems, code generators are problematic because you need to take special steps to make sure generated code appears before compilation or dependency generation begin. With abuild, code generators get run at the correct stage by virtue of appearing in the correct place in the dependency tree.
Any build item may provide custom rules.
[45]
To provide custom rules, a build item creates a
rules directory. The rules themselves go in
a subdirectory of rules either named
all, for rules that can be used by any build
item, or named after the target type (one of
object-code, java, or
platform-independent) for rules that are
available only to build items of the specified target type. When
searching for rules, abuild always looks the directory under
rules corresponding to the build item's
target type first, and then it searches the
all directory. The basic procedure for
providing build item rules is essentially the same for both
backends. The differences are mainly syntactic. We describe the
mechanisms in turn for each backend.
In order for a make-based build item
to provide code generation, it must supply additional make rules.
The rules are in the form of a make fragment. The name of the
rules file is
rulename.mkrulename is whatever you are
calling the rules. This is what people who use the rules will
place in their RULES variable in their
Abuild.mk file. Any rules provided by a
build item are run from the abuild output directory of the
build item that is using the rules, just as is the case with
built-in rules. That means that if the rules need to refer to
files inside the build item that provides
the rules, they must do so by either accessing interface
variables defined in that build item's
Abuild.interface or by prefixing the files
with a variable that abuild provides. Specifically, for a
build item named
build-itemabDIR_
that can be accessed from the rules implementation file. Note
that abuild only provides these variables for build items in
your dependency chain. Also, use of these variables from
build-itemAbuild.mk files is strongly discouraged as
it can cause your build tree to contain path-based dependencies
instead of name-based dependencies, which would defeat one of the
most compelling advantages of abuild. The best practice is to
refer to files in your own build item from your own files by
using the abuild-provided variable name to find your own path,
and to define interface variables for files that you intend for
other build items to access. Either way, there are certain
things that it are important to keep in mind when writing
GNU Make rules for use inside of
abuild. For a discussion of this topic, please see Section 30.2, “Guidelines for Make Rule Authors”.
In order for a Groovy-based build item
to provide rules, it must supply additional groovy code in a file
called
rulename.groovyrulenameabuild.rules parameter in their
Abuild.groovy files. Within the context of
the build item-supplied, the variables
abuild.sourceDirectory and
abuild.buildDirectory are
File objects that represent the build item
directory and output directory of the item on behalf of which the
rules are being invoked. If the rules need to reference a file
inside of the build item that is providing
the rules, it should either set an interface variable or access
its location by name using
abuild.itemPaths[,
where item-name]item-name is the name of the
build item providing the rules. Abuild only provides locations
for build items that are plugins or that are in the dependency
chain of the item being built.
A build item may actually provide rules for both backends at the
same time as .mk and
.groovy files can co-mingle in the
rules directory. Whichever type of rules
are being provided, rule authors are encouraged to create a help
file that gives the user information needed to use the rules.
The help file is called
rulename-help.txt
The derived-code-generator build item in
doc/example/general/user/derived/code-generator
contains a trivial code generator. All it does is generate a
source and header file that define a function that returns a
constant, which is read from a file. We have modified
derived-main to use the code generator.
The code generator itself is implemented in the
derived-codegen build item, which provides
a rule set called code-generator. The build
item is making these rules available for build items of type
object-code. The file that implements the rules is
therefore called
rules/object-code/code-generator.mk.
First, we'll look at the code generator itself. Notice that the
only abuild file contained in the
derived-code-generator build item
directory at user/derived/code-generator is
Abuild.conf. There is no
Abuild.interface or
Abuild.mk, though these files could exist if
the build item itself had something that it needed to build.
Before we get to the rules themselves, observe that there is
another file in rules/object-code: the help
file,
rules/object-code/code-generator-help.txt,
the contents of which are presented here:
general/user/derived/code-generator/rules/object-code/code-generator-help.txt
You must set these variables:
  DERIVED_CODEGEN_SRC -- name of a C source file to generate
  DERIVED_CODEGEN_HDR -- name of a C header file to generate
  DERIVED_CODEGEN_INFILE -- a file containing a numerical value

These rules will generate a source file called DERIVED_CODEGEN_SRC
which will contain a function called getNumber().  That function will
return the number whose value you have placed in the file named in
DERIVED_CODEGEN_INFILE.  The file DERIVED_CODEGEN_HDR will contain a
prototype for the function.

You must include DERIVED_CODEGEN_SRC in the list of sources for one of
your build targets in order to have it included in that target.
Whenever you provide a rule implementation for rule
rulename, you should create a
rulename-help.txtrulename.
The most important part of this example is the rule
implementation file, so we'll study it carefully. Here is the
rules/object-code/code-generator.mk file:
general/user/derived/code-generator/rules/object-code/code-generator.mk
# Make sure that the user has provided values for all variables
_UNDEFINED := $(call undefined_vars,\
                DERIVED_CODEGEN_HDR \
                DERIVED_CODEGEN_HDR \
                DERIVED_CODEGEN_INFILE)
ifneq ($(words $(_UNDEFINED)),0)
$(error The following variables are undefined: $(_UNDEFINED))
endif

all:: $(DERIVED_CODEGEN_HDR) $(DERIVED_CODEGEN_SRC)

$(DERIVED_CODEGEN_SRC) $(DERIVED_CODEGEN_HDR): $(DERIVED_CODEGEN_INFILE) \
                                $(abDIR_derived-code-generator)/gen_code
        @$(PRINT) Generating $(DERIVED_CODEGEN_HDR) \
                and $(DERIVED_CODEGEN_SRC)
        perl $(abDIR_derived-code-generator)/gen_code \
                $(DERIVED_CODEGEN_HDR) \
                $(DERIVED_CODEGEN_SRC) \
                $(SRCDIR)/$(DERIVED_CODEGEN_INFILE)
The first thing that happens is that we have some code that checks
for undefined variables. This isn't strictly necessary, but it
can save your users a lot of trouble if you detect when variables
they are supposed to provide are not there. We use the function
undefined_vars to do this check. This
function is provided by abuild and appears in the file
make/global.mk relative to the top of the
abuild installation. If you expect to write a lot of make
rules, it will be in your best interest to familiarize yourself
with the functions offered by this file. Even if we hadn't done
this, abuild invokes GNU Make in a manner that causes it to
warn about any undefined variables. This is useful because
undefined variables are a common cause of makefile errors.
Then we add our source file to the all:: target to make sure it gets built. Note that we use all::, not all:, since there are multiple all:: targets throughout various rules files. Adding our source files to the all:: target is not strictly necessary in this case since, by listing the source file as a source file for one of our targets (in the build item that uses this code generator), it will be built in the proper sequence. It's still good practice to do this though, but remember that in a parallel build, dependencies of the all:: target may not necessarily be built in the order in which they are listed.
Next, we have the actual make rules
that create the automatically generated files. In this case, we
make the output files depend on both the input file and the
code generator. Although abuild is running the rules from the
depending build item's output directory, we don't need to put any
prefix in front of the name of the input file: abuild sets
make's VPATH
variable so that the file can be found. By creating a dependency
on the code generator as well, we can be sure that if the code
generator itself is modified, any code that it generates will
also be updated.
In the commands for generating our files, notice that we don't
need an @ sign before the generation command
to prevent it from echoing since abuild doesn't echo its output
by default. Not putting an @ sign there means
that the user will see the command if he/she runs abuild with
the --verbose option. So that the user knows
something is happening, we generate a useful output message using
@$(PRINT). The use of
@$(PRINT) ensures that we don't see the actual
echo command even when running with --verbose
(since otherwise, we'd see the echo command
immediately followed by the output of the echo
command), and that we don't see the output at all when we're
running with --silent. All informational
messages should be generated this way. Note also that we invoke
the code generator with perl rather than
assuming that it is executable (since some version control
systems or file systems make it hard to preserve execute
permissions) and that we specify the path to the code generator
in terms of $(abDIR_derived-code-generator).
Also notice that we have to prefix the name of the input file
with $(SRCDIR) when we pass it to the code
generator since we are running from the abuild output
directory. The VPATH variable tells
make where to look, but it doesn't
tell our code generator anything! However, the special GNU Make
variables like $< and $^
will contain the full paths to prerequisites and can often be
used instead.
To use this code generator from
derived-main.src, all we have to do is
define the required variables in Abuild.mk,
add derived-code-generator as a dependency
in Abuild.conf, and add
code-generator to the
RULES variable in
Abuild.mk. Note that we have modified
main.cpp to include
auto.h and to call
getNumber(), thus testing the use of the code
generator. Since this application effectively contains the only
test suite for the code generator, we declare it as a tester of
the code generator in Abuild.conf using
traits. Here are the relevant files from
derived-main.src:
general/user/derived/main/src/Abuild.conf
name: derived-main.src
platform-types: native
deps: common-lib2 project-lib derived-code-generator world-peace
traits: tester -item=derived-main.src -item=derived-code-generator
general/user/derived/main/src/Abuild.mk
TARGETS_bin := main
DERIVED_CODEGEN_SRC := auto.c
DERIVED_CODEGEN_HDR := auto.h
DERIVED_CODEGEN_INFILE := number
SRCS_bin_main := main.cpp $(DERIVED_CODEGEN_SRC)
RULES := ccxx code-generator
Here is the modified main.cpp file:
general/user/derived/main/src/main.cpp
#include <ProjectLib.hpp>
#include <CommonLib2.hpp>
#include <iostream>
#include <world_peace.hh>
#include "auto.h"

int main(int argc, char* argv[])
{
    std::cout << "This is derived-main." << std::endl;
    ProjectLib l;
    l.hello();
    CommonLib2 cl2(6);
    cl2.talkAbout();
    cl2.count();
    std::cout << "Number is " << getNumber() << "." << std::endl;
    // We don't have to know or care whether this is the stub
    // implementation or the real implementation.
    create_world_peace();
    return 0;
}
The build tree containing the Java code generator example, built
using the Groovy framework, can be found in the tree located at
java. The code generator itself is at
java/code-generator. This example discusses
the code generator, and it also serves as a general example for
several aspects of the Groovy framework.
In any situation in which code generators are used, there will always be one build item that provides the code generator and one or more build items that use the code generator. In some cases, the provider and user will be the same build item, but in the most general case, the code generator will usually be provided by a build item whose sole purpose is to provide the code generator. In the Java world, a useful and common way to perform code generation is through providing a custom ant task, which is what we do here.
We'll start our examination by looking at the build item that
provides the code generator. We provide a simple build item
whose name is just code-generator. (In a
real implementation, you would obviously want to give this a more
specific name.) Its Abuild.conf and
Abuild.groovy files reveal a very ordinary
build item:
java/code-generator/Abuild.conf
name: code-generator
platform-types: java
java/code-generator/Abuild.groovy
parameters {
    java.includeAntRuntime = 'true'
    java.jarName = 'CodeGenerator.jar'
    abuild.rules = 'java'
}
The only thing unusual about this
Abuild.groovy file is that it sets the
parameter java.includeAntRuntime to
true. This is necessary for any build item that
uses ant's API, such as when adding a new ant task. This build
item generates a JAR file, but unlike most Java build items, this
JAR file is not intended to be added to the compile-time,
run-time, or package-time class paths. Instead, we just assign
it to a specific interface variable so that it can be used in the
taskdef statement of the rules implementation.
Here is the Abuild.interface file:
java/code-generator/Abuild.interface
# Provide a variable that names our code generator so we can use it in
# taskdef.  Since this jar just creates an ant task, we don't need to
# add it to the classpath.

declare code-generator.classpath filename
code-generator.classpath = $(ABUILD_OUTPUT_DIR)/dist/CodeGenerator.jar
Next, let's look at the example task itself. This is just a
regular Java implementation of an ant task. There's nothing
abuild-specific about it, but we'll show it here for
completeness. This task just creates a class with a public
negate method that returns the opposite of
the number passed in. The task takes the fully qualified class
name and the source directory into which the class should be
written as arguments. Here is the implementation:
java/code-generator/src/java/com/example/codeGenerator/ExampleTask.java
package com.example.codeGenerator;

import java.io.File;
import java.io.FileWriter;
import java.io.IOException;
import java.util.regex.Pattern;
import java.util.regex.Matcher;
import org.apache.tools.ant.Task;
import org.apache.tools.ant.BuildException;

public class ExampleTask extends Task
{
    private File sourceDir;
    public void setSourceDir(File dir)
    {
        this.sourceDir = dir;
    }

    private String fullClassName;
    public void setClassName(String name)
    {
        this.fullClassName = name;
    }

    public void execute() throws BuildException
    {
        if (this.sourceDir == null)
        {
            throw new BuildException("no sourcedir specified");
        }
        if (this.fullClassName == null)
        {
            throw new BuildException("no fullclassname specified");
        }
        Pattern fullClassName_re = Pattern.compile(
            "^((?:[a-zA-Z0-9_]+\\.)*)([a-zA-Z0-9_]+)$");

        Matcher m = fullClassName_re.matcher(this.fullClassName);
        if (! m.matches())
        {
            throw new BuildException("invalid fullclassname");
        }

        String packageName = m.group(1);
        String className = m.group(2);

        if (packageName.length() > 0)
        {
            packageName = packageName.substring(0, packageName.length() - 1);
        }

        File outputFile = new File(
            this.sourceDir.getAbsolutePath() + "/" +
            this.fullClassName.replace('.', '/') + ".java");
        File parentDir = outputFile.getParentFile();

        if (parentDir.isDirectory())
        {
            // okay
        }
        else if (! parentDir.mkdirs())
        {
            throw new BuildException("unable to create directory " +
                                     parentDir.getAbsolutePath());
        }

        if (! outputFile.isFile())
        {
            try
            {
                FileWriter w = new FileWriter(outputFile);
                if (packageName.length() > 0)
                {
                    w.write("package " + packageName + ";\n");
                }
                w.write("public class " + className + "\n{\n");
                w.write("    public int negate(int n)\n    {\n");
                w.write("        return -n;\n    }\n");
                w.write("}\n");
                w.close();
            }
            catch (IOException e)
            {
                throw new BuildException("IOException: " + e.getMessage());
            }

            log("created " + outputFile.getAbsolutePath());
        }
    }
}
To make this task available for use by other Java build items, we
have to provide an implementation of the appropriate rules. The
implementation of the rules can be found in the file
rules/java/codegenerator.groovy. This means
that people can use these rules by ensuring that
codegenerator appears in
abuild.Rules, almost certainly along with
java. As is always advisable, we also
provide a rules help file, which is
rules/java/codegenerator-help.txt, is shown
here:
java/code-generator/rules/java/codegenerator-help.txt
** Help for users of abuild.rules = 'codegenerator' **

Set the parameter codeGenerator.classname to the fully qualified
classname to be generated.

To generate multiple classes, instead set the parameter
codeGenerator.codegen to a list of maps, each of which has a
'classname' key.
The implementation of the rules is heavily commented, but we'll also provide some additional discussion following the text. You may wish to follow the implementation as you read the text in the rest of this section. Here is the code generator implementation:
java/code-generator/rules/java/codegenerator.groovy
// This code provides the "codegen" task, provided by this build item,
// to generate a class named by the user of the build item.

// Create a class to contain our targets.  From inside our class,
// properties in the script's binding are not available.  By doing our
// work inside a class, we are protected against a category of easy
// coding errors.  It doesn't matter if the class name collides with
// other classes defined in other rules.

class CodeGenerator
{
    def abuild
    def ant

    CodeGenerator(abuild, ant)
    {
        this.abuild = abuild
        this.ant = ant

        // Register the ant task.  The parameter
        // 'code-generator.classpath' is set in Abuild.interface.
        ant.taskdef('name': 'codegen',
                    'classname': 'com.example.codeGenerator.ExampleTask',
                    'classpath': abuild.resolve('code-generator.classpath'))
    }


    def codegenTarget()
    {
        // By using abuild.runActions, it is very easy for your custom
        // targets to support production of multiple artifacts.  This
        // method illustrates the usual pattern.

        // Create a map of default attributes and initialize this map
        // by initializing its members from the values of
        // user-supplied parameters.  In this case, the 'classname'
        // key gets a value that comes from the
        // 'codeGenerator.classname' parameter.  If the
        // codeGenerator.classname parameter is not set, the key will
        // exist in the map and will have a null value.
        def defaultAttrs = [
            'classname': abuild.resolveAsString('codeGenerator.classname')
        ]

        // Call abuild.runActions to do the work.  The first argument
        // is the name of a control parameter, the second argument is
        // a closure (here provided using Groovy's method closure
        // syntax), and the third argument is the default argument to
        // the closure.  If the control parameter is not initialized,
        // runActions will call the closure with the default
        // attributes.  Otherwise, the control parameter must contain
        // a list.  Each element of the list is either a map or a
        // closure and will cause some action to be performed.  If it
        // is a map, any keys in defaultAttrs that are not present in
        // the map will be added to the map.  Then the default closure
        // will be called with the resulting map.  If the element is a
        // closure, the closure will be called, and the default
        // closure and attributes will be ignored.
        abuild.runActions('codeGenerator.codegen', this.&codegen, defaultAttrs)
    }

    def codegen(Map attributes)
    {
        // This is the method called by abuild.runActions as called
        // from codegenTarget when the user has not supplied his/her
        // own closure.  Since defaultAttrs contained the 'classname'
        // key, we know that it will always be present in the map,
        // even when the user supplied his/her own map.

        // In this case, we require classname to be set.  This means
        // the user must either have defined the
        // codeGenerator.classname parameter or provided the classname
        // key to the map.  If neither has been done, we fail.  In
        // some cases, it's more appropriate to just return without
        // doing anything, but in this case, the only reason a user
        // would select the codegenerator rules would be if they were
        // going to use this capability.  Also, in this example, we
        // ignore remaining keys in the attributes map, but in many
        // cases, it would be appropriate to remove the keys we use
        // explicitly and then pass the rest to whatever core ant task
        // is doing the heart of the work.

        def className = attributes['classname']
        if (! className)
        {
            ant.fail("property codeGenerator.classname must be defined")
        }
        ant.codegen('sourcedir': abuild.resolve('java.dir.generatedSrc'),
                    'classname': className)
    }
}

// Instantiate our class and add codegenTarget as a closure for the
// generate target.  We could also have added a custom target if we
// wanted to, but rather than cluttering things up with additional
// targets, we'll use the generate target which exists specifically
// for this purpose.

def codeGenerator = new CodeGenerator(abuild, ant)
abuild.addTargetClosure('generate', codeGenerator.&codegenTarget)
In the Groovy programming language, a
script is a special type of class that has
access to read and modify variables in the
binding. This is a powerful facility that
makes it easy to communicate between the script and the caller of
the script. Abuild makes use of the binding to provide the ant
project and other state to rules implementations. However, one
downside is that any undeclared variable becomes part of the
binding, which may not be what you intended. To minimize
unintended consequences of using undeclared variables, we
recommend the practice of doing most of the work inside a class.
For any script that contains any code other than a single class
implementation, Groovy automatically creates a class named after
the file. Since our rules implementation defines a class and
then also contains other code, we set the name of the class
explicitly to something other than the name of the file. This
this case, the base part of the file name is
codegenerator, but we name the class inside
of it CodeGenerator. Our class's
constructor takes as arguments a reference to the
abuild object (see Section 19.10.1, “Interface to the abuild Object”) and to the ant
project (see Section 19.7.2, “The Ant Project”). This is
a common pattern suitable for use for just about any rule
implementation. The constructor performs global setup. In this
case, we just call ant.taskdef, as would be
done by virtually any task-providing custom rules. Other things
that would be appropriate to do in your constructor would be
initializing additional fields of your object or doing any other
types of operations that would be common in class constructors.
The main things you should not do are to
perform operations that depend on users' parameter settings or on
state of an in-progress build since, at the this is loaded, not
all initialization is necessarily in place.
Right after the constructor, we have the implementation of
codegenTarget. This method will be used as
the closure for the target provided by these rules. This target
follows the pattern expected to be used for all but the most
trivial rules: it sets up a default attributes list whose fields
are initialized from parameters intended to be set in users'
Abuild.groovy files. Here, we initialize
the classname field from the
codeGenerator.classname parameter. This is
what makes it possible for the user to specify the name of the
class to be generated by setting that parameter or,
alternatively, by providing lists of maps containing the
classname key. Once we provide our default
attributes, we can just call
abuild.runActions. The
abuild.runActions method takes three
arguments: the name of the control parameter, a closure that
implements the required actions, and the default attributes. The
closure, which here uses the Groovy method closure syntax of
object.&methoddefaultAttrs argument.
The next significant chunk of code here is the
codegen method. This is the method that
actually does the work. Everything up to this point has just
been scaffolding. The codegen method takes
a single parameter: a map of attributes. Any key provided in the
default attributes is known to be defined. Any other keys can be
used at the discretion of the code. A common convention, which
is used by most of abuild's built-in targets, is to take extra
attributes and just pass them along to whichever underlying ant
task is doing the real work. In this case, we simply ignore
extra attributes since the work is being done by a custom task,
and we have already handled all available options. In this code,
we set the className variable to a field of
the attributes element. Other common idioms
would be to set something conditionally upon whether a key is
present or to set something and also to delete the attribute.
For examples of these, please refer to the implementation of the
built-in java rules (Appendix J, The java.groovy and groovy.groovy Files). The actual implementation of
our code generator target just does a few sanity checks and then
invokes the task using the task we've provided. Notice that we
use java.dir.generatedSrc as the directory in
which to write the generated class. This is what all code
generators should do. By using
abuild.resolve to get the value at this
point, we ensure that any changes the user may have made to the
value of that parameter will be properly accounted for.
Resolving the parameter as needed is a better implementation
choice than reading the parameter value in the constructor and
stashing it in a field as it prevents rules from ignoring late
changes to the value of the parameter.
Finally, we come to the code that resides outside the
CodeGenerator class. This code just
creates an instance of the class, passing to it the
abuild and ant objects from
the binding, and then adds the codegenTarget
method as a closure for the generate target,
again using Groovy's method closure syntax. Sometimes you might
want to do other checks here, such as making sure other required
rules have been loaded. Abuild's built-in
groovy rules do this. The implementation of
those rules is included in Appendix J, The java.groovy and groovy.groovy Files.
Now that we've seen how the rules are implemented, we can see how
the rules are used. The good news is that using the rules is
much simpler than implementing them. This is as it should be:
creation of rules is a much more advanced operation that needs to
be performed by people with more in-depth knowledge of abuild.
Using rules should be very simple. Our
library build item in
java/library makes use of the code
generator. To do this, it must declare a dependency on the
code-generator build item, as you can see in
the Abuild.conf file:
java/library/Abuild.conf
name: library
platform-types: java
deps: code-generator
and it must set the required parameter to generate the class. In
this case, we use
com.example.library.Negator as the fully
qualified class name, as you can see by looking at the
Abuild.groovy file:
java/library/Abuild.groovy
parameters {
    java.jarName = 'example-library.jar'

    // Generate a Negator class using code-generator.  If we wanted to
    // create multiple classes, we could instead set
    // codeGenerator.codegen to a list of maps with each map
    // containing a classname key.  For an example of setting a
    // parameter to a list of maps, see ../executable/Abuild.groovy.
    codeGenerator.classname = 'com.example.library.generated.Negator'

    // Use both java and codegenerator rules.
    abuild.rules = ['java', 'codegenerator']
}
We also include one statically coded Java source file which,
along with the generated class, will be packaged into
example-library.jar. Here, for
completeness, is the text of the additional source file, which
just wraps around the generated class:
java/library/src/java/com/example/library/Library.java
package com.example.library;

import com.example.library.generated.Negator;

public class Library
{
    private int value = 0;
    private Negator n = new Negator();

    public Library(int value)
    {
        this.value = value;
    }

    public int getOppose()
    {
        return n.negate(value);
    }
}
Finally, as for any well-behaved Java build item that exports a
JAR file, we add the JAR file to the regular compile-time class
path as well as to the manifest class path. We do this here by
following
archiveName/archivePath
convention first discussed in Section 3.6, “Building a Java Library” and by adding the
archive file to both abuild.classpath and
abuild.classpath.manifest. Here is the
Abuild.interface file:
java/library/Abuild.interface
declare library.archiveName string = example-library.jar
declare library.archivePath filename = \
   $(ABUILD_OUTPUT_DIR)/dist/$(library.archiveName)
abuild.classpath = $(library.archivePath)
abuild.classpath.manifest = $(library.archivePath)
The example in Section 22.4, “Multiple Wrapper Scripts” creates an executable that tests this library.
This example illustrates use of a target's control parameter to
cause that target to be run multiple times. In this case, we set
the java.wrapper parameter to a list of maps
so that we can generate two wrapper scripts. One of them is used
to test the library and code generator discussed in Section 22.3, “Code Generator Example for Groovy”, and also
illustrates reading a file that was placed in the JAR by placing
it in src/resources. The other
main just prints a message.
Here is the very ordinary Abuild.conf:
java/executable/Abuild.conf
name: executable
platform-types: java
deps: library
Here is the first main class:
java/executable/src/java/com/example/executable/Executable.java
package com.example.executable;

import java.io.IOException;
import java.io.InputStream;
import java.io.InputStreamReader;
import java.io.BufferedReader;
import com.example.library.Library;

public class Executable
{
    private void showTextFile()
    {
        try
        {
            InputStream is = getClass().getClassLoader().getResourceAsStream(
                "com/example/file.txt");
            if (is == null)
            {
                System.err.println("can't find com/example/file.txt");
                System.exit(2);
            }
            BufferedReader r = new BufferedReader(new InputStreamReader(is));
            String line;
            while ((line = r.readLine()) != null)
            {
                System.out.println(line);
            }
            r.close();
        }
        catch (IOException e)
        {
            System.err.println(e.getMessage());
        }
    }

    public static void main(String[] args)
    {
        if (args.length != 1)
        {
            System.err.println("Executable: one argument is required");
            System.exit(2);
        }

        int value = 0;
        try
        {
            Integer i = new Integer(args[0]);
            value = i.intValue();
        }
        catch (NumberFormatException e)
        {
            System.err.println("Executable: argument must be a number");
            System.exit(2);
        }

        Library lib = new Library(value);
        System.out.println("The opposite of " + value +
                           " is " + lib.getOppose());


        new Executable().showTextFile();
    }
}
Here is the file it reads from resources:
java/executable/src/resources/com/example/file.txt
This is a text file.
Here is the second main class:
java/executable/src/java/com/example/executable/Other.java
package com.example.executable;

public class Other
{
    public static void main(String[] args)
    {
        System.out.println("Here's another main just for show.");
    }
}
Finally, here is the Abuild.groovy file.
Observe here how we set the java.wrapper
parameter to a list of maps by appending one map at a time. This
is one of many syntaxes that could be used, but it uses less
extraneous punctuation than many of the other choices:
java/executable/Abuild.groovy
parameters {
    java.jarName = 'example-executable.jar'

    // Here we are going to generate multiple wrapper scripts.  We do
    // this by appending two different maps to the java.wrapper
    // parameter, each of which has a name key and a mainclass key.
    // There are many choices of syntax for doing this.  Here we use
    // Groovy's << operator to add something to a list.  We could also
    // have appended twice to java.wrapper in two separate statements,
    // or we could have explicitly assigned it to a list of maps.
    java.wrapper <<
        ['name': 'example',
         'mainclass' : 'com.example.executable.Executable'] <<
        ['name': 'other',
         'mainclass' : 'com.example.executable.Other']

    abuild.rules = 'java'
}
In the previous example, we showed how to create a code generator
that generates code from a file. This works nicely because
make's dependency system is based on
file modification times. Sometimes, you may want to generate
code based on the value of a make
variable whose origin may be either
Abuild.mk or, more likely,
Abuild.interface. Doing this is more
difficult because it requires some obscure make coding, but it is
common enough to warrant an example.
The “obvious” way to pass information from a
make variable into your code would be
to use a preprocessor symbol based on the variable and to pass
this symbol to the code with XCPPFLAGS or
XCPPFLAGS_.
The problem with this is that there is no dependency tracking on
variable values, so if you change the variable value, there is
nothing that will trigger recompilation of the files that use the
preprocessor symbol. To get around this problem, we use local
rules to generate a file with the value of the variable. This
example can be found in
Filenamedoc/example/auto-from-variable.
First, look at the file-provider build
item in library. This build item
automatically generates a header file based on the value of a
make variable. The variable itself is defined in the
Abuild.interface file:
auto-from-variable/library/Abuild.interface
# Add $(ABUILD_OUTPUT_DIR) to includes since that's where the
# generated header is located.
INCLUDES = . $(ABUILD_OUTPUT_DIR)
LIBDIRS = $(ABUILD_OUTPUT_DIR)
LIBS = file-provider

# Provide a variable for the location of the file that we are
# providing
declare file-provider-filename filename
file-provider-filename = interesting-file
We define the variable file-provider-filename
to point to a local file. By making this a filename
variable, we tell abuild to translate its location to the path
to this file as resolved relative to the
Abuild.interface file's directory. Note
that we use the build item name in the variable name to reduce
the likelihood of clashing with other interface variables. In
the Abuild.mk file we use the
LOCAL_RULES variable to declare the local
rules file generate.mk. This is where we
will actually generate the header file. Otherwise, this is an
ordinary Abuild.mk:
auto-from-variable/library/Abuild.mk
TARGETS_lib := file-provider
SRCS_lib_file-provider := FileProvider.cc
RULES := ccxx
LOCAL_RULES := generate.mk
Here is generate.mk:
auto-from-variable/library/generate.mk
# Write the value to a temporary file and replace the real file if the
# value has changed or the real file doesn't exist.
DUMMY := $(shell echo > variable-value.tmp $(file-provider-filename))
DUMMY := $(shell diff >/dev/null 2>&1 variable-value.tmp variable-value || \
           mv variable-value.tmp variable-value)

# Write the header file based on the variable value.  We can just use
# the variable directly here instead of catting the "variable-value"
# file since we know that the contents of the file always match the
# variable name.

abs_filename := $(abspath $(file-provider-filename))
# If this is cygwin supporting Windows, we need to convert this into a
# Windows path.  Convert \ to / as well to avoid quoting issues.
ifeq ($(ABUILD_PLATFORM_TOOLSET),nt5-cygwin)
 abs_filename := $(subst \,/,$(shell cygpath -w $(abs_filename)))
endif

FileProvider_file.hh: variable-value
        echo '#ifndef __FILEPROVIDER_FILE_HH__' > $@
        echo '#define __FILEPROVIDER_FILE_HH__' >> $@
        echo '#define FILE_LOCATION "$(abs_filename)"' >> $@
        echo '#endif' >> $@

# Make sure our automatically generated file gets generated before we
# compile FileProvider.cc.  Unfortunately, the only way to do this
# that will work reliably in a parallel build is to create an explicit
# dependency.  We use the LOBJ variable to get the object file suffix
# because FileProvider.cc is part of a library.  One way to avoid this
# issue entirely would be to automatically generate a source file
# instead of a header file, but as it is often more convenient to
# generate a header file, we illustrate how to do so in this example.
FileProvider.$(LOBJ): FileProvider_file.hh
There is a lot going on here, so we'll go through line by line.
GNU Make is essentially a functional
programming environment. Makefiles are not executed
sequentially; they are evaluated based on dependencies instead.
Sometimes you need to force make to
run steps sequentially. You can trick
make into doing this by making the
operations side effects of a variable assignment using the
:= operator since these are evaluated when
they are read. Our goal here is to translate a variable value,
which can't be tracked by the dependency system, into a file
modification time, which can. To do this, we create a file whose
value and modification time get updated whenever the variable
value changes. We do this in two steps: first, we write the
value of the variable to a temporary file (the first
DUMMY assignment), and then we overwrite
another file with the temporary file if the other file either
doesn't exist or has a different value (the second assignment).
In this way, whenever the variable changes, the file called
variable-value gets updated. Although the
variable-value.tmp file gets updated every
time when run abuild, we don't care since that file is not used
as a dependency. Next, we provide the rules to actually generate
the header file. The header file depends on the file
variable-value so it will get regenerated
whenever the variable changes. Here we just use
echo to write the header file. Note that we
have to call make's
abspath function to translate the value of
file-provider-filename to an absolute path.
This is because abuild writes filename variables
as relative paths when it passes them to
make. Note also that didn't actually
have to use the value of the variable-value
file. We know that its contents are identical to the value of
the variable, so we can just use the variable's value directly.
Finally, we want to make sure that
FileProvider_file.hh exists before we start
compiling any of the files that reference it. We have a little
bit of a bootstrapping problem here: although abuild ordinarily
generates dependency information of object files on header files
automatically, this generation step is performed during the
compilation itself. In order to force the header file to be
generated before the compile starts, we have to create an
explicit dependency. We do this by creating an explicit
dependency from the object file to the header file. Notice that
we use the make variable LOBJ to get the
object file suffix rather than hard-coding it. All compiler
support files are required to set the variable
LOBJ to the suffix of object files that are
going into libraries and OBJ for object files
that are not going into libraries. Although they are often the
same, they don't have to be.
[46]
We have two files that use the header file. The first one is the library implementation itself:
auto-from-variable/library/FileProvider.cc
#include <FileProvider.hh>
#include <FileProvider_file.hh>
#include <fstream>
#include <iostream>
#include <stdlib.h>

FileProvider::FileProvider() :
    filename(FILE_LOCATION)
{
}

void
FileProvider::showFileContents() const
{
    std::ifstream in(this->filename);
    if (! in.is_open())
    {
        std::cerr << "Can't open file " << this->filename << std::endl;
        exit(2);
    }
    char c;
    while (in.get(c))
    {
        std::cout << c;
    }
}
The other is the main program from the other build item:
auto-from-variable/program/main.cc
#include <FileProvider.hh>
#include <FileProvider_file.hh>
#include <iostream>

int main()
{
    FileProvider fp;
    std::cout << "Showing contents of " << FILE_LOCATION << ":" << std::endl;
    fp.showFileContents();
    return 0;
}
There are a few additional points to be made about this example.
We have taken an approach here that can be tailored for a wide
variety of situations. In this example, the interface variable
is accessible to other build items. If we didn't want this to be
the case, we could have used an Abuild.mk
variable instead or we could have made this variable visible
conditionally upon an interface flag. We have also made the
header file available to other build items by adding the output
directory to INCLUDES in
Abuild.interface. If you didn't want these
to have such high visibility, you could protect them just as you
would protect any private interfaces. In other words, this
example is a little bit of an overkill for the exact case that it
implements, but it shows a pattern that can be used when this
type of functionality is required. The main thing to take away
here is the use of a make trick to
translate a variable value into a file modification time, thus
making it trackable with make's
ordinarily dependency tracking mechanism.
As a general rule, it's a good idea to avoid controlling
automatically generated files. Instead, it's often best to have
the generation of those files be part of the build process.
Sometimes, however, you might find yourself in a situation where
the tool used to create the generated file may not always be
available. Perhaps it's a specialized tool that requires
separate installation or licensing but whose output is generally
usable. In cases such as this, it would be helpful if the build
system would cache the generated files and use the cached files
if all the input files are up to date. This is the functionality
provided by codegen-wrapper, located in
abuild's util directory, and accessible
through use of the $(CODEGEN_WRAPPER) variable
within user-supplied make rules.
The codegen-wrapper command can handle the situation described above for relatively simple cases, but it is likely to be good enough for many situations. For details on its syntax, please run it with no options to get a summary. It works as follows:
The codegen-wrapper command the following inputs:
a cache directory, which must exist in advance
a list of input files
a list of output files
a command to generate the output files from the input files
The codegen-wrapper checks the following prerequisites:
For each input file
infile, see if the fileinfile.md5exists in the cache directory and contains the md5 checksum ofinfile. You may pass the--normalize-line-endingsflag to codegen-wrapper to have it disregard differences in line endings (carriage return + newline vs. newline) when computing checksums.For each output file
outfile, see if a file calledoutfileexists in the cache directory.
If all of the above prerequisites are satisfied, codegen-wrapper copies the output files from the cache directory into the output directory. Otherwise, codegen-wrapper runs the specified command. If the command succeeded and generated all the expected output files, codegen-wrapper updates the checksums of the input files and copies all the generated files into the cache directory. Note that the cache directory is expected to be a controlled directory that is part of your source tree. As such, it is likely that codegen-wrapper will actually update files in the cache directory which you will subsequently have to check into your version control system.
Let's now look at an example. We have an example that provides a simple code generator. This generator reads an input file and, based on annotations in the file, repeats some input lines into an output file. However, its exact functionality is not important; for purposes of this example, all we need to care about is that it generates some output file from an input file.
To use this code generator, we'll adopt a convention that any
input file passed to the code generator will generate a file by
the same name appended with the .rpt
suffix. The code generator build item will require that any
input files be named in the variable INPUT.
For each file named in $(INPUT), it will
the corresponding .rpt file using the code
generator. If the variable REPEATER_CACHE is
defined, the build item will use that as the cache directory. We
implement that with the following rule fragment:
codegen-wrapper/repeater/rules/all/repeater.mk
_UNDEFINED := $(call undefined_vars,\
                INPUT)
ifneq ($(words $(_UNDEFINED)),0)
$(error The following variables are undefined: $(_UNDEFINED))
endif

all:: $(foreach I,$(INPUT),$(I).rpt)

define rpt_command
        perl $(abDIR_repeater)/repeater.pl -i $< -o $@
endef

$(INPUT:%=%.rpt): %.rpt: %
        @$(PRINT) Generating $@ from $< with repeater
ifdef REPEATER_CACHE
        $(CODEGEN_WRAPPER) --cache $(REPEATER_CACHE) \
            --input $< --output $@ --command $(rpt_command)
else
        $(rpt_command)
endif
There's a lot here, so let's go through it line by line. At the
beginning, we see the normal check for undefined variables. We
want to make sure that the INPUT variable is
defined. (Obviously, a real build item would have to come up
with a better, less generic name than this.) Next, we add all
the .rpt lines to the all
target, as usual, by adding them as dependencies of
all specified with two colons, indicating that
there are multiple all targets. So far,
there's nothing different from any other code generator.
Next, we define a macro rpt_command which
actually runs the command to generate the files. Note that, in
this case, the code generator lives right in the build item, so
there's really not much reason to use
codegen-wrapper with it. But our purpose here
is to demonstrate codegen-wrapper, so we'll
use it! When defining this macro, we make use of the variables
$< and $@. These are
predefined make variables that, when evaluated in the context of
a rule, refer to the first prerequisite and the target
respectively. They aren't valid at the point where the macro is
defined, but they are valid at the point where it is expanded,
which is what's relevant. We don't really have to define a macro
for this, but doing so helps us to avoid having to repeat the
invocation of the code generator, which might be involved in some
cases.
Finally, there's the rule itself. This is a typically GNU Make
pattern rule that generates a .rpt file from
an input file without the suffix. The complete rule is prefixed
with the list of output files, thus restricting it to only apply
on this files. Within the rule definition itself, we make the
generation step conditional upon whether the
REPEATER_CACHE variable is defined. The
effect of the ifdef is applied at the time the
file is read, no at the time the rule is run, but this is okay
because the rule implementation file is always loaded after
Abuild.mk. When
REPEATER_CACHE is not defined, we just run the
repeater command normally. When it is defined, we run it with
$(CODEGEN_WRAPPER), specifying the cache
directory, the inptu files, the output files, and the commands
using arguments to the codegen-wrapper command
as invoked through the $(CODEGEN_WRAPPER)
variable.
Let's look at two build items that use these rules. They both
set their RULES variable to include
repeater. Both build items set the
INPUT variable. Only the second one sets the
REPEATER_CACHE variable. Here are the
Abuild.mk file:
codegen-wrapper/user1/Abuild.mk
INPUT := file1 file2
RULES := repeater
codegen-wrapper/user2/Abuild.mk
REPEATER_CACHE := cache
INPUT := file1 file2
RULES := repeater
Assuming that we start off with an empty cache directory, here is what the first build from scratch with abuild -b all would generate:
repeater-pass1.out
abuild: build starting
abuild: user1 (abuild-indep): all
make: Entering directory `--topdir--/codegen-wrapper/user1/abuild-indep'
Generating file1.rpt from ../file1 with repeater
Generating file2.rpt from ../file2 with repeater
make: Leaving directory `--topdir--/codegen-wrapper/user1/abuild-indep'
abuild: user2 (abuild-indep): all
make: Entering directory `--topdir--/codegen-wrapper/user2/abuild-indep'
Generating file1.rpt from ../file1 with repeater
codegen-wrapper: generation succeeded; cache updated
Generating file2.rpt from ../file2 with repeater
codegen-wrapper: generation succeeded; cache updated
make: Leaving directory `--topdir--/codegen-wrapper/user2/abuild-indep'
abuild: build complete
Note that, for the build item user1, we just
saw the messages that the output files were generated from the
input files. For user2, you can see
messages from codegen-wrapper indicating that
generation succeeded and that it has updated the cache.
If we built again right away, the output files would already
exist and be newer than the input files, so the rule wouldn't
even trigger. Therefore we have to first clean everything with
abuild -c all to demonstrate the cache
functionality. If you're following along, you'll notice that the
directory codegen-wrapper/user2/cache now
contains four files: file1.md5,
file1.rpt, file2.md5,
and file2.rpt. Here's the output of a
second build from clean with abuild -b all:
repeater-pass2.out
abuild: build starting
abuild: user1 (abuild-indep): all
make: Entering directory `--topdir--/codegen-wrapper/user1/abuild-indep'
Generating file1.rpt from ../file1 with repeater
Generating file2.rpt from ../file2 with repeater
make: Leaving directory `--topdir--/codegen-wrapper/user1/abuild-indep'
abuild: user2 (abuild-indep): all
make: Entering directory `--topdir--/codegen-wrapper/user2/abuild-indep'
Generating file1.rpt from ../file1 with repeater
codegen-wrapper: files are up to date; using cached output files
Generating file2.rpt from ../file2 with repeater
codegen-wrapper: files are up to date; using cached output files
make: Leaving directory `--topdir--/codegen-wrapper/user2/abuild-indep'
abuild: build complete
This time, the build of user1 looks the
same, but the build of user2 is different.
Instead of actually running the command to generate the output,
we see codegen-wrapper telling us that files
are up to date and that it is using the cached files.
The best part about this is that if we modify one of the input
files, the cache will get automatically updated. Without doing a
clean, we can add some line to the end of
codegen-wrapper/user2/file2 and run another
build with abuild -b all. That generates the
following output:
repeater-mod-pass1.out
abuild: build starting
abuild: user1 (abuild-indep): all
abuild: user2 (abuild-indep): all
make: Entering directory `--topdir--/codegen-wrapper/user2/abuild-indep'
Generating file2.rpt from ../file2 with repeater
codegen-wrapper: generation succeeded; cache updated
make: Leaving directory `--topdir--/codegen-wrapper/user2/abuild-indep'
abuild: build complete
Nothing happened in build item user1 at all
since everything was up to date. Likewise, we see no mention of
file1 in user2.
However, for file2 in
user2, we once again see the output from
codegen-wrapper indicating that generation
succeeded and that it has updated the cache. Doing another clean
build abuild -c all followed by
abuild -b all, we once again see that files
from the cache are used:
repeater-pass2.out
abuild: build starting
abuild: user1 (abuild-indep): all
make: Entering directory `--topdir--/codegen-wrapper/user1/abuild-indep'
Generating file1.rpt from ../file1 with repeater
Generating file2.rpt from ../file2 with repeater
make: Leaving directory `--topdir--/codegen-wrapper/user1/abuild-indep'
abuild: user2 (abuild-indep): all
make: Entering directory `--topdir--/codegen-wrapper/user2/abuild-indep'
Generating file1.rpt from ../file1 with repeater
codegen-wrapper: files are up to date; using cached output files
Generating file2.rpt from ../file2 with repeater
codegen-wrapper: files are up to date; using cached output files
make: Leaving directory `--topdir--/codegen-wrapper/user2/abuild-indep'
abuild: build complete
There's a lot to swallow here, but you will hopefully recognize the power and usefulness of such an approach. Hopefully, the codegen-wrapper tool will meet some of your needs. Even if it doesn't, it may provide a starting point. Here are a few things to take away from this example:
Writing code generators is always going to require some advanced make coding. The incremental complexity added by codegen-wrapper is relatively low, so for simple code generators, enhancing them to use this utility should be reasonably straightforward.
The codegen-wrapper tool doesn't do anything fancy with respect to knowing how to generate output file names from input file names. Instead, we just pass the actual names to it on the command line. Using the make variables
$<and$@makes this easy. Sometimes there may be multiple input files and/or multiple output files. Handling multiple input files is fairly easy. The make variable$^contains all the prerequisites for a given target while$<contains the first prerequisite. Using$<or$^for your input files and$@for your output files is nice when you can get away with it because all the handling of finding input files in..(through make'sVPATHfeature) is handled for you automatically.Handling multiple output files may be a bit trickier, but it can still be done. You may need to experiment a little. Often you will find that make will pick whichever target it tries to create first as $@ and that the rule will be invoked only one time. In this case, you may have to generate your output file names yourself. Sometimes you can do this by defining them relative to $@, which you should do if at all possible. For an example of this, you can look at
make/standard-code-generators.mkin your abuild distribution. This code uses codegen-wrapper for flex and bison. The bison rules generate multiple output files from a single input file and generate the multiple output names from$@in this way.In our little example, the code generator was always available, so when we modified the input file, everything worked. If the code generator were not available or if it failed, codegen-wrapper would fail with the same exit status and would not updated the cache.
[45]
Actually, there is no way for build items using the deprecated
xml-based ant backend to provide custom rules. They are
limited to providing code for specific hooks in the set rule
structure. It is possible for plugins to provide custom
targets using preplugin-ant.xml.
[46] It would be nice to be able to avoid this issue entirely. One way to avoid it would be generate a source file instead of a header file. In that case, make would definitely try to generate the source file before building, so no explicit dependency would be required. This approach would certainly work for this example. One option that would definitely not work would be to create a generate target, analogous to the generate target in abuild's Groovy/ant support, and making it a prerequisite for the all target. Although this would work for strictly serial builds, it wouldn't necessarily work for parallel builds as make is free to build all the prerequisites for a given target in any order as long as they don't have dependencies on each other. In fact, the reason this trick works in Groovy is that the Groovy framework never runs targets in parallel, and ant only runs tasks within a target in parallel when you explicitly tell it that it can. So the bottom line is that whatever we are automatically generating, at the file level, must appear as a dependency somewhere. Source files automatically appear as dependencies of their object files, but header files don't appear as dependencies anywhere until the compile has already been run at least one time. Therefore, a solution that works for parallel builds and generates header files has to create an explicit dependency such as in this example.
Table of Contents
In this chapter, we will examine interface flags. Both interface flags and standard abuild interface conditionals allow us to cause a particular interface variable assignment to be evaluated only under a specific condition. When such assignments are implemented inside normal abuild interface conditional blocks, all depending build items will see the results of such assignments in the same way (as would be typical of any variable assignment system). With interface flags, it is possible to have different build items see the effects of different assignments to certain variables, a concept we describe in greater depth below. This is an unusual capability, but it is very useful for implementing private interfaces. In this chapter, we will explore interface flags in enough detail to see how to use them to implement private interfaces, which is their primary use.
If there were a contest to select the most unusual feature of abuild, interface flags would probably be the strongest contender for the prize. This section presents a conceptual overview that should be good enough to enable you to make use of interface flags to implement private interfaces. We provide a private interface example at the end of this chapter. In order to provide a conceptual overview of how interface flags work, we will present a partial but accurate explanation of how they work, and we will focus our attention on list variables only. To understand interface flags in full detail, see Section 33.7, “Implementation of the Abuild Interface System”.
Every build item in abuild, whether it has an
Abuild.interface file or not, has an
abuild interface. The abuild interface for a build item is
the union of all the interfaces of all its dependencies, taken in
dependency order, along with its own
Abuild.interface, if any. To understand
what we mean by the “union” of abuild interfaces,
you have to know a little bit about how abuild stores
interfaces.
Recall that abuild interface files contain a series of variable
declarations and assignments, and that variables may be declared
in one file and assigned to in other files. In particular, it is
standard operating procedure for numerous
Abuild.interface files to all assign to the
same list variables (INCLUDES,
LIBDIRS, LIBS,
abuild.classpath, etc.). As abuild reads
interface files and encounters multiple assignments to the same
list variable, it doesn't actually update some internal notion of
that variable's value as you might suspect. Rather than storing
the values of variables in a build item's interface, abuild
actually retains a list of all the assignments to a given
variable throughout all the relevant
Abuild.interface files. This enables
abuild to compute the values of variables when they are needed.
When we say that an abuild interface is the union of the
interfaces of its dependencies, what we really mean is that the
value of each interface variable comes from the union of all
assignments to those variables across all the dependencies'
interface files.
There are two different times when abuild computes the value of
an interface variable. The first is when that variable is
expanded in an Abuild.interface file using
the $(VARIABLE) syntax. The second is when
abuild generates the dynamic output file as introduced in Section 17.1, “Abuild Interface Functionality Overview”. In each
case, abuild computes the value of a variable by looking at all
the assignments it knows about at that time and combining them
together based on whether the list variable is an
append list or a prepend list. Either
way, since abuild has a history of all assignments to the
variable, it has everything it needs to compute the value of the
variable.
Now this is where flags come in. As we saw in Section 17.2, “Abuild.interface Syntactic Details”, it is
possible to associate a given variable assignment with an
interface flag. When a variable assignment is associated with an
interface flag, abuild simply stores this fact in the list of
assignments to the variable. When it is time to compute a value
for the variable, abuild filters out all assignments that are
associated with a flag that isn't set. Consider the following
example. Suppose the variable VAR1 is
declared as an append list of strings,
and that you have the following assignments to
VAR1:
VAR1 = one
flag flag1 VAR1 = two
VAR1 = three
If you evaluate this sequence of assignments with the
flag1 flag set, the value of
VAR1 would be one two
three. If you evaluate this list of assignments
without the flag1 flag
set, the value of VAR1 would just be
one three.
Here is a subtle but important point. You don't really have to
understand it to make use of private interfaces, but if you can
understand it, you will be well on your way to grasping how
interface flags really work. This handling of interface flags
means that the value of a variable is based on the collection of
flags that are set when its value is
computed. As we already noted, there are two
instances in which abuild computes the values of variables:
when it encounters a variable expansion while reading
Abuild.interface files, and when it creates
dynamic output files. Interface flags are only set when creating
dynamic output files. At the time that
Abuild.interfaces are being read, flags
haven't been set yet. If this worked any other way, it would not
be possible for multiple build items to see different values for
certain variables, and that is the whole reason for being of
interface flags. We defer further discussion of this point to
Section 33.7, “Implementation of the Abuild Interface System”.
In order to associate a particular variable assignment with a
flag, the assignment in an Abuild.interface
file must be prefixed with flag
, as we have seen
above. Before flagname can be associated
with an assignment, it must be declared as one of the build
item's supported flags. This is achieved
by including the flag in the supported-flags
keyword in flagnameAbuild.conf. For example:
supported-flags: flagname
As we have already seen, the effect of an assignment that is
associated with a flag is visible only if the value of the
variable is requested when the specified flag is set. The only
time this ever happens is when abuild is creating the dynamic
output file for a build item. We mentioned above that abuild
maintains a list of assignments for each variable and retains a
record of any flag that may have been associated with each
assignment. Abuild also stores the name of the build item that
is responsible for each assignment in a variable's assignment
history. When one build item depends on another, it may request
the evaluation of any assignments made by the dependency item
that were associated with a specific flag. This is done by
including the
-flag= option
when declaring the dependency in the
flagnameAbuild.conf file. For example, if build
item A wanted to see all assignments that
B made associated with the
private flag, then
A's Abuild.conf would
contain the following line:
deps: B -flag=private
When a flag is specified as part of a dependency in this fashion,
abuild requires that the dependency list the given flag as one
of its supported flags. For example, in this case, it would be
an error if B's
Abuild.conf did not list
private in its
supported-flags key.
As mentioned above, the effect of any flag-based assignment is
visible only when actually exporting a build item's interface to
the dynamic output. When abuild exports a build item's own
interface for its own use, it does so with all of the flags
supported by that build item in effect. For example, in Figure 23.1, “Private Interface Flag”, B has an
include directory and a
private-include directory. It wants the
include directory to be visible to all build
items that depend on it, but the
private-include directory should be visible
only to other build items that specifically ask for it.
B would indicate that it supports the
private flag by adding this line to its
Abuild.conf:
supported-flags: private
If it wanted the header files in include
directory to be visible to all items that depend on it, but it
wanted the header files in the
private-include directory to be visible only
to those build items that specifically requested by depending on
it with the private flag, it would include
the following lines in its Abuild.interface
file:
INCLUDES = include
flag private INCLUDES = private-include
If A wanted to see the
private-include directory, it could indicate
that it wants the private flag set when it
reads B's
Abuild.interface. It would do this by
including the following in its Abuild.conf:
deps: B -flag=private
Then, when A reads
B's Abuild.interface
file, it will see the private-include
assignment. B will also see it because
build items always see all of their own flag-based assignments.
If a third build item X depended on
A without specifying the
private flag, it would not see
B's private-include
directory as that assignment would not be inherited through
A's interface.
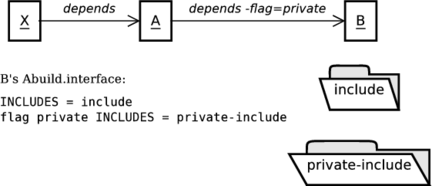
This is a bit tricky to understand. For additional
clarification, see the example below, Section 23.3, “Private Interface Example”.
Although we have used a single and generically named private flag for this example, there is nothing special about the name “private”. There's no reason that other special-purpose flags couldn't be introduced to provide fine-grained control over which parts of a build item are to be visible to other build items. In most cases, use of a simple flag like private should suffice. To reduce confusion among developers in a project, it is recommended that a project adopt its own conventions about how interface flags will be used.
Here we return to our user trees in
doc/example/general/user. In our user
branch, we have modified the project-lib
library to make use of private interfaces. If you look at the
Abuild.conf in the src
directory, you will see that it lists
private in its
supported-flags key:
general/user/project/lib/src/Abuild.conf
name: project-lib.src
platform-types: native
deps: common-lib1
supported-flags: private
In its Abuild.interface file, it adds
../private-include to
INCLUDES only when the
private flag is set:
general/user/project/lib/src/Abuild.interface
INCLUDES = ../include
flag private INCLUDES = ../private-include
LIBDIRS = $(ABUILD_OUTPUT_DIR)
LIBS = project-lib
This makes the headers in the
private-include directory visible to it and
any build item that depends on it with
-flag=private.
[47]
Note that the
project-lib.src build item didn't have to
do anything special to see its own private interfaces. This is
because a build item automatically operates with all of its own
interface flags set for itself. Another thing we've done in this
build item is to put the new source file
ProjectLib_private.cpp in a
private subdirectory:
general/user/project/lib/src/Abuild.mk
TARGETS_lib := project-lib
SRCS_lib_project-lib := \
        ProjectLib.cpp \
        private/ProjectLib_private.cpp
RULES := ccxx
The only reason we did this was to demonstrate that abuild
allows multi-element paths (i.e., paths
with subdirectories in them) in your source variables. Just
avoid putting “..” anywhere in
the path.
[48]
If you study ProjectLib.cpp in
user/project/lib/src, you will notice that
we have included the file
ProjectLib_private.hpp, which is located in
the private-include directory, and that we
have called a function that is declared in that file to get the
value with which we initialize cl1:
general/user/project/lib/private-include/ProjectLib_private.hpp
#ifndef __PROJECTLIB_PRIVATE_HPP__
#define __PROJECTLIB_PRIVATE_HPP__

extern int ProjectLib_private_get_value();
extern void ProjectLib_private_set_value(int);

#endif // __PROJECTLIB_PRIVATE_HPP__
general/user/project/lib/src/ProjectLib.cpp
#include "ProjectLib.hpp"
#include "ProjectLib_private.hpp"

#include <iostream>

ProjectLib::ProjectLib() :
    cl1(ProjectLib_private_get_value())
{
}

void
ProjectLib::hello()
{
    this->cl1.countBackwards();
}
Private interfaces can be particularly useful in any
implementation that hides implementation details from outside
users because it can prevent accidentally accessing restricted
header files. This type of construct is most useful in straight
C code rather than C++ code since C doesn't provide any
encapsulation capability other than use of opaque types defined
in private header files. This is somewhat akin to using the
friend keyword in C++, except that access to
private interfaces is requested by the accessor rather than the
accessee.
[49]
The test code in main.cpp in
user/project/lib/test also calls a function
defined in the private header file. Note that the
Abuild.conf file in the
test directory mentions
project-lib.src explicitly in its
dependency list, and that it is followed by
-flag=private:
general/user/project/lib/test/Abuild.conf
name: project-lib.test
platform-types: native
deps: project-lib project-lib.src -flag=private
traits: interesting tester -item=project-lib.src
This means that when project-lib.test
reads project-lib.src's
Abuild.interface file, any assignments that
are flagged with the private flag will be
processed.
The alert reader may notice that we have also assigned the trait interesting to this build item. Although the build item is somewhat interesting, the primary purpose of doing this is to illustrate the use of a trait without a referent build item and to show how a trait can be added in a specific tree to supplement traits that are available because of our tree dependencies.
[47]
Note that when the private flag is set,
both assignments to
INCLUDES take effect. To understand why
this is, please see Section 33.7, “Implementation of the Abuild Interface System”.
[48]
Such constructs, if permitted, would potentially cause abuild
to write files outside the output directory. For example, if
you had ../A.cc as a source file, abuild
would construct
abuild-
as the object file name. Fortunately, abuild actually
detects this case and reports an error.
platform/../A.o
[49] Since the build item that supports the private flag is also protected by the scope of its name, this gives us an added layer of protection.
Table of Contents
When abuild starts up, it determines a list of object-code platform types and, within each platform type, a list of platforms. Platforms are given initial priorities based on the order in which they are declared with later declarations having higher priority than earlier ones. (In this way, platforms added by plugins are preferred over internally defined ones.) By default, abuild builds each object-code build item on the highest priority platform in each of its platform types. Abuild may also choose to build an item on additional platforms to satisfy dependencies.
The list of platforms on which abuild will attempt to build an
item may be overridden using platform selectors. Platform
selectors may be specified in the
ABUILD_PLATFORM_SELECTORS environment variable
or on the command line using the
--platform-selector or -p
command-line flag. Each platform selector may refer to a
specific platform type or may be a general selector for all
platform types. There may be at most one selector for each
platform type and at most one general selector. If multiple
selectors for the sample platform type or multiple general
selectors are specified, abuild chooses the last one.
Selectors given on the command line always take precedence over
those in the environment variable. This makes it possible for
later options to override earlier ones or for the command line to
override the environment. To specify multiple selectors in the
environment, set the variable to contain multiple space-separated
words. To specify multiple selectors on the command line,
provide the command-line option more than once. For example:
--platform-selectorselector[ --platform-selectorselector... ]
or
ABUILD_PLATFORM_SELECTORS="selector[selector... ]"
Each selector is of the form
[platform-type:]criteria
If no platform-type is specified, then
the selector applies to all object-code platform types. When
applying selectors, abuild will always first try a selector for
the specific platform type first. Only if there isn't one will
abuild attempt to use the general selector.
The criteria field above may have one
of the following forms:
option=
optioncompiler=
compiler[.option]platform=
os.cpu.toolset.compiler[.option]all
default
skip
The special skip selector prevents automatic selection of any platforms from the type. When it is used, no platforms from that platform type are selected by default, so no builds will be done in that platform type except when needed to satisfy a dependency. This could be useful if you only wanted to do embedded builds, for example. This is the only selector that can be used with the indep or java platform types. Starting with abuild 1.1.4, it is valid to specify skip without a platform type qualifier, which will suppress any default platform selection for any object code platform type. This could be used to build only indep and java, or it could be used to suppress all but a specific platform type by also providing a type-specific selector for the type you do want to build.
The default selector means to select whichever platform would be selected if no platform specifier were given. It must be used with a platform type qualifier. This is useful to direct abuild to use the default for a given platform type when a general specifier was used.
The other selectors are translated into an (os,
cpu, toolset, compiler,
option) tuple. Each field may be
* or a platform field. The selector
all is equivalent to *.*.*.*.*.
The empty string may not be explicitly specified, but omitted
fields are mapped to the empty string. For example,
compiler=x is equivalent to ("",
"", "", "x",
""). Any empty string field except for
option matches the corresponding field of the
highest priority platform (the last one declared) in the list of
platforms for the given type. This is the always the first
platform listed for the platform type by abuild
--list-platforms. An empty option field
means that the option field of the platform must be
empty.
When picking platforms on which to build by default, abuild
will always pick the first platform that matches the criteria.
If there are no matches, it will pick the first platform of the
platform type. If any of the fields of the selector are equal to
*, then abuild will select
all platforms that match the criteria, again
falling back to only the first platform in the type if there are
no matches.
Here are several examples. For purposes of discussion, assume that we have the following platforms, shown here by type:
- vxworks
vxworks.ppc.6_3.vxgcc vxworks.x86.6_3.vxgcc vxworks.x86.6_3.vxgcc.debug - native
linux.x86.rhel4.xlc linux.x86.rhel4.xlc.debug linux.x86.rhel4.xlc.release linux.x86.rhel4.gcc linux.x86.rhel4.gcc.debug linux.x86.rhel4.gcc.release
If no platform selectors were provided, we would build native build items with linux.x86.rhel4.xlc and vxworks build items with vxworks.ppc.6_3.vxgcc. Here are several platform selectors along with a description of what they mean:
- native:option=debug
On the native platform type, build with the first platform that has the debug option. If none, build with the first platform regardless of its options. (This is always the behavior when there are no platforms that fit the criteria, so this will not repeated for each example.) In this case, we would build native items on linux.x86.rhel4.xlc.debug. Build the default platform for vxworks.
- native:compiler=gcc.release
On the native platform type, build with compiler gcc with the release option. In this case, that would be linux.x86.rhel4.gcc.release. Build the default platform for vxworks.
- compiler=gcc vxworks:default
On all object-code platform types except vxworks, build with gcc with no options. For native, this is linux.x86.rhel4.gcc. Explicitly build the default platform for vxworks.
- native:compiler=gcc.*
On the native platform type, build all gcc platforms with all options, including the gcc platform without any options. That would include linux.x86.rhel4.gcc, linux.x86.rhel4.gcc.debug, and linux.x86.rhel4.gcc.release. Build the default platform for vxworks.
- native:compiler=*.debug
On the native platform type, build all platforms that have the debug option: linux.x86.rhel4.xlc.debug and linux.x86.rhel4.gcc.debug. Build the default platform for vxworks.
- native:compiler=*.*
On the native platform type, build all platforms: linux.x86.rhel4.xlc, linux.x86.rhel4.xlc.debug, linux.x86.rhel4.xlc.release, linux.x86.rhel4.gcc, linux.x86.rhel4.gcc.debug, and linux.x86.rhel4.gcc.release. Build the default for vxworks.
- vxworks:platform=*.*.*.*.debug
On vxworks, build for all platforms that have the debug option: vxworks.x86.6_3.vxgcc.debug. Build the default platform for native.
- vxworks:platform=*.x86.*.*.*
On vxworks, build all platforms that have x86 as the cpu field: vxworks.x86.6_3.vxgcc and vxworks.x86.6_3.vxgcc.debug.
- skip indep:skip java:skip vxworks:default
Skip all platform types except vxworks, and build with the default platform for vxworks. Note that specifying skip by itself only skips object-code platform types, so we have to explicitly skip indep and java as well.
- vxworks:skip
Skip the vxworks platform type; no vxworks builds will be done except as needed to satisfy dependencies. Native builds are done normally.
- platform=*.*.*.*
For all otherwise unspecified platform types, build for all platforms that have an empty option field: vxworks.ppc.6_3.vxgcc, vxworks.x86.6_3.vxgcc, linux.x86.rhel4.xlc, and linux.x86.rhel4.gcc.
- platform=*.*.*.*.*
For all otherwise unspecified platform types, build for all platforms. This is the same specifying the platform selector all.
As you can see, any given build item may build on one more
platforms. When build item A depends on
build item B, that dependency must be
satisfied separately for each platform on which
A builds. So if A
and B both build on platforms
p1 and p2, then the actual situation is
that A on p1 depends on
B on p1, and
A on p2 depends on
B on p2. This case of
A and B building on
the same platforms is simple and common, but there are cases in
which things don't work out so easily. For this, abuild has
two concepts: platform compatibility and
explicit cross-platform dependencies. We
discuss platform compatibility here and explicit cross-platform
dependencies in the next section. These sections describe these
concepts in basic terms. For the complete story with all the
details, please refer to Section 33.6, “Construction of the Build Graph”.
The rules for platform compatibility are fairly straightforward. Specifically, a platform p in a platform type pt is compatible with all other platforms in pt and also with all platforms in pt's parent platform type, and by extension, all the way up the hierarchy of platform types. Starting with abuild 1.1.4, when a platform type is declared, it can optionally be declared to have a parent platform type. In all versions of abuild, any platform type declared without a parent has the platform type indep as an implicit parent. This means that all platforms are compatible with indep, which is how any build item of any platform type can depend on a build item of type indep.
For example, suppose you are creating a plugin to define platform
types for the VxWorks embedded operating system, and you are
creating separate platform types for different embedded boards
that have different vendor-supplied board support packages.
Suppose you also have a body of code that will work for all
VxWorks boards and don't contain anything that depends on a
specific board support package. To implement this, you could
create a common platform type for the specific version of VxWorks
and then also create child platform types for each specific
board. For example, you could have a base type called
vxworks-6_8-base and child types
vxworks-6_8-bsp1 and vxworks-6_8-bsp2.
Now if you had a build item Q of type
vxworks-6_8-bsp1 and a build item
R of type vxworks-6_8-bsp2,
both build items could depend on item S of
type vxworks-6_8-base since all platforms in the two
board-specific platform types are compatible with the platforms
in the base type. Additionally, if there were a build item
T of type indep, all three of
the other build items could depend on T
because indep is compatible with all other platform
types. For further discussion of creating platform types, see
Section 29.3.1, “Adding Platform Types”.
Ordinarily, when A depends on
B, abuild requires that
B be buildable on platforms that are
compatible with all the platforms A is
being built on. In this case, the instance of
A being built on platform p
depends specifically on the instance of B
being built on platform p or some other platform
that is compatible with p. Under these rules, it
would be impossible for A to depend on
B if B couldn't be
built on at least one platform that was compatible with each of
A's platforms. This would make it
impossible for a platform-independent item to depend on any
object-code or Java build items, object-code and Java build items
to depend on each other, or for non-compatible object-code
platform types to depend on each other. (Recall from the
previous section that any item can depend on a
platform-independent build item since the platform type
indep is compatible with all other platform types.)
To make these other cases possible, abuild allows a dependency
to declare that the dependency should be on a specific platform
by using the -platform flag to the dependency
declaration. Rather than declaring a platform by name, the
argument to the -platform argument is either a
platform type or a platform-type-qualified platform selector. In
this case, the instance of A on each of
its platforms depends on the specifically selected instance of
B.
[50]
To choose which of B's platforms will be
used, abuild picks the first platform in the given type that
matches the platform selector. Matches are performed using the
same technique as when platform selectors are specified on the
command line with two exceptions: the criteria field
may be omitted, and the selector only ever matches a single
platform even if * appears as one of the
fields. Abuild versions prior to 1.1 ignored any platform
specifiers given on the command line or in the environment when
resolving cross-platform dependencies, but the current abuild
does take them into consideration. If you want to specify a
platform-specific dependency on the default platform for a given
platform type regardless of any platform
selectors, you can specify
platform-type:default as
the -platform option to your dependency.
Under a very specific set of circumstances, it is possible to have a subtle and hard-to-understand error condition involving interface variables with cross-platform dependencies. You should feel free to skip this section unless you are either determined to understand the deepest subtleties of how abuild works or you have been directed here by an error message issued by abuild. To understand the material in this section, it will help to understand Section 33.6, “Construction of the Build Graph” and Section 33.7, “Implementation of the Abuild Interface System”.
Internally, when abuild builds a build item, it loads the
interfaces of all the other build items that the item depends
on. If item A depends on item
B in two different ways (say directly and
indirectly or indirectly through two different dependency
paths), abuild will effectively still load
B's interface file only one time because
of the way the interface system keeps track of things. At least
this is what happens under normal circumstances. If, however,
the two different instances of B in
A's dependency chain are from different
platforms, problems can arise.
We should note that this can happen only under the following conditions:
Build item
Adepends (directly or indirectly) on two items, which we'll callX1andX2.Both
X1andX2depend onB.At least one of
X1andX2depends onBwith a platform-specific dependency. If both do, they do so with different platform specifications.
When all of the above conditions have been met,
A will have two different instances of
B in its dependency chain.
Once this situation has occurred, it becomes possible for there
two be conflicting assignments to a variable, both of which
originate from the same line of the same interface file. For
example, if B's
Abuild.interface file assigns the value of
$(ABUILD_OUTPUT_DIR) to a scalar interface
variable, the effect of that assignment will differ across the
two different instances of B. Abuild
will detect this case and issue an error message. (That error
message will direct you here to this section of the manual!) If
B assigns this to a list variable,
there's no problem—abuild will honor both assignments.
It's also no problem if the assignment doesn't have different
meanings on the different platforms. It's only when the same
assignment causes a conflict that abuild will complain.
If you should run into this situation, there are several possible remedies you should consider.
Rethink why you are using cross-platform dependencies in this way. If you're just trying to make sure that some other build item gets built, consider whether you can use build-also instead of platform-specific dependencies to meet your needs.
If you want both values and doing this won't hurt other build items, use a list variable instead of a non-list variable. In this case, abuild will give you both (all) values.
If you don't care which value you get, and doing so doesn't cause other problems for other build items, use a fallback or override assignment instead of a regular assignment. Then you'll get the first (in the case of fallback) or last (in the case of override) assignment that is processed.
If you can't change
B's interface andAdoesn't care about the value of the value, you can do a reset on the offending variable from the one or more of the items thatAdepends on and that depend on different instances ofB. For example,X1could have an after-build file that resets the offending variable. Then whenAimportsX1's interface, it will no longer include the conflicting assignment fromB's interface.
When a build item does not declare any platform types and has dependencies on items of multiple platform types, that item because a pass-through build item and is handled slightly differently with respect to dependencies. Specifically, a pass-through build item is implicitly buildable on every platform, so any build item may depend on a pass-through build item. Also if a specific instance of pass-through build item on a specific platform depends on another item for which there are no compatible platform types, that dependency is ignored. This makes it possible to use pass-through build items to provide wrappers around families of alternative build items that provide related but separate functionality for consumers of different platform types.
For example, suppose build items A1 and
B1 build on platform X and
build items A2 and
B2 build on platform Y. If
A1 and A2 depend on
pass-through item P which in turn depends
on B1 and B2,
abuild will create effective dependencies between the
A1 and A2 and also
between B1 and B2
based on platform type (see Figure 24.1, “Multiplatform Pass-through Build Item”).
Figure 24.1. Multiplatform Pass-through Build Item
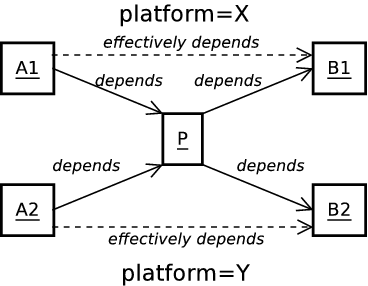
Pass-through item P effectively
connects A1 to
B1 and A2 to
B2 based on their platform types.
What's really happening here is that the instance of
P for X depends on
B1 and ignores B2
while the instance of P on Y
depends on B2 and ignores
B1. If P also had
a dependency on some third build item of type indep,
both instances of P, and therefore
effectively both A1 and
B1 would also depend on the third item of
type indep.
The documentation doesn't provide a specific example that
illustrates that case because this type of usage would be fairly
unusual.
[51]
Instead, we will provide a description of how it would work.
Suppose you had a plugin to support VxWorks, an embedded
operating system, that added a platform type
vxworks, and you wanted to provide a custom
threading library that worked for your native platform and for
VxWorks. Suppose also that your native library implementation
used boost threads but that you wanted to create a VxWorks
implementation that used VxWorks native threads. You could
create a pass-through build item called
threads that depends on
threads.native and
threads.vxworks, and you could set up
threads.native to have
platform-types native and
threads.vxworks to have
platform-types vxworks. The
threads build item would not declare any
platform types. It would just depend on
threads.vxworks and
threads.native. If you now had a program
that supported both native and vxworks
that depended on threads, your application
would use the threads.native
implementation when it built on the native platforms
and the threads.vxworks implementation
when it built on vxworks platforms. This would
happen transparently because of the pass-through build item. If
you wanted to allow any build item to depend
on threads even if there is no support for
that item's platform type, you could also create
threads.indep and make
threads depend on that as well. Just keep
in mind that all instances of threads will
depend on the indep version even if they also depend
on one of the platform-specific versions.
To fully understand why this works, please see Section 33.6, “Construction of the Build Graph”. Note that you could
also put conditionals in your
Abuild.interface and/or
Abuild.mk to avoid having to split this into
multiple build items, so this is not the only solution. The same
trick would work if you wanted to create a facade for a library
that was implemented in multiple languages, though it's unlikely
that there would be any reason to do that: although you can have
one build item that builds for multiple platform types, you can't
have a single build item that builds for target types.
In the doc/example/cross-platform directory,
there is a build tree that illustrates abuild's ability to
enhance dependency declaration with platform type or platform
information. In this example, we show a platform-independent
code generator that calls a C++ program to do some of its work.
We also show a program that uses this code generator. We'll
examine these build items from the bottom up in the dependency
chain. Our first several items are quite straightforward and are
no different in how they work from what we've seen before.
First, look at lib:
cross-platform/lib/Abuild.conf
name: lib
platform-types: native
cross-platform/lib/Abuild.mk
TARGETS_lib := lib
SRCS_lib_lib := lib.cc
RULES := ccxx
cross-platform/lib/Abuild.interface
LIBDIRS = $(ABUILD_OUTPUT_DIR)
LIBS = lib
INCLUDES = .
This build item defines a function f that
returns the square of its integer argument. Here is
lib.cc:
cross-platform/lib/lib.cc
#include "lib.hh"

int f(int n)
{
    return n * n;
}
Next, look at calculate:
cross-platform/calculate/Abuild.conf
name: calculate
platform-types: native
deps: lib
cross-platform/calculate/Abuild.mk
TARGETS_bin := calculate
SRCS_bin_calculate := calculate.cc
RULES := ccxx
cross-platform/calculate/calculate.cc
#include <lib.hh>
#include <iostream>
#include <stdlib.h>

int main(int argc, char* argv[])
{
    for (int i = 1; i < argc; ++i)
    {
        int n = atoi(argv[i]);
        std::cout << n << "\t" << f(n) << std::endl;
    }
    return 0;
}
This is a simple program that takes a number of arguments on the
command line and prints tab-delimited output with the number in
column 1 and the square of the number in column 2. It uses the
f function in lib to
do the square calculation, and therefore depends on the
lib build item.
So far, we haven't seen anything particularly unusual in this
example, but this is where it starts to get interesting. The
material here is tricky. To follow this, you need to remember
that variables set in Abuild.interface files
of build items you depend on are available to you as
make variables. We can use
make's export
command to make those variables available in the environment.
The calculate build item exports the name
of its program in an interface variable in its
Abuild.interface file by creating a variable
called CALCULATE:
cross-platform/calculate/Abuild.interface
declare CALCULATE filename
CALCULATE = $(ABUILD_OUTPUT_DIR)/calculate
after-build after.interface
As with all interface variables, this will be available as a make
variable within Abuild.mk. It also includes
the after-build file
after.interface:
cross-platform/calculate/after.interface
no-reset CALCULATE
reset-all
This file protects the CALCULATE variable from
being reset, and then calls reset-all. In
this way, items that depend on calculate
will not automatically inherit the interface from
lib or any of its dependencies. This
represents the intention that a dependency on the
calculate build item would be set up if
you wanted to run the
calculate program rather than to link with
or include header files from the libraries used to build
calculate. In other words, we treat
calculate as a black box and don't care
how it was built. This works because the
CALCULATE variable, which contains the name of
the calculate program, was protected from
reset, but the LIBS,
LIBDIRS, and INCLUDES
variables have been cleared. In that way, a user of the
calculate build item won't link against
the lib library or be able to include the
lib.hh header file unless they had also
declared a dependency on lib. If we
hadn't cleared these variables, any code that depended on the
calculate build item may well still have
worked, but it would have had some excess libraries, include
files, and library directories added to its compilation commands.
In some cases, this could create unanticipated code dependencies,
expose you to namespace collisions, or cause unwanted static
initializers to be run.
Next, look at the codegen build item.
This build item runs a code generator,
gen_code.pl, which in turn runs the
calculate program. We provide the name of
our code generator in the Abuild.interface
file:
cross-platform/codegen/Abuild.interface
declare CODEGEN filename
CODEGEN = gen_code.pl
This build item provides a rules implementation file in
rules/object-code/codegen.mk (and a help
file in rules/object-code/codegen-help.txt)
for creating a file called generate.cc. It
calls the gen_code.pl program, which it
finds using the CODEGEN interface variable, to
do its job. The gen_code.pl program uses
the CALCULATE environment variable to find the
actual calculate program. Although we have the
CALCULATE variable as a make variable
(initialized from calculate's
Abuild.interface file), we need to export it
so that it will become available in the environment. We also
pass the file named in the NUMBERS variable to
the code generator. Here are the
codegen-help.txt file, the
codegen.mk file, and the code generator:
cross-platform/codegen/rules/object-code/codegen.mk
# Export this variable to the environment so we can access it from
# $(CODEGEN) using the CALCULATE environment variable.  We could also
# have passed it on the command line.
export CALCULATE

generate.cc: $(NUMBERS) $(CODEGEN)
        perl $(CODEGEN) $(SRCDIR)/$(NUMBERS) > $@
cross-platform/codegen/rules/object-code/codegen-help.txt
Set NUMBERS to the name of a file that contains a list of numbers, one
per line, to pass to the generator.  The file generate.cc will be
generated.
cross-platform/codegen/gen_code.pl
require 5.008;
use warnings;
use strict;
use File::Basename;

my $whoami = basename($0);

my $calculate = $ENV{'CALCULATE'} or die "$whoami: CALCULATE is not defined\n";

my $file = shift(@ARGV);
open(F, "<$file") or die "$whoami: can't open $file: $!\n";
my @numbers = ();
while (<F>)
{
    s/\r?\n//;
    if (! m/^\d+$/)
    {
        die "$whoami: each line of $file must be a number\n";
    }
    push(@numbers, $_);
}

print <<EOF
\#include <iostream>
void generate()
{
EOF
    ;

open(P, "$calculate " . join(' ', @numbers) . "|") or
    die "$whoami: can't run calculate\n";
while (<P>)
{
    if (m/^(\d+)\t(\d+)/)
    {
        print "    std::cout << $1 << \" squared is \" << $2 << std::endl;\n";
    }
}

print <<EOF
}
EOF
    ;
In order for this to work, the codegen
build item must depend on the calculate
build item. Ordinarily, abuild will not allow this since the
calculate build item would not be able to
be built on the indep platform, which is the only
platform on which codegen is built. To
get around this, codegen's
Abuild.conf specifies a
-platform argument to its declaration of its
dependency on calculate:
cross-platform/codegen/Abuild.conf
name: codegen
platform-types: indep
deps: calculate -platform=native:option=release
The argument -platform=native:option=release
tells abuild to make codegen depend on
the instance of calculate built on the
first native platform that has the
release option, if any; otherwise, it depends on the
highest priority native platform. Note that this
will cause the release option of the appropriate
platform to be built for calculate and its
dependencies even if they would not have otherwise been built.
This is an example of abuild's ability to build on additional
platforms on an as-needed basis. For details on exactly how
abuild resolves such dependencies, see Section 33.6, “Construction of the Build Graph”.
Notice that this code generator uses an interface variable, in
this case $(CALCULATE), to refer to a file in
the calculate build item. Not only is
this a best practice since it avoids having us have to know the
location of a file in another build item, but it is actually the
only way we can find the calculate program:
abuild doesn't provide any way for us to know the name of the
output directory from the calculate build
item we are using except through the interface system. (The
value of the ABUILD_OUTPUT_DIR variable would
be the output directory for the item currently being built, not
the output directory that we want from the
calculate build item.) We also use an
interface variable to refer to the code generator within our own
build item, though in this case, it would not be harmful to use
$(abDIR_codegen)/gen_code.pl instead.
[52]
Finally, look at the prog build item.
This build item depends on the codegen
build item. Its Abuild.mk defines the
NUMBERS variable as required by
codegen, which it lists in its
RULES variable. This build item doesn't know
or care about the interface of the lib
build item, which has been hidden from it by the
reset-all in
calculate's
after.interface. (If it wanted to, it could
certainly also depend on lib, in which
case it would get lib's interface.) In
fact, running abuild ccxx_debug will show that
prog's INCLUDES,
LIBS, and LIBDIRS variables
are all empty:
cross-platform-ccxx_debug.out
abuild: build starting
abuild: prog (abuild-<native>): ccxx_debug
make: Entering directory `--topdir--/cross-platform/prog/abuild-<native>'
INCLUDES =
LIBDIRS =
LIBS =
make: Leaving directory `--topdir--/cross-platform/prog/abuild-<native>'
abuild: build complete
[50] Note that a platform-specific dependency overrides the dependency platform choice for all platforms on which the depending is being built. It is not presently possible to make the platform-specific dependency behave differently for different platform types of the depending item. This behavior could be simulated by making use of separate intermediate build items, but if you find yourself doing that, you may need to rethink how you're using the various platform types.
[51] Okay, we don't provide an example because it's tricky to make one that would be more illustrative than confusing without an actual embedded platform to work with. If we did create an example, we'd have to make up some kind of simulated embedded platform with a plugin, and that would probably create more confusion than it would be worth.
[52]
Actually, there is something a bit more subtle going on here.
If we didn't have an Abuild.interface file
or an Abuild.mk file, abuild would not
allow this build item to declare a platform type, and it would
automatically inherit its platform type from its dependency or
become a special build item of platform type all,
as discussed in Section 33.6, “Construction of the Build Graph”. In that case,
abuild would not allow us to declare a platform-specific
dependency, and although the code generator would still work
just fine, this wouldn't be much of an example! The construct
illustrated here is still useful though as this is exactly how
it would have to work if there were other values to be exported
through Abuild.interface or any products
that needed to be built by this build item itself. For
example, if the code generator example had been written in Java
instead of perl, this pattern would have been the only way to
achieve the goal.
By default, build items are allowed to refer to other build items
directly in their Abuild.conf files subject
to certain scoping rules as described in Section 6.3, “Build Item Name Scoping”. In some rare instances,
in order to resolve a conflict between what a given build item is
supposed to be able to see and which items a given item is
supposed to be seen by, it is necessary to increase the visibility
of a build item. In this chapter, we describe a mechanism for
doing this and present a real-world example in which it would be
required.
The Abuild.conf file supports an optional
visible-to key has a value consisting of a
single scope identifier. It may have one of the following two
forms:
ancestor-scope.*: the current build item is visible to all build items under the named ancestor-scope. The ancestor-scope must be at or above the “grandparent” of the current build item since build items belong by default to the scope named by the parent build item.*: this build item may be seen by any build item.
For example, if the item A.B.C declared
itself as visible to A.*, then the items
A.P, A.Q.R, or
anything else under A would be allowed to
access it directly. Even though it is hidden beneath
A.B, access to it would be checked as if
it were directly under A. The
A.B.C build item would increase its
visibility by adding this line to its
Abuild.conf:
visible-to: A.*
Here we describe a more concrete example. The next section demonstrates an actual implementation of the pattern described here. Suppose you needed to implement a project that contained build items at different levels of classification, which we'll call public and sensitive. We want the sensitive build items to be able to see the public ones, but the public ones should never be allowed to see the sensitive ones. To achieve this, we create an public build tree and a sensitive build tree, and then we have the sensitive build tree list the public build tree as a tree dependency. The explanation that follows refers to Figure 25.1, “Build Item Visibility”.
Figure 25.1. Build Item Visibility
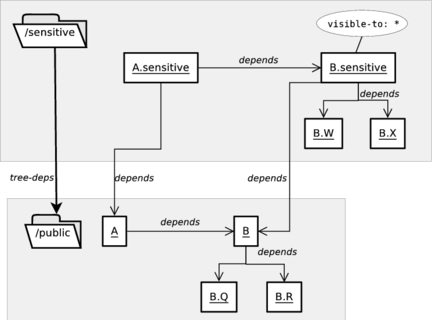
B.sensitive can see
B.W and B.X
because of its scope. B.sensitive can
be seen by A.sensitive because of its
visibility.
Suppose you have software components A and
B and that A
depends on B. Let's say that
B has two public subcomponents called
B.Q and B.R and
that B's Abuild.conf
declares those as dependencies, making it a facade build item for
its subcomponents. When A depends on
B, it will automatically get
B.Q's and B.R's
interfaces through B's dependency on them.
Now suppose that both A and
B have some additional subcomponents that
are sensitive. In order to avoid having the public items even
know that the sensitive items exist and to prevent them from ever
accidentally depending on them even when they are being modified
in a sensitive environment, we add sensitive subcomponents to
A and B in a
completely separate build tree. Suppose B
has sensitive subcomponents B.W and
B.X. Those need to be under the scope
B so that they can see
B.Q and B.R. Now
we can create a facade build item called
B.sensitive that depends on
B and also on B.W
and B.X. Then anyone who depends on
B.sensitive can see all four subcomponents
of B. Suppose we have a sensitive version
of A called
A.sensitive. Unfortunately, by our normal
scoping rules, A.sensitive would not be
allowed to depend on B.sensitive because
B.sensitive would be hidden beneath
B. We can't move
B.sensitive out of
B (by calling it something like
B_sensitive, for example) since then it
would not be able to depend on B.W and
B.X. Instead, we have to have
B.sensitive make itself globally visible
by adding visible-to: * to its
Abuild.conf. Now any build item that can
resolve its name, which by design means only build items in the
sensitive build tree, can declare a dependency directly on
B.sensitive. That way, the public
A build item depends on the public
B build item, and the sensitive
A.sensitive build item depends on the
sensitive B.sensitive build item, and all
constraints are satisfied. This pattern can be useful whenever
separate build trees are used to add new private subcomponents to
something defined in a different build tree. In this case, the
use of a separate tree and a tree dependency creates what is
effectively a one-way dependency gate:
items in the sensitive tree can see items in the public tree, but
items in the public tree can't see items in the sensitive tree.
The next section demonstrates an actual implementation of this
pattern.
This example shows a sample implementation of how one might solve
certain development problems in a mixed classification
development environment. To avoid any potential confusion, we'll
call our two classification levels “public” and
“sensitive.”. These could correspond to different
levels of protection of information and could apply to any
environment in which people have to be granted special access in
order to use parts of a system. The code is divided into two
separate build trees: public and
sensitive. The public
tree's root Abuild.conf file is here:
mixed-classification/public/Abuild.conf
tree-name: public
child-dirs: consumers executable processor
The sensitive tree's root
Abuild.conf is here:
mixed-classification/sensitive/Abuild.conf
tree-name: sensitive
tree-deps: public
child-dirs: consumers executable processor
If you were in an environment where the
sensitive tree were not present, the root of
the public tree could be the root of the
forest. In an environment where both trees are available, they
can be both be made known to abuild by supplying a common
parent Abuild.conf that lists them both as
children. Here is the common parent:
mixed-classification/Abuild.conf
child-dirs: public sensitive
Note that connecting these two trees together is achieved without modifying either tree and without having either tree know the location of the other.
In this example, we'll demonstrate a very simple message processing system. When a message is received, it is processed by a message processor and then dispatched to a series of message consumers. Our system allows message consumers to be registered with a special message consumer table. Each message consumer is passed a reference to a message processor. Then, for each message, each consumer processes the message with the message processor and then does whatever it needs to do with the results.
In the public version of the system, we have some message consumers and a message processor. In the sensitive version of the system, we want access to the public consumers, but we also want to register some additional consumers that are only allowed to work in the sensitive environment. In addition, we want to be able to replace the message processor with a different implementation such that even the public consumers can operate on the messages after processing them with the sensitive processor. Furthermore, we wish to be able to achieve these goals with as little code duplication as possible and without losing the ability to run the public version of the system even when operating in the sensitive environment as this may be important for testing the system. We also wish to protect ourselves against ever accidentally creating a dependency from a public implementation to a sensitive implementation of any part of the system.
In our sample implementation, each message is an integer, and the message processor receives the integer as input and returns a string. Rather than having “messages” actually be “received”, we just accept integers on the command line and pass them through the process/consume loop in the system.
This example may be found in
doc/example/mixed-classification. The
public code is in the public subdirectory,
and the sensitive code is in the sensitive
subdirectory. The example is implemented in Java, but there is
nothing about it that wouldn't work the same way in C or C++. We
will study the public area first.
In this example, we have a library of consumers and an executable program that calls each registered consumer the numbers passed in on the command line. The consumers each call the processor function through an interface, an instance of which is passed to the consumer with each message. The public version of consumer library includes two consumers. In order for us to allow the sensitive version to add two more consumers and provide a new processor that completely replaces the one defined in the public version, the processor function's interface and implementation are separated as we will describe below.
There are several things to note about the dependencies and
directory layout. First, observe that the Java
Processor class defined in the
processor build item implements a
Java interface (not to be confused with an abuild interface)
that is actually defined in the
consumers.interface build item in
the consumers/interface directory.
Here is the interface from the
consumers.interface build itme:
mixed-classification/public/consumers/interface/src/java/com/example/consumers/ProcessorInterface.java
package com.example.consumers;

public interface ProcessorInterface
{
    public String process(int n);
}
Here is its implementation from the
processor build item:
mixed-classification/public/processor/src/java/com/example/processor/Processor.java
package com.example.processor;

import com.example.consumers.ProcessorInterface;

public class Processor implements ProcessorInterface
{
    public String process(int n)
    {
        return "public processor: n = " + n;
    }
}
This means that the processor
build item depends on consumers
and the consumers build items do
not depend on processor. This
helps enforce that the implementation of the processor function
can never be a dependency of the consumers (as that would create
a circular dependency), thus allowing it to remain completely
separate from the consumer implementations.
mixed-classification/public/processor/Abuild.conf
name: processor
platform-types: java
deps: consumers
mixed-classification/public/consumers/Abuild.conf
name: consumers
child-dirs: interface c1 c2
deps: consumers.c1 consumers.c2
The consumers
themselves accept a ProcessorInterface
instance as a parameter, as you can see from the consumer
interface:
mixed-classification/public/consumers/interface/src/java/com/example/consumers/Consumer.java
package com.example.consumers;

public interface Consumer
{
    public void register();
    public void consume(ProcessorInterface processor, int number);
}
Next we will study the executable. If you look at the
executable build item, you will observe that
it depends on processor and
executable.entry:
mixed-classification/public/executable/Abuild.conf
name: executable
platform-types: java
child-dirs: entry
deps: executable.entry processor
Its Main.java is very minimal: it just
invokes Entry.runExecutable passing to it an
instantiated Processor object and
whatever arguments were passed to main:
mixed-classification/public/executable/src/java/com/example/executable/Main.java
package com.example.executable;

import com.example.processor.Processor;
import com.example.executable.entry.Entry;

public class Main
{
    public static void main(String[] args)
    {
        Entry.runExecutable(new Processor(), args);
    }
}
It is important to keep this main routine minimal because we will
have to have a separate main in the sensitive area as that is the
only way we can have the sensitive version of the code register
sensitive consumers prior to calling main.
[53]
If this were C++, the inclusion of the sensitive consumers would
be achieved through linking with additional libraries. In Java,
it is achieved by adding additional JAR files to the classpath.
In either case, with abuild, it is achieved by simply adding
additional dependencies to the build item. We will see this in
more depth when we look at the sensitive version of the code.
Turning our attention to the public
executable.entry build item, we can see
that our Entry.java file has a static
initializer that registers our two consumers,
C1 and C2:
[54]
mixed-classification/public/executable/entry/src/java/com/example/executable/entry/Entry.java
package com.example.executable.entry;

import com.example.consumers.ProcessorInterface;
import com.example.consumers.Consumer;
import com.example.consumers.ConsumerTable;
import com.example.consumers.c1.C1;
import com.example.consumers.c2.C2;

public class Entry
{
    static
    {
        new C1().register();
        new C2().register();
    }

    public static void runExecutable(ProcessorInterface processor,
                                     String args[])
    {
        for (String arg: args)
        {
            int n = 0;
            try
            {
                n = Integer.parseInt(arg);
            }
            catch (NumberFormatException e)
            {
                System.err.println("bad number " + args[0]);
                System.exit(2);
            }

            for (Consumer c: ConsumerTable.getConsumers())
            {
                c.consume(processor, n);
            }
        }
    }
}
Even though no place else in the code has to know about
C1 and C2 specifically, we
do have to register them explicitly with the table of consumers
so that the rest of the application can use them. The main
runExecutable function parses the command-line
arguments and then passes each one along with the
Processor object to each consumer in turn.
Adding additional consumers would entail just making sure that
they are registered. Observe in the source to one of the
consumers how we register the consumer in the consumer table:
mixed-classification/public/consumers/c1/src/java/com/example/consumers/c1/C1.java
package com.example.consumers.c1;

import com.example.consumers.ProcessorInterface;
import com.example.consumers.Consumer;
import com.example.consumers.ConsumerTable;

public class C1 implements Consumer
{
    public void register()
    {
        ConsumerTable.registerConsumer(this);
    }

    public void consume(ProcessorInterface processor, int n)
    {
        System.out.println("public C1: " + processor.process(n));
    }
}
The consumer table is a simple vector of consumers:
mixed-classification/public/consumers/interface/src/java/com/example/consumers/ConsumerTable.java
package com.example.consumers;

import java.util.Vector;

public class ConsumerTable
{
    static private Vector<Consumer> consumers = new Vector<Consumer>();

    static public void registerConsumer(Consumer h)
    {
        consumers.add(h);
    }

    static public Vector<Consumer> getConsumers()
    {
        return consumers;
    }
}
Now we will look at the sensitive version of the code. We have
the same three subdirectories in sensitive
as in public. In our
consumers directory, we define new consumers
C3 and C4. They are
essentially identical to the public consumers
C1 and C2. The
processor directory defines the sensitive
version of the Processor class:
mixed-classification/sensitive/processor/src/java/com/example/processor/Processor.java
package com.example.processor;

import com.example.consumers.ProcessorInterface;

public class Processor implements ProcessorInterface
{
    public String process(int n)
    {
        return "sensitive processor: n*n = " + n*n;
    }
}
Note that the class name is the same as in the public version,
which means that the public and sensitive versions cannot be used
simultaneously in the same executable. Also observe that the
name of the build item is actually
processor.sensitive, to make it different
from processor, and that the build item
sets its visibility to * so that it can be a
dependency of the sensitive version of the executable:
mixed-classification/sensitive/processor/Abuild.conf
name: processor.sensitive
platform-types: java
visible-to: *
deps: consumers
In this particular example, there's no reason that we couldn't
have given the build item a public name as there are no
subcomponents of the public
processor build item that the
sensitive one needs. In a real situation, perhaps this would be
the real processor build item and
the public one would be called something like
processor-stub. In any case, all
abuild cares about is that the build items have different
names.
Looking at the sensitive version of the executable, we can
observe that there is no separate sensitive version of the
Entry class. This effectively means that we
are using the public main routine even though we have sensitive
consumers. This provides an example of how to implement the case
that people might be inclined to implement by having conditional
inclusion of sensitive JAR files or conditional linking of
sensitive libraries. Since abuild doesn't support doing
anything conditionally upon the existence of a build item or even
testing for the existence of a build item, this provides an
alternative approach. This approach is actually better because
it enables the public version of the system to run intact even in
the sensitive environment. After all, if the system
automatically used the sensitive handlers
whenever they were potentially available, we couldn't run the
public version of the test suite in the sensitive environment.
This would make it too easy, while working in the sensitive
environment, to make modifications to the system that break the
system in a way that would only be visible in the public version.
By pushing what would have been main into a
library, we can avoid duplicating the code. If you look at the
actual build item and code in the executable
directory, you will see that the build item is called
executable.sensitive and that it depends
on consumers.sensitive and
processor.sensitive, both of which have
made themselves visible to * in their
respective Abuild.conf files. We saw
processor.sensitive's
Abuild.conf file above. Here is
consumers.sensitive's
Abuild.conf:
mixed-classification/sensitive/consumers/Abuild.conf
name: consumers.sensitive
visible-to: *
child-dirs: c3 c4
deps: consumers.c3 consumers.c4
Also observe that executable.sensitive
depends on executable.entry just like the
public version of the executable did:
mixed-classification/sensitive/executable/Abuild.conf
name: executable.sensitive
platform-types: java
deps: executable.entry consumers.sensitive processor.sensitive
Looking at the sensitive executable's
Main.java, we can see that it is essentially
identical to the public version except that it registers some
additional consumers that were not available in the public
version:
mixed-classification/sensitive/executable/src/java/com/example/executable/Main.java
package com.example.executable;

import com.example.processor.Processor;
import com.example.consumers.c3.C3;
import com.example.consumers.c4.C4;
import com.example.executable.entry.Entry;

public class Main
{
    static
    {
        new C3().register();
        new C4().register();
    }

    public static void main(String[] args)
    {
        Entry.runExecutable(new Processor(), args);
    }
}
Here are some key points to take away from this:
This example illustrates that it is possible to extend functionality in an area that uses the original area as a tree dependency with very little duplication of code. This is partially achieved by thinking about our system in a different way: rather than having a public program behave differently in a sensitive environment, we move the main entry point into a library. This completely eliminates the whole problem of conditional linking or making any other decisions conditionally upon the existence of particular build items or upon compile-time flags that differ across different environments. In fact, the top of the
publictree would happily function as the root of the forest if thesensitivetree and their common parentAbuild.conffile were not present on the system.This example shows an approach to separating interfaces from implementations that makes it possible, without conflict, to completely replace an implementation at runtime. This is achieved by having the implementation be a dependency of the final executable and having the rest of the system depend on only the interfaces.
Although, in this example, the sensitive versions of the consumers don't actually access any private build items from the public version of the code, the use of the build item name
consumers.sensitiveand thevisible-tokey would make it possible for them to do so.Creating run-time connections between objects without creating any compile-time connections requires some additional infrastructure to be laid. In some languages and compilation environments, this can be done through use of static initializers combined with techniques to ensure that they get run even if there are no explicit references to the classes in question. To keep things both simple and portable, it is still possible to use this pattern by performing some explicit registration step prior to the invocation of the main routine.
[53]
Well, it's not really the only way. You could also do
something like having a
RegisterConsumers object that both
versions of the code would implement and provide in separate
jar files much as we do with the
Processor object. One reason for doing
it this way, though, is that it makes the example easier to map
to languages with static linkage. In other words, we're trying
to avoid doing anything that would only work in Java to make
the example as illustrative as possible. This is, after all,
not a Java tutorial.
[54]
If this were a C++ program and portability to Windows were not
required, we could omit this static initializer block entirely
and put the static initializers in C1 and
C2 themselves as long as we used the whole
archive flag (see Section 26.1, “Whole Library Example”)
with those libraries. As with C++, however, there is no clean
and portable way to force static initializers to run in a class
before the class is loaded.
Table of Contents
In C and C++, most environments create library archives that consist of a collection of object files. Most linkers only link object files from libraries into executables if there is at least one function in the object file that is in the calling chain of the executable. In other words, if an object file in a library appears not to contain any code that is ever accessed, that object file is not included in the final executable. Abuild provides a way to force inclusion of all object files in a given library for underlying systems in which this is supported.
There are some instances in which it may be desirable to tell the
linker to include all the object files from a library. Common
examples include times when static libraries are converted into
shared libraries or when an object file is self-contained but
contains a static initializer whose side effects are important.
The doc/example/whole-library directory
contains an example of doing this. The lib1
and lib2 directories both contain
self-contained classes and have static variables that call those
classes' constructors:
whole-library/lib1/thing1.hh
#ifndef __THING1_HH__
#define __THING1_HH__

class Thing1
{
  public:
    Thing1();
    virtual ~Thing1();
};

#endif // __THING1_HH__
whole-library/lib1/thing1.cc
#include "thing1.hh"

#include <iostream>

static Thing1* static_thing = new Thing1;

Thing1::Thing1()
{
    std::cout << "in thing1 constructor" << std::endl;
}

Thing1::~Thing1()
{
    std::cout << "in thing1 destructor" << std::endl;
}
whole-library/lib2/thing2.hh
#ifndef __THING2_HH__
#define __THING2_HH__

class Thing2
{
  public:
    Thing2();
    virtual ~Thing2();
};

#endif // __THING2_HH__
whole-library/lib2/thing2.cc
#include "thing2.hh"

#include <iostream>

static Thing2* static_thing = new Thing2;

Thing2::Thing2()
{
    std::cout << "in thing2 constructor" << std::endl;
}

Thing2::~Thing2()
{
    std::cout << "in thing2 destructor" << std::endl;
}
Neither library is referenced by main.cc (in
bin):
whole-library/bin/Abuild.conf
name: main
platform-types: native
deps: thing1 thing2
whole-library/bin/main.cc
#include <iostream>

int main()
{
    std::cout << "In main" << std::endl;
    return 0;
}
Therefore, the linker would not ordinarily link them in even with the dependency on both library build items.
In this example, we force lib1 to be linked
in but not lib2. This is done by adding the
variable WHOLE_lib_thing1 (since
thing1 is the name of the library) to
lib1's
Abuild.interface:
whole-library/lib1/Abuild.interface
INCLUDES = .
LIBDIRS = $(ABUILD_OUTPUT_DIR)
declare WHOLE_lib_thing1 boolean
WHOLE_lib_thing1 = 1
LIBS = thing1
On systems that support this, defining this variable causes the corresponding library to be linked in its entirety into any executables that use the library. This facility may not be supported by all compilers. In particular, it is not supported for Microsoft Visual C++ in versions at least through .NET 2005, in which case setting this variable has cause an error.
For cases in which some users of a library may want to link in
the whole library and others may not, it is also possible to set
the
WHOLE_lib_
variable in an libnameAbuild.mk. For example, if
you were converting a static library to a shared library, you
might want to do this in the shared library build item's
Abuild.mk rather than the static library's
Abuild.interface file. That would prevent
other users of the static library from needlessly linking with
the whole library.
We do not set this variable for lib2:
whole-library/lib2/Abuild.interface
INCLUDES = .
LIBDIRS = $(ABUILD_OUTPUT_DIR)
LIBS = thing2
This means that its static initializer will not be linked in on any system. On a system that supports whole-library linking, the main program generates this output:
whole-library.out
in thing1 constructor
In main
This output includes the static initializer from
Thing1 but not from
Thing2.
Note that, in order to be truly portable, an application would have to contain explicit code that accessed the static initializers. We illustrate this in some Java code in Section 25.2, “Mixed Classification Example”. The same technique used for that example would work in C or C++ code.
Table of Contents
One of the most important features of abuild is that a given build item automatically inherits the interfaces of not only all of its direct dependencies but of its indirect dependencies as well. There may be instances, however, in which this is undesirable. We present such a case here.
This example shows how we can create a C/C++ build item that
implements an “opaque wrapper” around some other
interface. In the
doc/example/opaque-wrapper directory, there
are three directories: hidden,
public, and client.
The hidden item implements some interface.
The public item implements a wrapper around
hidden's interface, but uses
hidden privately: only its source files, not
its header files, access files from hidden:
opaque-wrapper/public/Public.hh
#ifndef __PUBLIC_HH__
#define __PUBLIC_HH__

class Public
{
  public:
    void performOperation();
};

#endif // __PUBLIC_HH__
opaque-wrapper/public/Public.cc
#include "Public.hh"
#include <Hidden.hh>

void
Public::performOperation()
{
    Hidden h;
    h.doSomething();
    h.doSomethingElse();
}
The intention is that users of public should
not be able to access any parts of hidden at
all. The client directory contains an
example of a build item that uses public.
It doesn't include any files from hidden,
and if it were to try, it would get an error since the
hidden directory is not in its include path.
However, it still must link against the
hidden library. The
public build item achieves this by resetting
the INCLUDES interface variable in an
after-build file:
opaque-wrapper/public/Abuild.interface
INCLUDES = .
LIBDIRS = $(ABUILD_OUTPUT_DIR)
LIBS = opaque-public

after-build hide-hidden.interface
opaque-wrapper/public/hide-hidden.interface
# Prevent those that depend upon us from seeing the INCLUDES that we saw
reset INCLUDES
# Re-insert our own include directory into the public interface
INCLUDES = .
This way, items that depend on public will
see only this item's includes and not those of the items it
depends on. Here is the output of abuild
ccxx_debug when run from the
client directory:
opaque-wrapper-ccxx_debug.out
abuild: build starting
abuild: opaque-client (abuild-<native>): ccxx_debug
make: Entering directory `--topdir--/opaque-wrapper/client/abuild-<native>'
INCLUDES = ../../public
LIBDIRS = ../../public/abuild-<native> ../../hidden/abuild-<native>
LIBS = opaque-public opaque-hidden
make: Leaving directory `--topdir--/opaque-wrapper/client/abuild-<native>'
abuild: build complete
As you can see, there is no reference to the
hidden/include directory even though its
library and library directory are present in
opaque-client's compilation environment.
Table of Contents
In widely distributed systems, it is often the case that a particular component may be able to be configured to work in different ways depending on whether some optional functionality is present. There are many ways to support this in any given software system, including having optional capabilities register themselves with some consumer of those capabilities as with our mixed classification example (see Section 25.2, “Mixed Classification Example”). There are some situations where, for whatever reason, the onus of determining how to behave must lie completely with the consumer of an optional capability rather than the supplier of the capability. This could happen if, for example, the supplier of the capability is completely unaware of the consumer. It could also happen if, because of the way the software is architected, the logic of how the consumer uses the producer must like with the consumer. To support these cases, abuild supports the use of optional dependencies.
Both item dependencies and tree dependencies may be declared as
optional by placing the -optional option after
the item or tree name in the deps or
tree-deps declaration in the
Abuild.conf file. If an optional tree
dependency is not found, abuild simply ignores the optional
tree dependency. If an optional item dependency is declared,
abuild will create a local (non-inheriting) boolean interface
variable called
ABUILD_HAVE_OPTIONAL_DEP_
where itemitem is the name of the item
that was declared as an optional dependency. If the optional
dependency is found, this variable will have a true value, and
abuild will process the dependency normally. If the optional
dependency is not found, this variable will have a false value,
and abuild will otherwise ignore the optional dependency.
Sometimes an optional dependency may be satisfied by a build item
or tree that may not always be present. In this case, you may
find that using -optional when listing the child
directory that contains the item or tree when it's present makes
it possible to use the exact same abuild configuration whether
or not the optional item is present. With this mode of use, a
capability may be turned on or off simply by including or
excluding a particular directory in a build. Although there are
certainly valid scenarios for this style of operation, this
feature has a high potential for abuse, so you should consider
carefully whether it is the right solution to your problem. It
is possible to create software that may behave differently based
on combinations of presence or absence of optional features.
Such software can become very difficult to maintain and test.
Ideally, if you have optional capabilities that are configured in
this way, they should be lightweight and independent from each
other. However, abuild leaves this choice up to you and
provides you with this capability. You are, of course, free to
use it or not as you choose.
To illustrate optional dependencies, we have a very simple C++
program that calls a function called xdriver
if the xdriver build item, which supplies
it, is present. The tree containing this build item can be found
at optional-dep/prog. Here is its
Abuild.conf file:
optional-dep/prog/Abuild.conf
tree-name: system
tree-deps: xdrivers -optional
name: prog
platform-types: native
deps: xdriver -optional
Observe that there is an optional tree dependency declared on a
build tree called xdrivers and also an
optional item dependency declared on the build item called
xdriver.
In the implementation of this build item, we use the
Abuild.interface file to define a
preprocessor symbol if the xdriver build
item is present. Here is the
Abuild.interface file:
optional-dep/prog/Abuild.interface
if ($(ABUILD_HAVE_OPTIONAL_DEP_xdriver))
  XCPPFLAGS = -DHAVE_XDRIVER
endif
This is one approach, but it is by no means the only approach.
Use of a preprocessor symbol in this way can be dangerous because
there is no mechanism to trigger a rebuild if its value changes.
However, as the presence of absence of optional dependencies is
likely to be relatively fixed for any given build environment,
use of a preprocessor symbol may be appropriate. Since the
interface variable is, like all interface variables, exported to
the backend, we could have also done something based on its value
in the Abuild.mk file. There, the value
would have a value of either 1 or
0 as with all boolean interface variables.
This would be appropriate if we didn't want the results of
whatever we do to be visible to our dependencies. In this case,
we use the Abuild.interface file, and the
Abuild.mk file looks completely normal:
optional-dep/prog/Abuild.mk
TARGETS_bin := prog
SRCS_bin_prog := prog.cc
RULES := ccxx
Let's look at the source code to the program. It's not clever at
all, but it illustrates how this mechanism works. Here is
prog.cc:
optional-dep/prog/prog.cc
#ifdef HAVE_XDRIVER
# include <xdriver.hh>
#endif

#include <iostream>

int main()
{
    std::cout << 3 << " = " << 3 << std::endl;
#ifdef HAVE_XDRIVER
    std::cout << "xdriver(3) = " << xdriver(3) << std::endl;
#else
    std::cout << "xdriver not available" << std::endl;
#endif
    return 0;
}
To build this without the optional build tree present, copy the
file optional-dep/Abuild.conf.without to
optional-dep/Abuild.conf. Here is that
file:
optional-dep/Abuild.conf.without
child-dirs: prog
Then run abuild from the
optional-dep/prog directory. This results
in the following output:
optional-without.out
abuild: build starting
abuild: prog (abuild-<native>): all
make: Entering directory `--topdir--/optional-dep/prog/abuild-<native>'
Compiling ../prog.cc as C++
Creating prog executable
make: Leaving directory `--topdir--/optional-dep/prog/abuild-<native>'
abuild: build complete
The resulting prog executable produces this output:
optional-without-run.out
3 = 3
xdriver not available
Now let's try this again with the optional tree present. First,
we have to copy
optional-dep/Abuild.conf.with to
optional-dep/Abuild.conf. Here is that
file:
optional-dep/Abuild.conf.with
child-dirs: prog xdriver
This adds the xdriver directory as a child.
This directory contains what are effectively “extra
drivers” to be used by prog. Here are
the header and source to the xdriver
function:
optional-dep/xdriver/xdriver.hh
#ifndef __XDRIVER_HH__
#define __XDRIVER_HH__

int xdriver(int);

#endif // __XDRIVER_HH__
optional-dep/xdriver/xdriver.cc
#include <xdriver.hh>
int xdriver(int val)
{
return val * val;
}
Next, we have to do a clean build since, as pointed out above,
there's no other mechanism for abuild to notice that the tree
has appeared and the preprocessor symbol has since the last
build. (We could implement a dependency on a make variable if we
wanted to. See Section 22.5, “Dependency on a Make Variable”
for an example of doing this.) Once we have set up the new
Abuild.conf and run abuild -c
all to clean the tree, we can run
abuild from prog again.
This results in the following abuild output:
optional-with.out
abuild: build starting abuild: xdriver (abuild-<native>): all make: Entering directory `--topdir--/optional-dep/xdriver/abuild-<native>' Compiling ../xdriver.cc as C++ Creating xdriver library make: Leaving directory `--topdir--/optional-dep/xdriver/abuild-<native>' abuild: prog (abuild-<native>): all make: Entering directory `--topdir--/optional-dep/prog/abuild-<native>' Compiling ../prog.cc as C++ Creating prog executable make: Leaving directory `--topdir--/optional-dep/prog/abuild-<native>' abuild: build complete
Running the resulting prog program in this case results in this output:
optional-with-run.out
3 = 3 xdriver(3) = 9
This time, you can see that the xdriver
function was available.
Table of Contents
This chapter is geared toward people who may extend or enhance abuild by adding additional rules, platforms, or compilers. Anyone interested in extending abuild in this way should also be familiar with the material covered in Chapter 30, Best Practices. If you think you may need to modify the main code of abuild itself, please see also Chapter 33, Abuild Internals. This section covers the most common uses for plugins. Examples of each topic presented may be found in Section 29.5, “Plugin Examples”.
Plugins are build items that are named in the build tree root's
Abuild.conf in the
plugins key. The list of which items are
plugins is not inherited through either backing areas or tree
dependencies. In other words, if a tree your tree depends on
declares something as a plugin, it does not automatically make
you get it as a plugin. The same applies to backing areas, but
in practice, the list of plugins is generally effectively
inherited because your local build tree's
Abuild.conf is typically a copy of its
backing area's Abuild.conf, assuming your
partially populated build tree was checked out of the same
version control system. The non-inheritance of plugin status
through tree dependencies is appropriate: since plugins can
change abuild's behavior significantly, it should be possible
for a given build tree to retain tight control over which plugins
are active and which are not. For example, a build tree may
include a plugin that enforces certain coding practices by
default, and use of this build tree as a tree dependency should
not necessarily cause that same set of restrictions to be applied
to the dependent tree. Plugins themselves are ordinary build
items and can be resolved in tree dependencies and backing areas
just like any other build item. This makes it possible for a
tree to provide a plugin without using it itself or for a build
tree to not use all plugins used by its tree dependencies.
Plugins are loaded by abuild and its backends in the order in
which they are listed in a root build item's
Abuild.conf. Usually this doesn't matter,
but if multiple plugins add native compilers the order in which
plugins are listed can have an effect on which platforms are
built by default.
Plugins are subject to the following constraints beyond those imposed upon all build items:
Plugins may not have any forward or reverse dependencies. It is good practice to put plugin build items in a private namespace (such as prefixing their names with
plugin.) to prevent people from accidentally declaring dependencies on them.Plugins may not belong to a platform type, have a build file, or have an
Abuild.interfacefile.
Plugins may contain the following items that are not supported for ordinary build items:
Abuild interface code loaded from
plugin.interfaceA
platform-typesfile to add new object-code platform typesA list_platforms perl script to add new object-code platforms
toolchainsdirectories containing additional compiler support filesAdditional make code in
preplugin.mkthat is loaded by all make-based build items before their ownAbuild.mkfiles are loadedAdditional make code in
plugin.mkthat is loaded by all make-based build items after their ownAbuild.mkfiles are loadedAdditional Groovy code in
preplugin.groovythat is loaded by all Groovy-based build items before their ownAbuild.groovyfiles are loadedAdditional Groovy code in
plugin.groovythat is loaded by all Groovy-based build items after their ownAbuild.groovyfiles are loadedAnt hook code in
plugin-ant.xmlthat is used as a hook file by all build items using the deprecated xml-based ant framework.Arbitrary hook code in
preplugin-ant.xmlthat is imported prior by all build items using the deprecated xml-based ant framework prior to readingAbuild-ant.properties.
Additionally, plugins may have rules
directories containing additional make
or Groovy rules files, as is true with
ordinary build items.
Although plugins themselves can never be dependencies of other build items or have dependencies of their own, they are still subject to abuild's integrity guarantee. In the case of plugins, this means that it is impossible to have an item in your dependency tree whose build tree declares a plugin that you are shadowing in your local tree. One way to avoid having this become a significant limitation is to keep your plugins in a separate build tree that others declare as a tree dependency.
It is possible for a build tree to declare one or more of its plugins to be global. The effect of declaring an item to be a global plugin is the same as having it be listed as a plugin for every build tree in the forest. [55] Global plugins should be used extremely sparingly, though there are some cases in which their use may be appropriate. For example, if a particular project requires certain environment setup to be done, it would be possible to create a global plugin that checks to make sure it is correct. It is often also appropriate to declare platform or platform type plugins globally so that dependent trees can be built with the declared compiler plugin.
A build tree can declare one of its plugins to be global by
following the plugin name with -global in the
plugins entry of
Abuild.conf, as in
plugins: global-plugin -global
When a build item is declared as a global plugin, abuild disregards access checks based on tree dependencies. In this sense, the affect of global plugins may “flow backwards” across tree dependencies. This is yet another reason that they should be used only for enforcing project-wide policy.
When abuild starts up, it reads its internal information about supported platforms and platform types. It then reads additional information from plugins, which it combines with its built-in information. This section contains information about the specific formats of the directives used to add platform types and platforms to abuild.
Platform type information is read from a plain text file that contains platform type declarations. Information about platforms is obtained by running a program, usually written in Perl. The reason for putting platform type information in a file and platform information in a program is that the list of platform types should be static for a given build tree, while the list of available platforms is a function of what the build host can provide. Abuild automatically skips build items that belong to a valid platform type that happens to have no platforms in it, but if it encounters a build item with invalid platform types, it considers that an error.
Of the target types that abuild supports, the only one for
which additional platform types and platforms may be specified
is the object-code target type. Platform
types are declared in a file called
platform-types. Abuild looks for this
file first in its own private directory and
then at the root of each declared plugin. The
platform-types file contains a single
platform type declaration on each line. Comment lines starting
with the # character and blank lines are
ignored. Each line may have the following syntax:
platform-typenew-platform-type[-parentparent-platform-type]
Platform type names may contain only alphanumeric characters, underscores, and dashes.
You may optionally specify another previously-declared
object-code platform type as the new platform type's parent. If
a platform type is declared without a parent platform type, it
has indep as its implicit parent. (Note that
indep may not be declared explicitly as a parent;
only other object-code platform types may be
declared are parents.) Declaring a parent platform type means
that any platform in the new platform type may link against any
platform in the parent platform type. It is up to the creator
of the platform types to ensure that this is actually the case.
One example use of parent platform types would be to implement a
base platform type for a particular environment and then to
create derived platform types that refine some aspect of the
base platform type. For example, this could be used to overlay
additional include directories or libraries on top of support
for an embedded operating system to support selective hardware.
It would also be possible to create platform types that refine
the native platform type for specific
circumstances. Most uses of parent platform types could be
achieved in some other way, such as through use of conditionals
in Abuild.interface or
Abuild.mk files or through use of
pass-through build items with multiple dependencies, but when
used properly, parent platform types can reduce the number of
times common code has to be recompiled for different platform
types.
The ability to specify parent platform types was introduced in abuild 1.1.4 and is closely related to platform type compatibility as discussed in Section 24.2, “Dependencies and Platform Compatibility”. It's possible that a future version of abuild may further generalize the ability to create compatibility relationships among platform types.
Since platforms are, by their nature, dynamic, abuild runs a program that outputs platform declarations rather than reading them from a file. This makes it possible for the existence of a platform to be conditional upon the existence of a specific tool, the value of an environment variable, or other factors. To get the list of platforms, abuild runs a program called list_platforms. Abuild invokes list_platforms with the following arguments:
list_platforms [ --windows ] --native-dataoscputoolset
The --windows option is only present when
abuild is running on a Windows system. The three options to
--native-data provide information about the
default native platform. Most compiler plugins will not need to
use this information since there is special way to add a native
platform, as discussed below.
To discover new platforms, abuild first runs the
list_platforms program in its own
private directory, and then it runs any
list_platforms programs it finds at the root
directories of any plugins. On a Windows system, abuild
explicitly invokes the list_platforms program
as perl list_platforms
options. For this reason,
to support portability to a Windows system,
list_platforms programs must be written in
perl. If necessary, a future version of abuild may provide a
mechanism to make writing list_platforms
programs in other languages. Note that abuild passes the
--windows flag to
list_platforms when running on Windows. This
not only saves the list_platforms program
from detecting Windows on its own but is actually necessary
since list_platforms couldn't tell on its own
whether it is being run to support a native Windows build of
abuild or whether it is being run to support a Cygwin build of
abuild.
[56]
Each line of output of list_platforms
declares either a new platform or a new native compiler, which
implies a new platform. A given platform may be declared
exactly one time across abuild's internally defined platforms
and plugins. When a platform type contains multiple platforms,
unless overridden, abuild always chooses to build on the last
platform declared that belongs to a given platform type. Since
plugins are evaluated in the order in which they are declared,
that means that platforms declared in later plugins can override
earlier ones as well as abuild's internal platform list with
respect to determining which platforms will be built by default.
[57]
When specifying a new platform or local compiler, the
list_platforms program may include the option
-lowpri to indicate that this is a low priority
platform or native compiler. This will cause the new platform
to be added with lower priority than previously declared
compilers including the built-in ones. Such compilers will only
be chosen if explicitly selected. The user can further refine
the choice of which platforms are built, including selecting low
priority compilers and platforms, by using platform selectors
(see Section 24.1, “Platform Selection”).
Each line of output of list_platforms must take one of the following forms:
platform [-lowpri]new-platform-typeplatform-typenative-compiler [-lowpri]compiler[.option]
By convention, each native compiler should support a platform with no options, a platform with the debug option, and a platform with the release option. The default should be to select the platform with no options, which means the list_platforms program should output platforms with no options last. The platform with no options should provide both debugging and optimization flags. The debug platform should omit all optimization flags, and the release platform should omit all debugging flags. For normal, everyday development, it generally makes sense to have both debugging and optimization turned on. The reason to have debugging turned on is that it makes it possible to do light debugging in a debugger even with optimized code. The reason to have optimization turned on is so that any problems introduced by the optimizer and additional static analysis that the compiler may do when optimizing will be enabled during normal development. Since optimized code is harder to debug in a symbolic debugger, the debug version of a platform omits all optimization. Since it is often desirable to ship code without debugging information in it, the release version of a platform omits all debug information.
These options only define the default behavior. It is still
possible to override debugging and optimization information on a
per-file basis or globally for a build item in
Abuild.mk (see Section 18.2.1, “C and C++: ccxx Rules”).
Note that on some platforms (such as Windows with Visual C++),
mixing debugging and non-debugging code may not be reliable. On
most UNIX platforms, it works fine to mix debugging and
non-debugging code.
When declaring a platform, all platform types that contain the platform must have already been declared.
Note that object code platform names take the form os.cpu.toolset.compiler[.option]. When declaring a platform with the native-compiler directive, abuild automatically constructs a platform name by using the native values for os, cpu, and toolset. This saves every list_platforms program from having to determine this information.
For a compiler to be used by abuild, it must be named in an
abuild platform. The platform can be added using either the
platform or native-compiler
directive as appropriate in the output of a
list_platforms command.
To add a new compiler toolchain to abuild, in addition to
declaring the native compiler or platform to make abuild try to
use it, you must create a file file called
compiler.mkcompiler is the name of the compiler
that is being added, and place this file in the
toolchains directory of a plugin.
Abuild's internal toolchains are under
make/toolchains. The best way to learn how
to write a toolchain is to read existing ones. Most compiler
toolchains will be designed to support C and C++ compilation and
are therefore used by the ccxx rules.
Details on the requirements for such toolchains can be found in
rules/object-code/ccxx.mk in the
abuild distribution (Appendix I, The ccxx.mk File).
Abuild has some rudimentary support for allowing you to force
compilation to generate 32-bit code or 64-bit code on systems
that can generate both types of code. As of abuild 1.1, this
functionality is only supported for the gcc
compiler. If you are writing a plugin for a native compiler, you
can check for the value of the variables
ABUILD_FORCE_32BIT or
ABUILD_FORCE_62BIT and adjust your compilation
commands as necessary. You can find an example of doing this in
make/toolchains/gcc.mk in the abuild
distribution. On Linux-based Intel and Power PC platforms,
abuild will also use these variables to change the platform
string, which makes it possible to use 64-bit systems to build
32-bit code that can be used natively without any special steps
by 32-bit systems. With an appropriate configured toolchain, you
can also build 64-bit code on a 32-bit system, though such code
would most likely not be able to be run natively on the 32-bit
system.
Once you have written a support file for a new compiler, you will
need to verify to make sure that it is working properly. A
verification program is included with abuild: the program
misc/compiler-verification/verify-compiler
can be run to verify your compiler. This program creates a build
tree that contains a mixture of static libraries, shared
libraries, and executables and puts those items in the platform
type of your choice. It then builds them with the specified
compiler. You provide the path to the build tree containing the
plugin, the name of the plugin, the platform type, and the
compiler. The program can be used with either native compilers
or non-native compilers. It also makes it very clear whether
everything is working or not. Please run
verify-compiler --help and see
misc/compiler-verification/README.txt for
additional details.
Ordinarily, a toolchain in platform type native is a native compiler, and a toolchain in a platform type other than native is a cross-compiler. There are, however, some instances in which it may make sense to have something in platform type native be treated as a cross compiler: specifically, you will want to do this when the compiler cannot create executables that run on your current platform. Here are some examples of where this may occur:
You are writing a compiler plugin for a static analyzer that is a drop-in replacement for the compiler but that produces reports instead of actual executables
You are building 64-bit executables on a 32-bit system
You are cross-compiling for a different architecture of the same operating system or at least of an operating system that is essentially compatible with your code base and could just as well support a native compiler; e.g. executables for a low-memory or slow embedded Linux without a native development toolchain might be built using a regular desktop Linux environment and a cross compiler
Most of abuild will work just fine if the compiler you add to
the native platform type is actually a cross
compiler, but there are two notable exceptions: the
autoconf rules, and the
verify-compiler program. For the
autoconf rules, you just need to make sure
./configure gets executed with some
--host option. This can be done by simply
adding this single line:
CONFIGURE_ARGS += --host=non-native
to your
compiler.mk--host that doesn't match
what autoconf determines your current host to be tells autoconf
that you are cross compiling. There's nothing special about the
specific value “non-native”. When
running verify-compiler, you will have to pass
the --cross option to the
verify-compiler command so that it will ask
you to run the test executables instead of running them itself.
The --cross option is not required if your new
compiler is not in the native platform type. In
this case, abuild will automatically figure out that it is a
cross compiler, just as it does in the
autoconf rules. Although these are the only
cases within abuild that care whether the compiler can create
native executables, you may run into others (such as ability to
run test suites), so just keep this in mind when using a
non-native compiler in the native platform type.
In this section, we present examples of using abuild's plugin facility. The examples here illustrate all of the capabilities of abuild's plugin system, albeit with simplistic cases. Plugins are a very powerful feature that can be used to do things that you could not otherwise do with abuild. If you are not careful, they can also create situations that violate some of abuild's design principles, so plugins should be used with particular care. You should also be careful not to overuse plugins. Many things you may consider implementing as a plugin would be better implemented as an ordinary build item with rules or hooks. Plugins should be used only for adding capabilities that can't be added without plugins or that should apply broadly and transparently across many items in the build tree.
Abuild enforces that no plugin may have dependencies or be
declared as a dependency of another build item. Still, it's good
practice to name plugins by placing them in a private namespace.
This prevents build trees that may have access to these items
(but may not presently declare them as plugins) from declaring
them as dependencies. In these examples, we always place our
plugins in the plugin namespace by
starting their names with plugin. even
though we have no actual plugin build
item. In order to use the plugins in this tree, we have to
declare them as plugins in the root build item's
Abuild.conf:
plugin/Abuild.conf
tree-name: plugin child-dirs: plugins java other outside echo plugins: plugin.echoer plugin.printer plugin.counter
Here we examine the plugin.counter
plugin, which can be found in
doc/example/plugin/plugins/counter. This
is a trivial plugin that illustrates use of an interface file
and also creates a custom rule that can be referenced in the
RULES variable of a build item's
Abuild.mk file. There's nothing special
about the plugin's Abuild.conf file:
plugin/plugins/counter/Abuild.conf
name: plugin.counter
The plugin.interface file declares a new
interface variable called TO_COUNT which
contains a list of file names:
plugin/plugins/counter/plugin.interface
declare TO_COUNT list filename append
This file gets loaded automatically before any regular build
items' Abuild.interface files. The file
count.mk in the
rules/all directory is the
file that a build item may include by placing RULES :=
count in its Abuild.mk file:
plugin/plugins/counter/rules/all/count.mk
all:: count
# Make sure the user has asked for things to count.
ifeq ($(words $(TO_COUNT)), 0)
$(error plugin.counter: TO_COUNT is empty)
endif
# Use echo `wc` to normalize whitespace
count:
for i in $(TO_COUNT); do echo `wc -l $$i`; done
If a build item includes count in the value
of its RULES variable, then any files listed
in TO_COUNT will have their lines counted
with wc -l when the user runs abuild with
the count target. The intention here is that
items that the target build item depends on would add files to
TO_COUNT in their
Abuild.interface files. Then the build
item that actually uses the count rule
would display the line counts of all of the files named by its
dependencies.
This is admittedly a contrived example, but it illustrates an
important point. Here we are adding some functionality that
enables a build item to make use of certain information provided
by its dependencies through their
Abuild.interface files. Although we could
certainly add the count target using a normal
build item that users would depend on, doing it that way would be
somewhat more difficult because each item that wanted to add to
TO_COUNT would also have to depend on
something that declares the TO_COUNT
interface variable. By using a plugin, we cause the plugin's
plugin.interface to be automatically loaded
by all build items in the build tree. That way, any build item
can add to TO_COUNT without having to take
any other special actions. This type of facility could be
particularly useful for adding support to abuild for other
programming languages that require other information to be known
from its dependencies.
For an example of a build item that uses this plugin's
capabilities, see the build items under
doc/example/plugin/other/indep. Here we
have the build item indep-a in the
a directory that adds a file to
TO_COUNT in its
Abuild.interface:
plugin/other/indep/a/Abuild.conf
name: indep-a platform-types: indep
plugin/other/indep/a/Abuild.interface
TO_COUNT = a-file
We also have the build item indep-b
(which depends on indep-a) in the
b directory that uses the
count rule in its RULES
variable in its Abuild.mk file:
plugin/other/indep/b/Abuild.conf
name: indep-b platform-types: indep deps: indep-a
plugin/other/indep/b/Abuild.mk
RULES := count
Here is the output of running abuild count
from the plugin/other/b directory:
count-b.out
abuild: build starting abuild: indep-b (abuild-indep): count make: Entering directory `--topdir--/plugin/other/indep/b/abuild-indep' 10 ../../a/a-file make: Leaving directory `--topdir--/plugin/other/indep/b/abuild-indep' abuild: build complete
Here we examine the plugin.echoer plugin
in the plugins/echoer directory. This
plugin supplies automatic build code for both Groovy-based and
make-based build items, something that cannot be done using
ordinary build item-supplied rules. This very simple plugin
causes a message to be printed when running the
all target. The contents of the message have
a default value but can be influenced by changes to a variable
that users can make in their individual build files. All build
items in any build tree that includes this plugin in its list of
plugins will get this functionality automatically without having
to take any explicit action. This would be preferable to
declaring this as a dependency for every item and modifying
RULES or abuild.rules for
every build item.
Here we show the code for both the make and Groovy backends in
plugin.mk and
plugin.groovy respectively:
plugin/plugins/echoer/plugin.mk
all:: echo ;
echo::
@$(PRINT) This is a message from the echoer plugin.
@$(PRINT) The value of ECHO_MESSAGE is $(ECHO_MESSAGE)
plugin/plugins/echoer/plugin.groovy
abuild.addTargetClosure('echo') {
ant.echo("This is a message from the echoer plugin.")
ant.echo("The value of echo.message is " + abuild.resolve('echo.message'))
}
abuild.addTargetDependencies('all', 'echo')
Observe that the make version refers to the variable
ECHO_MESSAGE and the Groovy version refers to
the parameter echo.message. Where do these
come from? The answer is that default values are provided by
pre-plugin initialization files in
preplugin.mk and
preplugin.groovy.
[58]
The pre-plugin initialization code is loaded
before your build file
(Abuild.mk or
Abuild.groovy), while the
plugin.mk and
plugin.groovy files are loaded after your
build file. Here are the files:
plugin/plugins/echoer/preplugin.mk
ECHO_MESSAGE = default message
plugin/plugins/echoer/preplugin.groovy
parameters {
echo.message = 'default message'
}
Although this example is trivial and doesn't do anything useful, it does illustrate how you can use pre-plugin initialization along with regular plugin code to interact with the user's build files. Although adding specific code without going through the usual rules method should generally be used sparingly, there are other cases in which this type of facility might be useful. Examples could include targets that gather statistics or run static analysis checks that may be required by a certain project, or code that enforces policy.
Although building any item in the plugin
tree will illustrate use of the
plugin.echoer plugin, the
echo directory contains four items
specifically designed to illustrate manipulation of the echo
message. Under the plugin/echo directory,
there are four build items. The item
echo-a in the a
directory uses the make backend and does not modify the
ECHO_MESSAGE variable:
plugin/echo/a/Abuild.mk
RULES := empty
The item echo-b in the
b directory uses the make backend and
modifies the ECHO_MESSAGE variabel:
plugin/echo/b/Abuild.mk
ECHO_MESSAGE += with modifications RULES := empty
The item echo-c in the
c directory uses the Groovy backend and does
not modify the echo.message parameter:
plugin/echo/c/Abuild.groovy
parameters {
abuild.rules = 'empty'
}
The item echo-d in the
d directory uses the Groovy backend and
modifies the echo.message parameter:
plugin/echo/d/Abuild.groovy
parameters {
echo.message = resolve(echo.message) + ' with modifications'
abuild.rules = 'empty'
}
To see this in action, run abuild -b desc
from the plugin/echo directory:
plugin-echo.out
abuild: build starting
abuild: echo-a (abuild-indep): all
make: Entering directory `--topdir--/plugin/echo/a/abuild-indep'
This is a message from the echoer plugin.
The value of ECHO_MESSAGE is default message
make: Leaving directory `--topdir--/plugin/echo/a/abuild-indep'
abuild: echo-b (abuild-indep): all
make: Entering directory `--topdir--/plugin/echo/b/abuild-indep'
This is a message from the echoer plugin.
The value of ECHO_MESSAGE is default message with modifications
make: Leaving directory `--topdir--/plugin/echo/b/abuild-indep'
abuild: echo-c (abuild-indep): all
[echo] This is a message from the echoer plugin.
[echo] The value of echo.message is default message
abuild: echo-d (abuild-indep): all
[echo] This is a message from the echoer plugin.
[echo] The value of echo.message is default message with modifications
abuild: build complete
In the plugin.printer plugin defined in the
plugins/printer directory, we create a new
platform type and corresponding platform. This is the mechanism
that would be used to add support to abuild for an embedded
platform, a cross compiler, or some other special environment.
In this example, we stretch the idea of platform types a bit for
the purpose of illustrating this capability with a simple
example.
Here we define a new platform type called printer.
This is done by creating a platform-types
file and declaring the platform type in it:
plugin/plugins/printer/platform-types
platform-type printer
In addition to adding the platform type, we also add a platform called zzprinter.any.test-suite.abc. [59] To add this platform, we print its name from the list_platforms command:
plugin/plugins/printer/list_platforms
#!/usr/bin/env perl
require 5.008;
BEGIN { $^W = 1; }
use strict;
print "platform zzprinter.any.test-suite.abc -type printer\n"
In this case, the program is trivial, but in a real implementation, the list_platforms command would probably be checking the environment or path for presence of certain tools before emitting the name of the platform. A list_platforms program should only mention the name of a platform that can actually be built on the build host from which it is run.
The fourth field of any object-code platform is
always the name of the compiler, so this implies that we have an
abc compiler defined somewhere. This plugin also
provides the rules for using the abc compiler in
toolchains/abc.mk. Here are the
implementation file and help file:
plugin/plugins/printer/toolchains/abc.mk
.LIBPATTERNS = shlib-% lib-%
OBJ := obj
LOBJ := obj
define libname
lib-$(1)
endef
define binname
print-$(1)
endef
define shlibname
shlib-$(1)$(if $(2),.$(2)$(if $(3),.$(3)$(if $(4),.$(4))))
endef
ABC := $(abDIR_plugin.printer)/bin/abc
ABCLINK := $(abDIR_plugin.printer)/bin/abc-link
DFLAGS :=
OFLAGS :=
WFLAGS :=
PREPROCESS_c := @:
PREPROCESS_cxx := @:
COMPILE_c := $(ABC)
COMPILE_cxx := $(ABC)
LINK_c := $(ABCLINK)
LINK_cxx := $(ABCLINK)
CCXX_GEN_DEPS := @:
# Usage: $(call include_flags,include-dirs)
define include_flags
$(foreach I,$(1),-I$(I))
endef
# Usage: $(call make_obj,compiler,pic,flags,src,obj)
define make_obj
$(1) $(3) -c $(4) -o $(5)
endef
# Usage: $(call make_lib,objects,library-filename)
define make_lib
cat $(1) > $(call libname,$(2))
endef
# Usage: $(call make_bin,linker,compiler-flags,linker-flags,objects,libdirs,libs,binary-filename)
define make_bin
$(1) $(2) $(3) $(foreach I,$(4),-o $(I)) \
$(foreach I,$(5),-L $(I)) \
$(foreach I,$(6),-l $(I)) \
-b $(call binname,$(7))
endef
# Usage: $(call make_shlib,linker,compiler-flags,linker-flags,objects,libdirs,libs,shlib-filename,major,minor,revision)
define make_shlib
$(1) $(2) $(3) $(foreach I,$(4),-o $(I)) \
$(foreach I,$(5),-L $(I)) \
$(foreach I,$(6),-l $(I)) \
-b $(call shlibname,$(7),$(8),$(9),$(10))
endef
plugin/plugins/printer/toolchains/abc-help.txt
The "abc" toolchain is a simple example toolchain support file. It doesn't do much of anything, but does illustrate many of the capabilities provided by abuild's ccxx rules.
You can see the help text by running abuild --help
rules toolchain:abc, and you can discover that this
toolchain is available by provided abuild --help rules
list from anywhere in the plugins
tree. To understand this file, you should read through the
comments in rules/object-code/ccxx.mk in
the abuild distribution (Appendix I, The ccxx.mk File). In
this case, our plugin also creates the compiler itself in
bin/abc and
bin/abc-link. Our “compilers”
here just create text files of the source code with numbered
lines. Doing this particular operation with a plugin is a bit
absurd—using some external utility would be a better
implementation. Still, it illustrates the mechanics of setting
up an additional platform type, and it is not at all uncommon
for a native compiler plugin to provide wrappers around the real
compiler.
Note that to invoke our compiler, the
abc.mk file uses
$(abDIR_plugin.printer) to refer to a file in
its own directory, just as would be necessary in rules provided
by a regular build item. Abuild provides these variables to
the make backend and also makes this
information available to the Groovy backend.
[60]
To see this plugin in action, build the build item in
other/bin with
--with-deps. You will see not only the
normal native executable program being built, but you will also
see a second output directory called
abuild-zzprinter.any.test-suite.abc which
contains a file called print-program. This
happens because both the bin build item
and the lib build item on which it
depends include the printer platform type
in their platform-types keys in their
Abuild.conf files:
plugin/other/lib/Abuild.conf
name: lib platform-types: native printer
plugin/other/bin/Abuild.conf
name: bin platform-types: native printer deps: lib
Here is the build output:
plugin-other-bin.out
abuild: build starting abuild: lib (abuild-<native>): all make: Entering directory `--topdir--/plugin/other/lib/abuild-<native>' This is a message from the echoer plugin. The value of ECHO_MESSAGE is default message Compiling ../lib.cc as C++ Creating lib library make: Leaving directory `--topdir--/plugin/other/lib/abuild-<native>' abuild: bin (abuild-<native>): all make: Entering directory `--topdir--/plugin/other/bin/abuild-<native>' This is a message from the echoer plugin. The value of ECHO_MESSAGE is default message Compiling ../main.cc as C++ Creating program executable make: Leaving directory `--topdir--/plugin/other/bin/abuild-<native>' abuild: lib (abuild-zzprinter.any.test-suite.abc): all make: Entering directory `--topdir--/plugin/other/lib/abuild-zzprinter.a\ \ny.test-suite.abc' This is a message from the echoer plugin. The value of ECHO_MESSAGE is default message Compiling ../lib.cc as C++ Creating lib library make: Leaving directory `--topdir--/plugin/other/lib/abuild-zzprinter.an\ \y.test-suite.abc' abuild: bin (abuild-zzprinter.any.test-suite.abc): all make: Entering directory `--topdir--/plugin/other/bin/abuild-zzprinter.a\ \ny.test-suite.abc' This is a message from the echoer plugin. The value of ECHO_MESSAGE is default message Compiling ../main.cc as C++ Creating program executable make: Leaving directory `--topdir--/plugin/other/bin/abuild-zzprinter.an\ \y.test-suite.abc' abuild: build complete
Here is the print-program file. This file
contains the concatenation of all the source files used to
create the executable as well as the “libraries” it
“links” against:
printer-program.out
------ ==> ../../lib/abuild-zzprinter.any.test-suite.abc/lib-lib <== ------
------ ../lib.cc ------
1: #include "lib.hh"
2:
3: #include <iostream>
4:
5: void f()
6: {
7: std::cout << "I am a function named f." << std::endl;
8: }
------ main.obj ------
------ ../main.cc ------
1: #include <iostream>
2: #include "lib.hh"
3:
4: int main()
5: {
6: f();
7: std::cout << "I, this program, am aware of myself." << std::endl;
8: std::cout << "Does that mean I'm alive?" << std::endl;
9: return 0;
10: }
In the example/plugin/outside build tree,
we have a tree that includes our plugin tree as an tree
dependency. This tree contains the prog2
build item which depends on the same lib
as our previous example's bin build item.
This build tree does not declare any plugins, so even though its
tree dependency declares plugins, those plugins are not used
within this tree. When we build the
prog2 build item with dependencies,
although the lib build item still builds
as before, prog2 completely disregards
the existence of the other platform type and the echoer's
additional build steps. This is very important. Sometimes, a
build tree may declare a plugin that works for every item in its
own tree but that would not necessarily work for items in other
trees. Examples might include strict static analyzers or other
code checkers. It may be desirable to allow the products of
this build tree to be usable by others that do not wish to
follow the same restrictions. Here is the output of building
prog2 with dependencies:
plugin-outside.out
abuild: build starting abuild: lib (abuild-<native>): all make: Entering directory `--topdir--/plugin/other/lib/abuild-<native>' This is a message from the echoer plugin. The value of ECHO_MESSAGE is default message make: Leaving directory `--topdir--/plugin/other/lib/abuild-<native>' abuild: lib (abuild-zzprinter.any.test-suite.abc): all make: Entering directory `--topdir--/plugin/other/lib/abuild-zzprinter.a\ \ny.test-suite.abc' This is a message from the echoer plugin. The value of ECHO_MESSAGE is default message make: Leaving directory `--topdir--/plugin/other/lib/abuild-zzprinter.an\ \y.test-suite.abc' abuild: prog2 (abuild-<native>): all make: Entering directory `--topdir--/plugin/outside/prog2/abuild-<native>' Compiling ../main.cc as C++ Creating prog2 executable make: Leaving directory `--topdir--/plugin/outside/prog2/abuild-<native>' abuild: build complete
In the example/native-compiler directory, we
have a plugin that defines a native compiler. The plugin is in
the compiler directory and is called
plugin.compiler. In this plugin, we are
adding a new platform to support our alternative compiler. We
don't have to add any new platform types since we are just adding
this platform to the native platform type. Since this is a
relatively common operation, abuild provides a short syntax for
doing it. Here is the list_platforms program:
native-compiler/compiler/list_platforms
#!/usr/bin/env perl
BEGIN { $^W = 1; }
use strict;
my $lowpri = '';
if ((exists $ENV{'QCC_LOWPRI'}) && ($ENV{'QCC_LOWPRI'} eq '1'))
{
$lowpri = ' -lowpri';
}
if (! ((exists $ENV{'NO_QCC'}) && ($ENV{'NO_QCC'} eq '1')))
{
print "native-compiler$lowpri qcc.release\n";
print "native-compiler$lowpri qcc.debug\n";
print "native-compiler$lowpri qcc\n";
}
It generates this output which automatically creates platforms with the same first three fields (os, cpu, and toolset) as other native platforms, with the qcc compiler as the fourth field, and with release, debug, or nothing as the fifth field:
native-compiler qcc.release native-compiler qcc.debug native-compiler qcc
Since new platforms take precedence over old platforms by
default when abuild chooses which platform to use for a given
platform type, our list_platforms script
offers the user a way of suppressing this platform and also of
making these low priority compilers. In this case, our
list_platforms program doesn't generate any
output if the NO_QCC environment variable is set,
and if the QCC_LOWPRI environment variable is set, it declares
these as low priority compilers which makes them available but
prevents them from being selected by default over built-in
compilers or compilers declared by earlier plugins. Setting
that environment variable would make that platform completely
unavailable, regardless of any compiler preferences expressed by
the user. (We could also prevent the platform using this
compiler from being built by default without making it disappear
entirely by using platform selectors as discussed in Section 24.1, “Platform Selection”). Note that we generate
output for the qcc compiler with the
release and debug flags as per our
usual convention. By placing the compiler with no options last,
we make abuild select it by default over the other two. It
will also be selected over any built-in platforms or platforms
provided by earlier plugins.
In addition to listing the compiler in
list_platforms, we have to provide a support
file for it in toolchains/qcc.mk:
native-compiler/compiler/toolchains/qcc.mk
.LIBPATTERNS = lib-%
OBJ = o
LOBJ = o
define libname
lib-$(1)
endef
define binname
bin-$(1)
endef
define shlibname
shlib-$(1)$(if $(2),.$(2)$(if $(3),.$(3)$(if $(4),.$(4))))
endef
QCC = echo
DFLAGS =
OFLAGS =
WFLAGS =
# Convention: clear OFLAGS with debug option and DFLAGS with release option.
ifeq ($(ABUILD_PLATFORM_OPTION), debug)
OFLAGS =
endif
ifeq ($(ABUILD_PLATFORM_OPTION), release)
DFLAGS =
endif
PREPROCESS_c = @:
PREPROCESS_cxx = @:
COMPILE_c = $(QCC)
COMPILE_cxx = $(QCC)
LINK_c = $(QCC)
LINK_cxx = $(QCC)
CCXX_GEN_DEPS = @:
# Usage: $(call include_flags,include-dirs)
define include_flags
$(foreach I,$(1),-I$(I))
endef
# Usage: $(call make_obj,compiler,pic,flags,src,obj)
define make_obj
$(1) make-obj $(5)
touch $(5)
endef
# Usage: $(call make_lib,objects,library-filename)
define make_lib
$(QCC) make-lib $(call libname,$(2))
touch $(call libname,$(2))
endef
# Usage: $(call make_bin,linker,compiler-flags,linker-flags,objects,libdirs,libs,binary-filename)
define make_bin
$(1) make-bin $(call binname,$(7))
touch $(call binname,$(7))
endef
# Usage: $(call make_shlib,linker,compiler-flags,linker-flags,objects,libdirs,libs,shlib-filename,major,minor,revision)
define make_shlib
$(1) make-bin $(call shlibname,$(7),$(8),$(9),$(10))
touch $(call shlibname,$(7),$(8),$(9),$(10))
endef
This file illustrates a degenerate compiler implementation,
providing minimal implementations of all the variables and
functions that ccxx.mk requires. For
details, please read the comments in
rules/object-code/ccxx.mk in the abuild
distribution (Appendix I, The ccxx.mk File).
In the native-compiler/outside directory,
there is another build tree that lists the plugin tree, in this
case native-compiler, as a tree dependency:
native-compiler/outside/Abuild.conf
tree-name: outside tree-deps: native-compiler name: outside platform-types: native deps: lib
This tree doesn't know about the qcc
compiler, so when we build the outside
build item, it would build only with the default native
compiler. In a default invocation of abuild
(i.e., one without any platform selectors),
the lib build item on which this depends
would only be built with qcc because of the
plugin in its build tree (which is a tree dependency of this
tree). However, the lib build item
could also be built with the default native
compiler. Abuild recognizes this fact and will therefore
compile lib with both
qcc and the default native compiler. This
is an example of abuild's ability to add additional build
platforms as needed based on the dependency graph:
as-needed-platforms.out
abuild: build starting abuild: lib (abuild-<native>): all make: Entering directory `--topdir--/native-compiler/lib/abuild-<native>' Compiling ../lib.cc as C++ Creating lib library make: Leaving directory `--topdir--/native-compiler/lib/abuild-<native>' abuild: lib (abuild-<native-os-data>.qcc): all make: Entering directory `--topdir--/native-compiler/lib/abuild-<native-\ \os-data>.qcc' Compiling ../lib.cc as C++ make-obj lib.o Creating lib library make-lib lib-lib make: Leaving directory `--topdir--/native-compiler/lib/abuild-<native-o\ \s-data>.qcc' abuild: outside (abuild-<native>): all make: Entering directory `--topdir--/native-compiler/outside/abuild-<nat\ \ive>' Compiling ../outside.cc as C++ Creating outside executable make: Leaving directory `--topdir--/native-compiler/outside/abuild-<native>' abuild: build complete
Another use of a plugin could be to enforce additional build
tree-specific rules that fall outside of abuild's normal
dependency checking capabilities. As an example, suppose you
had a build item that you wanted all build items to depend on
and that you couldn't make it a plugin because it had to build
something. You could have that build item set a variable to
some specific value in its Abuild.interface
file. Then you could create a plugin that would check that the
variable had that value, which would effectively make sure
everyone depended on the item that set the variable. This
plugin would have a plugin.mk file that
would check to make sure that the variable was set and report an
error if not. Since all build items would see the plugin code,
it would make this plugin an effective checker for enforcing
some rule that can't otherwise by expressed.
We illustrate this pattern in our
rule-checker example which can be found in
doc/example/rule-checker. This directory
includes four build items:
plugin.auto-checker,
auto-provider,
item1, and item2.
The goal is that every build item whose target type is
object-code should depend on
auto-provider. This rule is enforced
with the plugin.auto-checker plugin which
is declared as a plugin in the tree's root
Abuild.conf:
rule-checker/Abuild.conf
tree-name: rule-checker child-dirs: auto-checker auto-provider item1 item2 plugins: plugin.auto-checker
The plugin.auto-checker build item
contains two files aside from its
Abuild.conf. It has a
plugin.interface file that declares a
variable that indicates whether the
auto-provider build item has been seen:
rule-checker/auto-checker/plugin.interface
declare SAW_AUTO_PROVIDER boolean fallback SAW_AUTO_PROVIDER = 0
This plugin interface file is automatically loaded by all build
items before their own interface files or any of the interface
files of their dependencies. We include a fallback assignment
of a false value to this variable. The
auto-provider build item sets this
variable to true in its Abuild.interface
file:
rule-checker/auto-provider/Abuild.interface
# The plugin.auto-checker plugin must be enabled on any build tree # whose item depend on this since its plugin.interface file provides a # declaration for the SAW_AUTO_PROVIDER variable. Additionally, the # plugin.auto-checker plugin makes sure everyone depends on this # item. This item cannot itself be a plugin because it has an # Abuild.mk file. SAW_AUTO_PROVIDER = 1 # Make the automatically generated file visible INCLUDES = $(ABUILD_OUTPUT_DIR)
For completeness, here are the rest of the files from
auto-provider:
rule-checker/auto-provider/Abuild.mk
LOCAL_RULES := provide-auto.mk
rule-checker/auto-provider/provide-auto.mk
all:: auto.h
auto.h:
@$(PRINT) Generating $@
echo '#define AUTO_VALUE 818' > $@
Since auto-provider sets the
SAW_AUTO_PROVIDER variable, it possible for
the plugin.auto-checker build item to
detect that auto-provider is in the
dependency list by checking the value of that variable. It does
this in its plugin.mk file, which is
included by abuild's make code for
every make-based build item:
rule-checker/auto-checker/plugin.mk
ifeq ($(ABUILD_TARGET_TYPE), object-code) ifeq ($(SAW_AUTO_PROVIDER), 0) $(error This item is supposed to depend on auto-provider, but it does not) endif endif
To see what happens when a build item forgets to depend on
auto-provider, we will look at
item1. Here is its
Abuild.conf:
rule-checker/item1/Abuild.conf
name: item1 platform-types: native
As you can see, there is no dependency on
auto-provider. When we try to build this
item, we get the following error:
rule-checker-item1-error.out
abuild: build starting abuild: item1 (abuild-<native>): all make: Entering directory `--topdir--/rule-checker/item1/abuild-<native>' ../../auto-checker/plugin.mk:3: *** This item is supposed to depend on a\ \uto-provider, but it does not. Stop. make: Leaving directory `--topdir--/rule-checker/item1/abuild-<native>' abuild: item1 (abuild-<native>): build failed abuild: build complete abuild: ERROR: at least one build failure occurred; summary follows abuild: ERROR: build failure: item1 on platform <native>
This is the error that was issued from
plugin.auto-checker's
plugin.mk above. The build item
item2 does declare the appropriate
dependency:
rule-checker/item2/Abuild.conf
name: item2 platform-types: native deps: auto-provider
Its build proceeds normally:
rule-checker-item2-build.out
abuild: build starting abuild: auto-provider (abuild-indep): all make: Entering directory `--topdir--/rule-checker/auto-provider/abuild-i\ \ndep' Generating auto.h make: Leaving directory `--topdir--/rule-checker/auto-provider/abuild-indep' abuild: item2 (abuild-<native>): all make: Entering directory `--topdir--/rule-checker/item2/abuild-<native>' Compiling ../item2.c as C Creating item2 executable make: Leaving directory `--topdir--/rule-checker/item2/abuild-<native>' abuild: build complete
This examples shows how little code is required to implement your own rule checking. The possibilities for use of this technique are endless. Such techniques could be used to enforce all sorts of project-specific architectural constraints, build item naming conventions, or any number of other possibilities. You could even create a single project-wide global plugin that checked to make sure other plugins defined in other trees were appropriate declared, thus effectively working around the limitation of only being able to declare a single global tree dependency in a forest.
Still another use of plugins could be to implement an install target. Although abuild provides most of what is required to use build products within the source tree, in most real systems, there comes a time when a distribution has to be created. You can write your own install target or similar using plugins.
[55] In fact, this is how abuild implements this internally. As such, certain error conditions in global plugins may be repeated once for each build tree. This is unfortunate, but fixing it doesn't seem worth the trouble for reporting what are likely to be infrequent problems with what is likely to be a rarely used feature.
[56]
Note that Cygwin is not Windows. Cygwin is really more like a
UNIX environment. Although abuild uses Cygwin to provide
make and other UNIX-like tools, the
Windows abuild executable is a native Windows application.
If you were to compile a Cygwin version of abuild, it would
not consider itself to be running in Windows and would not
invoke list_platforms with the
--windows option. That said, there are a few
pieces of code in the periphery of abuild that assume that,
if we're in a Cygwin environment, it is to support Windows.
These are all commented as such. Those parts of the code
would need to change if someone were to attempt to package
abuild for Cygwin.
[57]
Note, however, that the --list-platforms
option shows highest priority platforms first, which
effectively means that it shows the user platforms in the
opposite of their declaration order.
[58]
We had originally wanted to call these
pre-plugin instead of
preplugin, but this interferes with the
way Groovy generates classes for scripts. Since
pre-plugin is not a valid class name
and we want to avoid specific mixed case file names (like
prePlugin, we went with
preplugin. The make version is called
the same thing for consistency.
[59]
This odd name has been picked to facilitate testing of all
examples in abuild's own automated test suite. By starting
the platform name with zz, we effectively
ensure that it will always appear alphabetically after
whatever the real native platform is on our build system.
[60]
For the deprecated xml-based ant backend, corresponding ant
properties
abuild.dir.
are available.
build-item
Table of Contents
This chapter describes some “best practices” that should be kept in mind while using abuild. It is based on experience using abuild and lessons learned from that experience.
If you are writing code to extent abuild through plugins or build item rules, there are several things you should keep in mind. This section describes items that pertain to both make and Groovy/ant extensions.
If your rules or plugin adds support for an optional tool, you must consider carefully what you will do if that tool is not available. One option would be to fail. Another option would be to simply not provide the added functionality. For example, if you are providing a plugin that adds support for a new compiler, your plugin should detect whether the compiler is available, and if it is not, it should avoid listing it as an available compiler or platform. This makes it possible for people to continue to build with other compilers on systems that lack your additional one. If you are adding support for an optional code generator, abuild's code generator caching program may be of use to you; see Section 22.6, “Caching Generated Files”.
Since you can't define your own custom clean target, you should generally avoid having rules create files outside of the output directory from which they are run. Any such products will not be removed by abuild clean as run by ordinary users. If you have situations in which you must create files in external locations, such as installer plugins, you may want to provide a specific target to remove them as well.
The code that goes into a make rule implementation file,
preplugin.mk, or
plugin.mk file is regular GNU
Make code. There are certain practices that you
should follow when writing GNU Make
code for use within abuild. A good way to learn about writing
rules for abuild is to study existing rules. Here we will
briefly list some things that rules authors must keep in mind:
If you are about to write some rules, consider carefully whether they should be local rules for a specific build item (accessed with the
LOCAL_RULESvariable), exported rules provided by a build item (accessed with theRULESvariable), or whether they should be made globally accessible by being included in a plugin. The last case will be rare and should only be used for functionality that really should work “out of the box” in a particular build tree. Plugin rules and build item rules must appear in therules/directory or thetarget-typerules/alldirectory within the providing build item. Local rules can appear anywhere, and the location must be named in theLOCAL_RULESvariable inAbuild.mk. It is also possible to create global make code that is loaded from a plugin directory: abuild will load anypreplugin.mkandplugin.mkfiles defined in plugins in the order in which the plugins are declared. Remember thatpreplugin.mkis loaded beforeAbuild.mk, andplugin.mkis loaded afterAbuild.mk. This makes it possible for a plugin to provide some initial variable settings for the user inpreplugin.mk, have the user do something with or modify those values inAbuild.mk, and then use the result that operation inplugin.mk.Abuild invokes make with the --warn-undefined-variables flag. This means that your users will see warnings if you assume that an undefined variable has the empty string as a value. If it is your intention to have an undefined variable default to the empty string, then you should include
VARIABLE?=in your rules, where
VARIABLEis the name of the variable you are setting. You can always provide default values for variables in this fashion if the intention is to allow users to override those values in their ownAbuild.mkfiles.Note that
Abuild.mkfiles are included before rules files. This is necessary because theAbuild.mkfile contains information about which rules are to be included. If your rules are providing values that users will use in theirAbuild.mkfiles, you should recognize that your users will need to avoid referencing those variables in assignment statements that use:=instead of=since theRules.mkvariables will not yet be defined whenAbuild.mkis read. Alternatively, you can make use of thepreplugin.mkfunctionality for rules supplied by plugins.You should always provide a help file for your rules. The help file is called
rulename-help.txtIf your rules require certain variables to be set, check for those variables and given an error if they are not defined. For an example of this, see Section 22.2, “Code Generator Example for Make”. The
ccxx.mkrules in the abuild sources (Appendix I, Theccxx.mkFile) provide a somewhat more elaborate example of doing this since they actually generate dynamically in terms of other values the list of variables that should be defined.All rules should provide an all:: target. Note that abuild never invokes a user-supplied clean target, so providing a clean target is not useful. [61] Although you can add additional targets in your rules files, think carefully before doing so. Having too many custom targets will make a source tree hard to build and maintain. If you are adding functionality that should be done as part of every build, consider making it part of the all:: target.
If you are adding support for a new test driver, you should make sure that your test driver is invoked from the check, test, and test-only targets. You must also ensure that both the check and test targets depend on the all target but that the test-only target does not depend on the all target. Abuild internally provides this construct for these targets that don't do anything, so if your test support only operates conditionally upon the presence of test files, you don't have to worry about conditionally defining empty targets. For an example, see
make/qtest-support.mkin the abuild distribution.Sometimes it may be useful to provide debugging targets for your users that provide some information about the state as your rules see it. The
ccxxrules provide a ccxx_debug target for this purpose.Always remember that any targets you define in your rules files are run from the output subdirectory. The variable
$(SRCDIR)points to the directory that contains the actualAbuild.mkfile and therefore presumably the source files. Abuild sets theVPATHvariable to this as well, but you may have to explicitly run your actions with arguments that point back to the source directory (e.g.,-I $(SRCDIR)). If make finds a target's prerequisite usingVPATH, the full relative path to the prerequisite will be accurately reflected in$<and$^, which will be sufficient for many cases.In order to have your rules behave properly with the --verbose and --silent flags, you should avoid putting
@in front of commands that the user should see in verbose mode, and you should have all your rules print short, simple descriptive messages about what they are doing. These rules should be printed using@$(PRINT). ThePRINTvariable is usually set to echo, but it is set to@:when abuild is running in silent mode. Note that we put an@sign at the beginning of the@$(PRINT)command so that the user will not see the echo command itself (in addition to what is being echoed) being echoed when they are running in verbose mode.There are some convenience functions provided by abuild's GNU Make code. The best way to learn is to read existing rules. If you are going to be writing a lot of make code for abuild, it will be in your interest to familiarize yourself with the code in
make/global.mkin the abuild distribution.
All Groovy files loaded by abuild are Groovy scripts. This gives you plenty of rope with which you can hang yourself. When creating rules or other Groovy code for use with abuild keep in mind following guidelines:
If your code does anything more elaborate than adding stand-alone closures, consider having your script explicitly define a class and then instantiate it. This provides a “fence” to protect us against certain types of errors, such as mistyping a field name and ending up adding something to the binding instead. All built-in Groovy rules provided by abuild follow this convention.
When writing custom rules or defining additional targets, allow all defaults to be overridable through parameter settings. This helps to avoid locking the user into a set of conventions. Abuild's Groovy backend's
runActionsmethod provides an easy framework that enables your rules to offer the same layers of customization that are provided by abuild's own rules. For an example of using this construct, see Section 22.3, “Code Generator Example for Groovy”.When developing support for a new test framework, you only have to add new closures for the test-only target. Abuild automatically calls the test-only from both test and check. This is actually different in the make backend, which requires adding code to all three test-related targets. The reason we don't have to do this in Groovy is that our target framework allows to explicitly call one target from another in a dependency-aware fashion.
Instead of adding closures to test-only, you may instead decide to create your own custom target, make it a dependency of test-only, and add your closures to your custom target. This is what both QTest and JUnit support do. The advantage of this approach is that it makes it possible for you invoke a particular collection of tests explicitly and, for build items that use more than one test framework, prevents later tests from being skipped if earlier ones fail.
The best way to learn about what is offered by abuild's Groovy
backend is to study existing rules from the
rules directory in your abuild
distribution. You can find a complete copy of the
java rules in Appendix J, The java.groovy and groovy.groovy Files. If you're really adventurous,
you can read the source to the Groovy backend itself in
abuild's source distribution.
It's easy to fall into the trap of thinking that, just because a file is a text file or some other format that can be processed on any platform type, it is a platform-independent file. A plain text file that contains platform-specific information is, in fact, a platform-specific file. So if you have a build item that runs a platform-specific tool and caches platform-specific information, that build item should probably have platform type native rather than indep.
This is one reasons that abuild doesn't provide information about the current platform to the abuild interfaces for java and platform-independent build items. It would be a bug to have an interface variable have a different value in different contexts when it might influence a build that could be used on multiple platforms. For example, an indep build item could write out some value based on a platform variable and then that information could be wrong when the results of the build were used on a different platform.
Abuild itself actually breaks this rule for Java wrapper scripts. This is a known problem for which we don't have a ready solution. It just show that there may be instances in which you might break this rule, but be aware when you do that you are creating a situation in which a single built instance of build tree may not work properly when used across multiple platforms.
30.5. Hidden Dependencies
Suppose you have build items A,
B, and C, and suppose
that B doesn't actually require
C to build, but anyone who needs
B also needs C. In
this case, B should declare a dependency
on C, or B and
C should be combined. In other words, a
build item should depend on all build items that will be needed
if you use it.
Consider a concrete example. Suppose our three build items are
main, lib-headers, and
lib-src. Suppose
lib-headers doesn't have an
Abuild.mk and doesn't actually build
anything. Instead, it just has an
Abuild.interface that adds its directory to
your INCLUDES variable. Suppose
lib-src builds a library and has an
Abuild.interface that adds the library
directory to LIBDIRS and the library to
LIBS. If main uses the
library built by lib-src but declares a
dependency on lib-headers, then it will be
able to compile but not link. In order to link, it requires a
dependency on lib-src. This means that
anyone that depends on lib-headers must
also depend on lib-src. Rather than
having this situation, make lib-src's
Abuild.interface append to
INCLUDES and just eliminate the
lib-headers build item entirely. It is
still okay to have the headers in a separate directory; just
don't place an Abuild.conf in that
directory.
Separation of implementations from interfaces can be a good idea and can reduce the complexity of the dependency graph of a build tree since users of a capability need to depend only on the interfaces and not the implementations. If done incorrectly, however, separating implementations from interfaces has several pitfalls. One may be tempted to implement separation of interfaces from implementations by using a scheme such as the one described in the previous section, Section 30.5, “Hidden Dependencies”. In addition to creating a potential hidden dependency issue, it is possible to create even worse situations, such as hidden circular dependencies.
The case in the previous situation showed how we can create a
link error that could be resolved by adding an extra dependency
in main. It is relatively easy to create
situations that will cause unresolvable link errors as well by
creating separate header-only build items. For example, suppose
you have libraries A and
B and separate build items
A-headers and
B-headers to export their static header
files. Suppose now that A depends on
A-headers and
B-headers and that
B also depends on
A-headers and
B-headers. (See Figure 30.1, “Hidden Circular Dependency”) In this case,
A and B are
actually interdependent but there are no circular dependencies
declared. If there are any situations between
A and B in which
the first reference to something in B
appears in A and the first reference to
something else in A appears in
B, then anything that depends on
A and B will have a
link error.
[62]
This is a hidden circular dependency. The best way to avoid this
situation is to not split A-headers from
A.
Figure 30.1. Hidden Circular Dependency
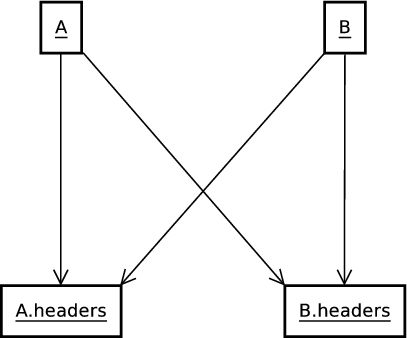
A and B are
interdependent even though no explicit circular dependencies
exist.
There are other less insidious problems that are still annoying.
For example, A-headers might really depend
on B-headers but forget to declare this.
As long as A-src declares a dependency on
B-headers, we'll never notice that
A-headers forgot to declare its dependency
because A-headers isn't actually built.
We might later try to build something else that declares a
dependency on A-headers. This other build
may fail because of B-headers not being
known. We've then created a hidden dependency situation: anyone
who depends on A-headers must also depend
on B-headers. The best way to this
situation is also to not split A-headers
from A.
One cost of not separating these is that if one library depends only on another library's header files, the two libraries could be built in parallel. By making one library depend on the other in its entirety, abuild will force the other library to be built before the dependent library. This is unfortunate, but it's not a good idea to work around this by introducing holes in abuild's dependency management. A better technique would be to use some external analyzer that could detect at a finer level what things can actually be built in parallel. There are commercial tools that are designed to do this. Perhaps, over time, abuild will acquire this capability, or users of abuild can implement some solution on top of abuild that uses an external tool.
Proper separation of interfaces from implementations, such as using a bridge pattern (as described in the Design Patterns book by Gamma, et al), which allows the implementation and interface to vary separately by implementing proxy methods that call real methods through a runtime-supplied implementation pointer, can solve the parallel build problem without introducing any of these other pitfalls. Ultimately, as long as you don't create a situation where depending on one thing automatically requires you to depend on some other specific thing to avoid link errors, you should be in pretty good shape. You can also see an example of true separation of interfaces from implementations in Section 25.2, “Mixed Classification Example”.
Note that another way to create this hidden dependency problem is to create a directory that contains header files for multiple build items. Suppose, for example, that you have the directory structure shown in Figure 30.2, “Shared Include Directory”:
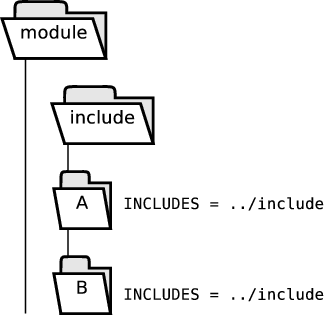
and that A and B
both have their header files in the include
directory. If both A and
B add ../include to
INCLUDES in their
Abuild.interface files, any build item that
depends on A could accidentally include
B's header files and therefore
accidentally require B as well. A simple
way to avoid this without having to distribute the public header
files throughout module's directory
structure would be to create separate directories under include,
such as shown in Figure 30.3, “Separate Include Directories”.
Figure 30.3. Separate Include Directories
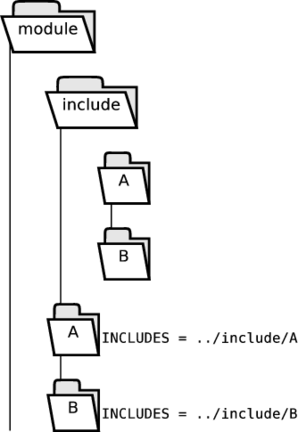
Headers are still easy to find and are separated by build item.
[61] In abuild 1.0, user-supplied clean targets were run when abuild was invoked from inside an output directory, but this turned out not to be particularly useful or reliable. The practice of having clean targets simply remove output directories seems to have emerged as a best practice in the community anyway.
[62] Use of shared libraries or repeating libraries in the link statement could actually work around this specific case, but there are good reasons to avoid circular dependencies beyond just making abuild happy. The point is that this technique allows them to hide in the dependency graph, which is a bad thing.
When run with the --monitored flag, abuild runs
in monitored mode. In this mode, abuild
generates output that would be useful to an external program that
may be monitoring its progress. This includes the output of
--dump-data (see Appendix F, --dump-data Format). With the data output in monitored
mode, it is possible to present information to the user that
reveals considerable detail about abuild's progress during the
course of a build. Monitored mode was introduced into abuild to
support development of graphical front ends or IDE plugins for
abuild, but it could be useful for other purposes as well.
All additional information in monitored mode is either prefixed by
the string abuild-monitored: followed by a
keyword or is delimited on both ends by strings so prefixed. The
following information is provided in monitored mode:
- begin-dump-data ... end-dump-data
Lines delimited by these keywords surround
--dump-dataoutput. In monitored mode,--dump-dataoutput appears just before build graph output or, if there were errors, just before it exits. Note that--dump-dataoutput is always included in monitored mode, so inclusion of the--dump-dataoption is not required and would in fact make abuild exit before it built anything.- begin-dump-build-graph ... end-dump-build-graph
Lines delimited by these keywords surround
--dump-build-graphoutput. In monitored mode,--dump-build-graphoutput appears just before abuild begins a build. It is not included if there were errors. Note that--dump-build-graphoutput is always included in monitored mode, so inclusion of the--dump-build-graphoption is not required and would in fact make abuild exit before it built anything.- error
Any error message output by abuild is repeated in a monitor output message prefixed by this keyword.
- fatal-error
Any fatal error message output by abuild is first issued in a monitor output message prefixed by this keyword.
- state-change
During a build, abuild outputs state changes from the dependency evaluator using this keyword. State change monitor output lines will always have this form:
abuild-monitor: state-change item-name platform state
where
stateis one of the following:waitingThe item is scheduled to be built but still has dependencies that have not yet been built
readyThe item is scheduled to be built, and all its dependencies have been successfully built
runningThe item is currently being built
completedThe item has been built successfully
failedAn attempt was made to build the item, but the build failed
dependency-failedThe item was previously scheduled to be built, but a build will no longer be attempted because of the failure of one of its dependencies
- targets
Before abuild invokes the backend to perform a build, it will output a line of the form
abuild-monitor: targets item-name platform target [target ...]
to indicate a space-separated list of targets that will be passed to the backend.
Additional monitor output lines may be added in the future. To ensure forward compatibility, programs intending to consume abuild monitor output should ignore any abuild monitor output lines that they do not recognize.
Abuild has various options that output or otherwise generate XML
data. Among these are --dump-data,
--dump-build-graph, and
--dump-interfaces. XML data can be hard to read
and cumbersome for people to operate on directly, but it is a very
convenient input format for additional processing. See the
misc/xslt directory in the abuild source or
binary distribution for some example XSL-T scripts. There is a
README.txt file in that directory which
contains additional information.
Table of Contents
- 33.1. Avoiding Recursive Make
- 33.2. Starting Abuild in an Output Directory
- 33.3. Traversal Details
- 33.4. Compatibility Framework
- 33.5. Construction of the Build Set
- 33.6. Construction of the Build Graph
- 33.7. Implementation of the Abuild Interface System
- 33.8. Loading Abuild Interfaces
- 33.9. Parameter Block Implementation
This chapter provides detailed information about the inner workings of parts of abuild. Understanding this material is not essential even for using abuild in an advanced way, but reading it may provide insight into some of the reasons that abuild works the way it does. Understanding this material is essential to anyone who would want to modify any of abuild's core functionality.
There has been some thought and writing about recursive make, and there are various approaches to the problem of make recursion. On one extreme, you can write makefiles that iterate through subdirectories and invoke make recursively for each subdirectory. These are hostile to parallelism and invoke make recursively bounded by the depth of the file system. This use of recursive make is expensive in terms of time and system resources. At the other end of the spectrum, you can create makefiles that include all the other makefiles and effectively create one monolithic makefile for the entire project. These makefiles are fragile and very hard to maintain because you have to make sure that no makefile defines any targets or variables that conflict with those defined by other makefiles, and you have to jump through hoops to make sure that whatever paths are in the makefiles can be resolved properly regardless of the starting directory of the build.
Abuild takes a middle ground. The only files that may be
included in multiple contexts that actually set variables and
contain end-user knowledge are rules files. To make this work,
we provide variables that contain the currently resolved path of
each build item. This is necessary anyway in order to support
backing areas. Abuild then allows users to create
Abuild.mk files that don't have to coexist
with other Abuild.mk files at runtime.
Since abuild knows all the dependencies between build items, it
can build items iteratively or even in parallel without using any
recursion at all. Although a monolithic makefile system that is
perfectly constructed would allow arbitrarily complex
dependencies to be declared between specific targets in specific
directories, maintaining this for a system of any size or for a
system that was dynamic would be impractical. Abuild replaces
this with precise management of inter-build item dependencies.
Even so, abuild's make code actually does generate fine-grained
dependencies at the file level, so most of the advantages of the
monolithic non-recursive makefile approach are realized with
abuild. We believe that this achieves the right balance
between granularity and ease of maintenance and makes abuild's
approach robust and efficient for both small and large build
trees.
When abuild starts up, it decides that it is running in an output directory if all of the following conditions hold:
The current directory does not contain an
Abuild.conffileThe parent directory does contain an
Abuild.conffileThe current directory name starts with
abuild-The current directory contains a file called
.abuild
If abuild is invoked in an output directory, it determines the
current platform from the name of the output directory (which is
always called
abuild-)
and the current build item from the
platformAbuild.conf in the parent directory. Then
it will run a build only for that specific platform on that
specific build item. In this mode, abuild explicitly prohibits
specification of a build set or clean set and does not build
dependencies, as if --no-deps were specified.
In this mode, the clean target recursively
removes all files only in the current output directory (except
that it leaves the empty .abuild file
behind). The main use for this feature would be in testing rules,
but it could also be useful in helping to track down some
hard-to-trace build problem that applies to only one of several
platforms that are being built for a specific build item. Most
users will never use this functionality.
This section describes how abuild traverses build trees to
resolve build item names to paths. Here we describe the process
at a level of detail that is closer to the code. The
traverse function in the abuild source
code is responsible for the behavior described here. It will
likely be necessary to read this section more than once to fully
understand what is happening as some parts of the description
won't make sense without knowing about parts you won't have read
yet. (Fortunately, the human brain is better at resolving
circular dependencies than a build system is.)
Internally, abuild maintains tree data structures to hold onto
the shape and contents of build forests:
BuildForest,
BuildTree and
BuildItem. The
BuildForest object has a map from build
tree names to BuildTree objects and also
from build item names to BuildItem
objects. The BuildForest object also
contains the list of backing areas that apply to the forest as
well as the list of items and trees that are specified as deleted
in the Abuild.backing file.
The BuildTree object contains
tree-specific information, such as the tree's list of plugins,
tree dependencies, supported traits, etc. It also contains the
absolute path of the root build item of the tree. The
BuildItem object contains the absolute
path of the build item, the name of the containing build tree,
its dependencies, and various other information from the
Abuild.conf file. Additionally, both
objects store the tree's or item's backing
depth, which is a count of the number of backing
areas that had to be followed to resolve the item or tree.
Although the backing depth is an integer value, nothing in
abuild cares about the depth other than whether it is zero or
not. A backing depth of zero indicates that the tree or item
appears locally in the current forest.
When abuild starts up, it first locates the root of the local
forest. It does this by starting with the current directory and
walking up the file system (toward the root) until it encounters
an Abuild.conf that is not referenced as a
child of the next higher Abuild.conf, if
any. When it finds such an Abuild.conf, it
verifies that it is either a tree root build item or that is has
only a child-dirs key. In either case, it
is the root of the forest. Otherwise, it is an error, and
abuild indicates that it is not able to find the forest root.
Once abuild has found the root of the local build tree, it
begins traversal. The actual traversal logic is more complicated
than what is described here because it contains code to recognize
the abuild 1.0 build tree structure (with external directories
and unnamed trees) as well as the simpler 1.1 format. We omit
those details from the description and refer you instead to
comments in the code. Continuing with our description of the 1.1
traversal algorithm, we just read each build item's
Abuild.conf doing a breadth-first traversal
of the tree formed by following child-dirs
keys. If the child directory does not exist and the forest has a
backing area, we ignore this condition. This is what allows
backed forests to be sparse. Otherwise, if the directory exists,
it must have an Abuild.conf, and no
directory between the child directory and the parent may have
Abuild.conf files (possible only if a
child-dirs value has multiple path
elements).
After traversing the local forest, abuild traverses each
backing area, creating a separate
BuildForest object for each backing
forest. Finally, once abuild has traversed all the build items
in all known forests, abuild creates a dependency graph of
backing areas. Then, working from the leaves of the dependency
graph, it copies into the forest from the backing areas all the
BuildTree and
BuildItem objects of items and trees that
do not appear locally and increments the backing depth of the
local copies. Items that are marked as deleted or that are in
trees that are marked as deleted are not copied. Also, trees
that are marked as deleted are not copied. This is where
abuild notices if you have multiple backing areas and one of
them backs to another. In this case, abuild simply ignores the
further back of the backing areas since it will already get
copies of those items and trees through the closer backing area.
Finally, after all the traversal is completed, abuild validates
each forest, again starting with the furthest back forest and
working toward the local forest. Numerous validations are
performed. For details, please refer to the
validateForest method in the abuild source
code.
Internally to abuild's implementation, there is an object
called CompatLevel that encapsulates the
compatibility level for any given run of abuild. The code
itself is careful to wrap deprecated or backward compatibility
code in checks to compat_level.allow_1_0()
(or whatever version is appropriate). This helps to keep
backward compatibility code isolated and makes it easy to remove
at some future time. It also makes it relatively straightforward
to implement being able to run abuild at a newer compatibility
level.
Many of abuild's test suites run the same tests at different compatibility levels to ensure that, when compatibility code is not required, it doesn't get in the way.
If one were to remove compatibility code from abuild, it would
be necessary to check for variables that are no longer used
because of the removal of compatibility support. The intent is
that all such variables are commented with something that
contains the string compat. Searching for
compat should be an excellent starting point
for locating all backward compatibility code.
As of version 1.1, there is no backward compatibility code in the
Groovy backend (since it is new in 1.1) or the old ant backend
(since it is deprecated in 1.1). When abuild invokes the make
backend, it passes the compatibility level in a make variable.
This makes it possible for various make code to be conditional
upon whether a particular version is supported. In versions
after 1.1, if the need arises, a similar capability could easily
be added to the Groovy backend by using the
BuildArgs object to hold into this
information.
This section describes the process that abuild uses to
construct the build set. First, abuild creates a list of build
items that directly match the criteria of the specified build
set. If --only-with-traits was specified, only
build items that match the build set criteria and have all of the
named traits are included. This is considered the explicit build
set. In the absence of --related-by-traits or
--apply-target-to-deps, this is the set of build
items that will be built with any explicitly specified target.
Once this is finished, expansion of the build set is performed
based on dependencies, build-also
specification, traits, or reverse dependencies. Expansion is
performed in two phases. In the first phase of expansion, all
dependencies of any item in the build set is added to the build
set, as are any item specified in any
build-also key of any item's
Abuild.conf. In the second phase, the build
set is additionally expanded based on traits or reverse
dependencies. Specifically, if abuild was invoked with the
--with-rdeps option, all direct or indirect
reverse dependencies of every item in the
build set are added to the build set. Then, if
--related-by-traits was specified, every build
item that is related to an item in the set by the named traits is
added to the build set.
After the completion of phase 2, we repeat the expansion process
until we go through an expansion pass that adds no items. During
repetitions of the expansion, the default behavior is that only
phase 1 (dependencies and build-also) is
repeated. However, if --repeat-expansion was
specified, then phase 2 is repeated as well.
To understand the distinction between whether phase 2 of the
expansion process is repeated, consider the following scenario.
Suppose the original build set contains A
and B, and that
AC-test is declared as a tester of item
A, which is in the build set, and also of
item C which is not in the build set. If
we are adding items related by the tester
trait, the AC-test build item will be
added to the build set. Assuming AC-test
depends on C, then
C will also be added to the build set
since this is part of phase 1 of the expansion, which is always
repeated until no new items are added. Now if there is another
build item called C-test that tests
C, it will only be added to the build set
if --repeat-expansion was specified since it
test an item that wasn't an original member of the build set.
[63]
When --with-rdeps is specified, the
--repeat-expansion option is likely to have a
much greater affect. In fact, it will cause any build item that
is reachable in the dependency graph from any initial build item
to be added to the build set. For many build trees, the
combination of --with-rdeps and
--repeat-expansion may end up causing every
build item to be built.
[64]
During validation, abuild creates a
DependencyGraph object to represent the
space of build items and their dependencies. It performs a
topological sort on this graph to determine dependency order as
well as to detect errors and cycles in the dependency graph.
During the actual build, abuild needs to expand the dependency
graph to include not just build items but build item/platform
pairs. Every “instantiated” build item has to exist
on a particular platform. We refer to this platform-aware
dependency graph as the build graph. The
build graph can be inspected by running abuild with the
--dump-build-graph command-line option. For
information about the format of this output, see Appendix H, --dump-build-graph Format.
There are several steps required in order to determine exactly
which build items are to be built on which platforms and which
build item/platform pairs depend on which other pairs. Before
we do anything else, we need to perform several validations and
computations. The first of these is the determination of what
platform types a build item belongs to. For most build items,
this is simply the list of platform types declared in the build
item's Abuild.conf file. For build items
that have no build or interface files, there are no platform
types declared. In this case, the rules are different: if the
build item declares any dependencies and all of its directly
declared dependencies have identical platform type sets, then
the build item inherits its platform types from the items it
depends on. Otherwise, it has no platform types and has the
special target type all. Note that this analysis
is performed on build items in reverse dependency order (forward
build order). That way, every build item's platform types and
target type has been determined before any items that depend on
it are analyzed.
Once we have determined the list of platform types for each
build item, we can figure out which platforms a build item may
be built on. We refer to the list as the buildable
platform list. The buildable platform list for a
build item is included in the --dump-data
output (see Appendix F, --dump-data Format). Note that this is
generally a broader list than the list of platforms on which a
given build item will actually be built; the actual build
platform list is determined later in the build graph
construction process. For build items that have a specific
target type and platform types, the list of buildable platforms
is the union of all platforms supported on all platform types a
build item has. For items of target type all, we
don't explicitly compute a buildable platform list. These
platforms are allowed to “build” on any platform
since there are no actual build steps for such build items.
(Remember that for a build item to have target type
all, it must not have any declared platform types,
and this in turn means that it must have no build or interface
files.)
When we compute the buildable platform lists, we also pre-initialize the build platform list (the list of platforms on which the item will actually be built) by including all buildable platforms that are selected by default on the basis of any platform selectors, as described in Section 24.1, “Platform Selection”, that may be in effect. For build items of target type all, we would not add any items to the list at this step.
All of the above steps can be completed without knowing which build items are actually included in the build set. These computations, in fact, are determined at startup for every build item in every known build tree regardless of whether the items are in the build set.
The above validations are all completed before abuild starts to build. If any errors are found in the above checks, abuild will report them and exit before it attempts to construct the build graph. This means that the build graph construction itself can operate under the assumption that all of the above constraints have been satisfied.
The next step is the construction of the actual build graph
itself. This is performed only when all previous validations
have been performed successfully, and this step is also
performed only for build items that are actually in the build
set. We present a prose description of the process here. For a
fully detailed description, please read the comments and code in
addItemToBuildGraph in
Abuild-build.cc (and in other places it
references) in the abuild sources.
We construct the build graph in reverse build order; i.e., we start with least depended-on build item and end with the most depended-on build item. That way, each item is added to the build graph before any item it depends on is added. This is the opposite of the order in which we compute the platform types. This makes it possible to modify an item's build platform list while processing items that depend on it. Therefore, at the time a build item is added to the build graph, its build platform list will have been fully computed. The build platform list may be the initial list as computed during validation, or it may have been modified during the addition of its reverse dependencies to the build graph. When a build item is added to the build graph, a node is added to the build graph for each platform on which the item is being built. Each node of the build graph therefore corresponds to a build item/platform pair. [65]
Then, for each direct dependency, we determine which instance of it (which of its platforms) we will depend on for each of our platforms. If the dependency in question is declared with a platform selector, we pick the best platform from among the dependency's buildable platform list that satisfies the platform selector and make this the override platform. If there are no matches, it is an error. If an override platform is selected, it applies to this dependency for all instances of the current item.
Next, still processing an individual dependency, we iterate through the item's list of build platforms to decide which of the dependency's platforms each instance will depend on. We refer to this as the dependency platform. If we previously computed an override platform for this dependency, we just use that as the dependency platform. Otherwise, we pick the best match from among the dependency's buildable platform list. If the dependency is type all, it can be “built” on any platform, so the dependency platform is the current build platform of the item. If the dependency is actually buildable on the exact platform that we are considering, then it is the best match and the dependency platform is the current platform. Otherwise, we have to search for a platform from a compatible platform type. To do this, we determine the platform type that contains the current platform and then get a list of compatible platform types (as discussed in Section 24.2, “Dependencies and Platform Compatibility”) in order of preference. Then we iterate through this list until we find a platform type that is in the dependency's list of platform types. Once we have identified this type, we find the best matching platform in that type and use that as the dependency platform. The best matching platform will be first selected platform, or if no platforms are selected, then it will be the first unselected platform. If no platforms are available, it is an error.
If we have successfully determined a dependency platform from
among the dependency's buildable platform list, we next add that
to the dependency's actual build platform list if it's not
already there. This is the mechanism by which as-needed
platform selection occurs. An example of this is presented in
Section 24.5, “Cross-Platform Dependency Example”. So if
item A on p1 wants item
B on p2, then item
B will be built on p2 even
if p2 would not have been selected to build for
B based on platform selectors. There are
many ways in which this can happen including
B being in a different build tree with
different plugins or A using a
platform-specific dependency to depend on
B.
Even if the exact steps of constructing the build graph are
involved, there are some implications that are worth separate
discussion. Specifically, a build item of target type
all may depend on any build item, and any build
item may depend on an item of target type all. For
other build items, if a build item depends on another build item
and declares the dependency with a
-platform=
option, the dependency must have the platform type mentioned in
the platform selector. If a build item depends on another item
without a platform-specific dependency, the dependency must be
buildable on at least one platform type that is compatible with
(or exactly matches) each platform type of the depending build
item. Since all platform types are compatible with
indep, this means that any build item may depend on
any other build item whose target type is
platform-independent. (This was actually a special
case prior to abuild 1.1.4, but now it falls out from the fact
that indep is made the parent platform type of all
platform types that don't declare a parent.) For example, if
selectorA has platform types X and
Y and depends on B which has
types X, Y, and Z, this
is okay because B has all of
A's platform types. Likewise, if
platform types X and Y both declared
type XY as a parent and B
has types XY and Z, that would also be
fine since each of A's types can be
matched with at least one of B's types.
It would be an error if B depended on
A in either case since the instances of
B building for platform type
Z would not be able to satisfy their dependences on
A since it doesn't support that platform
type or anything compatible with that platform type.
Another important point involves the exact way in which we
search for a compatible platform. Note that we first search for
a compatible platform type and, once we have found one, we pick
the best platform in that type. This is subtly different from
picking the first matching platform from any compatible platform
type. To illustrate the difference, consider the case of
A, which has platform type
X, depending on B, which has
platform types Y and Z, where
X declares Y as a parent and
Y declares Z as a parent. In this
case, A on X will
always depend on B on
Y even if Y has no
platforms and Z does. The reason for
this is that platform types are static but platforms within
types are influenced by the environment. If Y has
no platforms, this should result in a build error. If we fell
back to Z, instead the lack of platforms
for Y would actually change the shape of
the build graph, which goes against abuild's design. If it
were specifically desired to fall back on one thing if something
else weren't available, there are ways to make that happen
(using autoconfiguration or other similar mechanisms) that don't
require the actual build graph itself to change shape.
There are also some implications of the way pass-through items
(items of type all) ignore dependencies when no
matching platform is available. This is discussed in Section 24.4, “Dependencies and Pass-through Build Items”. Specifically, if a
pass-through item depends on multiple items of different types,
it's possible for the pass-through to effectively connect one of
its reverse dependencies to multiple of its forward
dependencies. So if A depends on
P which depends on one item of type
indep and one item of A's
platform type, A will end up with
both of P's
dependencies in its dependency list. This is a consequence of
the fact that the dependency platform computation is performed
separately for each build platform and for each dependency of a
given item.
Up to this point, we have pretended that when abuild builds an item, it recursively reads the interface files of all its dependencies. Although this is the effect of what the interface system does, it is not exactly what happens. In this section, we will explain what really happens.
Internally, abuild implements an
Interface object and an
InterfaceParser object. Each
InterfaceParser instance contains one
Interface object. We use one
InterfaceParser instance to load each
Abuild.interface file and all of its
after-build files. The scope of
reset and reset-all
statements is the InterfaceParser
instance.
Internally, an Interface object maintains
a list of variables, each of which has a declaration and a list
of assignments. Each declaration and assignment is marked with
the file location (file name, line number, and column number) at
which it appeared. Additionally, assignment information includes
any flag that the assignment may be conditional upon. Abuild
does not actually maintain the value of a variable. It only
maintains the list of assignments. Values of variables are
computed on the fly as they are needed. For list variables, all
assignment statements are maintained. For scalar variables, we
store first all fallback assignments in the opposite of the order
in which they appeared (with later fallback assignments being
pushed onto the beginning of the history), the one normal
assignment (as more than one normal assignment is an error), and
then all override assignments in the order in which they appear
(with later assignments added to the end of the history). When
we perform a reset operation on an interface
variable, we do not store the reset
operation (other than to record that it happened for purposes of
showing it in the --dump-interfaces output).
Rather, we actually clear out the variable's assignment history.
We discuss this further momentarily.
When a build item or another Interface
object attempts to retrieve the value of a variable, abuild
determines what flags, if any, are in effect and filters out any
assignments that are connected with flags that are not set.
Then, for list variables, the results of each remaining
assignment are appended or prepended to the list, depending upon
whether the list was declared as append or
prepend. For scalar variables, only the last item
in the assignment history is used. In this way, if there were
only fallback assignments, the first fallback assignment would be
at the end of the list. If there were any override assignments,
the last override assignment would be at the end of the list. If
there were only normal assignments, the normal assignment would
be there. It is important that we maintain all of this
information because we might filter out some assignments based on
flags. We discuss this in more depth below.
One Interface object may
import other
Interface objects. When one
Interface object imports another, the
object merges the imported object's variable history with its
own. Any declarations or assignments that are exactly duplicated
(that is, they have the same file location as a previously seen
operation) are ignored. This is important since we may import
the same interface file through more than one path.
The import process is the only part of the interface system
implementation that is affected by the scope of a variable
(whether the variable is a normal recursive variable or was
declared non-recursive or local).
Specifically, when importing an interface, if the variable was
declared as local, the declaration and assignments
are both ignored by the import process. If the variable was
declared as non-recursive, the declaration is always
imported, but only assignments that were made in the item that
owns the interface are actually imported. For example, suppose
A imports B's interface
which in turn imports C's interface. In
this case, A would not see the affect of any
assignments to non-recursive variables that were made in
C since it does not directly import
C's interface. It would also not see
declarations or local variable assignments to any local variables
in either B or C.
There is a subtle aspect of how reset works
in connection with loading interfaces as a result of the fact
that a reset actually clears the assignment
history of a variable at the time of the reset operation rather
than storing the reset as part of the
history. For example, suppose you have interfaces
Q and R and that
R imports Q,
Q assigns to variable
A, and R resets
variable A. If interface
S imports just R,
it will not see Q's assignment to
A because that assignment is not part of
R. On the other hand, if
S imports both Q
and R in any order, it
will see Q's
assignment to A. If the reset operation were
actually part of the assignment history rather than being a local
operation, then whether or not S saw
Q's assignment to A
would be dependent upon the order in which
S loaded Q and
R. For items that are not in each other's
dependency chains, the order is not deterministic. This could
cause very strange side effects: if one build item depended on
other, it could sometimes not see all of that item's interface
because of some third item that did a reset. Note also that
abuild uses a single interface parser to load a given interface
file and any after-build files, so a reset in an after-build
actually does effectively remove the effect of any assignments to
that variable in the file that loads it. Since a reset in an
after-build file is not visible to the item itself, this is a
useful construct for clearing interface variables that a build
item means to set for its own use but not for its dependencies.
For an example of this construct, see Section 27.1, “Opaque Wrapper Example”.
When a variable assignment is prefixed by a
flag statement, the assignment entry that
goes into the variable's assignment history is associated with
the name of the build item and the flag. When a variable value
is retrieved, abuild filters out any assignments that are
marked with a flag that is not set. This makes it possible for
abuild to store exactly one representation of each interface
object rather than having to keep track of different instances
for each possible combination of flags. It also makes it
possible for different build items to actually see different
results for the same interface objects depending upon what flags
they are requesting.
Abuild only turns on interface flags when it retrieves variable
values for export into the automatically generated file used by
the back end (the dynamic output file,
first introduced in Section 17.1, “Abuild Interface Functionality Overview”). It
does not have any flags set when it references variables inside
of other Abuild.interface files. For
example, if A does this:
declare X string declare Y string X = v1 flag f1 override X = v2 Y = $(X)
the value of Y will
always be v1 in every
build item's dynamic output file regardless of whether or not
that build item sets the f1 flag in its
dependency on A. This is because that is
the value that X had at the time when
Y was assigned since the flag was not in
effect during the parsing of the interface file. The value of
X in the dynamic output files
will be dependent upon whether the flag is
in effect for the dependency on A because
abuild does set flags before generating the dynamic output
files. This makes sense when you consider that abuild reads
each Abuild.interface file once for each
platform and that values of variables are not computed until they
are needed.
When abuild prepares to build, it creates the
base Interface object
by reading private/base.interface from the
abuild distribution. Then, for every item that is a plugin in
any known build tree (remember: an item can be a plugin in one
build tree but not in another because plugin status is not
inherited through tree dependencies), abuild creates an
InterfaceParser object, imports the base
interface, and loads the plugin's
plugin.interface file, if any. Plugins'
interface files are not allowed to have
after-build files, so it is an error if any
are declared.
After this preparation has been done, abuild constructs the
build graph (see Section 33.6, “Construction of the Build Graph”.) and traverses the
graph in dependency order to build each build item/platform pair.
For each build item/platform pair, abuild creates an
InterfaceParser object and retrieves the
underlying Interface object. Before
loading that item's Abuild.interface file,
if any, abuild first imports the base interface and the
interfaces for any plugin that pertains to this build item.
(These would be all items that were declared as plugins in the
build item's home build tree.) Then it imports the interfaces of
all of its direct dependencies which, as nodes in the build
graph, are actually build item/platform pairs. Those interfaces,
therefore, already include the interfaces of
their direct dependencies, and so
forth—this is how we achieve the effect of having each
build item read the interfaces of its entire dependency chain.
Once this has been done, abuild performs override assignments
for all variables that are specific to the build item
(ABUILD_THIS,
ABUILD_OUTPUT_DIR, etc.) and then uses the
InterfaceParser object to load the item's
own Abuild.interface file. At this point,
the build item's interface is in the state required to build the
item itself, so we perform the build. If the build succeeds, we
then see whether the Abuild.interface had
any any after-build statements. If so, we
use the same InterfaceParser object to
load those, verifying that each one has no
after-build declarations of its own. The
resulting Interface object is then stored
with the build item by platform so that it can be imported by
items that depend on it.
The parameters function in the binding for
scripts loaded by abuild's Groovy backend is actually a closure
returned by ParameterHelper.createClosure.
This function takes a closure as an argument. In order to make
things that look like assignments inside that closure modify
abuild parameters, the parameters call
changes the delegate of the closure to an instance of
ParameterHelper helper class constructed
with a reference to the abuild object, an
instance of BuildState. Within
ParameterHelper, the
get, set, and
leftshift methods are overridden to result
in fields being translated into
ParameterHelper objects which, when
assigned to or appended to, relay the action through appropriate
calls in BuildState, which implements the
Parameterized interface. The code is
relatively small. For additional details, please find
ParameterHelper.groovy and
Parameterized.groovy in abuild's source
code and look at the parameter-helper test
suite.
[63]
In versions of abuild prior to 1.0.3, the second expansion
phase was never repeated. In version 1.0.3, it was always
repeated. When the --with-rdeps flag was
introduced in abuild 1.1 and reverse dependency expansion was
added to the second phase of expansion, the differences between
repeating and not repeating the second phase became
significant, so the --repeat-expansion option
was added.
[64]
Formally, if the dependency graph is divided into independent
sets, the combination of --with-rdeps and
--repeat-expansion will cause inclusion of all
build items in any independent set that contains any of the
initial build set members.
[65] The actual build graph node is a string made up of three fields: a fixed-width numeric prefix representing the build tree, the item name, and the platform name. Numeric prefixes for the trees are assigned based on a topological sort of the tree dependency graph. When build graph nodes are sorted lexically, the result is a topologically sorted list of trees each containing a lexically sorted list of items in the tree. This is the mechanism that abuild uses to build items in less dependent trees before items in more dependent trees.
Table of Contents
- A. Release Notes
- B. Major Changes from Version 1.0 to Version 1.1
- C. Upgrading from 1.0 to Version 1.1
- D. Known Limitations
- E. Online Help Files
- E.1. abuild --help groovy
- E.2. abuild --help helpfiles
- E.3. abuild --help make
- E.4. abuild --help usage
- E.5. abuild --help vars
- E.6. abuild --help rules rule:empty
- E.7. abuild --help rules rule:groovy
- E.8. abuild --help rules rule:java
- E.9. abuild --help rules rule:autoconf
- E.10. abuild --help rules rule:ccxx
- E.11. abuild --help rules toolchain:gcc
- E.12. abuild --help rules toolchain:mingw
- E.13. abuild --help rules toolchain:msvc
- E.14. abuild --help rules toolchain:unix_compiler
- F.
--dump-dataFormat - G.
--dump-interfacesFormat - H.
--dump-build-graphFormat - I. The
ccxx.mkFile - J. The
java.groovyandgroovy.groovyFiles - K. The Deprecated XML-based Ant Backend
- L. List of Examples
This table includes a list of user-visible changes or changes to the documentation broken down by the specific release in which they were entered. This can help get you “caught up” if you are upgrading from an older release.
Note
If you are interested in seeing a summary of all the changes made between versions 1.0 and 1.1 of abuild, please refer to Appendix B, Major Changes from Version 1.0 to Version 1.1. You can also get this information from the release notes, but the information is presented there in a more compact and organized fashion.
- 1.1.6: June 30, 2011
Bug Fixes
The verify-compiler command used for testing your own compiler plugins did not work with nested platform types. Nested platform types were added to abuild in version 1.1.5, and compiler plugins worked with them; it was only the verify-compiler command itself that was broken.
When using qtest, the test-only target no longer depends on the all target.
When dependencies are duplicated and platform specifications are associated with at least one of the dependencies, it is reported as an error. In the past, the last platform specifier given would silently be used over others, which could lead people to a false sense of security if they were trying to declare a dependency on two different platform types.
Enhancements
Duplicated dependencies and duplicated tree dependencies are now reported as warnings.
New variables
ABUILD_TRAITSandabuild.traitsare available to make and groovy (respectively) backends that indicate which traits are declared for the current build item.A new interface variable,
SYSTEM_INCLUDEShas been added. For compilers that support it, any include directory that starts with any of the values in SYSTEM_INCLUDES will be specified to compiler with a flag that indicates that it is a system include directory. For details, see Section 17.5.2, “Interface Variables for Object-Code Items”.
- 1.1.5: February 18, 2011
Enhancements
When abuild is run with the
-kflag, the condition of a particular item not being able to be built on a particular platform because a dependency can't be built on a compatible platform now causes a failure of only that item on that platform rather than causing a failure of the entire build.Platform types may now have parents, which makes it possible to make some platform types specializations of other platform types. This is discussed in Section 24.2, “Dependencies and Platform Compatibility”. Three sections of the documentation have been significantly updated based on this change: Chapter 24, Cross-Platform Support, Section 29.3.1, “Adding Platform Types”, and Section 33.6, “Construction of the Build Graph”.
The skip platform selector may now be used without a platform type qualifier to prevent default selection of any platform in any object-code platform type. See Section 24.1, “Platform Selection” for details.
The build-also key has been enhanced to allow specification of trees to build in addition to items. It also allows options to be added to the build-also items to further refine what is built. The result is that anything can be built from the command-line using build sets (except for the regular expression pattern build set), and more, can now be specified in a build-also key. This enables much greater flexibility in creating project-level top-level build items. For details, see Section 9.3, “Using build-also for Top-level Builds”.
Miscellaneous Changes
Minor tweaks were made to abuild's code and test suite to enable it to be built with Visual C++ 2010 and boost 1.43.
The embedded version of Groovy has been updated to 1.7.8.
Bug Fixes
A bug to the groovy backend that prevented relative directories from working properly when assigned to java.dir.src and similar variables has been fixed. Thanks to Brian Reid for the report, test case, and proper diagnosis for the problem.
- 1.1.4: February 17, 2011
This release was not made publicly. It was basically what 1.1.5 is except that it had a logic error that rendered it inoperative under certain conditions. The problem was caught moments after internal release but prior to public release.
- 1.1.3: October 1, 2010
Output Capture
Abuild is now able to capture the output of builds and associate each line of output with the build item that produced it. For additional details, please see Chapter 20, Controlling and Processing Abuild's Output.
It is now possible to have abuild prefix every line of normal output and/or every line of error output with fixed prefixes. For details, see Chapter 20, Controlling and Processing Abuild's Output.
Bug Fixes
File-specific variables for
XCPPFLAGS,XCFLAGS, andXCXXFLAGSwere referenced in a manner that prevented them from being properly expanded. They are now properly expanded, so their values may include references to other variables.
Miscellaneous Enhancements
The codegen-wrapper command now accepts the
--normalize-line-endingsflag, which tells it to disregard differences in line endings when checking cached files to see whether their sources have changed. Thanks to Jeremy Trimble for the suggestion.When a platform plugin's list_platforms script had Windows-style line endings, abuild (or, more accurately, the underlying system) would produce a confusing error message when trying to execute the script. On non-Windows systems, abuild now explicitly calls your attention to the incorrect line endings if list_platforms fails.
The first line of output produced by the processing of any build item now always includes an indication of the build item name and output directory. In prior versions, there were certain rare instances in which this would not happen. For example, if an interface-only build item depended on two other items whose
Abuild.interfacefiles declared conflicting variables, abuild would complain about the conflict and indicate where it occurred, but it would not provide any hint as to what build item caused the two interface files to be loaded together. Now abuild will always indicate which build item is responsible for causing the problem to be detected.When a platform selector specifies a platform type, platform, compiler, or option specification that doesn't match any items anywhere in the entire forest, abuild now reports that as an error. It remains (and must remain) perfectly normal for platform selectors to apply to only a subset of the trees or items in a forest since most plugins only apply to subsets of the forest. The previous behavior of ignoring invalid platform types in platform selectors was intended to allow the same platform selectors to work across multiple forests, but in practice, having abuild tell you about potential typos in platform selectors is much more important functionality, and it's not really practical to use the same platform selectors across multiple forests in general anyway.
Documentation Changes
New help topics,
makeandgroovy, provide brief reminders of things you can do inAbuild.mkandAbuild.groovyfiles or local rules files that they reference.Fix errors in documentation for global plugins and platform selectors.
Create new section on capturing and parsing abuild's output.
- 1.1.2: April 16, 2010
Java Backend Implementation Changes
A minor improvement has been made to how abuild communicates with its java backends. This is not a user-visible change, but should eliminate any possibility of protocol errors between abuild and its backend. This problem has never been reported in production, but there was a race condition under which it was possible.
Abuild invokes the JVM that runs the Java backends with a parameter that sets the maximum PermGen space to 200 megabytes, overriding the default of 64 megabytes. This should hopefully eliminate the out of memory problems that are sometimes encountered with large builds.
New command line arguments
--jvm-append-args ... --end-jvm-argsand--jvm-replace-args ... --end-jvm-argshave been added to provide finer control over how the JVM that runs abuild's java backends is invoked. These options are intended for use in debugging abuild. If you have to use them to make your build work, you should submit a bug report with the details.
- 1.1.1: March 1, 2010
Bug Fixes
The Groovy-based Java backend was separating elements of the manifest classpath with the path separator rather than a space character. Thanks to Brian Reid for the fix.
Fix threading error in the Groovy backend that could, on very rare occasion, cause a crash with multithreaded builds. Thanks to Katie Outram for observing and reporting the problem.
The Groovy backend was not including the
classesdirectory in the compile-time classpath. This prevented java and groovy compiles in the same build item from being able to see each other's classes.
Other Changes
For compatibility with abuild 1.0 and to reduce warnings with ant version 1.8.0, the Groovy backend sets
includeantruntimetofalseby default in the javac task. This can be overridden by setting thejava.includeAntRuntimeparameter inAbuild.groovy.Minor fixes were made to abuild's ant backend to make it work properly with ant version 1.8.0. Due to a bug in ant, abuild's test suite may fail in spite of proper operation. For details, please see ant bug 48746 for details.
Minor fixes were made to abuild's build so that it works properly on systems that require special arguments to use pthread.
A new build set
descdeptreeshas been added. This is the intersection ofdescanddeptrees. It does whatdescdid in abuild 1.0 and was added just so that there was a 1.1 equivalent to abuild 1.0'sdescbuild set. Most users will never need to use this build set.Environment variable references in interface files may now be specified with defaults. To do this, use
$(ENV:VARIABLE:default-value). Thedefault-valueportion of the variable reference may not contain spaces or parentheses.Command line parameters may now also be referenced from interface files. To do this, use
$(PARAM:PARAMETER)or$(PARAM:PARAMETER:default-value). Thedefault-valueportion of the variable reference may not contain spaces or parentheses.
- 1.1.0: December 7, 2009
Miscellaneous Changes
Abuild version 1.1.0 runs at compatibility level 1.1 by default. You can still turn on backward compatibility with 1.0 by running abuild with the
--compat-level=1.0flag or by setting thatABUILD_COMPAT_LEVELenvironment variable, though it is recommended that you do this only while upgrading trees to avoid accidentally re-introducing deprecated features. Also, abuild will often be able to give a clearer error message with backward compatibility mode turned off.The embedded version of Groovy has been updated to 1.6.7.
The verify-compiler command now accepts the
--crossoption to better support cross compilers that are in the native platform type. See Section 29.4, “Adding Toolchains” for a discussion.
Usability Improvements
When error messages are tied to a file but not to a specific line in the file, the error message now assumes the line number “1” rather than not outputting a line number. This makes tools like emacs, vim, or eclipse that can automatically take users to the error location more likely to handle those conditions.
The format of the build duration has been changed to something that is not mistakenly interpreted as an error message by vim.
Bug Fixes
Initialize ant
Projectproperly so that tasks using the deprecated xml-based ant framework can properly accessSystem.in.Tighten up the logic for detecting tree roots in partially upgraded build trees. This reduces the number of false positives when running an upgrade process over an already upgraded forest, though it does not entirely eliminate them. The upgrade caveats section of the documentation has also been clarified slightly.
- 1.1.b6: November 10, 2009
Core Functionality Changes
The implementation of global plugins has changed again. Now, instead of having items declare themselves to be global plugins, a tree can declare a plugin to be global for the forest by adding the
-globalflag to the plugin declaration inAbuild.conf. This actually makes global plugins usable in a real setting.
Bug Fixes
The logic to detect shadowed plugins has been corrected to eliminate false positives and to provide enough information to resolve the problem. In many cases, multiple distinct error messages will be issued when a plugin is actually shadowed, but this is better than not having the required information to resolve the problem.
Minor Updates
Parsing of interface files has improved slightly. Some abuild reserved words are now valid on the right hand side of assignments without quoting, and handling of whitespace is more robust, including allowing lines to be split with continuation characters in some places where they could not previously be split.
When an abuild 1.0-style
Abuild.backingfile is found in an otherwise upgraded area, a deprecation warning is given rather than telling the user to run the upgrade process.
- 1.1.b5: October 28, 2009
Core Functionality Changes
The
-optionalflag may follow a child directory in the child-dirs key inAbuild.conf. In this case, abuild will not complain if the child directory is missing. This can be especially useful forAbuild.conffiles that may contain that are optional trees or optional dependencies.
Windows-related Enhancements
Both the mingw and msvc toolchains now create DLL file names that include the major version number of the library. The static library that goes with the DLL remains versionless so that linking works, but executables that use the DLL will expect its name to contain the version number. This is described in Chapter 21, Shared Libraries.
- 1.1.b4: September 28, 2009
Core Functionality Changes
The global tree dependency feature has been removed as there was no way to make its use practical. As such, global plugins no longer have to be in trees declared as global tree dependencies. Instead, abuild disregards tree dependency-based access checks when turning on global plugins. To ensure build consistency when global plugins are used, abuild disallows use of global tree dependencies if any tree in the forest uses external-dirs. Otherwise, a global plugin may not be in effect if a build were started in the root of an external tree from which the real forest root could not be determined.
Changes to Deprecated xml-based Ant Framework
The file
preplugin-ant.xmlis now imported for each plugin prior to loading the local build file or running any targets. This makes it possible for a plugin to override built-in tasks, set properties, and do other activities that would not be possible from inside of hooks. This was introduced primarily to support static analyzers and similar tools that require replacing built-in tasks.
- 1.1.b3: July 28, 2009
Command-line Parsing Improvements
When specifying build set options cases, later options now supersede earlier ones rather than contradicting them. This makes it possible to alias abuild to abuild --no-deps, abuild --build=desc, or other similar invocations to suit your preferences while still being able to get different behavior just by appending additional arguments on the command line.
As a convenience, abuild now recognizes abuild --build=
setclean as a synonym for abuild --clean=set. This means that if you have abuild aliased to abuild --build=desc, typing abuild clean will now have the effect of running abuild --clean=desc.Abuild's command-line parsing has been made more flexible. For options with arguments,
--option=valueand--option valueboth work, among other possibilities. In previous versions of abuild, there were inconsistencies in how options took arguments.
- 1.1.b2: June 13, 2009
Miscellaneous Changes
Reworked the mutex protection in main build loop slightly to remove all possibility of concurrent write access to shared data during a multithreaded build. This appears to have removed a rarely encountered race condition in which abuild could crash while building multiple instances of the same build item on multiple platforms simultaneously in separate threads.
The
--dump-build-graphoption has been changed to output XML data and is now always included in the output when abuild is running in monitored mode. A new directory,misc/xslthas been included in the abuild distribution that includes some sample XSL-T script that can process some of abuild's XML output. There are three scripts that generatedotoutput of various dependency graphs. This output is intended to be used as input to the dot program, which is part of graphviz. Thanks to Joe Davidson for the dot code and the idea of using graphviz to visualize the build graph.Moved reference DTDs from
srctodocso that they're in the same place in the source and binary distributions.
- 1.1.b1: May 22, 2009
Version numbering
The version numbering conventions for abuild have changed slightly such that the first 1.1 release will be called 1.1.0 instead of just 1.1. This makes the phrase “abuild 1.1” unambiguously refer to all 1.1.x releases rather than just the first 1.1 release, which will now be called 1.1.0.
Documentation Updates
There are no significant user-visible changes in functionality between the latest alpha release and this first beta release of version 1.1. The principal change is that the documentation has been largely brought up to date. The documentation is still very rough and incomplete in several places, and it has not yet had a full proofreading pass. However, in most cases, it should now accurately reflect abuild 1.1 functionality. Additionally, many new sections have been added. Of particular interest are Appendix B, Major Changes from Version 1.0 to Version 1.1 and Appendix C, Upgrading from 1.0 to Version 1.1.
Other Changes
QTest-based test suites are now invoked using a custom qtest ant task from both the Groovy backend and the legacy ant backend. This means that when qtest-based test suites are run on Windows from the legacy-based ant backend, it now works to have qtest-driver be a shell-script wrapper around the actual perl implementation.
- 1.1.a9: May 4, 2009
Enhancements to gcc toolchain support
The behavior of
ABUILD_FORCE_32BIThas been expanded, and the variableABUILD_FORCE_64BIThas been added. If exactly one of these variables has the value “1”, the option-m32or-m64, as appropriate, will be added to all gcc compilation steps. Additionally, in some cases the CPU portion of the platform string may be changed. This is a generalization of the behavior introduced in version 1.0.1, and also a change of the status of theABUILD_FORCE_32BITvariable to “supported” instead of temporary, at least pending some better solution.
Core Functionality Changes
The attributes key in
Abuild.confmay now have the value serial for any build item that is built with GNU Make (i.e., any build item that has anAbuild.mkfile). In this case, abuild will never instruct make to build that item in parallel even if--make-jobsis specified. This is useful for build items that, for whatever reason, do not build properly in parallel. Many build items that use autoconf will benefit from setting this, as will builds that use other tools that create temporary files whose names may clash with other instances of themselves.The behavior of whether expansion by trait and reverse dependency is repeated has changed again. Now, expansion by related traits or by reverse dependency is performed only once by default. In order to have the expansion process repeated until no more build items are added, specify the new option
--repeat-expansion.
Groovy Framework Changes
The junit test target now accepts attributes that allow the batchtest task to be run in addition to or instead of the test task.
Bug Fixes
Fix bug that caused an assertion failure when platform selectors were used if there were any platform-specific dependencies on java build items.
- 1.1.a8: April 22, 2009
Bug fixes
Various refinements have been made to abuild's multithreaded building code, which should improve both performance and reliability of multithreaded builds. This includes correction of a few possible race conditions, strengthening of multithreaded testing in the test suite, and correction of a long-standing problem that was visible only on Solaris but actually turned out to be present on all platforms.
The java builder code has been corrected so that it invokes IBM's JDK according to its requirements.
The built-in support for sun RPC's rpcgen has been fixed to avoid using a GNU-specific option to sed.
Building abuild
Abuild now uses a re-entrant scanner in the lexical portion of the interface parser, which should further simplify building abuild. Additional notes have been added to
src/README.buildregarding this and other build-related issues.
- 1.1.a7: April 20, 2009
Deprecated Features
The interface variable
ABUILD_THISis no longer deprecated. We can't really deprecate an interface variable because there's no way to detect or warn for the use of a specific variable in backend configuration files. People should useABUILD_ITEM_NAMEinstead ofABUILD_THIS, but theABUILD_THISvariable will stick around.The
--antcommand line option, which had been removed in an earlier alpha release, has been restored, but it only supports arguments of the form-Dprop=value. Using it will generate a deprecation warning and will point out the new syntax. This is to make it easier for users to discover the new way to pass parameters to builds and to avoid breaking some scripted builds.External directories crossing symbolic links is no longer an error condition. Instead, this will generate a deprecation warning, and abuild --upgrade-trees will refuse to upgrade any build trees that have symbolically linked externals. This change should make it easier for people to test abuild 1.1 without having to make unwanted changes to their build areas, particularly when things outside of abuild may be relying on the symbolic links. As allowing symbolically linked externals is just postponing the inevitable, people are still encouraged to avoid them.
Usability Features
Add new flag
--findthat can be used to show the location of a build item or build tree. Use abuild --finditem-nameto show the location and containing tree name of a build item, and abuild --find tree:tree-nameto show the location of a tree name.Abuild is somewhat quieter with
--silentthan it used to be.
Bug Fixes
Older versions of abuild would allow assignment of multiple words to scalar interface variables. This was never intended functionality, and only happened to work because of the syntax of make and ant. With the Groovy backend, this actually causes a problem, so abuild no properly gives an error when multiple words are assigned to a scalar interface variable. (Thanks to Brian Reid for noticing the problem.)
New Help System
Abuild has a new help system. The new help system provides a more robust ways for help to be provided for built-in and user-provided toolchains and rules. Pending full documentation, run abuild --help help for details. For information on creating help files, see
src/manual/pending.txt. Help files have not yet been written for all built-in rules and toolchains, but this will be done prior to the release of abuild version 1.1.The targets rules-help and interface-help have been removed. For the ant framework, the targets properties-help and hooks-help are still there since the new help system does not have any support for the ant backend.
Improved Code Generator Support
A new tool,
util/codegen-wrapper, has been provided. This tool can be used to wrap code generation that uses optional code generators. It is invoked with a source directory (automatically supplied by abuild), a cache directory, a list of input files, a list of output files, and a command used to generate the output files. It caches the generated output files and checksums of the input files. If all input files have matching checksums and all output files are present in the cache, codegen-wrapper will copy the cached output files into the output directory. Otherwise, it will run the command and then cache the output files and update the input file checksums. Pending documentation of this tool, seesrc/qtest/abuild-misc/codegen-wrapperfor an example of its use.Abuild uses codegen-wrapper in its own build. As such, the save-autos target and all support for it have been removed from the build of abuild itself. The abuild source, as distributed, now includes automatically generated scanners and parsers, so flex and bison are no longer needed to build it from the source distribution.
Backend Changes
Reverted earlier change to the order in which
plugin.mkfiles are loaded relative toAbuild.mk. As in abuild 1.0, abuild 1.1 now loadsplugin.mkafter loadingAbuild.mk. A new file,preplugin.mk, is now loaded beforeAbuild.mkto allow plugins to provide initialization that is run prior to parsing of theAbuild.mkfile. The previous change to loading order was an unnecessary non-backward-compatible change.To be consistent with the make backend, the file
plugin.groovyis now loaded afterAbuild.groovy, and the filepreplugin.groovyhas been provided for pre-plugin initialization.QTest support for both make and Groovy now exports the
TC_SRCSvariable automatically.Built-in flex and bison support have been expanded to use the codegen-wrapper. The variables
FLEX_CACHEandBISON_CACHEmust be set to enable this.
- 1.1.a6: April 13, 2009
Ant framework
Reverting an earlier change, abuild will no longer import
ant-hooks.xmlorplugin-ant.xmlfiles. This enhancement to the ant framework had unintended side effects that broke some existing builds. As the goal is to move from the ant framework to the Groovy framework, we wish to avoid any needless distractions caused by changes to the ant framework. This means that it is once again no longer possible to add targets in hook files.
Core Functionality Changes
Both item dependencies and tree dependencies can be made optional by adding the
-optionalflag to them inAbuild.conf. Optional dependencies are ignored if the items referenced do not exist. For details, seesrc/manual/pending.txt.New command-line argument
--with-rdepscauses expansion of the build set to include reverse dependencies of all items in the build set. Running abuild --with-rdeps in a build item's directory would cause all items that depend on it, directly or indirectly, to be built.
Visual C++ Toolchain Changes
New make variables have been added for increasing the flexibility of configuring Visual C++. See Section 18.2.2, “Options for the
msvcCompiler”.
Building Abuild
Abuild does a better job of detecting the appropriate libraries for networking, threading, and boost. In particular, when using a custom installation of boost, it is necessary only to set
BOOST_TOPto the location of the boost installation. Abuild's build will automatically figure out includes, library paths, preprocessor settings, and library naming conventions. For details, seesrc/README.build.
- 1.1.a5: April 7, 2009
Non-compatible changes
Absolute path externals are no longer supported.
The
--winpathoption to externals has been removed. Without absolute path externals, it is no longer needed.Note: in a later release, this was changed to a warning. Externals may no longer be symbolic links nor may they cross symbolic links. If you were relying on symbolically linked externals before, you can instead create dummy directories with
Abuild.backingfiles or with their own externals pointing to the real location.Read-only externals are no longer supported. Use of the
-roflag generates a deprecation warning and is ignored. Instead, if you need to make parts of your build tree read-only, use--ro-pathor--rw-path(described below). This gives you much greater and more precise control over what is read-only than read-only externals did.Child directories (specified with child-dirs) may no longer be nor may they cross symbolic links. Most likely, this would not have worked in previous versions either, but abuild now specifically checks for this case.
When parent-dir appears, it must point up, and child-dirs values must point down in the file system. “Interleaved” build items are no longer permitted. There must be no
Abuild.conffiles in any directories between a parent directory and its child build items. In practice, the chances of ever finding a build tree that doesn't already obey these restrictions are very low, and any configuration that fails to follow these guidelines would have been very confusing, so this change is not likely to be noticed.
Deprecated Features
Use of read-only externals generates a deprecation warning, but in fact, it's more than deprecated—it's entirely ignored. The deprecation warning indicates that use of
-rocould potentially become an error in a post-1.1 abuild release.Use of external-dirs to point to a build tree that has been upgraded to use 1.1 syntax will generate a deprecation warning.
Use of this, deleted, or parent-dir in
Abuild.conf, or having a tree root that does not include the tree-name key will generate a single warning suggesting that you should upgrade your build trees using abuild --upgrade-trees. The specific locations of the deprecated features is not reported. This is to discourage attempts to manually upgrade trees. The upgrade process is complex, and all the complexities are managed automatically by abuild --upgrade-trees. In general, abuild tries to avoid suggesting that you run an upgrade if it concludes that the upgrade will not be able to do anything. Detailed documentation of the upgrade process will be included in the manual prior to the final 1.1 release. In the interim, seesrc/manual/pending.txtin the source distribution.Use of
Abuild.backingfiles below the root of the build forest (defined) below is deprecated. A new syntax forAbuild.backingfiles has been introduced and is also described below. Use of the old format is deprecated.Note:
ABUILD_THISwas removed from the deprecated list in a later release. The interface variableABUILD_THISis deprecated and has been replaced byABUILD_ITEM_NAME. Note that abuild is not able to detect use of$(ABUILD_THIS)in Makefile fragments. It will, however, warn about them when they are used inAbuild.interfacefiles.
Pending Documentation
Documentation for significant new features that have not yet been incorporated into the manual now appear in the file
src/manual/pending.txt.
Groovy Framework Changes
Compiled rules files are now cached, resulting in a significant performance improvement.
When the
groovyrules are used, Groovy sources are now expected to be insrc/groovyinstead ofsrc/java.The package-rar target has been replaced with package-high-level-archive. Various parameter and attribute names have been updated for consistency. The
javarules should now be considered in a soft freeze for version 1.1. Non-compatible changes can still be made for cosmetic reasons or to fix minor problems, but the rules should be in pretty close to final form. Generation of javadoc and junit testing may still change more significantly.
Compatibility Mode
Compatibility level can be set using the
ABUILD_COMPAT_LEVELenvironment variable in addition to use the--compat-levelcommand line argument.
New Build Tree Structure
This version of abuild includes a new build tree structure. The highlights of this structure are named build trees, name-based tree dependencies instead of externals, multiple backing areas, improved build ordering, and removal for the need of parent-dir.
With the exception of the non-compatible changes listed above, abuild will continue to recognize the old build tree structure and will internally map it to the new structure by assigning randomly generated names to build trees. If abuild finds deprecated 1.0 features while traversing the build tree, it will notify the user that the trees can be upgraded with the abuild --upgrade-trees command. Needless to say, if you are trying to use the same build tree under both versions 1.0 and 1.1 (during a transition period), you should hold off on performing your upgrades. Upgraded trees will not be recognized by abuild 1.0.
The way backing areas work has been significantly improved. As in the case of the new build tree structure, abuild will continue to recognize 1.0-style
Abuild.backingfiles when running in 1.0 compatibility mode (the default).For a brief summary of changes in the new build tree structure, please refer to Section B.5, “Redesigned Build Tree Structure”.
New interface variables
ABUILD_ITEM_NAMEandABUILD_TREE_NAMEhave been introduced. These variables contain the value of the current build item name and its containing tree. TheABUILD_ITEM_NAMEvariable replaces the deprecatedABUILD_THISvariable.
Command Invocation Changes
Build set all builds all items in all known trees as before, but with the new build structure, this may include trees that were not previously included. In particular, abuild now knows about all trees in the forest, not just those that are tree dependencies of the current build item.
The new build set deptrees builds all items in the current tree and all its tree dependencies. It has the same semantics as all had in abuild 1.0, and does the same thing as all in 1.0-compatibility mode.
New arguments
--ro-pathand--rw-pathhave been added. These replace read-only externals as the way to make parts of the local build forest read-only. See discussion insrc/manual/pending.txtfor details.New option
--no-depsis described below.
Build Behavior Changes
When abuild is run with no build set arguments,
--with-depsis enabled by default. In order to build a build item without its dependencies (effectively assuming that the dependencies are up to date), run abuild with the--no-depsoption.Removed all clean targets previously provided by backends. In older versions of abuild, the clean target was passed to the backend under the special case of abuild being invoked from inside the output directory. Now abuild implements the clean target internally for that case. Abuild always has and continues to implement clean internally for invocations that are not in an output directory.
Abuild always has and continues to guarantee that it will build all dependencies of an item before it builds the item. Previous versions of abuild would rearrange an initial build that built all items alphabetically, deviating from that order only to satisfy dependencies. Abuild now uses, as an initial ordering, build items sorted alphabetically within trees, with trees sorted in dependency order. In other words, if tree
Adeclares a tree dependency on treeB, then abuild will build all items inAbefore building any build items inB. As always, build ordering is considered an implementation detail that should not be relied upon.
Platform Changes
Platform-specific dependencies now obey user-supplied platform selectors. The rationale for not doing this before was that the command-line and environment should not affect the shape of the build graph, but that's not really a good reason since this is a myth anyway. People can always run with
DFLAGS=-gor set an environment variable used by a specific platform plugin's list_platforms script to suppress the platform. If a specific compiler or option is required, it can be specified explicitly with the platform-specifier in the dependency.To explicitly disregard user-supplied platform selectors, it is possible to specify "default" as the platform selector, as in
deps: item -platform=platform-type:default
It is also possible to specify an explicitly empty option, as in
deps: item -platform=platform-type:option=
Both the empty option and default platform selector are available on the command-line as well, making it possible to run
abuild -p option=debug -p native:default
or
abuild -p option=debug -p native:option=
Abuild now passes information about the native platform to all list_platforms programs, which are supplied by plugins that are offering support for new compilers. list_platforms is now invoked as follows:
list_platforms [ --windows ] --native-data
oscputoolset
Core Functionality Changes
Abuild now supports global plugins. This is implemented through introduction of a new, general-purpose key in
Abuild.conf: attributes. (Note: implementation of this feature was changed in a subsequent release.) This key can be used to flag certain build items as having specific properties that abuild recognizes. At present, only two attributes are recognized:Note: this feature was removed in a subsequent release. global-tree-dep: This attribute may be assigned to any root build item of an explicitly named tree. Such a tree may not have any tree dependencies of its own and is implicitly treated as if it were declared as a tree dependency by all other trees.
Note: this feature was changed in a subsequent release. global-plugin: This attribute may be assigned to any build item that otherwise meets the qualifications for being a plugin. It must reside in a tree with the global-tree-dep attribute. Note: global-tree-dep was removed in a later release. This item will then be treated as if it had been explicitly listed as a plugin for all build trees. This is a very powerful feature which must used with care. Good uses for it might include implementing project-wide checks, such as making sure appropriate environment variables are set or appropriate dependency rules are followed, or for adding new platforms or platform types that may be used by all build items in a forest. Care should be taken to avoid introducing global plugins that wider consequences than you might initially expect. Global plugins should generally be coded in such a way that their impact can be disabled in some way.
Implemented abuild --upgrade-trees. You should use this command to upgrade your build trees rather than attempting to upgrade your trees manually. Although abuild will work fine with mixed 1.0/1.1 trees, you will get a lot more warnings and possibly incorrect results in some cases (though no such cases are known) if you partially upgrade your trees. There is a lot to keep track of when upgrading your trees. You are much better off letting abuild do it for you. Documentation on the upgrade process, for the time being, can be found in
src/manual/pending.txt.
- 1.1.a4: March 19, 2009
Deprecated Features
No features have been deprecated in this release.
Documentation Changes
Documentation for the Groovy framework has been moved to
src/manual/groovy-framework.txtpending full inclusion in the manual.Java examples that are not specifically illustrating the ant framework have been converted to use the Groovy framework. The rest have been moved into an ant-specific portion of the test suite. The text remains in the manual, but the files are no longer included. Prior to the release of version 1.1, new examples to illustrate the Groovy framework will be introduced, ant the ant framework will be mentioned briefly in an appendix.
Core Functionality Changes
Support
--compat-level=. When specified, backward compatibility support is disabled for features that were deprecated at or before versionx.yx.y.Abuild now prints the total clock time that elapsed during a build right before it exits. The time is printed in the form HH:MM:SS.
In preparation for deprecation of parent-dir, the value of parent-dir is required to point up in the file system, and all values of child-dirs are required to point down. Additionally, if either parent-dir or child-dirs reach more than one directory away, no
Abuild.conffiles are permitted in intervening directories.These changes, along with the existing check that an item's child's parent point back to the item, are sufficient to enable abuild to safely ignore the value of the parent-dir key.
As an intermediate step toward adoption of the new traversal system, we now walk up the tree looking for an item that doesn't have us as its child when finding the top of the forest. The old behavior was to follow parent-dir, which is now ignored.
- 1.1.a3: March 16, 2009
Deprecated Features
No features have been deprecated in this release.
Changes to Groovy Framework
Some default path names have changed. See
rules/java/_base.groovyfor details. This will likely continue to change until the mainjavarules have been nailed down.Targets have been added for copying and signing JARs, and for creating RARs, WARs, and EARs. The RAR target happens after copying and signing of jars. There's nothing RAR-specific about it. It could be generalized to create any kind of JAR that could contain other JARs.
Support for JUnit-based tests have been added to the built-in
javarules.Calls to abuild.appendParameter will pre-initialize the parameter with the result of calling
resolveon it. This means that attempting to append to an interface variable will effectively copy the interface variable to a parameter and then append it.Variable-like constructs on the right-hand side of an assignment or left shift inside of
parameterscall are no longer automatically resolved as parameters. You now must useresolveexplicitly. This is to reduce confusion that could step from the fact that you always had to do this for some cases, and that using a parameter in a context where it is not magically resolved would result in having aParameterHelperobject, which is not useful in itself. This is a case of removing a little bit of convenience in a common case to avoid creating a very obscure error in a less common case. Although having to explicitly resolve variables on the right hand side of assignments is not “normal” in a programming language environment, it is similar to variable assignment in a properties file, shell script, make file, or even abuild interface file, which makes it consistent with the rest of abuild.
Core Functionality Changes
It is now possible to declare local variables in an interface file. Local variables are visible to the backend of the build item to which they belong, and their scope extends from the main
Abuild.interfacefile to any after-build files, but nothing about them, including their declarations, is exported to depending build items. This means that local variables with the same names may be used in multiple build items' interface files. Declare local variables using the syntaxdeclare
variablelocaltype[ =initialization]
- 1.1.a2: March 11, 2009
Deprecated Features
The following features, each of which is discussed elsewhere in these relates notes, have been deprecated in this version:
LINK_SHLIBS. No functionality changes have been introduced relative to version 1.0.3, but usingLINK_SHLIBSnow results in a deprecation warning.
The following feature was listed as deprecated in 1.1.a1 but is no longer deprecated:
The
abuild.hook-build-itemsis no longer deprecated since the-with-rulesflag for dependencies as been removed in favor of a different solution that can't be applied to the ant backend.
Changes to Groovy Framework
The
javarules have been completely rewritten.The
src/TODOfile remains the primary location of documentation of the Groovy framework while it is still in flux, so these notes contain only a very brief summary of changes.An improved syntax has been provided for setting parameters. This takes advantage of Groovy's meta-programming capabilities to allow a closure passed to the
parametersmethod to contain parameter settings that look like normal variable assignments.Parameter names have been changed to use camelCaps instead of dashed-components to make the syntax more natural when setting parameters from a closure.
All
getVariablemethods have been replaced with calls to methods whose name start withresolve.There is now a
replaceClosuresmethod that allows closures for a target to be replaced rather than appended to. This practice should generally be avoided, and seldom be necessary based on the way the default rule implementations work. (You can already provide your own closures to run instead of the default ones.)
Changes to ant framework
Note: this change was removed in a subsequent release. This change was actually introduced in version 1.1.a1. Abuild now complains if the
ant-hooks.xmlfile for a hook build item does not exist.
Changes to make Framework
Note: this change was reverted in a subsequent release. The order in which files are loaded by the GNU Make backend has been changed slightly.
plugin.mkfiles and the base rules (which load the compiler toolchain support files) are now loaded beforeAbuild.mk. This makes it possible forAbuild.mkfiles to modify variables set in those places and also provides a mechanism for plugins and built-in rules to supply default values for parameters that can be referenced fromAbuild.mk.
Core Functionality Changes
The
-with-rulesoption to the deps key inAbuild.conf, introduced in 1.1.a1, has been removed. It didn't turn out to be a very good idea. Instead, a new, unified method for build items to provide rules has been added. All build items, not just plugins, provide rules by creating arulesdirectory and putting a named rules file in a subdirectory named after the target type. In addition, a subdirectory namedallmay be used to provide rules that are valid for all target types.As a result of this change, all uses of
BUILD_ITEM_RULESand ofRules.mkare now deprecated. Additionally, since there is no facility to provide loading of named rules in the ant framework, use ofabuild.hook-build-itemsis no longer deprecated (except in as much as the entire ant framework is deprecated).When build items want to use rules provided by another build item, they just place the name of the rules (without the
.mkor.groovysuffix inRULESorabuild.rulesjust as they would for plugin or built-in rules.As part of this change, the
make/rulesandgroovy/rulesdirectories have been merged and placed inrulesat the top of the abuild distribution. Additionally, theemptyrule sets for both Groovy and make have been moved into therules/alldirectory.The interface system now supports non-recursive variables. A variable can be declared non-recursive by putting the keyword non-recursive in the declaration after the variable name and before the type.
When an interface variable is declared as non-recursive, only assignments from the item itself and its directly declared dependencies are effective. Specifically, when importing an interface, only assignments from the item that owns the interface imported. Since abuild imports interfaces of its direct dependencies, this causes the behavior of seeing only assignments in direct dependencies and in the item. To avoid seeing assignments from the item itself, place those assignments in an after-build file.
Non-recursive variables can be useful for carrying information for subsystems that handle recursive dependencies on their own. Examples could include manifest classpaths or shared library information.
It is now possible to initialize an interface variable at the time of declaration using the shorthand syntax
declare
variabletype=initialization
- 1.1.a1: February 20, 2009
Deprecated Features
Some features have been deprecated. Deprecated features always result in a warning. You can pass the
--deprecation-is-errorto abuild to cause it to treat use deprecated features as an error instead.The following features, each of which is discussed elsewhere in these relates notes, have been deprecated in this version:
BUILD_ITEM_RULESabuild.hook-build-items(Note: removed from deprecated list in a subsequent release)abuild.use-local-hooks
Major Enhancements
A new Groovy-based backend has been added. Although, like all backends, it could be used to build build items of any target type, it is primarily intended as a replacement for the Apache Ant backend. This first alpha release of 1.1 includes a rudimentary collection of rules for building Java and Groovy code currently called
java_proto. These rules may change in non-compatible ways throughout the 1.1 alpha testing period. The Groovy backend is invoked through Java APIs. A single instance of the Java Virtual Machine is shared for all Groovy-based builds.For now, documentation on the interface to the Groovy framework can be found in
src/TODOin the abuild distribution. It will be moved into the manual as it is stabilized.The same JVM that is used to run Groovy-based builds is now also used to invoke ant-based builds. As such, abuild runs all ant builds from a single JVM and no longer invokes ant from the command line. This can result in a noticeable performance improvement.
Licensing Changes
Abuild itself remains under the terms of Version 2 of the Artistic license. Abuild now also embeds the embeddable JAR from the Groovy distribution. Groovy is distributed under the terms of the Apache License. A
NOTICE.txtfile has been included in abuild's source distribution in accordance with that license.
Changes to command-line syntax
The
--deprecation-is-erroroption has been added. When specified, deprecation is considered an error rather than a warning.Note: a limited version of
--antwas added back in a subsequent release. The--antand--no-abuild-loggeroptions are no longer supported since abuild now invokes ant through Java APIs.Abuild now recognizes arguments of the form
variable=value--makeor--antis now the recommended way of overriding variables. Any variables defined in this way are made available to the ant backend and to the ant project in the Groovy backend as properties, and to the GNU Make backend as variables passed on the command line. They are also passed to the Groovy backend in a manner that causes them to override variable values that are set in other ways, as long as the documented interfaces are used for getting and setting variables.The
--just-print,--dry-run, and--reconoptions are no longer synonyms for-n. These are accepted as synonyms by GNU Make, which is why they were originally supported by abuild as well.
Core Functionality Changes
Note: this change was reverted in a subsequent release, and a different solution was implemented in its place. When declaring dependencies, a new flag
-with-rulesmay be specified. This causes the build item to loadRules.mk(make),ant-hooks.xml(ant), orRules.groovy(Groovy). This replaces the now deprecatedBUILD_ITEM_RULESmake variable andabuild.hook-build-itemsant property. This change means that there is now a unified mechanism for forcing build item-supplied rules to be run rather than having a separate mechanism for each backend. In some rare cases, it may be that a build file only has item-based rules. In this case, you will have to create an empty build file (or one containing only comments) so that abuild will still know which backend to use for building the item.Since you can't declare a dependency on yourself, if you wish to use your own rules, you can specify
Rules.mkinLOCAL_RULES(make) orant-hooks.xmlinabuild.local-buildfile(ant).When traversing a build tree with a backing area, abuild now accepts non-existent child directories without requiring a corresponding directory to exist in the backing area. This check served no useful purpose, and it was removed in preparation for the upcoming revamping of how backing areas work.
The
-nis now supported for all the backends, not just make. For the ant and Groovy backends, abuild doesn't actually invoke the backend but instead just prints some information on what targets would be run.Considerable additional information is output when abuild is run with
--verbose. In particular, there is much more information about how abuild starts up and invokes backends. This should make it easier to solve certain types of configuration problems, such as abuild picking the wrong version of make.Although abuild still does not require
JAVA_HOMEorANT_HOMEto be set, it will start up slightly faster if they are set. The reason for this is that abuild actually invokes java and ant to more reliably infer values forJAVA_HOMEandANT_HOMEif they are not already set.Build item names are no longer permitted to start with the “-” character.
Changes to ant framework
Note: this change was reverted in a subsequent release. All files from which hooks may be loaded, including hook build items'
ant-hooks.xmlfiles, plugins'plugin-ant.xmlfiles, and any file specified asabuild.local-buildfileare now imported. Before, plugin and build item-supplied files were used only for loading hooks. This means that it is possible to add new targets in plugins and hook build items. Some caveats are described in the documentation for this feature. Most notably, when multiple instances of a new target are imported, only one will actually be used. The recommended practice is for newly defined targets to do nothing other than call run-hooks to run a hook of the same name.The property
abuild.use-local-hooksis no longer used. Instead, the ant backend always behaves as if it were set, meaning that it always uses the local build file for hooks. People were in the habit of setting the now deprecatedabuild.hook-build-itemsto contain the current build item and writing hooks that apply only to the local build item. This functionality is intended to be offered by local build files, and that mechanism should be used instead. If you have a build item that offers hooks for others and also wants to use them for itself, it can setabuild.local-buildfiletoant-hooks.xmlor important-hooks.xmlfrom its existing local build file.Note: this change was reverted in a subsequent release. Abuild now loads the groovy ant task. Parts of the abuild ant framework use this task to embed Groovy code. It is recommended that you switch to the groovy backend rather than using this task, but embedding Groovy code in your ant files may help with a transition to the new backend.
Since abuild no longer invokes ant from the command line, the
--antoption has been removed. Note: a limited version of--antwas added back in a subsequent release. As such, it is no longer possible to pass arbitrary flags to ant. The most common use of this was to pass-Dprop-valueoptions to ant. This can now be accomplished through abuild's newVAR=valueargument syntax as described above. Certain things that used to be possible before, such as running abuild --ant -p, are no longer supported. A future 1.1 alpha version of abuild will introduce a new help system, so this feature should hopefully not be missed.Since abuild now uses its own ant launcher to start ant-based builds using the ant Java API, the old problem of ant.bat not properly reporting failures on Windows is no longer relevant. This means that ant-based failures are now properly detected on Windows.
The
--no-abuild-loggeris no longer supported. Abuild now always uses the abuild logger when running ant.
Building Abuild
Abuild has already required Java 1.5 since its own Java code uses generics. This requirement is made more firm now since abuild's own Java code now also makes use of some thread pool functionality that was added in version 1.5.
Abuild now requires boost version 1.35 or greater since it uses the asio (Asynchronous I/O) library to communicate with its Java build launcher.
When bootstrapping abuild, you must now run the BootstrapJava.groovy script in abuild's
srcdirectory to build the Java code. A full Groovy installation (>= 1.5.7) is needed to build abuild from scratch. A Groovy installation is not required run abuild as abuild embeds Groovy.
Usability Improvements
Starting in 1.0.3, if any build failures occur in a given abuild run, abuild issues an error message indicating this at the end of its output. Now this error message is followed by a list of which build items failed on which platforms.
- 1.0.3: January 9, 2009
NON-COMPATIBLE CHANGE: removal of
LINK_SHLIBSAlthough care is taken to avoid introducing non-compatible changes within a minor release, it was necessary to change how shared libraries are linked as the old behavior caused too many problems. Specifically, prior to abuild 1.0.3, shared libraries were not linked unless the
LINK_SHLIBSvariable was set. Starting with version 1.0.3, this variable has been removed, and builds are conducted as if the variable were set: shared libraries are always linked. This is almost always the correct behavior for systems that support linking of shared libraries. Without this, it is very easy to end up in a situation where replacing one version of a shared library with another one results in undefined or multiply-defined symbols at runtime. One possible consequence of this change is that, in some cases involving mixing of shared and static libraries, a single shared library may be linked into multiple shared libraries. This is usually (but not always) harmless, but it is also usually wasteful. If you encounter this situation, the best option would be to rework your build to avoid whatever arrangement is causing this. Alternatively, you can manipulate the value of theLIBSvariable in your shared library build item'sAbuild.mkfile. The old behavior was based on an incomplete analysis of usage of shared libraries. It optimized for the unusual case of mixing shared libraries with static libraries rather than the more normal case of being able to replace earlier versions of shared libraries with later versions that may have different dependencies.
Enhancements
A new command line option, --clean-platforms, can be used to restrict which platforms' directories are removed by any abuild clean operation.
A new key, build-also, is now supported in
Abuild.conf. This key's value is a space-separated list of build items that should be automatically built if the original build item is added to a build set. No dependency relationship is implied. This provides a more robust method than dependencies of creating virtual “top-level” build items. A corresponding element has been added to the dump data output as well.When
--cleanis used to clean a build set, abuild now attempts to clean all build items, not just items with build files. This means abuild will attempt to clean interface-only items, plugins, and other items that it previously would not have attempted to clean.A new option,
--dump-interfaces, has been added. Using this option during a build causes abuild to write an XML dump file of the full state of the interface system for every writable build item. For details, see Section 17.6, “Debugging Interface Issues”.Build sets
downanddescendinghave been added as aliases fordesc.Behavior of the special platform selector skip has improved. Rather than unconditionally disabling builds of the given platform type, it just prevents them from being selected by default. Builds for a platform type for which skip has been specified may now be done in order to satisfy a platform-specific dependency.
The skip platform selector may now be used for platform types indep and java. When java:skip or indep:skip is specified as a platform selector, no builds for the given platform type will be performed unless needed to satisfy a dependency.
When expanding the build set with
--related-by-traits, abuild now repeats the expansion until no more items are added.
Bug Fixes
A failing qtest test suite when invoked from ant now properly causes the build of that item with the check or test targets to fail.
If a build item has instances of another build item in its dependency chain for more than one platform, abuild previously ignored all but the first instance of the second item's interface. (Recall that abuild creates a separate instance of each item's interface for every platform on which that item builds.) Abuild now properly treats each instance of the interface separately for purposes of importing interfaces into a dependent item's build. This bug could only be exercised by creating multiple build items that depend on a common build item using different platform-specific dependencies.
Usability Improvements
If any build failures occur in a given abuild run, abuild now issues an error message indicating this at the end of its output just before exiting. This makes it easier to recognize a failed build by looking at the end of abuild's output. This is especially helpful when for parallel builds or builds with
-ksince, in those cases, the output of the failed builds may not be at the end of the output.Abuild is clearer about reporting when a build item fails. Additionally, if a build failure of one item causes other items to be skipped, this is now reported as well.
Internal Changes
A minor change was made to make it easier for users to create plugins that would enable use of GNU Make to build Java code. This could make it easier to create prototypes of different back-end build approaches for Java without having to modify abuild's internals.
- 1.0.2: October 7, 2008
Abuild no longer includes the minor release of Red Hat Enterprise Linux and Centos releases in the platform string. The minor release number is not necessary as the minor releases are intended to be binary compatible. This allows a Red Hat Enterprise Linux 5.2 system to use a backing area built by a Red Hat Enterprise Linux 5.1 system, for example.
Minor fixes were made to C++ source files in the test suite and examples so that they would compile properly with gcc 4.3.
In some cases, shared libraries would be linked with the C++ compiler even when
LINK_AS_Cwas set. This has been corrected.Setting
OFLAGS,DFLAGS, andWFLAGSinAbuild.mkfiles had no effect because of the way these variables were assigned in toolchain support files. Abuild's built-in toolchains have been fixed to initialize these with?=instead of=. This should make it possible to override these variables globally at least for abuild's built-in toolchains. Overriding these variables globally is generally not a good idea in any case, however. Thanks to Ben Muzal for reporting the problem.
- 1.0.1: May 28, 2008
Minor updates to test suite to make it more portable. In particular, abuild's test suite is now known to pass on Solaris 8.
Internal code change: avoid using boost regular expression objects across multiple threads in hopes of solving occasional assertion failures inside the boost library when running with multiple threads under Windows.
Abuild was previously passing a JAR file rather than a directory to ant's -lib argument. This has been corrected. (Thanks for the problem report from Craig Pell.)
If
AUTOCONFIGHis not set, abuild's autoconf rules will not run autoheader. This makes it possible to create an autoconf build item without generating a header file if desired.When autoconf invokes the compiler, it now honors any flags or includes set by dependencies. (Thanks for the problem report from Joe Davidson.)
Include two small patches to make abuild build properly in MacOS Darwin. (Thanks for the patches from Joe Davidson.)
With --verbose, abuild now prints the backend command that is invoking. (Thanks for the suggestion from Craig Pell.)
Documentation updated to add autoconf, automake, and GNU diffutils, and gcc configured with gnu ld to the list of system requirements.
Abuild now mentions when nothing is built but some native build items were skipped due to lack of available platforms. Hopefully this will reduce confusion when Windows users without any valid compilers or cygwin perl type abuild and don't get any output. Also, when --verbose is specified, abuild always mentions when it skips any build item because of lack of build platforms.
Bug fix: if tree
Acontained a plugin but did not use it, treeBhadAas an external and used the plugin, and treeChadAandBin that order as externals and did not use the plugin,Cwould have not realize that the plugin was a plugin in any tree. This would cause a segmentation fault when loading the interface. This problem has been corrected because abuild now has a more robust way of keeping track of whether a given build item is ever a plugin.Enhancement: When the
abuild.main-classproperty is set inAbuild.properties, abuild now sets the Main-Class attribute in the JAR file's manifest. This doesn't solve the problem of adding custom attributes to manifest files in the general case, but it does address the most common situation. Thanks to Craig Pell for providing an implementation.When building with Visual C++, embed the manifest file, if any, into the executable or dll file. Thanks to Matt Nassr for the suggestion and pointer to the relevant information.
Temporary change: for abuild version 1.0.1, the environment variable
ABUILD_FORCE_32BITmay be set to the value1to force abuild to generate 32-bit code on 64-bit platforms under certain conditions. Specifically, on a ppc64 platform, abuild will pass-m32to gcc and will use ppc as the CPU type in the platform string. Likewise, on an x86_64 platform, abuild will pass-m32to gcc and will use ix86 as the CPU type in the platform string. Note that abuild will not otherwise override the type of object file generated by your compiler based on the platform string. This means if you are building on a 64-bit system with a compiler that generates 32-bit object files, abuild will happily create 32-bit object files in a directory whose name suggests 64-bit code. (This is the case on Red Hat's ppc64 distribution at least with Red Hat Enterprise Linux 4 and 5.) This change is temporary and may be removed in a future release in favor of a more robust solution for generating both 32-bit code and 64-bit code on 64-bit systems.
- 1.0: February 12, 2008
WARNING ABOUT Java SUPPORT: Java support is considered alpha at the time of release of abuild version 1.0. This means the Java support in abuild version 1.1 may not be compatible with the Java support in abuild version 1.0. We are in the process of rethinking how abuild should support Java, and it is possible that a wholesale redesign of abuild's Java support will be forthcoming.
Changes from earlier versions
Added
--no-dep-failuresoption. When used with-k, tells abuild to attempt to build items even when their dependencies have failed.Bug fix: a failing JUnit test suite run now causes the build item to fail.
Added test-only target to test a build item without depending on all.
Documentation update: clarify that
XLINKFLAGSshould not be used for libraries. The documentation still reflected an earlier idea of what this variable should be used for.
- 1.0.rc1: December 3, 2007
Hitting CTRL-C in Windows while abuild was running ant would sometimes leave the console window in an unusable state as ant, a batch file, tried to ask the user whether to terminate the batch job. On Windows, abuild now waits for subsidiary processes to exit before exiting itself.
Trailing whitespace is now trimmed around
abuild.hook-build-itemsinAbuild-ant.properties.New command line option
--find-confdirects abuild to find the firstAbuild.confat or above the current directory and to run the build from there.Enhance handling of absolute externals so that an absolute external directory may be a symbolic link.
Many additional improvements have been made to the documentation, thanks to input from reviewers mentioned in Acknowledgments.
The HTML version of this complete document in the binary distributions is now in
doc/html/abuild-manual.htmlinstead ofdoc/abuild-manual.html. A multi-file version of the HTML documentation is now also generated. Its entry point isdoc/html/index.html.
- 1.0.b3: November 13, 2007
Support has been added for read only externals and for specifying a separate path for an external that is used only on Windows.
If a
WHOLE_lib_variable is set during a build using thelibnamemsvccompiler, an error message will be generated. Previously, the whole library instruction would be silently ignored.Numerous improvements have been made to the documentation, thanks to input from reviewers mentioned in Acknowledgments.
- 1.0.b2: November 2, 2007
Removal of Deprecated Functionality
Abuild no longer automatically removes stray automatically generated files created by versions older than 1.0.a14.
Abuild no longer accepts
BI_RULESas a synonym forBUILD_ITEM_RULES.
Movement of Functionality to External Plugins
VxWorks and XLC support have been removed from abuild and are now available as plugins in a build tree maintained separately from abuild.
Javadoc support is no longer provided by the default ant rules but is instead provided by a doc hook, which is provided separately.
New Features
External trees may now be specified as absolute paths. This makes it easier to support external trees that contain things like libraries of build items that may be maintained separately from the projects that use them.
The
-Coption to the abuild command tells abuild to change directories to the given directory before doing anything. Similar to make'sdirectory-Coption.The
-lowprioption to platform and native-compiler commands output from list_platforms scripts may now be specified when adding new platforms and native compilers from plugins.Abuild interface variable
ABUILD_PLATFORM_TYPEis now defined.A program is now provided to verify proper operation of compiler plugins. (See Section 29.4, “Adding Toolchains”.)
C/C++ rules will, in most cases, recognize orphan targets are deal with them properly. (Stray object files in subdirectories of the output directory will not currently be detected.)
The new make variable
LINKWRAPPERcan be set on the command line or in theAbuild.mkfile to specify the name of a command to wrap the link step. This is intended to be used to support tools such as Purify which wrap the link command in this fashion.The new variable
LINK_AS_Cmay be set in anAbuild.mkfile to cause all shared libraries and executables in that build item to be linked as straight C code instead of C++ code. This avoids a dependency on the C++ runtime libraries for straight C code.A new example has been created to illustrate how to pass information safely from a make variable to your source code. See Section 22.5, “Dependency on a Make Variable”.
Functionality Changes
The
-ansiflag is no longer passed to g++ by default for thegccandmingwcompilers. If you want it, create a plugin that adds it toXCXXFLAGS(orXCFLAGS) inplugin.mkconditionally upon the compiler. In older versions,-ansiwas passed to g++ but not gcc.The doc target for Java builds no longer runs javadoc. Instead, this capability must be provided by a plugin. The reason for this change is that there is too much site-specific policy in how the javadoc task would be invoked. In light of this, the pre-doc and post-doc hooks have been replaced by a doc hook.
A few error messages have been cleaned up so that, whenever possible, all abuild error messages are of a form that is parseable by the error-handling code in Emacs and Eclipse. (Most error messages already conformed, but a small number did not.)
Bug Fixes
The
autoconfrules have been fixed so that they do not generate warnings about undefined variables and work better by default for cross compiles.File-specific
OFLAGS,DFLAGS, andWFLAGSvariables now work properly when set to the empty string.On Windows, abuild no longer attempts to run perl if Cygwin perl is not the first perl in the path. In verbose mode, a message to this effect is printed when perl is not found.
- 1.0.b1: September 28, 2007
Warnings About Next Release
Note: This is intended to be the last release to include VxWorks and xlc support inside of abuild. Abuild's VxWorks and xlc support code should be moved into plugins prior to the next beta release of abuild.
Documentation Changes
The documentation has been substantially reorganized. Many new sections have been added, and many parts have been rewritten.
Examples are now spread throughout the documentation rather than being grouped together in one section. (See Appendix L, List of Examples for a convenient list of examples.) The contents of files referenced from the examples are now included inline in the text. The contents of every file in the
doc/exampledirectory are no longer included in the document.The documentation has been converted from Texinfo to docbook.
The documentation in the binary distribution is now installed as
doc/abuild-manual.pdfanddoc/abuild-manual.html. There is also now a cascading stylesheet calleddoc/stylesheet.cssthat has to be in the same directory as the HTML version of the documentation.
VxWorks Changes
Shared library and partial load script support has been added to vxworks. When building an executable, abuild generates
binname.loaddata
Basic Functionality Changes
Subtle changes have been made to how abuild picks which targets to apply to which build items: explicit targets are no longer applied to build items being built just to satisfy dependencies unless the new
--apply-targets-to-depsoption is specified.New name and pattern based build sets have been added. See Section 9.2, “Build Sets” for details.
--with-depsis now exactly the same as--build=current. Both behave the way--with-depsbehaved in previous releases. To get the old behavior of--build=current, also specify the--apply-targets-to-depsoption.When cleaning with a clean set, dependencies of items in the clean set are no longer cleaned by default. To cause them to be cleaned as well, use the
--apply-targets-to-depsoption along with--clean.The
--verboseoption now prints additional information about what abuild is doing in addition to passing verbose flags to make and ant.The
--silentflag now passes-quietto ant in addition to suppressing some make output and some of abuild's own output.Build item scoping rules have changed slightly: a build item no longer has automatic access to items in grandchild scopes or lower (
Acan still seeA.B, but it can no longer seeA.B.C). Access can still be granted using the visible-to key if needed.Bug fix: if
--dump-dataand--monitoredwere both specified, the dump data output is now properly delimited by monitor statements.
Ant/Java changes
The
ANT_HOMEandJAVA_HOMEenvironment variables are no longer required. IfANT_HOMEis set, abuild will still run the copy of ant in${ANT_HOME}/bin, but if it is not set, abuild will now attempt to run ant from the path. This makes abuild completely free of mandatory environment variable settings.The ability to generate wrapper scripts to run Java “executables” has been moved into the standard ant support for abuild. The old Java wrapper example has been changed to use this functionality instead of implementing it with a special build item.
The new property
abuild.include-ant-runtimehas been added to include ant's runtime libraries in your compilation class path. This removes the need to accessANT_HOME(and therefore require it to be set) when compiling custom ant tasks.Boolean
Abuild.interfacevariables are now converted to “1” and “0” for ant-based builds just as they are for make-based builds. Earlier versions of abuild used “1” and “0” for make-based builds and “yes” and “no” for ant-based builds.
Make/C/C++ Changes
Abuild now supports the creation of shared library files on UNIX platforms and DLL files on Windows platforms. It also compiles all library files as position-independent code. Users wishing to take advantage of this new functionality are recommended to rebuild from a clean state.
It is now possible to generate the preprocessed version of any C or C++ source file by running abuild
SourceFile.i.The old
dummymake rules, never previously documented, have been renamed toemptyand are now documented and officially supported.The
texinforules have been removed.
- 1.0.a20: September 4, 2007
Configuration changes
Writable backing areas are no longer supported; all backing areas are read only. The
Abuild.backingfile now contains only the path name of the backing area.Added new
deletedkey toAbuild.conf, making it possible to make build items in a backing area that are not present in the local tree inaccessible.
Invocation changes
Platform selection criteria are now supported via the
--platform-selectoror-pcommand-line option and theABUILD_PLATFORM_SELECTORSenvironment variable. This makes it possible to more tightly control which platforms will be built. Along with this, the option field, formerly known as the flags field, of object code platforms is implemented along with a recommended method for generating release and debug builds.The
allbuild set no longer ever builds items in backing areas since all backing areas are now read only. Thelocalbuild set no longer builds externals. If you wish to build the local tree and its externals as well, use theallbuild set. This makes thelocalbuild set do what people always thought it did anyway.The
--list-platformscommand-line argument lists all known object-code platforms grouped by platform type.The command abuild --dump-data will now attempt to generate dump data output even when there were errors. This makes it possible to use the dump data output to help figure out what may be causing the errors. The
errorsattribute will be present and have the value1when errors have been detected.Added
--monitoredflag to put abuild into monitored mode. This is primarily intended to support front-ends to abuild that want to monitor progress. For information, see Chapter 31, Monitored Mode.Abuild's choice of backend is no longer determined by the target type of the build item but is instead determined by the type of build file it has. This change is invisible to users of older versions of abuild as it will always do the same thing for any existing configurations. It does, in principle, make it possible to use ant for C/C++ builds and make for Java-based builds, provided the proper support code was added, and it also opens the door for supporting a wider array of backends.
In many error messages, relative paths to
Abuild.conffiles have been replaced with absolute paths.
Make changes
The
BI_RULESvariable has been renamed toBUILD_ITEM_RULES. A deprecation warning will be issued ifBI_RULESis used. This backward compatibility will be removed before 1.0.New documented flags have been added to
ccxx.mk. These changes are mostly user-invisible, but end userAbuild.mkfiles that set theDFLAGSmake variable will need to be changed.Previously undocumented toolchain-specific make flags variables have been removed in favor of using conditionals based on
$(CCXX_TOOLCHAIN).ccxx.mkhas been reworked somewhat to make it easier to write new compiler support files and to simplify overriding of debug, optimization, and warning flags. These changes are invisible to the vast majority of end-userAbuild.mkfiles but have a significant impact on toolchain support files, which prior to this release, were all included in abuild anyway. Theccxx.mkfile itself is heavily commented.
Java changes
An alternative for Java builds has been provided. In this alternative, you can write your own
build.xmlfiles with some minor limitations.Non-compatible change: there is now only one java platform,
java. The interface variableabuild.platform.bytecodeis no longer defined. Abuild no longer attempts to manage different java bytecode versions itself. However, two new properties:abuild.source-java-versionandabuild.target-java-versioncan now be set inAbuild-ant.properties. This change is invisible to people who did not either access theabuild.platform.bytecodevariable or theabuild-java5path.Bug fix: abuild will now work properly if
$(ANT_HOME)points to a path with a space it in.
Platform changes
There is no longer support for nested platform types. All the operating system-specific platform types (
unix,windows, etc.) have been removed. This is not a user-visible change since there were never any platforms in those platform types. Note that new platforms and platform types may now be added in plugins.Abuild's internal list_platforms command has moved from
private/bintoprivateand generates new kinds of output. Abuild's own bootstrapping usesprivate/bin/bootstrap_native_platform.Full cross-platform dependency support is fully implemented. It is now possible to mention a platform type and platform selection criteria on a dependency declaration using the
-platformoption in thedepskey inAbuild.conf.The
USE_MSVCenvironment variable is no longer required for using Visual C/C++. Instead, abuild will try to use it if theVCINSTALLDIRvariable is set. Based on Microsoft documentation, this appears to be a reliable test that the appropriate Visual Studio variables are in the environment.
--dump-datachangesSince writable backing areas are no longer supported, there is no longer a
writableattribute to thebacking-areaelement.The
platform-dataelement has been added. This gives overall platform information as well as build-tree-specific platform information.The
deleted-itemselement has been added tobuild-tree.Several attributes and elements have been added because of plugin support. In particular, the
is-pluginandis-plugin-anywhereattributes have been added tobuild-item, thehas-shadowed-dependenciesattribute has been changed tohas-shadowed-referencesand is also true if plugins are shadowed, and the newpluginselement has been added.The new attribute
external-depthhas been added tobuild-item. Items local to the build tree from which abuild was started are now detectable by having bothexternal-depthandbacking-depthequal to0. (They can, as before, also be detected by having their home tree be the current build tree.)With full cross-platform dependencies supported, the
dependencyelement now has an optionalplatform-typeattribute.The
build-platformsandknown-platformsattributes have been removed frombuild-item, and thebuildable-platformsattribute has been added.
- 1.0.a19: July 31, 2007
Java changes
Non-compatible change: Previously undocumented
ear-contentsandwar-classpathdirectories are no longer used. New documentedclasspathdirectory has been introduced for use in copying classpath files into archives. This mechanism may change in the future.Non-compatible change: It is no longer possible to create a local JAR file in the same build item as an EAR file. The EAR example in the Java Archive Types example has been updated to illustrate a different way to do this.
Non-compatible change: For WAR build items, the property
abuild.war-typemust now be set to eitherclientorserver.It is now possible to add arbitrary files to an EAR file and to populate an EAR file's
META-INFdirectory.
New functionality
The new
--print-abuild-topflag has been added to print the name of the abuild's installation directory.Non-compatible change: the
autofilesstatement inAbuild.interfacehas been changed toafter-buildto more accurately reflect its purpose and functionality.Interface flags are now supported. Build items can declare supported flags in their
Abuild.conffiles and can reference those flags in theirAbuild.interfacefiles. They can also specify which flags should be set for other build items in their direct dependency list.Non-compatible change: in light of the introduction of interface flags,
BI_PRIVATEandPrivate.mkare no longer supported. The private interface example illustrates how to support this construct in a cleaner way using interface flags.Build item traits are now supported. This allows build items to be grouped based on functionality or relationships to other build items that fall outside of the dependency graph.
Several examples in the documentation have been updated to demonstrate new functionality. Some new examples have also been added.
It is now possible to reset a variable in
Abuild.interfaceusing thereset,reset-all, andno-resetstatements. Please see the relevant sections of the document to understand how these work and the subtleties of their use.Externals that are resolved through backing areas now appear in the
--dump-dataoutput with thebacked="1"attribute. Before, they did not appear at all.Information about traits and flags have been added to
--dump-dataoutput.All whitespace-separated lists have been removed from
--dump-dataoutput and have been replaced by nested elements instead. This made room for inclusion of flag and trait information in the dump data output and also makes it easier for applications to parse the XML.
Bug fixes
Incorrect regular expression could cause “memory exhausted” to be printed when certain syntax errors appeared in
Abuild.conffiles.Several cases involving whitespace handling were fixed in the interface parser. Specifically, the following patterns could result in parse errors: trailing whitespace at the end an interface file without a line terminator, a continuation character in a file with Windows-style newlines, and a continuation character followed by a line that did not start with a space.
Path comparison on Windows is now case-insensitive when computing one path relative to another. When asking for one path relative to a path on a different drive, the first path is returned unchanged. This should make abuild itself able to use backing areas on different drives, though this case has not been thoroughly tested.
Short forms of command-line options added in 1.0.a14 have been added to abuild --help's output.
- 1.0.a18: July 18, 2007
Run junit tests with
fork="true"for better performance.Support added for WAR files.
The
src/javadirectory is now optional. It makes sense to omit it for some WAR files as well as for JAR files that consist entirely of resources or automatically generated code.In order to support a wider range of java archive types, the
abuild.jar-nameandabuild.ear-nameproperties inAbuild-ant.propertiesmust now include the filename extension of the archive file.
- 1.0.a17: July 9, 2007
Implemented new build item accessibility scheme that allows nested namespace scopes. To upgrade your build item names, please run
misc/upgrade-scope-namesfrom the abuild installation directory. Two consecutive dashes (--) no longer has any special meaning in build item names. Abuild also no longer requires the public parent of a private build item to exist. For details on the new accessibility system, see Section 6.3, “Build Item Name Scoping”.Added optional
visible-tofield to theAbuild.conffile to allow build items to expand their visibility as otherwise restricted by the new scoping rules. This is also an optional attribute toBuildItemin the--dump-dataoutput.Added “mixed classification” example to the complete example section. This shows a pattern of how one might organize build items in a mixed classification environment. It also shows a real-world application of the new
visible-tofield in theAbuild.conffile.Added an optional
descriptionfield toAbuild.conf. This is for informational use only. It appears in the--dump-dataoutput if present.Run pre- and post- compile and package hooks in Java even if the compile and package targets are not being run. This makes it possible to, for example, generate wrappers from post-package hooks even if no packages are being created. The Java example has been enhanced to illustrate this case.
Bug fix: autoconf rules have been modified slightly so that they should work properly when
--make-jobsis used.Added cygwin as a valid platform type as distinct from Windows. Although abuild should in principle work just fine if compiled as a cygwin application, this has not been tested and there is no intention of actually supporting it. However, there's also no good reason to hard-code into abuild the idea that when cygwin is present, it means Windows, not cygwin.
Change layout of source directory: manual sources are now in
src/manualand dump data DTD is now in thesrcdirectory. The compiled manual in PDF and HTML formats along with the DTD are included in thedocdirectory in the binary distribution.
- 1.0.a16: June 22, 2007
Abuild no longer has to be in a directory called
abuild. Instead, it looks above the full path of the abuild executable for a directory that containsmake/abuild.mk. This means it's possible to install abuild under a directory namedabuild-version, for example.The ant
packagetarget has been recoded to avoid multiple invocations of thecompiletarget.A small error was corrected in
abuild_data.dtd. A test case has been added to ensure that it is always accurate in future releases.
- 1.0.a15: June 18, 2007
Basic Java support has been added.
Add
-mlongcallto vxworks compilationThe documentation has been reorganized somewhat for greater clarity. The contents of the example files have been moved to an appendix at the back of the document which makes them easier to separate when going through examples.
A standard doc target has been added, though it does not yet do anything for make-based target types
The test and check targets are now identical in functionality. It used to be that test did not depend on all, but this is no longer the case.
Abuild now looks in the
qtestdirectory rather than thetestsfor qtest test suites.Environment variables may now appear in interface files using the syntax
$(ENV:VARIABLE). Use sparingly.When cleaning with a clean set, items that have no build files are skipped.
The
--argument has been dropped in favor of--makeand--antoptions which pass arguments specifically to make or ant. Both options can be specified so that a mixed build can pass different arguments to make and to ant.The style of element names used in
--dump-datahas been changed fromThisStyletothis-styleThere is no longer a default value for the
platform-typeskey inAbuild.conf. Theupgrade-interfacesscript that assists with upgrading from pre-1.0.a14 versions of abuild will create values when necessary based on the old rules.Build item names are restricted to containing only alphanumeric characters, underscores, periods, and dashes.
Added
--dump-build-graphdebugging option.
- 1.0.a14: May 18, 2007
A new XML-based
--dump-dataformat has been implemented.Short forms of
--build=set,--clean=set, and--with-depsoptions have been provided. See command line syntax for details.Clean sets are no longer automatically expanded to include recursively expanded dependencies. The
depsandcurrentbuild/clean sets have been redefined to explicitly include expanded dependencies and therefore have no change of semantics. The main result of this change is that running--clean=descnow no longer ever cleans anything not below the directory from which abuild was invoked.The option to pass
VAR=valuearguments to abuild and to have those passed on to make has been removed. If you need to do this, place these arguments after--, since all those arguments are passed directly to the backend anyway.The documentation was updated to accurately reflect recent changes of platform handling, the new interface system, and refactoring that was performed during the C++ port.
Implementation of completely new interface system. Interfaces now use
Abuild.interfaceinstead ofInterface.mk. The new interface files are loaded internally by abuild and are no longer tied to GNU Make.Remove Windows-only
XLIBSinterface variable. Instead of appendingxyztoXLIBS, appendxyz.libtoXLINKFLAGS. (Note: in a later change, we now recommend using LIBS and LIBDIRS for third-party libraries just as you would for your own libraries.)Bug fix: detect parent/child loops better while reading
Abuild.conffiles. Parent loops were previously detected properly, but child loops were not necessarily detected.Terminology change: “architecture” is now “platform”, “architecture category” is now “platform type”, and “architecture class” is now “target type.” The
archkey inAbuild.confis nowplatform-types. Thearchclasskey inAbuild.interfaceis nowtarget-type.Changes to platform identifiers: this release includes an early implementation of the new
os.cpu.toolset.compiler[.flags]format.The
vc7C/C++ toolchain is now calledmsvcsince it works with Visual C++ version 8 as well as version 7. The environment variable USE_MSVC, rather than USE_VC7, now selects it.
- 1.0.a13: May 1, 2007
Abuild, previously implemented in Perl, was rewritten in C++.
For compilers that support it, gen_deps is bypassed in favor of the compiler's internal dependency generation capabilities. This will improve build performance for those compilers. As of 1.0.a13, the only compiler that produces exactly what abuild needs is gcc.
The default optimization for gcc and xlc has been changed from -O3 to -O2 as many people have reported problems with -O3. For most cases, -O3 will not make a big difference in performance, but there are some cases in which it can be a significant difference. For those cases, it is still possible to override this for individual files or individual build items if desired.
Abuild no longer provides the variables
abHOST_ARCH,abHOST_OS,abHOST_DIST, orabHOST_CPUas they did not previously contain reliably useful values and were never documented.When looking for GNU Make, abuild now checks all occurrences of gmake and then of make in the path, stopping with the first one that appears to be GNU Make version 3.81 or newer. It previously checked only the first occurrence of make or gmake and required that occurrence to be GNU Make 3.81 or newer.
Abuild now only checks for GNU Make if at least one build item requires it.
Abuild no longer calls umask 002 before starting to build. This means that it will not create group-writable files unless the calling user's umask is set appropriately. The old behavior of calling umask 002 was a vestige of the past when it was common for multiple users to be building in the same directory. Although this may sometimes still be desirable, it's not the place of abuild to override the user's umask setting.
Starting in version 1.0.a11, abuild no longer creates
.ab-dynamic.mkoutside of architecture directories. Versions 1.0.a11 and 1.0.a12 deleted stray.ab-dynamic.mkfiles created by older versions of abuild. This version no longer does. If you are upgrading from a version older than 1.0.a11, you should manually remove any.ab-dynamic.mkfiles that are left lying around. Since abuild automatically creates those that it needs on each run, running find . -name .ab-dynamic.mk -exec rm {} \; will do the job.The
--host-archcommand line argument was removed.
- 1.0.a12: April 2, 2007
It is now possible to specify that a library should be linked in its entirety by defining the variable
WHOLE_lib_libnamefor librarylibnamein theInterface.mkfile that provideslibname. For systems that use the gnu linker, this results in the--whole-archiveflag being used for the specified library. Note that not all systems support this feature, so this behavior should not be relied upon when not absolutely necessary.
- 1.0.a11: March 30, 2007
Move
XLINKFLAGSto the end of the link step (afterLIBS) for all C/C++ compilers.The
-jflag now controls how many build items abuild will attempt to build in parallel and is no longer passed to make. The new command-line option--make-jobscan be used to pass the-jflag to make.Abuild no longer uses any recursion at all. Rather than having a top-level abuild process invoke subsidiary abuild processes for specific builds, abuild computes all the directories in which builds will be run and invokes the backend directly in each directory. Abuild now manages all of its build order computations and parallelism computations itself rather than relying on GNU Make. This means that abuild now uses GNU Make only for performing the actual compiles, which greatly simplifies abuild's make code and makes it much more able to support alternative backends. A pleasant side effect of this change is that abuild runs much more quickly and no longer needs to cache any information. A version of abuild to appear in the very near future will change the mechanism through which build items publish their build interfaces, eliminating
Interface.mkand replacing it with some other mechanism.Abuild no longer creates
.abuild-cache.*directories at all and also no longer creates.ab-dynamic.mkfiles outside of architecture subdirectories.
- 1.0.a10: March 26, 2007
Various Windows portability fixes including changing cache file names to make them shorter.
Deprecated debugging flag removed from VC7 toolchain support file.
Abuild now works when run via a symbolic link. In other words, it now works to add a symlink called abuild in your path and have it point to the real abuild. If you attempted to do this in prior versions, you would get an error because abuild would not be able to find its data files.
The support test framework is now called
qtest, and the name of its driver isqtest-driver. Abuild has been updated with the new name information.Bug fix: abuild was previously invoking qtest-driver in a manner such that test coverage files would never been seen. This is now fixed. (Requires the qtest version >= 1.0.a1 as well.)
- 1.0.a9: March 14, 2007
Use
$WIND_HOMEinstead of/opt/WindRiverto find the vxworks toolchain.
- 1.0.a8: March 13, 2007
Change the hacked vxworks support to be just a little bit less hacked. Abuild no longer uses the hacked toolchain on hydra1; it now recognizes the vendor-supplied cross compiler toolchain if installed in
/opt/WindRiver, resulting in working C++ support for a Linux Intel to vworks ppc cross compilation. This is still a temporary solution, but it is closer to the real thing.
- 1.0.a7: March 7, 2007
Make a few changes to the temporary vxworks support to allow C++ compilation to succeed.
- 1.0.a6: March 6, 2007
Abuild now loads
Interface.mkfiles in forward rather than reverse dependency order. In order to avoid having to change all theInterface.mkfiles to ensure that library ordering is still correct, special case code has been added to handle theINCLUDES,LIBS, andLIBDIRSvariables. This turned out to be a temporary solution, as hoped. For a detailed description of this change, please see the 1.0.a6 documentation.Abuild now loads the C/C++ toolchain configuration before loading any architecture-specific rules. This means that the
autoconfrules will know the proper C/C++ toolchain even if theccxxrules are not also loaded.Bug fix: some of the
XCFLAGS-like variables were not being used at all the right places after the refactoring of the toolchain support.
- 1.0.a5: March 5, 2007
Bug fix: don't include
Interface.mkfiles for build items whose architecture categories don't match what is being built.
- 1.0.a4: February 23, 2007
Change VxWorks support so that library targets build normal
.afiles and executable targets build.outfiles that can link with libraries. This is still not necessarily the final way it's going to work.
- 1.0.a3: February 20, 2007
Fix
.LIBPATTERNSwarning on VxWorksDetect when a build set contains no buildable items and exit cleanly without attempting to build.
- 1.0.a2: February 19, 2007
The strings
as Coras C++are included in abuild's output when compiling C and C++ respectively.Internal
makedirectory has been reorganized. The two changes that affect the documentation are thatmake/rules/arch-indepis nowmake/rules/indepandmake/rules/arch-depis nowmake/rules/archdep. Other changes were also made.Hacked in support for xlc (IBM compiler) and vxworks. The xlc and vxworks are specific to a particular configuration and will disappear in a future release when a suitable facility is added for extending abuild with external rules.
The beginning of multiple architecture support has been implemented. It now works to set
archinAbuild.conftonative vxworksto build for both the native platform and for VxWorks or to set it tovxworksto build for VxWorks only. The rest of the documentation has not been updated to reflect this yet.
- 1.0.a1: February 8, 2007
Separate specification of private interfaces are now supported through use of the
Private.mkfile. (This mechanism was changed in a later release.)Abuild now enforces that
BI_RULESinAbuild.mkmay not contain inaccessible private build items.
Table of Contents
This chapter presents a summary of the major changes to abuild that were introduced in version 1.1. If you are already familiar with abuild 1.0, this material should help you come up to speed with version 1.1 fairly quickly.
With few exceptions, abuild 1.1 is able to build trees that
version 1.0 could build, which should make it possible, in almost
all cases, to operate in a mixed 1.0/1.1 environment during a
transitional period. Once you are ready to start taking full
advantage of new functionality in 1.1, it is recommended that you
upgrade your trees. Abuild includes a utility that will do
almost all of the work of upgrading your
Abuild.conf files. You will have to perform
upgrades to your Abuild.mk files manually,
though there are relatively few such upgrades, and most build
items will not require any changes. For details on the upgrade
process, please see Appendix C, Upgrading from 1.0 to Version 1.1.
Warning
Please do not use the list below to try to upgrade your build
trees manually. You shouldn't go through this list and start
manually fixing your Abuild.conf files.
Doing this will only waste your time and making the automated
upgrade process less reliable. There is a lot of complex logic
involved in doing the upgrades, so you're best off leaving it to
abuild which has the benefit of knowing the entire build tree
structure of all your trees. Refer to Appendix C, Upgrading from 1.0 to Version 1.1 for details.
As a general rule, we avoid making non-compatible changes in abuild minor releases. There are some instances, however, in which supporting the old feature is very difficult or problematic in comparison to fixing existing build trees. In all cases, there is a solution that provides the desired functionality that will work in a hybrid 1.0/1.1 environment.
The make backend now loads the toolchain support file before your
Abuild.mkfile. This will almost never make a difference, and it allows build items to manipulate or override variables defined by the toolchain. This greatly simplifies things like selectively overriding warning or optimization flags, and is also used by the new variables that allow for tighter configuration of themsvctoolchain. It's possible that certain incorrectAbuild.mkcode that you might have gotten away with in the past may cause problems now as a result of this change. This is discussed in Section C.2, “Potential Upgrade Problems: Things to Watch Out For”.Absolute path externals are no longer supported. Use of the absolute path externals or of the
-winpathoption in the external-dirs key will result in an error message. If you are relying on absolute path externals, you can replace them with relative-path externals, and make the relative path externals be empty except for anAbuild.backingfile that points to the absolute path previously referenced. This provides the exact functionality of the absolute path external. You will use this only as a temporary workaround, since after you upgrade your trees to version 1.1, you will no longer have any external-dirs keys.Read-only externals are no longer supported. In abuild 1.1, you can force parts of your build tree to be read only by using the much more flexible
--ro-pathand--rw-pathoptions, described in Chapter 12, Explicit Read-Only and Read/Write Paths. In order to allow hybrid 1.0/1.1 environments to work properly, abuild 1.1 will allow the-rooption to be specified in yourAbuild.conf's external-dirs keyword, but it will issue a warning and ignore the option. Once you upgrade to version 1.1, you will no longer have any external-dirs keys anyway.The value of the parent-dir key must now point up in the file system. That is, if the value has more than one path element, every path element must be “
..”. (So, for example, “../..” is valid.) Once you upgrade your build trees to abuild 1.1, you will no longer have any parent-dir keys. This check for existing parent-dir keys effectively just makes sure that whatever abuild 1.1 would now automatically figure out is consistent with you explicitly specified in your 1.0 trees.Each value of the child-dirs key must now point down in the file system. That is, the path element “
..” may not appear in a child-dirs key. This check is important to ensure that whatever parent/child relationships between build items abuild 1.1 would now automatically figure out is consistent with you explicitly specified in your 1.0 trees.The values of child-dirs keys may not be or cross over any symbolic links. In most cases, use of symbolic links for child directories would not have worked in abuild 1.0 anyway and would have resulted in a cryptic error message. Now abuild explicitly detects and disallows this case.
If you use multi-element paths in your child-dirs keys (skipping directories), none of the intermediate directories may contain
Abuild.conffiles. In other words, you can't interleave unrelated abuild trees. Trying to do this with abuild 1.0 would have been crazy anyway, but abuild would not have noticed if you tried. Now it will notice and prevent you from doing so. This check is required in order to ensure that abuild 1.1 is always able to accurately locate the parent of any build item.
This section includes a complete list of all features from
abuild 1.0 that are deprecated in abuild 1.1. Use of any of
these features will generate a warning when running in
1.0-compatibility mode. When running in 1.1-compatibility mode,
these features will not be recognized. Depending on the nature
of the feature, this may result in an error (such as using a
deprecated Abuild.conf key), and in other
cases, use of the feature will be ignored (such as setting a
particular make variable).
Warning
You should avoid trying to upgrade your
Abuild.conf files by hand. See earlier
warnings in this chapter, and refer to Appendix C, Upgrading from 1.0 to Version 1.1 for details.
-
Abuild.confkeys Use of the this key is deprecated. This key has been replaced by name. When you run abuild --upgrade-trees (described in Appendix C, Upgrading from 1.0 to Version 1.1), your
Abuild.conffiles will be updated automatically.The deleted key is deprecated. Item deletion is now specified with the deleted-items key in the
Abuild.backingfile.The external-dirs key is deprecated. External build trees have been replaced by tree dependencies as discussed in Section B.5, “Redesigned Build Tree Structure”
The parent-dir key is deprecated. Abuild 1.1 automatically finds parent build items, thus rendering the parent-dir unnecessary.
- GNU Make variables
BUILD_ITEM_RULESis deprecated and has been replaced by a new and more flexible mechanism for specifying build-item supplied rules. See Chapter 22, Build Item Rules and Automatically Generated Code for details.LINK_SHLIBSis ignored and treated as if it were always set. This change was actually made in version 1.0.3, but now use ofLINK_SHLIBSgenerates a deprecation warning.
- Properties for deprecated ant framework
abuild.use-local-hooksis deprecated; abuild's ant framework now acts as if this is always on. Note that the entire 1.0 ant framework is considered deprecated.
- Command line arguments
The
--antoption is no longer supported since abuild no longer invokes ant. However, for backward compatibility, abuild will still look through any--antarguments for arguments of the form-Dprop-valand treat them as regular variable definitions (specified as justprop=valin abuild 1.1).
- Interface Variables
The variable
ABUILD_THISshould no longer be used as it has been replaced by the more descriptively namedABUILD_ITEM_NAME. However, it is not actual deprecated since abuild has no way to detect and report its use in build files. As such,ABUILD_THISwill likely not be removed in a future version of abuild, though its use in new code is discouraged.
-
Abuild.backingfiles In abuild 1.1, there is a new syntax for
Abuild.backingfiles, and backing areas are at the forest level rather than at the tree level. (For details, see Chapter 11, Backing Areas.)Abuild.backingfiles that just contain a path name are deprecated.
This section describes small, localized changes to abuild. Some of changes described here are small changes that be accommodated by editing individual build or configuration files. Others are new, special-purpose features.
When abuild is invoked with no options, the effect is now as if the
--with-depsor, equivalently,--build=currentoption had been specified. To select the old behavior of building just the item without its dependencies, use the newly added--no-depsoption.The preferred way of passing variables to backend build systems is now to specify
VAR=valueon the command line. Such definitions are passed to all backends. You should use this rather than the--makeor (now deprecated and mostly unsupported)--antoption.Abuild has a new online help system, described in Chapter 8, Help System. The targets rules-help and interface-help have been removed in favor of the new system.
Abuild now prints elapsed clock time before it exits.
When one or more build items fail, abuild now provides a summary that lists the failed build items.
It is now possible to declare local and non-recursive interface variables and also to declare and initialize interface variables in a single statement. For details, see Chapter 17, The Abuild Interface System.
The new
Abuild.confkey name replaces this as the way to provide the name of a build item. Note that you should not go around replacing this with name manually in existingAbuild.conffiles as abuild will do this automatically when you run abuild --upgrade-trees (Appendix C, Upgrading from 1.0 to Version 1.1).The new
Abuild.confkey attributes can be used to assign particular supported attributes to build items. For details, see Section 15.1, “Abuild.confSyntax”.It is possible to declare plugins to be global. Global plugins are discussed in Section 29.2, “Global Plugins”.
Build item dependencies and also newly added build tree dependencies can be declared optional; see Chapter 28, Optional Dependencies. To go along with this, child directories specified in child-dirs can also be made optional.
The
ABUILD_FORCE_32BITenvironment variable is no longer considered temporary, and theABUILD_FORCE_64BIThas been added to encourage abuild to generate code of the specified word size. It is initially only supported for builds that use the gcc compiler. A future version of abuild may offer a better solution.The
msvctoolchain can now be configured to make it easier to support different runtime and management flags, making it possible to build applications that statically link the runtime environment or work with the .NET framework. For details, see Section 18.2.2, “Options for themsvcCompiler”.Shared library version information is now partially supported when building DLL files. For details, see Chapter 21, Shared Libraries.
The behavior of when expansion of the build set is repeated during application of
--related-by-traitshas changed and is now controlled by--repeat-expansion. For details, see Section 33.5, “Construction of the Build Set”.The new argument
--with-rdepscan be used to add reverse dependencies of all specified items to the build set.The new command line option
--findhas been added to print the location of build items or build trees.The new command line options
--ro-pathand--rw-pathhave been added to allow certain parts of the build tree to be treated as read only. For details, see Chapter 12, Explicit Read-Only and Read/Write Paths.The new command line argument
--compat-leveland environment variableABUILD_COMPAT_LEVELhave been added to specify abuild's compatibility level. Abuild will not support any features that were deprecated at a version equal to or older than the specified compatibility level.Some build sets will build more items in an upgraded forest than they would have in version 1.0. For example, the build set
allnow really builds all items including those in trees that your starting build item's tree doesn't depend on. Also, the build setdescwill really include all build items at or below the current directory even if they are in trees that are not dependencies of the current tree.A new build set,
deptrees, has been added. This build set includes all items in the current tree and its tree dependencies. It essentially does whatalldid in version 1.0. These concepts are described in Chapter 7, Multiple Build Trees. See also Section B.5, “Redesigned Build Tree Structure”.The clean target is no longer passed to the backend when abuild is invoked from an output directory. All clean targets have been removed from rules provided by abuild and from the examples.
Platform-specific dependencies on object-code build items are now influenced platform selectors. To create a dependency on the default platform of a given platform type regardless of platform selectors (which was the old behavior), specific
-platform=in your dependency declaration.type:defaultThe list_platforms script, for plugins that add platforms, is now invoked with information about the native platform. See Section 29.3.2, “Adding Platforms”.
A new utility has been added to help with caching the results of code generators. For details, see Section 22.6, “Caching Generated Files”.
A new file,
preplugin.mk, can now contain make code to be run by every selected plugin beforeAbuild.mkis loaded. This can be used to provide initialization of certain variables, among other purposes.QTest support now automatically exports the
TC_SRCSvariable to the environment, so individualAbuild.mkfiles no longer need to do so.The verify-compiler command now accepts the
--crossoption to better support cross compilers that are in the native platform type. See Section 29.4, “Adding Toolchains” for a discussion.
An entirely new backend has been added to support Java builds, replacing the ant framework from abuild 1.0. The new framework uses ant through a Groovy backend. For details, see Chapter 19, The Groovy Backend.
Abuild 1.1 introduces a new build tree structure that replaces externals with named trees and named tree dependencies. In abuild 1.0, one build tree established a one-way relationship with another tree, gaining the ability to use the other tree's build items without making its own build items available to the other tree, by declaring the other tree as an external. Externals were set up by specifying a relative path to the other tree. Externals could be resolved in backing areas by resolving that relative path as relative to the backing area instead of to the tree itself.
There were three major problems with this approach. The first and most important problem is that externals were based on path. Not only is this in violation of a fundamental design principle of abuild, but it forced build environments with multiple trees to organize those trees in a strict relative directory structure. Worse, knowledge of that directory structure was not contained in any one location but was, instead, spread out among all the root build trees in the system. This made it very hard to reuse specific trees across multiple projects or even across multiple configurations of the same project. The second problem with the 1.0 scheme was that there was no way for you to get a complete list of all the trees that comprised any given build environment. The third problem is that the interaction with backing areas an externals was too complex and didn't scale. People were never really able to understand how backing areas and externals interacted.
Abuild 1.1 resolves all of these problems by requiring build trees to be named and by setting up the one-way relationship among build trees through named tree dependencies. The new mechanism is discussed in detail in Chapter 7, Multiple Build Trees. Here is a brief summary of the changes:
Abuild 1.1 introduces the term build forest to refer to the collection of all the build trees that are built together. The 1.1 concept of build forests roughly corresponds to an abuild 1.0 build tree with all of its externals.
The this key has been replaced with name.
Build trees are required to be named. Root build items must contain a key called tree-name which gives the name of the tree.
Rather than using the deprecated external-dirs key to indicate by path a one-way dependency on another build tree, use tree-deps to indicate this dependency using the name of the other build tree. This removes abuild 1.0's flawed use of paths for this purpose.
The parent-dir key is no longer used.
It is permissible to have
Abuild.conffiles above the roots of all your build trees that contain onlychild-dirskeys. These files, in addition to build tree root files, may be roots of the entire forest of build trees.
Additionally, the way backing areas work has been significantly improved. Backing areas are discussed in Chapter 11, Backing Areas. Here is a summary of the changes:
Backing areas are at the forest level, not at the tree level. When abuild 1.1 is used, any given development effort requires only a single
Abuild.backingfile, and that file will be located at the root of the forest. In 1.0 compatibility mode, abuild will still use information from old styleAbuild.backingfiles at the roots of not-yet-upgraded trees in the forest, though such files are considered deprecated.Abuild.backingfiles are now key/value pairs likeAbuild.conffiles. Valid keys are backing-areas, deleted-trees, and deleted-items.The paths to your backing areas are specified as the value to the backing-areas key in
Abuild.backing. You may now have multiple backing areas. Abuild will issue an error if unrelated backing areas try to supply build items or build trees with the same name. (If one of your backing areas backs to another one of your backing areas, abuild will notice this case and handle it appropriately.)The deleted key is no longer valid in
Abuild.conf. Instead, use the deleted-items key inAbuild.backing. In 1.0 compatibility mode, abuild will still read the information from theAbuild.conffile and treat it as if it had been read from anAbuild.backingfile.It is possible to suppress inheritance of entire trees from backing ares using the deleted-trees key in
Abuild.backing.
Table of Contents
Note
Abuild is purposely stealth about pinpointing specific locations of outdated constructs in trees that are not upgraded to encourage you to use the automated upgrade process. If you are working in a previously upgraded tree and some deprecated feature has snuck back in but you can't find where it is, the easiest way to find it is to run in 1.1-compatibility mode. Most outdated constructs will generate errors in 1.1-compatibility mode.
Abuild 1.1 offers many new capabilities relative to 1.0. These
are summarized in Appendix B, Major Changes from Version 1.0 to Version 1.1. Among the
most significant of these changes is the redesigned build tree
structure. When abuild 1.1 is run on a set of build trees that
were created to work with abuild 1.0, it internally maps the old
structure into its new representation. Abuild can make this
mapping explicit by actually upgrading your trees from 1.0 to 1.1.
To use abuild to upgrade your trees, you can run the command
abuild --upgrade-trees. Abuild will analyze
your build area and generate a file that you have to edit. By
editing this file, you supply the information that abuild can't
possibly know on its own. Once all the information is available,
abuild will rewrite your Abuild.conf and
Abuild.backing files. In this chapter, we
discuss a general strategy for upgrading and then proceed to
provide specific instructions.
Abuild 1.1 can operate in 1.0 compatibility mode. If you are testing out abuild 1.1 on a build tree that is still under active development with abuild 1.0, you should obviously wait before you try to upgrade the trees. Once you have upgraded your build trees, abuild 1.0 will no longer be able to build them.
As a general rule, it's best to start your upgrade process with build trees that don't have any backing areas. This will save you a lot of trouble. Most of the time, if you have backing areas and your backing areas are already upgraded, abuild's upgrade process can run without any intervention. But we'll come back to that in the next section.
Once you are ready to start upgrading, the first thing you should do is to make sure your build is working with abuild 1.0. You must be sure to start with this as a known baseline so you can be sure problems that you find during upgrade weren't already there.
The next thing you should do is to make sure your build still
works with abuild 1.1 running in 1.0-compatibility mode, which
you can enable by passing --compat-level="1.0"
on the command line or by setting the environment variable
ABUILD_COMPAT_LEVEL to
“1.0”. There are a small number
of non-compatible changes (Section B.1, “Non-compatible Changes”). If your build trees run
into any of those, you should try to fix them in a way that is
still compatible with abuild 1.0. You should fairly quickly be
able to reach a point where you have a build tree that builds the
same way under 1.0 and 1.1. Only when you have reached this
stage should you attempt to upgrade. If you run into trouble
during this process, ask for help or consult Section C.2, “Potential Upgrade Problems: Things to Watch Out For”.
Once you have your build trees in a state where your build
produces identical results with both abuild 1.0 and 1.1, you
should find a directory that is above all the trees you are
trying to upgrade. If your intention is to upgrade an entire
forest of trees at once, meaning that you wish to upgrade a
collection of build trees that refer to each other through
external-dirs, you should go to a common
ancestor of all those trees. This will be the root of your
upgraded build forest. If you only wish to upgrade specific
trees, you can just go to the root of the trees you are
upgrading. The upgrade process will allow you to upgrade your
forests a little bit at a time. This is especially important for
distributed development environments in which different trees are
maintained by different teams. Whichever case you pick, your
starting directory must either contain a root build item or be
above the top of trees with root build items. You can't pick a
directory that's in the middle of a build tree. For example, you
can't start in a directory that has a
parent-dir key or that is referred to as a
child in a higher Abuild.conf file.
Once you have identified your start directory, you should run abuild --upgrade-trees and follow the upgrade process as described in Section C.3, “Upgrade Procedures”. At the end of that process, your trees will be upgraded, but you are not done yet! There are still a few ways in which things can be broken, so read on.
After you have finished this stage of the upgrade process, you should once again run abuild in 1.0-compatibility mode to make sure your build still works. If you run into problems, please consult Section C.2, “Potential Upgrade Problems: Things to Watch Out For”.
Once your build is once again working as it should, you will want
to address deprecation errors that are reported by the backends.
Mostly this would involve moving build item-supplied rules from
Rules.mk to their new locations under
rules (see Chapter 22, Build Item Rules and Automatically Generated Code ) and then replacing
BUILD_ITEM_RULES with appropriate
RULES entries by the items that use them. You
could also remove LINK_SHLIBS variables that
you find. After you have done this, you should hopefully reach a
point where you are no longer getting any deprecation warnings.
When you think you have eliminated all deprecation warnings, you
should retry your build in 1.0-compatibility mode with the
--deprecation-is-error flag. In this mode, any
deprecated features will be reported as errors instead of
warnings. Once your build gets past this point, then you can be
confident that you are no longer using any deprecated features.
If you have upgraded a tree that has externals that point into an area that has not yet been upgraded, though you won't be getting any deprecation warnings, abuild will still tell you that it sees deprecated features and that you should upgrade. This is because your root build item will still have a external-dirs key in it. Abuild is not warning you about it specifically because there's nothing you can do about it if the directory it points to is the root of a tree that hasn't been upgraded yet. The solution to this problem is to run the upgrade process from a higher level directory to upgrade the other tree. If you can't do that, you'll just have to wait until the other tree is upgraded. As soon as it is, abuild will notify you that you have an external-dirs that points to the root of an upgraded tree. Then you can run abuild --upgrade-trees again to let abuild replace the external-dirs key with tree-deps. In the mean time, you will continue to see the upgrade suggestion until all your build trees have been upgraded.
When you finally get to the point where all your build trees are
upgraded, you should once again run with the
--deprecation-is-error flag. This will give you
one last check that you are not using any deprecated features.
Once that passes, you are finally ready to try running in
1.1-compatibility mode. To do this, either run abuild with
--compat-level=1.1, set the
ABUILD_COMPAT_LEVEL environment variable to the
value “1.1”, or just unset
ABUILD_COMPAT_LEVEL and don't specify a
compatibility level on the command line. If all goes well, you
should see no difference. Once you have reached this point, you
can be sure that your upgrade process is complete.
For the most part, abuild upgrades are expected to be quite smooth as extensive testing as been done to abuild's compatibility mode. There are a few subtleties that might cause problems. Here are some things to watch out for.
If you have upgraded some trees in a forest and not others, you may have build trees that are fully upgraded except that they still contain external-dirs keys in their
Abuild.conffiles. If this happens, when you run abuild, you will get a warning that tells you that you should run abuild --upgrade-trees. However, if you try to run the upgrade process from the root of that tree, it will tell you that there is nothing to upgrade. The solution is to run the upgrade process from a directory that is above all the externals that are still there. Once the externals are upgraded, then abuild will be able to replace the remaining external-dirs keys with tree-deps.In abuild 1.0, if you have a collection of trees that refer to each other through their external-dirs keys, in the context of any tree, abuild only knows about items that are reachable from that tree. In abuild 1.1, abuild knows about all items that are reachable from any tree in the forest. For example, if you have trees
AandBthat both refer toCbut don't refer to each other, in abuild 1.0,AandBcould have build items with the same name. This would work because abuild would never know aboutAandBat the same time. If you came along later and make build treeDrefer to bothAandB, you would get an error message at that time since abuild would complain about seeing the same item in multiple locations. In abuild 1.1, abuild would know about all three trees and would immediately complain thatAandBboth contained an item with the same name. So it's possible that, after running the upgrade process, you may need to rename some build items. If you have been careful to stick to build item naming conventions that avoid duplications across tree boundaries, you should not run into this problem. During alpha testing of abuild 1.1, at least one case was encountered in which a build item had been copied from one tree to an unrelated tree without changing its name. Abuild was able to upgrade the all the trees and complained about the problem after the upgrade was finished.When abuild 1.1 encounters a build item with neither a tree-name key nor a parent-dir key, and if that build item is not referenced as a child of the next higher build item, abuild can't tell whether it is the root of a non-yet-upgraded build tree or whether it just hasn't been properly added to its parent's
Abuild.confas a child. In 1.0-compatibility mode, abuild will guess that it's missing from its parentsAbuild.confif there is a name key. Otherwise, it will guess that it is the root of a forest. In 1.1-compatibility mode, abuild will issue an error. If you are running in 1.0-compatibility mode on upgraded trees and you get unexplained errors about build items not being known, you might first try running in 1.1-compatibility mode where you might get a better error message. If you have intentionally left it out of the parent'sAbuild.conffile because you want to disable the build item for some reason, then you must either enter this directory in the ignored directories section of theabuild.upgrade-datafile or add it back as a child of its parent during the upgrade process and remove it again later.In the make backend, compiler toolchain implementation files are now loaded before
Abuild.mk. Most of the time, this won't matter, but sometimes it might, particularly in the case of errors inAbuild.mkthat may have not mattered before. For example, aAbuild.mkfile may check to see whether a variable is defined or not and take some action based on that. If the variable in question is defined by a toolchain support file, it could change the semantics of such a check. At least one case was found during testing in which aAbuild.mkfile assigned toXCPPFLAGSusing “:=” inAbuild.mkthus overwriting values supplied by the interface system. Additional values supplied by the toolchain support file in turn modified the value as supplied by the user'sAbuild.mk, which allowed the incorrect assignment to go unnoticed. With the 1.1 load ordering change, the error inAbuild.mksuddenly caused the build to stop working.Again, in the vast majority of cases,
Abuild.mkfiles should not need to be changed as a result of this ordering change, but if yourAbuild.mkis inspecting or modifying variables that are also used by the toolchain support files, you may see a slight change in semantics.
This section covers the specific steps involved in running
abuild --upgrade-trees to upgrade the
Abuild.conf and
Abuild.backing files in your tree. Recall
that this is only one step of the overall upgrade process, though
it is the most significant step.
Note
The abuild --upgrade-trees process will create some new files and will remove or modify some old files, always saving the old versions. When you run abuild --upgrade-trees, it is highly recommend that you capture the output using script or tee so you can see a log of exactly which files were removed, added, and changed by the process.
Here is an outline of the basic process:
Change your current directory (cd) to a directory that is above all your build trees and that you wish to use as the new forest root. This should be a common ancestor of all the trees you wish to upgrade.
Run abuild --upgrade-trees.
Abuild analyze all
Abuild.conffiles that it finds at or below your starting directory. It will then generate a file calledabuild.upgrade-datathat you will have to edit. Edit the file as described below.Once you have filled in all required information in
abuild.upgrade-data, rerun abuild --upgrade-trees. This time, it will perform the upgrade by rewriting anyAbuild.conforAbuild.backingthat needs to be rewritten. The original file will be renamed toAbuild.conf-1_0orAbuild.backing-1_0. When you are satisfied with the upgrade, you can delete the*-1_0files, as those files are never used by abuild. You should also be sure to remove deleted files and check in added and modified files with your version control system. Remember that, in addition to modifying files, some files may be added or removed.
Generally, if you have a backing area, you should upgrade the backing area first. If your backing areas are set up such that each tree backs to the corresponding tree in the backing area and if you have not added any new trees in your area, the upgrade of your regular area may work without any intervention, as abuild will use the backing area to figure out tree names for trees that are backed.
Among the most significant changes to abuild for version 1.1
is the requirement that all build trees have names. In order
for abuild to upgrade your trees from version 1.0 to version
1.1, it will need to know what name you wish to assign to all
your build trees. You will use the
abuild.upgrade-data file to provide this
information to abuild.
Note that abuild's upgrade process is extremely tolerant of
partially upgraded forests. It uses exactly the same logic as
abuild's normal build process (it is part
of abuild, after all) to internally map a forest consisting of
a mixture of 1.0 and 1.1 files into an internal 1.1 structure.
The main difference between the upgrade procedure and abuild's
normal build process is that, when upgrading, abuild requires
you to provide names of previously unnamed trees, while during
the build process (in 1.0-compatibility mode only) it will
generate a temporary name on the fly. So if a tree already has
a name, or if abuild can figure out what its name is from a
backing area, it will use that information. Otherwise, it will
use the information you supply in
abuild.upgrade-data.
Once it has all the required information, abuild will insert the
tree-name key into the root
Abuild.conf file of every tree, and it will
replace any external-dirs keys with
tree-deps keys. It will also remove
parent-dir keys, replace
this with name,
upgrade Abuild.backing files including
merging tree-level Abuild.backing files
into a single forest-level Abuild.backing
file, and remove any occurrences of deleted
from root Abuild.conf files, moving the
information into the deleted-items key of
the new forest-wide Abuild.backing file.
In addition, if you have any trees that are nested inside your
existing trees, abuild will add
child-dirs entries to those root items'
parent Abuild.conf files to connect them
into the forest. (Recall that, in abuild 1.1, nested tree
roots are discovered through child-dirs
just like any other build items. In 1.0, they were connected
into the forest using path names in other trees'
external-dirs keys instead.)
During the analysis process, abuild will find all tree roots
at or below your starting directory. It will study them,
examining any external-dirs or
tree-deps keys to figure out which trees
refer to which other trees. It will then group trees into
separate, independent forests so that it can upgrade each forest
separately. The list of forests is generated such that no tree
in one forest refers to any tree in another forest through any
of its items' Abuild.conf files. In many
cases, you will find that there is only one forest. However, if
you have self-contained collections of build trees nested within
your primary forest, those will be recognized as separate. This
could happen for several reasons, including the following:
Maybe you used abuild to build some self-contained, third-party software and you kept a copy of the
Abuild.conffiles.You might have test suites that contain self-contained build trees. This is certainly true of abuild's own source tree which contains numerous self-contained build trees in its own test suite.
You may have stray
Abuild.conffiles that you never actually connected into your regular build trees. You might just be able to delete them as part of the upgrade process.
For each independent forest abuild finds, it will pick a
top-level directory for that forest. This will be the lowest
directory abuild can find that is a common ancestor of all the
trees in the forest. This directory might, in some cases, be
the root of one of the trees in the forest. If not, it might be
a directory that contains no Abuild.conf
file. In that case, abuild will create a
Abuild.conf file containing only a
child-dirs key whose value is the relative
paths to all the root directories of all the build trees in the
forest. You may wish to manually edit this file depending on
how you intend to organize your forest. In some cases, abuild
may include references to trees that are not always present.
When this happens, you may wish to add the
-optional flag after the directory name in the
child-dirs key.
This section describes how to edit the
abuild.upgrade-data file. Here's a
“quick start” for the impatient or those who are
already basically familiar with the process:
For each directory whose contents you wish to (recursively) ignore (such as nested trees you're not ready to upgrade), place the directory in the [ignored-directories] section. Place one directory per line, and specify directories relative to the one containing the
abuild.upgrade-datafile.For each remaining detected build tree root below, replace “
***” with the name you intend to give the tree.Lather, rinse, repeat.
The abuild.upgrade-data file is a
configuration file used to assist abuild
--upgrade-trees. Every time abuild
--upgrade-trees is run, it will replace this file, so
any comments or formatting changes you make will be lost. Any
tree names you assign will be preserved even if abuild no
longer believes the directory is a tree root, so it is very
unlikely that abuild will throw away work you have already
done toward editing this file. If you're paranoid, make a
backup copy of abuild.upgrade-data before
rerunning abuild --upgrade-trees.
The abuild.upgrade-data file consists of sections Each section is opened with a line of the form
[section-name]
where section-name is replaced by one
of the valid section names.
There are three sections:
- [ignored-directories]
lists directories that will be skipped during the upgrade
- [forest]
a repeatable section; one occurs for each group of trees that abuild finds to be in a given forest
- [orphan-trees]
an optional section used to hang onto names previously assigned to any trees root at directories that no longer appear in a known forest
If there are directories below the start directory that you wish
to ignore during the conversion process, list them in the
[ignored-directories] section. Abuild
will ignore those directories when looking for
Abuild.conf files.
In each forest that abuild discovers, it will require a name
for each tree. If the tree already has a name, that name will
appear in the file. Otherwise, the place-holder
“***” will appear. Your job is
to go through and replace all occurrences of
“***” with the name you wish to
assign to the tree rooted at that directory.
In some cases, there may be a tree that you are not ready to upgrade, perhaps because that tree is still being used by a project that hasn't yet upgraded its version of abuild. In that case, just list the path to the root of the tree in the [ignored-directories] section. You do not need to remove it from the [forest] section in which it appears; abuild will remove it from there automatically next time it writes the file. If you subsequently change your mind and remove the path from [ignored-directories], abuild will move it back to the appropriate [forest] section. This is also where [orphan-trees] comes into play: if you had assigned a name to a tree that ended up later under an ignored directory, that path and assigned name will get moved to [orphan-trees]. if you later remove the ignored directory entry, abuild will move the path back out of [orphan-trees] so you will not lose the name you previously assigned to the tree.
Abuild is able to perform the actual upgrade when all of the following conditions are met:
Abuild is able to parse all
Abuild.conffiles at or below the current directory, excluding any ignored directories, without finding any errors.Every external-dirs entry exists or can be resolved through a backing area. There is one exception, discussed below.
No external-dirs entries cross over any symbolic links
Every tree root listed in every [forest] section has a name assigned to it.
Every tree that abuild finds during its scan as well as every external-dirs entry referenced by those trees that points to a place at or below the start directory appears in a [forest] section and has a name assigned to it.
Abuild is usually able to upgrade forests with backing areas,
but it will not do so if any externals resolve to 1.0-style
trees in backing areas. (That is, the external doesn't exist
relative to the tree that declares it but does exist relative to
that tree's backing area.) In that case, you must either
upgrade the backing area first (which is the recommended
practice) or make the external resolve locally. You can make
the external local by just creating a directory and populating
it with an Abuild.conf and an
Abuild.backing. The reason for this
restriction is that abuild will not read the
Abuild.backing file of an upgraded tree
root that is not at the root of a forest. This means that
abuild would no longer be able to resolve the external in the
backing area. As discussed, it is best to upgrade your backing
area first anyway since upgrades to forests with upgraded
backing areas often require no manual intervention.
Here we list known limitations of abuild. These limitations will hopefully be addressed over time.
- dependence on Cygwin for make on Windows
On Windows, using abuild to build Java code works fine and should be comparable in performance to building Java code with abuild on a UNIX platform. For C/C++ builds, abuild uses Cygwin for GNU Make and perl. It can use Visual Studio for compilation and can produce targets that don't depend on Cygwin, but abuild itself uses Cygwin. The overhead of running things in Cygwin is very high, and the result is that abuild for C/C++ is slow on Windows even though the Windows compilers are actually quite fast. We need to get abuild working properly with a native GNU Make and remove the last uses of perl from abuild, which means rewriting gen_deps in C++ or otherwise folding it into the abuild sources. The automated test system that is integrated in abuild is likely to stay in perl and likely to continue to require Cygwin, but perhaps that can be rewritten or can be ported to a native perl when a native Windows perl that supports the
"|-"form of open is released. Empirical tests suggest that compiling multiple source files at once results in negligible performance improvement. Most of the performance penalty on Windows appears to be spawning processes, particularly when Cygwin is involved. This is true, however, even with Visual Studio's nmake utility and not the result of something about how abuild is implemented.- Incomplete mingw Support
Although mingw is partially supported and the mingw compiler passes the compiler verification support, mingw support is not really complete in abuild. In particular, we only offer mingw as a valid compiler if the
MINGWenvironment variable is set to1, and we use gcc -mnocygwin from cygwin to get mingw. This means that absolute Windows paths won't work. Although abuild tries to use relative paths when possible, paths on different drive letters are always given as absolute paths. In spite of these limitations, mingw support should work okay for build environments in which everything is under the same drive letter. If necessary, builds that have to work with both Microsoft Visual C++ and mingw can have conditionals in their build or interface files. Hopefully a future version of abuild will better address this.
Table of Contents
- E.1. abuild --help groovy
- E.2. abuild --help helpfiles
- E.3. abuild --help make
- E.4. abuild --help usage
- E.5. abuild --help vars
- E.6. abuild --help rules rule:empty
- E.7. abuild --help rules rule:groovy
- E.8. abuild --help rules rule:java
- E.9. abuild --help rules rule:autoconf
- E.10. abuild --help rules rule:ccxx
- E.11. abuild --help rules toolchain:gcc
- E.12. abuild --help rules toolchain:mingw
- E.13. abuild --help rules toolchain:msvc
- E.14. abuild --help rules toolchain:unix_compiler
This appendix includes the text of all of abuild's internal online help.
This help file provides a quick reminder on using Abuild.groovy files.
For additional details, please consult the abuild manual.
General Abuild.groovy Help
--------------------------
Abuild.groovy files are interpreted by groovy and contain groovy code.
Most Abuild.groovy files should do nothing other than setting abuild
parameters. All Abuild.groovy files must set either abuild.rules or
abuild.localRules. The preferred syntax is
parameters {
abuild.rules = 'rulename'
}
The abuild.rules parameter should be set to the name of a rule set.
To see what rules are available, run
abuild --help rules list
To get help on a specific set of rules, run
abuild --help rules rule:rulesetname
For example
abuild --help rules rule:java
Most Abuild.groovy files will include a parameter block that sets
abuild.rules to 'java' and sets additional parameters as required by
the 'java' rule set.
Custom Targets
--------------
When adding custom targets, set abuild.localRules to the name of a
file that contains the rules. For example:
parameters {
abuild.localRules = 'local.groovy'
}
Abuild targets defined within groovy have associated dependencies and
closures. From the context of a groovy rules file, you can always
access the abuild object under the name "abuild" and the current ant
project as a groovy ant builder under the name "ant".
The abuild object offers a number of methods for configuring targets.
A commonly used one is "addTargetClosure", which adds additional code
to be run when a given target is invoked. For example, the following
block of code in a local rules file would invoke ant's "echo" task
with the message 'hello' when the "all" abuild target is built:
abuild.addTargetClosure('all') {
ant.echo('message': 'hello')
}
You can access parameters and interface variables by using the
abuild.resolve method. For example, abuild.resolve('VAR') would
provide the value of the VAR parameter or interface variable.
For additional details, please consult the abuild manual.
The abuild help system reads various help files. Help files are just text files. Lines beginning with # are stripped before displaying the file contents to the user.
This help file provides a quick reminder on using Abuild.mk files.
For additional details, please consult the abuild manual.
General Abuild.mk Help
----------------------
The Abuild.mk file is parsed by GNU Make and therefore has GNU
Makefile syntax. It is intended to contain make code but not to
contain any make targets. Custom targets should be added to build
item-supplied rules files or local rules files. Most Abuild.mk files
contain only variable settings.
Every Abuild.mk file must set either RULES or LOCAL_RULES and may set
both. Most Abuild.mk files will set RULES and not set LOCAL_RULES.
If RULES is set, it should be set to the name of a rule set. To see
what rules are available, run
abuild --help rules list
To get help on a specific set of rules, run
abuild --help rules rule:rule-set-name
For example
abuild --help rules rule:ccxx
Most Abuild.mk files will include
RULES := ccxx
along with other variable settings required by the ccxx rules, which
are described in the help file for the ccxx rules.
Conditionals
------------
All Abuild.interface variables defined by a build item and its
dependencies are available as make variables within Abuild.mk. When
writing conditional code, remember that you have to use GNU Make
syntax, not abuild interface syntax. For example, you could add the
-Werror flag to WFLAGS when running gcc with
ifeq ($(ABUILD_PLATFORM_COMPILER), gcc)
WFLAGS += -Werror
endif
Consult the GNU Make documentation for additional details.
Custom Targets
--------------
When adding custom targets or custom behavior, set LOCAL_RULES to the
name of a file that contains the make code. For example:
LOCAL_RULES := local.mk
would tell abuild to load local.mk for additional make code. If you
want to add something to the default target, you would define your own
"all" target. You must use two colons when defining the target, which
tells GNU Make to allow other definitions of the target. For example:
all::
your-rules-here
would add an additional action to be run with the "all" target. Bear
in mind that, in a parallel build, your all target can be run
simultaneously with other targets, so you can't rely on its being
invoked in any particular sequence.
Usage: abuild [options] [defines] [targets]
This help message provides a brief synopsis of supported arguments.
Please see abuild's documentation for additional details.
Options, defines, and targets may appear in any order. Any argument that
starts with "-" is treated as an option.
Any option not starting with - that contains an = is treated as a variable
definition, with the variable name being everything prior to the first =.
These are passed as variables to make, properties to ant, keys in
abuild.defines for groovy.
If no targets are specified, the "all" target is built.
OPTIONS
-H | --help print help message and exit
-V | --version print abuild's version number and exit
--apply-targets-to-deps apply explicit targets to dependencies as well;
when cleaning with a clean set, expand to include
dependencies
--buffered-output produce the entire output of a specific item's
build after the item finishes building; prevents
interleaving of output in multithreaded builds
--build=set | specify a build set; see below for a list of valid sets
-b set
-C start-dir change directories to start-dir before running
--clean=set | specify a clean set; see below for a list of valid sets
-c set
--clean-platforms=pattern when cleaning, only remove platforms that
match the given shell-style filename pattern
--compat-level=x.y disable backward compatible for constructs that
were deprecated at or before version x.y
--deprecation-is-error treat deprecation warnings as errors
--dump-build-graph dump abuild's internal build graph
--dump-data dump abuild's data to stdout and build no targets
--dump-interfaces write details about items' interfaces to files
in the output directory
-e | --emacs pass the -e flags to ant and also set a property
telling our ant build file that we are running in
emacs mode.
--error-prefix=prefix prepend the specified prefix to every error
message generated by abuild as well as every line
any build program writes to standard error; see
also --output-prefix
--find={ item-name | tree:tree-name} print the location of build item
item-name or build tree tree-name
--find-conf look above the current directory to find a directory
that contains Abuild.conf and run abuild from there
--full-integrity check integrity for all items, not just items being built
--interleaved-output in a multithreaded build, interleave the
output of all items building in parallel, and
prefix each line of output (normal and error) with
a marker that the item that produced it; this is
default for multithreaded builds
--jobs=n | -jn build up to n build items in parallel
--jvm-append-args ... --end-jvm-args append to the list of extra
arguments passed to the java builder JVM; for
debugging only
--jvm-replace-args ... --end-jvm-args replace the list of extra
arguments passed to the java builder JVM; for
debugging only
--keep-going | don't stop when a build item fails; also tells backend
-k not to stop on failure
--list-platforms list all object-code platforms
--list-traits list all known traits
--make-jobs[=n] passes the -j flag to make allowing each make to use
up to n jobs; omit n to let it use as many as it can
--make pass all remaining arguments to make
--monitored run in monitored mode
-n pass no-op flag to backend
--no-dep-failures when used with -k, attempt to build items even when
one or more of their dependencies have failed
--no-deps build only the current item without its dependencies
--only-with-traits=trait[,trait,...] remove all items from build set
that do not have all of the named traits
--output-prefix=prefix prepend the specified prefix to every
non-error line of output generated by abuild or
any program it invokes; see also --error-prefix
--platform-selector=selector | specify a platform selector
-p selector for object-code platforms; see below
--print-abuild-top print the path to the top of the abuild installation
--raw-output do not capture or process output generated by
programs abuild invokes; this is the default for
single-threaded builds
--related-by-traits=trait[,trait,...] add to the build set all items that
relate to any item already in the build set by all of
the named traits
--repeat-expansion repeat expansion from --related-by-traits or
--with-rdeps until no new build items are added to
the build set
--ro-path=dir repeatable: treat everything under dir as read only
--rw-path=dir repeatable: treat everything under dir as writable
--silent suppress most non-error output
--upgrade-trees run special mode to upgrade build trees
--verbose generate more detailed output
--with-deps | -d short-hand for --build=current; on by default
--with-rdeps expand build set with reverse dependencies of all
items in the build set
BUILD/CLEAN SETS
all all buildable/cleanable items in writable build trees
deptrees all items in the local tree and its full tree-deps chain
local all items in the local build tree
desc all items at or below the current directory
descending alias for desc
down alias for desc
deps all expanded dependencies of the current item
descdeptrees intersection of desc and deptrees
current the current item
name:name,... items with the given names
pattern:regex items whose names match the given regular expression
When building (as opposed to cleaning), all build sets automatically
include dependencies that are satisfied in writable build trees.
PLATFORM SELECTORS
Platform selectors may be specified with --platform-selector and in the
ABUILD_PLATFORM_SELECTORS environment variable. A platform selector is
of this form:
[platform-type:]match-criterion
A match-criterion may be on the following:
option=<option>
compiler=<compiler>[.<option>]
platform=<os>.<cpu>.<toolset>.<compiler>[.<option>]
all
skip
Any criterion component may be '*'.
TARGETS
The special targets "clean" and "no-op" are not passed to the
backend build tools and may not be combined with any other targets.
Other targets are passed directly to the backends.
The following interface variables are defined automatically by abuild:
ABUILD_STDOUT_IS_TTY: boolean indicating whether or not standard
output is a terminal; potentially useful in test environments
ABUILD_ITEM_NAME: the name of the current item
ABUILD_TREE_NAME: the name of the current item's tree
ABUILD_TARGET_TYPE: the target type of the current item
ABUILD_PLATFORM_TYPE: the platform type of the current item
ABUILD_OUTPUT_DIR: the output directory of the current item/platform
ABUILD_PLATFORM: the platform of the current build of the current item
For object-code build items, these variables provide access to the
individual fields of the platform string:
ABUILD_PLATFORM_OS string
ABUILD_PLATFORM_CPU string
ABUILD_PLATFORM_TOOLSET string
ABUILD_PLATFORM_COMPILER string
ABUILD_PLATFORM_OPTION string
The following variables are used by C/C++ rules. You can assign to
them in your Abuild.interface files. You can also append to them in
Abuild.mk if needed, though it's usually not recommended. If you do,
you should use +=, rather than = or :=, in order to avoid overriding
assignments made in your dependencies' interface files.
declare INCLUDES -- include directories
declare LIBS -- libraries specified without the "-l"
declare LIBDIRS -- library directories
declare XCPPFLAGS -- extra flags passed to the C preprocessor
declare XCFLAGS -- extra flags passed to the C compiler
declare XCXXFLAGS -- extra flags passed to the C++ compiler
declare XLINKFLAGS -- extra flags passed to the linker
For java build items, these variables are also defined:
abuild.classpath -- items used at compile-time, run-time, and in packaging
abuild.classpath.external -- used at compile-time but not in packaging
abuild.classpath.manifest -- to be included in the manifest of direct
reverse dependencies
The abuild.classpath.manifest variable "non-recursive", meaning you
only see assignments made to it your own build item and in those on
which you directly declare dependencies. You do not see assignments
made to it by your indirect dependencies.
If you declare any optional dependencies, for each optional dependency
"item" that you declare, a variable called
ABUILD_HAVE_OPTIONAL_DEP_item
is declared as a local variable. You have access to it in your own
Abuild.interface, but it will not be visible to items that depend on
your item.
The "empty" rules are provided for cases in which you have to supply some value but don't have anything to build. They are available for both Groovy-based and make-based builds. There are two typical reasons why you might use these rules: * You wish to have accessed to globally available features such as qtest support. If you have a build item that has qtest-based test suites but doesn't actually have to build anything, you can use the "empty" rules. * You decide which rules to use based on some kind of conditional logic. For example, for a Windows-only build item, you might use RULES=ccxx Windows and RULES=empty everywhere else.
** Help for users of abuild.rules = ['java', 'groovy'] **
The "groovy" rules add compilation of Groovy source code using groovyc
to the "java" rules. They are structured in the same way as the
"java" rules are structured. Run abuild --help rules rule:java for
details.
You must use the 'java' rules together with the 'groovy' rules. You
can list them in either order. If you list 'java' first, abuild will
compile your Java code before your Groovy code. If you list 'groovy'
first, abuild will compile your Groovy code before your Java code. If
some of your Groovy classes depend on some of your Java classes or
vice versa, you should make sure you put your rules in the right
order. If you want to mix Groovy and Java sources in the same build
item, they should not be interdependent or else you will have a hard
time doing a clean build.
With the groovy rules, we have these two additional properties
groovy.dir.src (src/groovy): the default location for Groovy sources
groovy.dir.generatedSrc (abuild-java/src/groovy): the default
location for automatically generated groovy sources
Now new targets are added. The control parameter
groovy.compile
is supported to control groovy compilation. Its fields are
srcdirs: defaults to groovy.dir.src + groovy.dir.generateSrc
destdir: defaults to java.dir.classes
classpath: defaults to abuild.classpath + abuild.classpath.external
Any additional keys are passed as attributes to the groovyc task.
** Help for users of abuild.rules = ['java'] **
BASIC USAGE
===========
(For advanced usage, see below -- many options are available beyond
what is described in this section.)
JAR files
---------
Required for all JAR files:
java.jarName = 'name-of-jar-file.jar'
To add a Main-Class attribute key:
java.mainClass = 'class.containing.main'
To create a wrapper script:
java.wrapperName = 'name-of-wrapper-script'
WAR files
---------
Required for all WAR files:
java.warName = 'name-of-war-file.war'
java.webxml = 'path-to-config.xml'
EAR files
---------
Required for all EAR files:
java.earName = 'name-of-ear-file.ear'
java.appxml = 'path-to-application.xml'
High-level JAR-like archives
----------------------------
java.highLevelArchiveName = 'name-of-archive.ext'
JAR signing
-----------
java.sign.alias - required "alias" attribute of signjar task
java.sign.storepass - required "storepass" attibute of signjar task
java.sign.keystore - "keystore" attribute of signjar task
java.sign.keypass - "keypass" attribute of signjar task
java.jarsToSign - JAR files to sign; usually set from
values of interface variables
JUnit
-----
java.junitTestsuite - name of class with JUnit test suite
java.junitBatchIncludes - pattern matching classes with test suites
java.junitBatchExcludes - pattern to filter out classes to search
for test suites
javadoc
-------
java.javadocTitle: Doctitle and Windowtitle
GENERAL INFORMATION
===================
If you're familiar with the general structure of the java rules and
you just need to be reminded about specific parameters and control
parameter attribute map keys, search for SPECIFIC PARAMETERS below.
The general pattern is that the behavior all targets can customized in
layers. Implementation of this pattern is achieved through using the
abuild.runActions call. For examples, consult the abuild manual or
look at rules/java/java.groovy.
LAYER 1: DEFAULT USE
By default, all targets are activated either by the existence of
certain files or by setting certain parameters. No targets generate
error conditions or do anything at all when not activated.
For example, the "compile" target won't compile anything if there are
no .java files in src/java, and the "package-jar" target won't create
any JAR files if java.jarname property is not set.
To use these rules at layer 1, you just have to set required
parameters or create required input files. This is all most build
items will have to do.
LAYER 2: OVERRIDING DEFAULTS
In most cases, there is some parameter that can be overridden to
change the default behavior of a particular build item. For example,
you can set the parameter java.dir.src to change the default location
where abuild looks for Java sources. A list of parameters is
presented below. All parameters that can be customized in this way
are declared in _base.groovy for all built-in rules implemented for
the Groovy backend.
LAYER 3: TARGET-SPECIFIC CONTROL PARAMETERS
Each target has a control parameter. The control parameter's value,
if defined, is always a list. Each element of the list is either a
map or a closure. To customize at layer 3, we set the control
parameter to a list of maps. This can be done by appending a map to
the value of the control parameter.
Each target has a map of "default attributes". Many of the values of
the map are initialized directly or indirectly from general
parameters. If a target's control parameter is not defined, abuild
runs the target as if the control parameter were a list containing the
default attribute map. The fact that the default attribute map is
itself initialized from other parameters provides the mechanism behind
which layer 2 customization works.
If the control parameter is explicitly initialized, each map element
of the list is expanded by copying into it any elements from the
default attribute map that are not locally overridden.
The control parameter may contain multiple elements. In this case,
the target's main closure will be run multiple times, once for each
map. This makes it possible for a single build item to create
multiple JAR files, for example.
LAYER 4: CUSTOM CLOSURES
The control parameter for a target can also contain closures. In the
description of layer 3 customization, we described what happens with
map elements. If any control parameter element is a closure, abuild
just calls the closure. Setting a target's control parameter to a
list containing a single closure allows you to completely override the
behavior of the target. You can also set the control parameter to a
combination of maps and closures, which enables you to combine custom
behavior with default behavior.
CLASS PATHS
Abuild's java rules define four class paths:
compile-time: JAR files used at compile time; the classpath argument
to javac
run-time: JAR files used at runtime; the classpath argument when
running test suites
package: JAR files or other archives included in higher level
archives
manifest: JAR files whose names are to be listed in the Class-Path
manifest key of JAR files
These four class paths are initialized from the three classpath
abuild interface variables as follows:
compile-time: abuild.classpath + abuild.classpath.external - locally
created JAR files
runtime: abuild.classpath + abuild.classpath.external
package: abuild.classpath
manifest: abuild.classpath.manifest
Note that we explicitly exclude any locally created JAR files from the
compile-time class path. This helps to keep clean builds and
consistent with incremental builds. Users of the runtime classpath
may, in some cases, have to explicitly add locally generated archives
if they have not been included in abuild.classpath or
abuild.classpath.external in the host item's Abuild.interface file.
OVERRIDING INTERFACE VARIABLES
The classpath values in particular are derived from interface
variables rather than parameters. Generally speaking, you should not
have to override them in Abuild.groovy files, but there may be certain
instances in which it can be useful. Because of the way abuild
initializes parameters when you append to them, it works to do
something like
abuild.classpath.external << 'something.jar'
This will convert abuild.classpath.external from an interface variable
to a parameter, and the parameter value will be used to initialize the
appropriate class path.
TYPES OF DIRECTORIES
====================
When compiling Java files and creating packages, there are directories
for the following kinds of things:
* Java sources: contains .java files that are compiled to .class
files with javac
* Java class files: contains .class files; could contain other
generated files as well
* Resources: contains arbitrary files that are to be packaged
* META-INF: contains files to go into META-INF except for a few
specific types of files that are called out separately
* web content: contains files that are to be at the root of WAR files
* WEB-INF: contains files for the WEB-INF directory of WAR files
When creating all types of archives except for WAR files, the package
is created from the contents of classes and resources directories with
each file being placed in the archive at the same relative position as
it was in the classes or resources directory. Additionally, the
package's META-INF directory contains files from the META-INF
locations preserving relative location.
For WAR files, class and resources directories are used to populate
WEB-INF/classes instead of the root of the archive. The root of the
archive takes files from the web content directories, again preserving
relative location of the files. The WEB-INF directory is packaged
from WEB-INF locations in the same manner.
DEFAULT PARAMETERS
==================
The following parameters control behavior of specific tasks:
java.includeAntRuntime -- value of the includeantruntime attribute
to the javac task; default is false
The following parameters can be used to add locations in which
abuild look for specific types of files. You can append to these in
your Abuild.groovy file (e.g., java.dir.extraSrc << 'src/java2'). All
relative paths are treated as relative to the build item directory
(the one that contains Abuild.groovy).
java.dir.extraSrc -- additional Java source directories
java.dir.extraResources -- additional resource directories
java.dir.extraMetainf -- additional META-INF directories
java.dir.extraWebContent -- additional web content directories
java.dir.extraWebinf -- additional WEB-INF directories
The following parameters contain the default locations where abuild
will look for various types of files. They can be be modified to
deviate from abuild's build conventions. As a general rule, it's a
good idea not to modify these. These values are all treated as
relative to the build item directory.
java.dir.src (src/java): location of Java sources
java.dir.resources (src/resources): location of resource files
java.dir.metainf (src/conf/META-INF): location of META-INF files
java.dir.webContent (src/web/content): location of web content
java.dir.webinf (src/web/WEB-INF): location of WEB-INF files
The following parameters provide locations that the java rules use for
generating its outputs. You can modify these, but you probably
shouldn't.
java.dir.dist (dist): for JAR files and other published artifacts
java.dir.classes (classes): for .class files
java.dir.signedJars (signed-jars): temporary location for signed JARs
java.dir.junit (junit): JUnit ouptut
java.dir.junitHtml (junit/html): JUnit HTML reports
The following parameters provide the locations for generated files.
There's really no good reason to change these. If you are creating a
code generator, you should use these parameters to decide where to put
whatever you're generating. The purposes of the directories are the
same as their non-generated counterparts.
java.dir.generatedDoc: abuild-java/doc
java.dir.generatedSrc: abuild-java/src/java
java.dir.generatedResources: abuild-java/src/resources
java.dir.generatedMetainf: abuild-java/src/conf/META-INF
java.dir.generatedWebContent: abuild-java/src/web/content
java.dir.generatedWebinf: abuild-java/src/web/WEB-INF
TARGET DEPENDENCIES
===================
The following chart illustrates the dependencies among the targets
provided by the java rules.
all -> package, wrapper
package -> package-ear -> { package-high-level-archive, package-war }
package-high-level-archive -> sign-jars
package-war -> sign-jars
wrapper -> package-jar
sign-jars -> package-jar
package-jar -> compile -> generate -> init
test-only -> test-junit
doc -> javadoc
SPECIFIC PARAMETERS
===================
For each target, we will describe the attributes in its default
attribute map and where they come from. From here, it is possible for
you to figure out which parameter to change to override the default.
For example, for the package-jar target, the 'jarname' key in the map
gets its value from the 'java.jarName' parameter. This means you can
set the name of the primary JAR artifact by setting java.jarName.
In each case below, we present the map key, its default value usually
specified as a parameter name, and its purpose. If a default value is
given as a particular classpath, its initialization is as described
above in CLASS PATHS.
COMMON FOR ARCHIVE TARGETS
--------------------------
Unless otherwise noted, all archive targets' control parameters
support the following keys:
distdir (java.dir.dist): directory into which artifact will be placed
classesdir (java.dir.classes): classes directory
resourcesdirs (java.dir.resources + java.dir.generatedResources):
resource directory
extraresourcesdirs (java.dir.extraResources as list): additional
resources directories
metainfdirs (java.dir.metainf + java.dir.generatedMetainf): META-INF
directories
extrametainfdirs (java.dir.extraMetainf as list): additional META-INF
directories
extramanifestkeys (empty): a map whose keys are extra keys for the
Manifest and whose values are the values of those keys
TARGET: init
------------
No customization available. Initializes internal fields used by other
rules.
TARGET: generate
----------------
No customization available; no action provided by default. This
target is provided for user-provided rules to add closures to in order
to implement their own code generation steps. User-provided code
generators are encouraged to follow the same layered customization
model as the java rules.
TARGET: compile
---------------
Purpose: compile Java sources into class files
Name of control parameter: java.compile
srcdirs (java.dir.src + java.dir.generatedSrc): source directories
extrasrcdirs (java.dir.extraSrc as list): additional source
directories
destdir (java.dir.classes): where to write class files
classpath (compile classpath): compile-time classpath
compilerargs (['-Xlint', '-Xlint:-path']): additional arguments to javac
debug (true): value of the debug attribute to the javac ant task
deprecation (on): value of the deprecation attribute to the javac ant task
includeantruntime (java.includeAntRuntime): value of the includeantruntime
attribute to the javac ant task
Any additional keys are treated passed as additional attributes to the
javac ant task.
TARGET: package-jar
-------------------
Purpose: create JAR files
Name of control parameter: java.packageJar
contains default archive keys plus the following:
jarname (java.jarName): the name of the JAR to create
mainclass (java.mainClass): the name of the main class
manifestclasspath (manifest classpath): the manifest classpath
The "jarname" key (possibly initialized from java.jarName) must be
defined in order for this target to create any artifact.
Any additional keys are treated passed as additional attributes to the
jar ant task.
TARGET: sign-jars
-----------------
Purpose: sign JAR files for inclusion in higher level archives
Name of control parameter: java.signJars
alias (java.sign.alias): required attribute of signjar ant task
storepass (java.sign.storepass): required attribute of signjar ant task
keystore (java.sign.keystore): optional attribute of signjar ant task
keypass (java.sign.keypass): optional attribute of signjar ant task
lazy (true): whether or not to use lazy JAR signing
signdir (java.dir.signedJars): directory into which to place the signed JARs
jarstosign (java.jarsToSign): a list of JAR files to sign
includes ('*.jar'): sign everything in signdir that matches this pattern
This target copies all the jars listed in jarstosign into signdir and
then signs them in place using the specified parameters. Lazy JAR
signing is enabled by default to allow idempotent builds (in other
words, so that a build of an already-built area doesn't do anything
new).
In order for this target to do anything, alias and storepass must be
provided and either jarstosign must be provided or signdir must
already exist.
jarstosign can contain things other than JAR files, but if you do
that, you will need to override includes as well. You can also
populate signdir on your own and set includes appropriately if needed.
Any additional keys are treated passed as additional attributes to the
signjars ant task.
TARGET: wrapper
---------------
Purpose: create wrapper scripts for executable JARs that run in the
context of the source tree; useful for testing without installation
Name of control parameter: java.wrapper
name (java.wrapperName): name of wrapper script
mainclass (java.mainClass): name of main class
jarname (java.jarName): name of local JAR file presumably containing
main class
dir (abuild-java): name of directory into which to write the wrapper
script
distdir (java.dir.dist): name of directory in which to find the local
JAR file
classpath (runtime classpath): classpath to include in the wrapper script
The "name" and "mainclass" key must be initialized in order for any
wrapper scripts to be created. The "jarname" key may be set to
include a local JAR file if that JAR is not in the class path.
Any additional keys are ignored.
TARGET: package-war
-------------------
Purpose: create WAR files
Name of control parameter: java.packageWar
contains default archive keys plus the following:
warname (java.warName): name of WAR file
webxml (java.webxml): path to the web.xml file
webdirs (java.dir.webContent + java.dir.generatedWebContent): web
content directories
extrawebdirs (java.dir.extraWebContent as list): additional web
content directories
webinfdirs (java.dir.webinf + java.dir.generatedWebinf): WEB-INF
directories
extrawebinfdirs (java.dir.extraWebinf as list): additional WEB-INF
directories
signedjars (java.dir.signedJars): directory containing signed JARS to
include at the root of the WAR file
libfiles (java.warLibJars as list): JAR files to include in the WAR
under WEB-INF/lib
Unlike other high level archives, the default package classpath is not
used by default for any purpose. In order to get JAR files into the
WAR file, they must either be in the "signedjars" directory or they
must be listed in the "libfiles" key. A typical WAR file will list
all the JARs it wants at the root of the archive in the
java.jarsToSign parameter and all those it wants in its WEB-INF/lib
directory in the java.warLibJars parameter. Since the package-war
target depends on the sign-jars target, this will cause signed
versions of the JARs to get appropriately included in the right place.
The "warname" and "webxml" parameters must be set in order for this
target to do anything.
Any additional keys are treated passed as additional attributes to the
war ant task.
TARGET: package-high-level-archive
----------------------------------
Purpose: create high-level JAR-like archives that may contain other
archives; one example of what you would use this for would be creation
of RAR files
Name of control parameter: java.packageHighLevelArchive
contains default archive keys plus the following:
highlevelarchivename (java.highLevelArchiveName): the name of the
archive to create
filestopackage (package classpath): additional files to include at
the root of the archive
The "highlevelarchivename" key must have a value in order for this
target to do anything. The default behavior is to include all the
files in the abuild.classpath interface variable in the higher level
archive. You can use the filestopackage key to include other files,
which don't have to be archives. You can also make such files appear
by having them be in src/resources or abuild-java/src/resources, but
using filestopackage can avoid having to copy them from other
locations.
Any additional keys are treated passed as additional attributes to the
jar ant task.
TARGET: package-ear
-------------------
Purpose: create EAR files
Name of control parameter: java.packageEar'
contains default archive keys *except classesdir* plus the following:
earname (java.earName): the name of the EAR file
appxml (java.appxml): path to the application.xml file
filestopackage (package classpath): additional files to include at
the root of the archive
The "earname" and "appxml" keys must have values in order for this
target to do anything. The default behavior is to include all the
files in the abuild.classpath interface variable in the EAR file. You
can use the filestopackage key to include files other files, which
don't have to be archives. You can also make such files appear by
having them be in src/resources or abuild-java/src/resources, but
using filestopackage can avoid having to copy them from other
locations.
Any additional keys are treated passed as additional attributes to the
ear ant task.
TARGET: test-junit
------------------
Purpose: run JUnit test suites
Name of control parameter: java.junit
testsuite: (java.junitTestsuite): name of a class containing a JUnit
test suite
batchincludes (java.junitBatchIncludes): pattern matching classes in
the classesdir in which to find JUnit test suites
batchexcludes (java.junitBatchExcludes): pattern to filter out classes
in the classes directory from being searched for JUnit test
suites
classpath (runtime classpath): classpath during test suite run
classesdir (java.dir.classes): directory searched for classes
containing test suites
distdir (java.dir.dist): directory containing local archives; all JAR
files in this directory are added to the classpath
junitdir (java.dir.junit): directory in which to write the XML test
results
reportdir (java.dir.junitHtml): directory in which to write the HTML
JUnit report
printsummary (yes): passed as an attribute to junit
haltonfailure (yes): passed as an arguments to junit
fork (yes): passed as an arguments to junit
At least one of "testsuite" or "batchincludes" must be set for this to
do anything. This target runs JUnit test suites and generates a
report. A report will be generated even if the tests fail. This does
not interfere with the affect of haltonfailure.
Any additional keys are treated passed as additional attributes to the
junit ant task.
TARGET: javadoc
---------------
Purpose: generate javadoc documentation
Name of control parameter: java.javadoc
Doctitle (java.javadocTitle)
Windowtitle (java.javadocTitle)
srcdirs (java.dir.src + java.dir.generatedSrc)
extrasrcdirs (java.dir.extraSrc as list)
classpath (compile classpath)
access (java.doc.accessLevel if set, or 'protected')
destdir (java.dir.generatedDoc)
All keys above plus any additional ones are passed to as arguments to
the javadoc ant task with the exception of srcdirs and extrasrcdirs.
Those are combined and passed as the "sourcepath" attribute.
At least one source directory must exist for this target to do
anything.
** Help for users of RULES=autoconf **
These rules can be used by build items that require some
autoconf-based configuration either internally for to provide
information for their users.
Note: there have been some problems reported with autoconf rules in
parallel builds (with --make-jobs). It is recommended that you place
attributes: serial
in the Abuild.conf of build items that use autoconf rules.
In order for these rules to work, the following conventions must be
followed:
- The configure input file must be called configure.ac
- If the AUTOCONFIGH variable is defined, configure.ac must include
the statement AC_CONFIG_HEADERS([header.h]) where header.h is the
value of the AUTOCONFIGH. The header file must be named in such a
way as to avoid naming clashes with those created by other build
items.
- Any custom m4 macros used by the configure.ac script are in a
directory called m4 and end with the extension .m4
The following variables may be defined in Abuild.mk:
AUTOFILES: must be set to the list of files that appear in
AC_CONFIG_FILES in configure.ac
AUTOCONFIGH: must be set to the name of the header file in
AC_CONFIG_HEADERS in configure.ac
Additionally, the following variable may be set if needed:
CONFIGURE_ARGS: additional arguments to be passed to ./configure
** Help for Abuild.interface for autoconf build items **
Generally, Abuild.interface files for autoconf-based build items will
assign to INCLUDES for the benefit of any C/C++ build items that use
this. See help for the ccxx rule set for details. It is also common
for autoconf-based build items to generate an autoconf.interface file
to be declared in Abuild.interface as an autofile. This allows
additinal variables to be set based on the output of autoconf.
** Help for users of RULES=ccxx ** Variables to be set in Abuild.mk: TARGETS_lib := lib1 lib2 ... TARGETS_bin := bin1 bin2 ... SRCS_lib_lib1 := lib1-src1.cpp lib1-src2.c ... SRCS_lib_lib2 := lib2-src1.cpp lib2-src2.c ... SRCS_bin_bin1 := bin1-src1.cpp bin1-src2.c ... SRCS_bin_bin2 := bin2-src1.cpp bin2-src2.c ... Note that no file should be listed as belonging to more than one target. Doing so will result in a cryptic make message about redefinition of a rule. If the same source file is needed by more than one target, put it in a library target. All bin targets automatically link with (and depend upon) all lib targets defined in a given Abuild.mk Note that the targets are just base names. For example, the library target "moo" might generate libmoo.a on a UNIX system and moo.lib on a Windows system. Each library and executable target gets its own corresponding list of sources. Sources may consist of C or C++ files ending in .c, .cc, or .cpp. Files ending with .c are compiled as C sources. Files ending with .cc or .cpp are compiled as C++ sources. The following additional variables may also be set or appended to: XCPPFLAGS - additional flags passed to the preprocessor, C compiler, and C++ compiler (but not the linker) XCFLAGS - additional flags passed to the C compiler, C++ compiler, and linker XCXXFLAGS - additional flags passed to the C++ compiler and linker XLINKFLAGS - additional flags passed to the linker DFLAGS - debug flags passed to the processor, compilers, and linker OFLAGS - optimization flags passed to the processor, compilers, and linker WFLAGS - warning flags passed to the processor, compilers, and linker Each of the above variables also has a file-specific version. For the X*FLAGS variables, the file-specific values are added to the general values. For DFLAGS, OFLAGS, and WFLAGS, the file-specific values replace the general vales. For example, setting XCPPFLAGS_File.cc will cause the value of that variable to be added to the preprocessor, C compiler and C++ compiler invocations for File.cc. File-specific versions of XCPPFLAGS, XCFLAGS, and XCXXFLAGS are used only for compilation and, if appropriate, preprocessing of those specific files. They are not used at link time. The file-specific versions of DFLAGS, OFLAGS, and WFLAGS *override* the default values rather than supplementing them. This makes it possible to completely change debugging flags, optimization flags, or warning flags for specific source files. For example, if Hardware.cc absolutely cannot be compiled with any optimization, you could set OFLAGS_Hardware.cc to the empty string to suppress optimization on that file regardless of the value of OFLAGS. By default, library code is compiled as position independent code if supported by the compiler. This enables it to be included in static or shared libraries. If the variable NOPIC_File.cc is set, then File.cc will not be compiled as position independent code. Use of this option would be appropriate only in extreme cases where the negligible performance hit of using PIC would be a problem. To create a shared library instead of a static library for a given library target, define the variable SHLIB_libname := major minor revision where major, minor, and revision are the major version number, minor version number, and revision number of the shared library version. If your intention is to build a versionless shared library object file (such as one to be used as a dynamically loadable module), set SHLIB_libname to the empty string. By default, all shared libaries and executable targets will be linked using the C++ compiler. To force a program or shared library to be linked as a C program, set the variable LINK_AS_C to a non-empty value. This applies to all shared libraries and executables declared in the Abuild.mk file. If the variable LINKWRAPPER is set, it should contain a command that will be prepended to each link step. This is useful for running programs such as purify and quantify which wrap the link step in this fashion. Any source file ending with .ll.cc or .ll.cpp is generated from the corresponding .ll using flex to generate C++ code. Any source file ending with .l.c is generated from the corresponding .l file using lex to generate C code. Using .fl.cc, .fl.cpp, or .fl.c will force the use of flex rather than lex. Any source file of the form FlexLexer.something.cc will be generated with flex from something.fl using the -+ option to a C++ parser class. Any source file of the form something.tab.cc will be generated with bison from something.yy. Any source file ending of the form base_rpc_xdr.c, base_rpc_svc.c, or base_rpc_clnt.c is automatically generated along with base_rpc.h from base.x using rpcgen. The special target ccxx_debug can be used to print the values of the INCLUDES, LIBDIRS, and LIBS and can be useful for debugging. ** Help for Abuild.interface for C/C++ build items ** Abuild.interface files for C/C++ build items are expected to assign to the following variables: INCLUDES -- list of directories to add to the include path LIBDIRS -- list of directories to add to the library path LIBS -- list of libraries to link against Note that LIBS just includes the library basenames as with the TARGETS_lib variable used in Abuild.mk. The following additional variables may also be assigned to: XCPPFLAGS XCFLAGS XCXXFLAGS XLINKFLAGS When using these variables, be careful to avoid code that is compiler-dependent. If necessary, make the assignments conditinal on values of the ABUILD_PLATFORM_* variables.
** Help for users of the "gcc" compiler ** The gcc toolchain uses the unix_compiler toolchain behind the scenes. You generally shouldn't need to do anything special to use the gcc compiler. It is the compiler used on abuild's default platform on UNIX systems. Here are a few notes: * ABUILD_FORCE_32BIT and ABUILD_FORCE_64BIT will cause -m32 and -m64 respectively to be added to all compilation commands. It is up to you to make sure you only use these variables when those flags work. * The gcc compiler support file assumes "ar cru" and "ranlib" for library creation. This may not always be correct on some platforms. * The gcc compiler support file uses -fPIC for creating position independent code and passes -shared to the linker for creating shared libraries. This may not work on all platforms and is probably wrong for platforms on which gcc is not configured to use the gnu linker.
** Help for users of the "mingw" compiler ** Abuild's mingw support is incomplete. At present, it is implemented using Cygwin's gcc or g++ with the -mno-cygwin option. There are a few known problems. Since abuild itself is a Windows application but make and gcc are both provided by Cygwin, absolute paths are not portable between the two systems. This means that abuild's mingw support will almost surely not work if there are any absolute paths in your build or if there are any build items that span drive letters. However, for simple builds, it will probably work fine and generate executables that don't depend on Cygwin at runtime. Because of the incomplete nature of mingw support, you must set the environment variable MINGW=1 in order for abuild to make the mingw compiler available as a platform choice.
** Help for users of the "msvc" compiler ** The "msvc" compiler provides support for Microsoft Visual C++. You are required to have your environment set up for use of the compiler on the command line. There's usually a shortcut that creates a shell set up in this way, and there is a batch file that does it as well. For details, consult your Visual C++ documentation. There is also some discussion in the abuild manual. As of the release of abuild 1.1, the msvc compiler support is known to work with Visual C++ .NET 2003, .NET 2005, and .NET 2008. Both full enterprise and "express" versions have been tested. We support building both static libraries and shared libraries. Abuild creates DLL files for shared libraries. Any version number information provided in the SHLIB_libname variable is ignored. By default, we compile with /Zi for all compiles. /Zi enables debugging and causes debugging information to be written to the .pdb file. We have observed that cl has trouble with long path names when invoked without /Zi. Microsoft support suggests that we should use /Zi for all builds, including release builds. See http://msdn.microsoft.com/en-us/library/xe4t6fc1.aspx for additional discussion. You can override this behavior by changing the value of MSVC_GLOBAL_FLAGS. See make/toolchains/msvc.mk for additional details. There are two additional variables that you can configure: MSVC_MANAGEMENT_FLAGS (default /EHsc) MSVC_RUNTIME_FLAGS (default /MD) You can build for .NET by setting MSVC_MANAGEMENT_FLAGS /clr. You can build executables that link the runtime environment statically, thus avoiding a runtime dependency on MSVCRT*.dll, by setting MSVC_RUNTIME_FLAGS to /MT. We automatically add "d" to the end of MSVC_RUNTIME_FLAGS when building a debugging executable. If a manifest file is created when building a DLL or executable, we automatically run mt -manifest to embed the manifest file.
The "unix_compiler" toolchain is not a real toolchain intended to be used directly by end users. Instead, it is intended for use by compiler toolchain support authors. For details of its use, please look at make/toolchains/unix_compiler.mk itself. To study an example, refer to make/toolchains/gcc.mk.
The --dump-data option outputs all the
information abuild knows about the build trees after reading all
the Abuild.conf files and performing all of
its validations. Its output is in an XML format that corresponds
to the following DTD. Comments in the DTD describe the meanings
of the fields. The DTD may be found in
doc/abuild_data.dtd in the abuild
distribution. For additional ways to use the build graph output,
see also Chapter 32, Sample XSL-T Scripts.
When there are no errors, the --dump-data output
always presents build trees and build items such that no
dependency reference is ever made to an item that has not already
been seen. (This does not apply to items referenced by
build-also since no dependency relationship
is implied in that case.) When there are errors, the
errors attribute to the
abuild-data element will be present and will
have the value 1. In this case, this guarantee
does not apply as the output may contain circular dependencies,
unknown build items, etc.
The contents of the abuild_data.dtd file are
included here for reference.
<!-- This DTD describes the format of abuild's dump-data output. -->
<!-- Inline comments explain the details. The file is called -->
<!-- abuild_data.dtd instead of abuild-data.dtd so we don't -->
<!-- accidentally ignore it because it matches the pattern -->
<!-- abuild-* (like abuild output directories). -->
<!-- By convention, we use "0" or "1" for boolean values. Some -->
<!-- boolean values are optional. In this case, omitted always -->
<!-- means "0". -->
<!ENTITY % boolean "(0|1)">
<!-- Whenever the target-type attribute appears, it may only -->
<!-- have one of these values. -->
<!ENTITY % target-type "(all|platform-independent|object-code|java)">
<!-- The version attribute is always "2". We will only -->
<!-- increment this if there is a change to the output such that -->
<!-- previously valid data is either no longer valid or is valid -->
<!-- but has different semantics. The version attribute was -->
<!-- incremented from "1" when a new build tree structure was -->
<!-- introduced in version 1.1. Adding new attributes with -->
<!-- default values, optional attributes, or optional elements -->
<!-- will not cause the version number to be increased. Code -->
<!-- that reads this output should be prepared to accept and -->
<!-- ignore unknown attributes or elements. The errors -->
<!-- attribute is present and has the value "1" whenever abuild -->
<!-- has detected errors. In this case, normal guarantees about -->
<!-- output consistency do not apply, and the output may contain -->
<!-- references to unknown build items, platform types, flags, -->
<!-- traits, etc. Abuild will still make every effort to -->
<!-- produce useful and coherent data and will also always -->
<!-- produce XML output that parses against this DTD. -->
<!ELEMENT abuild-data (platform-data, supported-traits?, forest+)>
<!ATTLIST abuild-data
version CDATA #REQUIRED
errors %boolean; #IMPLIED
>
<!-- The platform-data element provides information about all -->
<!-- platform types known and any platforms they contain. When -->
<!-- it appears directly under abuild-data, it refers to the -->
<!-- built-in platforms and platform types. When it appears -->
<!-- under build-tree, it refers to the platforms known to that -->
<!-- tree. This would include built-in platform information as -->
<!-- well as any platform information added by a plugin in that -->
<!-- tree. -->
<!ELEMENT platform-data (platform-type+)>
<!-- The platform-type element describes a platform type. When -->
<!-- used inside of platform-data, it gives the name of the -->
<!-- platform type, its target type, and the list of platforms -->
<!-- it contains. When used inside a build item, it just lists -->
<!-- a platform type on which that build item could be built. -->
<!ELEMENT platform-type (platform*)>
<!ATTLIST platform-type
name CDATA #REQUIRED
parent CDATA #IMPLIED
target-type %target-type; #IMPLIED
>
<!-- The selected attribute is present only when platform -->
<!-- appears inside of platform-type. In this case, it has the -->
<!-- value "1" when items in that platform type would always be -->
<!-- built on that platform (based on platform selection -->
<!-- criteria) and "0" otherwise. -->
<!ELEMENT platform EMPTY>
<!ATTLIST platform
name CDATA #REQUIRED
selected %boolean; #IMPLIED
>
<!-- Every build tree includes a list of traits that are allowed -->
<!-- on any items that appear natively to that build tree. -->
<!-- There is also an overall list of supported traits that are -->
<!-- available from the command line. This element lists all -->
<!-- traits when it appears under abuild-data and the traits -->
<!-- defined by any of the build tree or its externals when it -->
<!-- appears under build-tree. -->
<!ELEMENT supported-traits (supported-trait+)>
<!ELEMENT supported-trait EMPTY>
<!ATTLIST supported-trait
name CDATA #REQUIRED
>
<!-- forests are given IDs so that they may be referred to by -->
<!-- other forests and by build items. forests are always -->
<!-- output in an order such that no forest refers to a later -->
<!-- forest. Although not enforced by the DTD, readers may rely -->
<!-- on this if it is helpful. This constraint is satisfied -->
<!-- even with the errors attribute of the top-level element is -->
<!-- set. -->
<!ELEMENT forest (backing-area*, deleted-trees?, deleted-items?,
global-plugins?, build-tree+)>
<!ATTLIST forest
id ID #REQUIRED
absolute-path CDATA #REQUIRED
>
<!-- Each backing-area element contains a reference to a backing -->
<!-- area. It is omitted if there are no backing areas. -->
<!ELEMENT backing-area EMPTY>
<!ATTLIST backing-area
forest IDREF #REQUIRED
>
<!-- The deleted-trees and deleted-items elements contain a list -->
<!-- of build trees and build items that were deleted in this -->
<!-- forest. This information comes from Abuild.backing. -->
<!ELEMENT deleted-trees (deleted-tree+)>
<!ELEMENT deleted-tree EMPTY>
<!ATTLIST deleted-tree
name CDATA #REQUIRED
>
<!ELEMENT deleted-items (deleted-item+)>
<!ELEMENT deleted-item EMPTY>
<!ATTLIST deleted-item
name CDATA #REQUIRED
>
<!-- The global-plugins element contains a list of all plugins -->
<!-- that are declared as global in the forest. Such plugins -->
<!-- will also appear in the plugins element of every tree. -->
<!ELEMENT global-plugins (plugin+)>
<!-- One build-tree element appears for each build tree. -->
<!-- build-trees are output in dependency order such that no -->
<!-- build tree will depend on another build tree that has not -->
<!-- already been output. Readers may rely on this behavior if -->
<!-- it is helpful, unless the errors attribute of the top level -->
<!-- element is set. The home-forest and backing-depth -->
<!-- attributes have the same meaning as with build-item. See -->
<!-- its comment for a description. -->
<!ELEMENT build-tree (platform-data, supported-traits?, plugins?,
declared-tree-dependencies?,
expanded-tree-dependencies?,
omitted-tree-dependencies?,
build-item+)>
<!ATTLIST build-tree
name CDATA #REQUIRED
absolute-path CDATA #REQUIRED
home-forest IDREF #REQUIRED
backing-depth CDATA #REQUIRED
>
<!-- The plugins element contains a list of build items that are -->
<!-- declared as plugins in the tree. This includes any global -->
<!-- plugins. -->
<!ELEMENT plugins (plugin+)>
<!ELEMENT plugin EMPTY>
<!ATTLIST plugin
name CDATA #REQUIRED
>
<!-- declared-tree-dependencies contains the list of direct -->
<!-- dependencies in the order in which they were declared in -->
<!-- the Abuild.conf file. Additionally, any tree declared as a -->
<!-- global tree dependency will be included here as well. -->
<!ELEMENT declared-tree-dependencies (tree-dependency+)>
<!-- expanded-tree-dependencies contains the list of recursively -->
<!-- expanded tree dependencies in sorted order from least to -->
<!-- most dependent. In other words, if A depends on B and B -->
<!-- depends on C, A's expanded-tree-dependencies contains C, -->
<!-- and then B. -->
<!ELEMENT expanded-tree-dependencies (tree-dependency+)>
<!-- omitted-tree-dependencies contains the list of tree -->
<!-- dependencies that were declared optional and were not -->
<!-- present. -->
<!ELEMENT omitted-tree-dependencies (tree-dependency+)>
<!-- The tree-dependency element represents a single tree -->
<!-- dependency. -->
<!ELEMENT tree-dependency EMPTY>
<!ATTLIST tree-dependency
name CDATA #REQUIRED
>
<!-- One build-item element appears for each build-item. -->
<!-- build-items are output in dependency order such that no -->
<!-- build item will depend on another build item that has not -->
<!-- already been output. Readers may rely on this behavior if -->
<!-- it is helpful, unless the errors attribute of the top level -->
<!-- element is set. Note that there is no expectation of -->
<!-- dependency ordering for the build-also-items element since -->
<!-- the build-also key in Abuild.conf implies no dependency -->
<!-- relationship. -->
<!-- The attributes have the following meanings: -->
<!-- name: the name of the build item -->
<!-- description: an optional description of the build item for -->
<!-- informational purposes only -->
<!-- home-forest: a reference to the forest from which the build -->
<!-- item is resolved -->
<!-- absolute-path: the absolute path of the build item -->
<!-- backing-depth: the number of backing areas that have to be -->
<!-- crossed to reach this build item -->
<!-- has-shadowed-references: "1" if this build item uses any -->
<!-- plugins or dependencies that are shadowed by a tree that -->
<!-- backs to this item's tree. Items with shadowed references -->
<!-- are not able to be built. -->
<!-- visible-to: the scope at which this item is visible; -->
<!-- corresponds to the visible-to key in the Abuild.conf. If -->
<!-- absent, default visibility applies. -->
<!-- target-type: the target type of this build item -->
<!-- is-plugin: true if the item is used as a plugin by at least -->
<!-- one tree -->
<!-- serial true if the item is declared to be serial; absent -->
<!-- otherwise. -->
<!ELEMENT build-item (build-also-trees?, build-also-items?,
declared-dependencies?, expanded-dependencies?,
omitted-dependencies?,
platform-types?, buildable-platforms?,
supported-flags?, traits?)>
<!ATTLIST build-item
name CDATA #REQUIRED
description CDATA #IMPLIED
home-forest IDREF #REQUIRED
absolute-path CDATA #REQUIRED
backing-depth CDATA #REQUIRED
has-shadowed-references %boolean; "0"
visible-to CDATA #IMPLIED
target-type %target-type; #REQUIRED
is-plugin %boolean; #REQUIRED
serial %boolean; #IMPLIED
>
<!-- build-also-trees and build-also-items contain the list of -->
<!-- build trees/items named in the build-also key. Each item -->
<!-- appears in a nested build-also element. There is no -->
<!-- guarantee that the build item has appeared. Build-also -->
<!-- trees as well as the desc and with-tree-deps options were -->
<!-- added in abuild 1.1.4. For clarity, is-tree="1" always -->
<!-- appears with build also trees, and for backward -->
<!-- compatibility, the attribute is omitted for build also -->
<!-- items. -->
<!ELEMENT build-also-items (build-also+)>
<!ELEMENT build-also-trees (build-also+)>
<!ELEMENT build-also EMPTY>
<!ATTLIST build-also
name CDATA #REQUIRED
is-tree %boolean; "0"
desc %boolean; "0"
with-tree-deps %boolean; "0"
>
<!-- declared-dependencies contains the list of direct -->
<!-- dependencies in the order in which they were declared in -->
<!-- the Abuild.conf file. Any flags associated with direct -->
<!-- dependencies appear in a nested flag element. -->
<!ELEMENT declared-dependencies (dependency+)>
<!-- expanded-dependencies contains the list of recursively -->
<!-- expanded dependencies in sorted order from least to most -->
<!-- dependent. In other words, if A depends on B and B depends -->
<!-- on C, A's expanded-dependencies contains C, and then B. -->
<!-- Note that flags appear only with direct dependencies, so -->
<!-- nested dependencies here will never have flag attributes. -->
<!ELEMENT expanded-dependencies (dependency+)>
<!-- omitted-dependencies contains the names of any dependencies -->
<!-- that were declared "optional" and that do not exist. Such -->
<!-- items are not listed in declared-dependencies or -->
<!-- expanded-dependencies. Additionally, if they were listed -->
<!-- as referent items on any traits, they will have been -->
<!-- removed from there as well. -->
<!ELEMENT omitted-dependencies (dependency+)>
<!-- The dependency element represents a single dependency. For -->
<!-- direct dependencies declared with flags, the dependency -->
<!-- element will contain nested flag elements. Dependencies -->
<!-- that appear inside of expanded-dependencies never contain -->
<!-- flags elements since flags apply only to direct -->
<!-- dependencies. If a dependency is declared with a specific -->
<!-- platform type, the platform type appears in the -->
<!-- "platform-type" attribute. -->
<!ELEMENT dependency (flag*)>
<!ATTLIST dependency
name CDATA #REQUIRED
platform-type CDATA #IMPLIED
>
<!-- The flag element represents a single dependency flag. -->
<!ELEMENT flag EMPTY>
<!ATTLIST flag
name CDATA #REQUIRED
>
<!-- platform-types contains the list of platform types in the -->
<!-- order in which they appeared in the Abuild.conf. -->
<!ELEMENT platform-types (platform-type+)>
<!-- buildable-platforms contains the list of platforms on which -->
<!-- this item could be built. -->
<!ELEMENT buildable-platforms (platform+)>
<!-- supported-flags contains a list of flags that are supported -->
<!-- by this build item. -->
<!ELEMENT supported-flags (supported-flag+)>
<!ELEMENT supported-flag EMPTY>
<!ATTLIST supported-flag
name CDATA #REQUIRED
>
<!-- The traits element contains a list of traits that this -->
<!-- build item has. Any referent build items appear in nested -->
<!-- trait-referent elements. -->
<!ELEMENT traits (trait+)>
<!ELEMENT trait (trait-referent*)>
<!ATTLIST trait
name CDATA #REQUIRED
>
<!ELEMENT trait-referent EMPTY>
<!ATTLIST trait-referent
name CDATA #REQUIRED
>
The --dump-interface option causes abuild to
create various XML output files exposing everything abuild knows
about the interface system before and after processing each build
item. For details, please refer to Section 17.6, “Debugging Interface Issues”. The format of those files
conforms to an XML DTD. Comments in the DTD describe how to
interpret the elements and attributes. The DTD may be found in
doc/interface_dump.dtd in the abuild
distribution. Its contents are included here for reference.
<!-- This DTD describes the format of the output of the files --> <!-- created by abuild dump-interfaces. Inline comments explain --> <!-- the details. The reader is assumed to have advanced --> <!-- familiarity with the interface system as described in the --> <!-- documentation. --> <!-- All location attributes have values of the form --> <!-- filename:lineno:colno. Some operations are performed --> <!-- internally by abuild. In those cases, location will --> <!-- something including the word "internal" inside square --> <!-- brackets. --> <!-- The version attribute is always "1". We will only --> <!-- increment this if there is a change to the output such that --> <!-- previously valid data is either no longer valid or is valid --> <!-- but has different semantics. Adding new attributes with --> <!-- default values, optional attributes, or optional elements --> <!-- will not cause the version number to be increased. Code --> <!-- that reads this output should be prepared to accept and --> <!-- ignore unknown attributes or elements. The item-name and --> <!-- item-platform attributes describe the name and platform of --> <!-- the item whose interface this is. --> <!ELEMENT interface (variable*)> <!ATTLIST interface version CDATA #REQUIRED item-name CDATA #REQUIRED item-platform CDATA #REQUIRED > <!-- One variable element exists for each variable that has been --> <!-- declared. The attributes' values are self-explanatory. --> <!ELEMENT variable (reset-history?, assignment-history?)> <!ATTLIST variable name CDATA #REQUIRED type CDATA #REQUIRED target-type CDATA #REQUIRED declaration-location CDATA #REQUIRED > <!-- Each time a variable is reset, an entry is recorded in the --> <!-- reset history. No assignments prior to the most recent --> <!-- reset will be output, so the reset history can be used to --> <!-- find earlier information about a variable. --> <!ELEMENT reset-history (reset+)> <!-- The attributes of the reset element refer to the build item --> <!-- whose interface performed the reset operation. --> <!ELEMENT reset EMPTY> <!ATTLIST reset item-name CDATA #REQUIRED item-platform CDATA #REQUIRED location CDATA #REQUIRED > <!-- Each time an assignment is made to a variable, there is an --> <!-- entry in the assignment history. All assignments to a --> <!-- variable are shown, including those that do not contribute --> <!-- to the value of a variable. Remember that, for scalar --> <!-- variables, only the last assignment affects the value of --> <!-- the variable; and that for list variables, each assignment --> <!-- is appended or prepended to prior ones as determined by the --> <!-- list type. Also, variable assignments are filtered at --> <!-- runtime based on flags. --> <!ELEMENT assignment-history (assignment+)> <!-- The item-name, item-platform, and location attributes of --> <!-- the assignment element refer to the build item whose --> <!-- interface performed the assignment. Remaining attributes --> <!-- apply to the assignment and are self-explanatory. --> <!ELEMENT assignment (value*)> <!ATTLIST assignment assignment-type CDATA #REQUIRED flag CDATA #IMPLIED item-name CDATA #REQUIRED item-platform CDATA #REQUIRED location CDATA #REQUIRED > <!ELEMENT value EMPTY> <!ATTLIST value value CDATA #REQUIRED >
The --dump-build-graph option causes abuild to
output XML data showing the internal build graph as described in
Section 33.6, “Construction of the Build Graph”. The format of
those files conforms to an XML DTD. Comments in the DTD describe
how to interpret the elements and attributes. The DTD may be
found in doc/build_graph.dtd in the abuild
distribution. Its contents are included here for reference.
<!-- This DTD describes the format of the output of the files --> <!-- created by abuild dump-build-graph. Inline comments --> <!-- explain the details. --> <!-- The version attribute is always "1". We will only --> <!-- increment this if there is a change to the output such that --> <!-- previously valid data is either no longer valid or is valid --> <!-- but has different semantics. Adding new attributes with --> <!-- default values, optional attributes, or optional elements --> <!-- will not cause the version number to be increased. Code --> <!-- that reads this output should be prepared to accept and --> <!-- ignore unknown attributes or elements. The item-name and --> <!-- item-platform attributes describe the name and platform of --> <!-- the item whose interface this is. --> <!ELEMENT build-graph (item*)> <!ATTLIST build-graph version CDATA #REQUIRED > <!-- One item element appears for each platform built for each --> <!-- item. It corresponds to the item/platform pair. The --> <!-- attributes are self-explanatory. --> <!ELEMENT item (dep*)> <!ATTLIST item name CDATA #REQUIRED platform CDATA #REQUIRED > <!-- One dep element appears for each direct dependency of each --> <!-- item/platform pair. The attributes are self-explanatory. --> <!ELEMENT dep EMPTY> <!ATTLIST dep name CDATA #REQUIRED platform CDATA #REQUIRED >
Here we include a complete copy of
rules/object-code/ccxx.mk.
# This makefile rules fragment supports compilation of C and C++ code
# into static libraries and dynamically linked executables. Shared
# libraries are not presently supported but will be in the future.
# Please see the file make/README.shared-libraries for details.
#
# Please see ccxx-help.txt for details on how to use these rules.
# ---------------
# Notes to implementors
# CCXX_TOOLCHAIN contains the name of a makefile fragment (without the
# .mk; loaded from abuild-specified search path) that defines the
# functions that these rules use to perform actual compiles. The best
# place to learn about how these work, in addition to carefully
# reading these notes, is to look at the built-in compiler support
# files included with abuild. gcc.mk is a good UNIX example, and
# msvc.mk is a good Windows example. The compiler support file
# provide the following:
# .LIBPATTERNS: gnu make variable which must contain patterns to
# match library names so that dependencies on -llib will work.
# OBJ: the suffix of non-library object files
# LOBJ: the suffix of library object files; may be the same as OBJ
# PREPROCESS_c: a command used to invoke the C preprocessor
# PREPROCESS_cxx: a command used to invoke the C++ preprocessor
# COMPILE_c: a command used to invoke the C compiler
# COMPILE_cxx: a command used to invoke the C++ compiler
# LINK_c: a command used to invoke the linker for a C program that
# uses no C++ libraries
# LINK_cxx: a command used to invoke the linker for a C++ program
# DFLAGS: default debugging flags
# OFLAGS: default optimization flags
# WFLAGS: default warning flags
# CCXX_GEN_DEPS: if it is possible to make COMPILE_c and COMPILE_cxx
# generate correct dependency information as a side effect of
# compilation, add the appropriate flags to COMPILE_c and
# COMPILE_cxx and set CCXX_GEN_DEPS to @: to suppress the running of
# gen_deps. Otherwise, don't set this variable, in which case it
# will default to $(GEN_DEPS). Abuild requires dependency files
# that contain an empty rule with each object file depending on all
# of its dependencies as well as an empty rule for each dependency
# that depends on nothing. This way, missing header files will
# cause the target to rebuild instead of fail. Our own gen_deps
# does this, as does gcc's -MP option.
# IGNORE_TARGETS: optional: a list of targets (object files,
# libraries, etc.) that should be ignored when determining whether
# there are orphan targets.
# $(call libname,libbase): a function that returns the full name of
# a library from its base. For example, $(call libname,moo) would
# typically return libmoo.a on a UNIX system and moo.lib on a
# Windows system.
# $(call shlibname,libbase,major,minor,revision): a function that
# returns the full name of a shared library from its base, major
# version, minor version, and revision number. For example, $(call
# shlibname,moo,1,2,3) might return libmoo.so.1.2.3 on a UNIX system
# and moo1.dll on a Windows system. The version arguments are
# optional. Each one must be ignored if the ones before it are
# omitted.
# $(call binname,binbase): a function that returns the full name of
# an executable from its base. For example, $(call binname,moo)
# would typically return moo on a UNIX system and moo.exe on a
# Windows system.
# $(call include_flags,include-dirs): a function that returns
# include flags forthe given include directories. This result
# should be suitable to passing as flags to the preprocessor and C
# or C++ compiler.
# $(call make_obj,compiler,pic,flags,src,obj): a function that uses
# the given compiler to convert src to obj. The first argument will
# always be either $(COMPILE_c) or $(COMPILE_cxx). The second
# argument will be 1 if we need position-independent code for shared
# libraries (or static libraries that might be linked into shared
# libraries) and empty otherwise.
# $(call make_lib,objects,libbase): a function that creates a
# library with the given base name. Note that libbase has not been
# passed to $(libname).
# $(call make_bin,linker,compiler-flags,link-flags,objects,lib-dirs,li\
\bs,binbase):
# a function that generates an executable file with the given base
# name from the given objects linking from libs that are found from
# the given libdirs. The first argument will always be either
# $(LINK_c) or $(LINK_cxx). Note that that binbase has not been
# passed to $(binname). Compiler support implementors are
# encouraged to prepend the variable $(LINKWRAPPER) to link
# statements. This makes it possible for the user to set
# LINKWRAPPER to some program that wraps the link step. Examples of
# programs that do this include Purify and Quantify. NOTE: Your
# make_bin function should do something with the
# WHOLE_lib_$(libname) variables: either it should link in the whole
# library or issue an error that it is not supported. See
# toolchains/unix_compiler.mk and toolchains/msvc.mk for examples of
# each case.
#
# $(call make_shlib,linker,compiler-flags,link-flags,objects,lib-dirs,\
\libs,shlibbase,major,minor,revision):
# function that creates a library with the given base name. This
# function must take the same arguments as make_bin plus the shared
# library version information. Compiler support authors are
# encouraged to prepend the link statement with $(LINKWRAPPER) as
# with make_bin.
# When preparing to use a specific toolchain, please see comments in
# that toolchain's makefile fragment for any requirements that it may
# have.
# ---------------
TARGETS_lib ?=
TARGETS_bin ?=
# Make sure the user has asked for some targets.
ifeq ($(words $(TARGETS_lib) $(TARGETS_bin)), 0)
_qtx_dummy := $(call QTC.TC,abuild,ccxx.mk no targets,0)
$(error No ccxx targets are defined)
endif
# Separate TARGETS_lib into _TARGETS_static_lib and
# _TARGETS_shared_lib
_TARGETS_shared_lib := $(filter-out %:static,$(foreach L,$(TARGETS_lib),\
\$(L)$(if $(filter undefined,$(origin SHLIB_$(L))),:static)))
_TARGETS_static_lib := $(filter-out $(_TARGETS_shared_lib),$(TARGETS_lib))
# Define ccxx_shlibname to call shlibname with the right arguments
define ccxx_shlibname
$(call shlibname,$(1),$(word 1,$(SHLIB_$(1))),$(word 2,$(SHLIB_$(1))),$(\
\word 3,$(SHLIB_$(1))))
endef
# Define ccxx_all_shlibnames to get all variants of the shared library name
define ccxx_all_shlibnames
$(sort $(call shlibname,$(1),$(word 1,$(SHLIB_$(1))),$(word 2,$(SHLIB_$(\
\1))),$(word 3,$(SHLIB_$(1)))) \
$(call shlibname,$(1),$(word 1,$(SHLIB_$(1))),$(word 2,$(SHLIB_$(\
\1))),) \
$(call shlibname,$(1),$(word 1,$(SHLIB_$(1))),,) \
$(call shlibname,$(1),,,))
endef
# Add each target to the "all" and "clean" rules
_static_lib_TARGETS := $(foreach T,$(_TARGETS_static_lib),$(call libname,$(T)))
_shared_lib_TARGETS := $(foreach T,$(_TARGETS_shared_lib),$(call ccxx_sh\
\libname,$(T)))
_lib_TARGETS := $(_static_lib_TARGETS) $(_shared_lib_TARGETS)
_bin_TARGETS := $(foreach T,$(TARGETS_bin),$(call binname,$(T)))
all:: $(_lib_TARGETS) $(_bin_TARGETS)
# Add all local libraries to LIBS and all local library directories to
# LIBDIRS.
ifneq ($(words $(TARGETS_lib)),0)
LIBS := $(filter-out $(LIBS),$(_TARGETS_static_lib) $(_TARGETS_shared_li\
\b)) $(LIBS)
LIBDIRS := $(filter-out $(LIBDIRS),.) $(LIBDIRS)
endif
# Make sure that the user has provided sources for each target.
_UNDEFINED := $(call undefined_vars,\
$(foreach T,$(TARGETS_lib),SRCS_lib_$(T)) \
$(foreach T,$(TARGETS_bin),SRCS_bin_$(T)))
ifneq ($(words $(_UNDEFINED)),0)
_qtx_dummy := $(call QTC.TC,abuild,ccxx.mk undefined variables,0)
$(error The following variables are undefined: $(_UNDEFINED))
endif
# Basic compilation functions
DFLAGS ?=
OFLAGS ?=
WFLAGS ?=
XCPPFLAGS ?=
XCFLAGS ?=
XCXXFLAGS ?=
XLINKFLAGS ?=
LINKWRAPPER ?=
LINK_AS_C ?=
ifeq ($(ABUILD_SUPPORT_1_0),1)
ifneq ($(origin LINK_SHLIBS), undefined)
ifeq (-$(strip $(LINK_SHLIBS))-,--)
$(error setting LINK_SHLIBS to an empty value no longer works; overri\
\de LIBS instead)
else
$(call deprecate,1.1,LINK_SHLIBS is deprecated; as of version 1.0.3$(\
\_comma) abuild always links shared libraries)
endif
endif
endif
# These functions expand to the complete list of debug, optimization
# and warning flags that apply to a specific file. In this case,
# file-specific values override general values.
# Usage: $(call file_dflags,src)
define file_dflags
$(call value_if_defined,DFLAGS_$(call strip_srcdir,$(1)),$(DFLAGS))
endef
# Usage: $(call file_oflags,src)
define file_oflags
$(call value_if_defined,OFLAGS_$(call strip_srcdir,$(1)),$(OFLAGS))
endef
# Usage: $(call file_wflags,src)
define file_wflags
$(call value_if_defined,WFLAGS_$(call strip_srcdir,$(1)),$(WFLAGS))
endef
# Usage: $(call file_dowflags,src)
define file_dowflags
$(call file_dflags,$(1)) $(call file_oflags,$(1)) $(call file_wflags,$(1))
endef
# These functions expand to the complete list of "extra" flags that
# apply to a specific file. They are, from general to specific:
# XCPPFLAGS, then XCPPFLAGS_file (and similar for CFLAGS and
# CXXFLAGS). We use $(call value_if_defined ...) to access the
# file-specific variables to avoid the undefined variable warning for
# each undefined variable since not defining these is the usual case.
# Usage: $(call file_cppflags,src)
define file_cppflags
$(call include_flags,$(INCLUDES) $(SRCDIR) .) $(call file_dowflags,$(1))\
\ $(XCPPFLAGS) $(call value_if_defined,XCPPFLAGS_$(call strip_srcdir,$(1)),)
endef
# Usage: $(call file_cflags,src)
define file_cflags
$(call file_cppflags,$(1)) $(XCFLAGS) $(call value_if_defined,XCFLAGS_$(\
\call strip_srcdir,$(1)),)
endef
# Usage: $(call file_cxxflags,src)
define file_cxxflags
$(call file_cflags,$(1)) $(XCXXFLAGS) $(call value_if_defined,XCXXFLAGS_\
\$(call strip_srcdir,$(1)),)
endef
# Usage: $(call use_pic,src): determines the value of pic to pass to make_obj
define use_pic
$(and $(filter $(call strip_srcdir,$(<)), $(_lib_SRCS)), $(if $(call val\
\ue_if_defined,NOPIC_$(call strip_srcdir,$(<)),),,1))
endef
LANGNAME_c := C
LANGNAME_cxx := C++
CCXX_GEN_DEPS ?= $(GEN_DEPS)
CCCXX_LINKER = $(if $(LINK_AS_C),$(LINK_c),$(LINK_cxx))
# Usage: $(call ccxx_compile,language): language = { c | cxx }
define ccxx_compile
@: $(call QTC.TC,abuild,ccxx.mk ccxx_compile,0)
@mkdir -p $(dir $@)
$(CCXX_GEN_DEPS) \
"$(PREPROCESS_$(1)) $(call file_cppflags,$<)" \
"$<" "$@" "$*.$(DEP)"
-$(RM) $@
@$(PRINT) "Compiling $< as $(LANGNAME_$(1))"
$(call make_obj,$(COMPILE_$(1)),$(call use_pic,$<), \
$(call file_$(1)flags,$<),$<,$@)
endef
# Usage: $(call ccxx_preprocess,language): language = { c | cxx }
define ccxx_preprocess
@mkdir -p $(dir $@)
@$(PRINT) "Preprocessing $< as $(LANGNAME_$(1)) to $@"
-$(RM) $@
$(PREPROCESS_$(1)) $(call file_cppflags,$<) $< > $@
endef
# Usage: $(call ccxx_make_static_lib,library-base)
define ccxx_make_static_lib
@: $(call QTC.TC,abuild,ccxx.mk ccxx_make_static_lib,0)
-$(RM) $(call libname,$(1))
@$(PRINT) "Creating $(1) library"
$(call make_lib,$(OBJS_lib_$(1)),$(1))
endef
# Usage: $(call ccxx_make_shared_lib,library-base)
define ccxx_make_shared_lib
@: $(call QTC.TC,abuild,ccxx.mk ccxx_make_shared_lib,0)
@$(PRINT) "Creating $(1) shared library"
er-out $(_TARGETS_shared_lib),$(LIBS)),$(1),$(word 1,$(SHLIB_$(1))),$(wo\
\rd 2,$(SHLIB_$(1))),$(word 3,$(SHLIB_$(1))))
endef
# Usage: $(call ccxx_make_bin,executable-base)
define ccxx_make_bin
@: $(call QTC.TC,abuild,ccxx.mk ccxx_make_bin,0)
-$(RM) $(call binname,$(1))
@$(PRINT) "Creating $(1) executable"
$(call make_bin,$(CCCXX_LINKER),$(XCFLAGS) $(XCXXFLAGS) $(DFLAGS\
\) $(OFLAGS) $(WFLAGS),$(XLINKFLAGS),$(OBJS_bin_$(1)),$(LIBDIRS),$(LIBS),$(1))
endef
c_to_o = $(call ccxx_compile,c)
cxx_to_o = $(call ccxx_compile,cxx)
lib_c_to_o = $(c_to_o)
bin_c_to_o = $(c_to_o)
lib_cxx_to_o = $(cxx_to_o)
bin_cxx_to_o = $(cxx_to_o)
c_to_i = $(call ccxx_preprocess,c)
cxx_to_i = $(call ccxx_preprocess,cxx)
# For each SRCS_lib_x and SRCS_bin_x, create corresponding OBJS_lib_x
# and OBJS_bin_x by transforming all .c, .cc, and .cpp file names to
# object file names.
$(foreach T,$(TARGETS_lib),\
$(eval OBJS_lib_$(T) := \
$(call x_to_y,c,$(LOBJ),SRCS_lib_$(T)) \
$(call x_to_y,cc,$(LOBJ),SRCS_lib_$(T)) \
$(call x_to_y,cpp,$(LOBJ),SRCS_lib_$(T))))
$(foreach T,$(TARGETS_bin),\
$(eval OBJS_bin_$(T) := \
$(call x_to_y,c,$(OBJ),SRCS_bin_$(T)) \
$(call x_to_y,cc,$(OBJ),SRCS_bin_$(T)) \
$(call x_to_y,cpp,$(OBJ),SRCS_bin_$(T))))
# Combine all sources from various bases into types (lib and bin) and
# then separate by suffix. These variables are used for static pattern
# rules to invoke the correct compilation steps for files based on
# suffix and target type.
_lib_SRCS := $(sort $(foreach T,$(TARGETS_lib),$(SRCS_lib_$(T))))
_bin_SRCS := $(sort $(foreach T,$(TARGETS_bin),$(SRCS_bin_$(T))))
_all_SRCS := $(sort $(_lib_SRCS) $(_bin_SRCS))
_lib_COBJS := $(call x_to_y,c,$(LOBJ),_lib_SRCS)
_lib_CCOBJS := $(call x_to_y,cc,$(LOBJ),_lib_SRCS)
_lib_CPPOBJS := $(call x_to_y,cpp,$(LOBJ),_lib_SRCS)
_bin_COBJS := $(call x_to_y,c,$(OBJ),_bin_SRCS)
_bin_CCOBJS := $(call x_to_y,cc,$(OBJ),_bin_SRCS)
_bin_CPPOBJS := $(call x_to_y,cpp,$(OBJ),_bin_SRCS)
_Cpproc := $(call x_to_y,c,i,_lib_SRCS) $(call x_to_y,c,i,_bin_SRCS)
_CCpproc := $(call x_to_y,cc,i,_lib_SRCS) $(call x_to_y,cc,i,_bin_SRCS)
_CPPpproc := $(call x_to_y,cpp,i,_lib_SRCS) $(call x_to_y,cpp,i,_bin_SRCS)
# Make sure ".." doesn't appear in any source file names.
ifneq ($(words $(findstring /../,$(_all_SRCS)) $(filter ../%,$(_all_SRCS))), 0)
_qtx_dummy := $(call QTC.TC,abuild,ccxx.mk ERR .. in srcs,0)
$(error The path component ".." may not appear in any source file names)
endif
# Include dependency files for each source file
_lib_OBJS := $(_lib_COBJS) $(_lib_CCOBJS) $(_lib_CPPOBJS)
_bin_OBJS := $(_bin_COBJS) $(_bin_CCOBJS) $(_bin_CPPOBJS)
_all_DEPS := $(call x_to_y,$(LOBJ),$(DEP),_lib_OBJS) \
$(call x_to_y,$(OBJ),$(DEP),_bin_OBJS)
# Remove any extraneous dep files
_extra_deps := $(filter-out $(_all_DEPS),$(wildcard *.$(DEP)))
ifneq ($(words $(_extra_deps)),0)
_qtx_dummy := $(call QTC.TC,abuild,ccxx.mk remove extra deps,0)
DUMMY := $(shell $(PRINT) 1>&2 Removing extraneous $(DEP) files)
DUMMY := $(shell $(RM) $(_extra_deps))
endif
-include $(_all_DEPS)
# Define static pattern rules that invoke the proper compilation
# function for each object file.
$(_lib_COBJS): %.$(LOBJ): %.c
$(lib_c_to_o)
$(_lib_CCOBJS): %.$(LOBJ): %.cc
$(lib_cxx_to_o)
$(_lib_CPPOBJS): %.$(LOBJ): %.cpp
$(lib_cxx_to_o)
$(_bin_COBJS): %.$(OBJ): %.c
$(bin_c_to_o)
$(_bin_CCOBJS): %.$(OBJ): %.cc
$(bin_cxx_to_o)
$(_bin_CPPOBJS): %.$(OBJ): %.cpp
$(bin_cxx_to_o)
$(_Cpproc): %.i: %.c FORCE
$(c_to_i)
$(_CCpproc): %.i: %.cc FORCE
$(cxx_to_i)
$(_CPPpproc): %.i: %.cpp FORCE
$(cxx_to_i)
# Ensure that we can use -llib dependencies properly.
.LIBPATTERNS ?=
$(foreach PAT,$(.LIBPATTERNS),$(eval vpath $(PAT) $(LIBDIRS)))
# For each library and executable target, create a rule that makes the
# target dependent on its objects. Also make executable targets
# depend on the libraries in LIBS, which includes local libraries,
# and shared libary targets depend on the static libraries in LIBS.
# In addition, we make local executable targets explicitly depend on
# local library targets. The reason for doing this as well as adding
# the -llib target for local libraries is that make will not try to
# build the -llib target if it doesn't exist.
l_LIBS = $(foreach L,$(LIBS),-l$(L))
l_not_local_shared = $(foreach L,$(filter-out $(_TARGETS_shared_lib),$(L\
\IBS)),-l$(L))
$(foreach T,$(_TARGETS_static_lib),\
$(eval $(call libname,$(T)): $(OBJS_lib_$(T)) ; \
$(call ccxx_make_static_lib,$(T))))
$(foreach T,$(_TARGETS_shared_lib),\
$(eval $(call ccxx_shlibname,$(T)): $(OBJS_lib_$(T)) $(l_not_local_sh\
\ared) $(_static_lib_TARGETS); \
$(call ccxx_make_shared_lib,$(T))))
$(foreach T,$(TARGETS_bin),\
$(eval $(call binname,$(T)): $(OBJS_bin_$(T)) $(l_LIBS) $(_lib_TARGETS); \
$(call ccxx_make_bin,$(T))))
# For each local library target x that does not exist, make -lx depend
# on $(call libname,x). This prevents errors about -lx not existing
# when a binary target is built explicitly from clean. We avoid
# creating this dependency if the library already exists because
# otherwise make will translate this into a circular dependency when
# it replaces -lx with the actual library file in the rule.
$(foreach T,$(_TARGETS_static_lib),\
$(eval -l$(T): $(if $(wildcard $(call libname,$(T))),,$(call libname,\
\$(T)))))
$(foreach T,$(_TARGETS_shared_lib),\
$(eval -l$(T): $(if $(wildcard $(call ccxx_shlibname,$(T))),,$(call c\
\cxx_shlibname,$(T)))))
_all_obj := $(sort $(_lib_OBJS) $(_bin_OBJS))
# The list of all libraries includes static versions of the shared
# libraries as well since on some platforms (Windows), creating a
# shared library also creates a static library of the same name.
_all_lib := $(sort \
$(foreach T,$(TARGETS_lib),$(call libname,$(T))) \
$(foreach T,$(_TARGETS_shared_lib),$(call ccxx_all_shlibnames,$(T))))
_all_bin := $(foreach T,$(TARGETS_bin),$(call binname,$(T)))
# Check for and remove orphan targets
IGNORE_TARGETS ?=
_existing_obj := $(sort $(wildcard *.$(OBJ) *.$(LOBJ)))
_extra_obj := $(filter-out $(_all_obj) $(IGNORE_TARGETS),$(_existing_obj))
ifeq ($(words $(_extra_obj)),0)
# No extra objects found; check for other extra targets. Check for
# libraries and shared libraries, and if we can recognize executables
# as such (they have some recognizable suffix), check for them as
# well.
_all_other := $(_all_lib)
_existing_other := $(sort $(wildcard $(call libname,*) $(call shlibname\
\,*,,,)))
ifneq ($(call binname,*),*)
# If executables are recognizable as such
_all_other += $(_all_bin)
_existing_other += $(sort $(wildcard $(call binname,*)))
endif
_extra_other := $(filter-out $(_all_other) $(IGNORE_TARGETS),$(_existin\
\g_other))
ifneq ($(words $(_extra_other)),0)
_qtx_dummy := $(call QTC.TC,abuild,ccxx.mk found extra other,0)
# For all binary and library targets to relink
DUMMY := $(shell $(PRINT) 1>&2 Extra targets found: removing libraries\
\ and binaries)
DUMMY := $(shell $(RM) $(_extra_other) $(_all_lib) $(_all_bin))
endif
else
# Extra object files found; remove all extra objects as well as any
# library or binary targets which we want to force to be recreated.
_qtx_dummy := $(call QTC.TC,abuild,ccxx.mk found extra objs,0)
DUMMY := $(shell $(PRINT) 1>&2 Extra object files found: removing libra\
\ries and binaries)
DUMMY := $(shell $(RM) $(_extra_obj) $(_all_lib) $(_all_bin))
endif
# Create a debugging target that shows values of some critical
# variables.
.PHONY: ccxx_debug
ccxx_debug::
@: $(call QTC.TC,abuild,ccxx.mk ccxx_debug,0)
@$(PRINT) INCLUDES = $(INCLUDES)
@$(PRINT) LIBDIRS = $(LIBDIRS)
@$(PRINT) LIBS = $(LIBS)
# Include built-in support for certain code generators. These should
# have been plugins, but they were added before plugins were
# supported.
include $(abMK)/standard-code-generators.mk
Here we include a complete copy of
rules/groovy/java.groovy and
rules/groovy/groovy.groovy.
import org.abuild.groovy.Util
//
// NOTE: when modifying this file, you must keep java-help.txt up to
// date!
//
class JavaRules
{
def abuild
def ant
def pathSep
List<String> defaultCompileClassPath = []
List<String> defaultManifestClassPath = []
List<String> defaultPackageClassPath = []
List<String> defaultWrapperClassPath = []
JavaRules(abuild, ant)
{
this.abuild = abuild
this.ant = ant
this.pathSep = ant.project.properties['path.separator']
}
def getPathVariable(String var)
{
String result = abuild.resolveAsString("java.dir.${var}")
if (! new File(result).isAbsolute())
{
result = new File(abuild.sourceDirectory, result)
}
// Wrap this in a file object and call absolutePath so
// paths are formatted appropriately for the operating
// system.
new File(result).absolutePath
}
def getPathListVariable(String var)
{
abuild.resolveAsList("java.dir.${var}").collect {
if (new File(it).isAbsolute())
{
new File(it).absolutePath
}
else
{
new File(abuild.sourceDirectory, it).absolutePath
}
}
}
def getArchiveAttributes()
{
[
'distdir': getPathVariable('dist'),
'classesdir': getPathVariable('classes'),
'resourcesdirs': [getPathVariable('resources'),
getPathVariable('generatedResources')],
'extraresourcesdirs' : getPathListVariable('extraResources'),
'metainfdirs' : [getPathVariable('metainf'),
getPathVariable('generatedMetainf')],
'extrametainfdirs' : getPathListVariable('extraMetainf'),
'extramanifestkeys' : [:]
]
}
def initTarget()
{
// We have three classpath interface variables that we combine
// in various ways to initialize our various classpath
// variables here. See java_help.txt for details.
defaultCompileClassPath.addAll(
abuild.resolve('abuild.classpath') ?: [])
defaultCompileClassPath.addAll(
abuild.resolve('abuild.classpath.external') ?: [])
defaultManifestClassPath.addAll(
abuild.resolve('abuild.classpath.manifest') ?: [])
defaultPackageClassPath.addAll(
abuild.resolve('abuild.classpath') ?: [])
defaultWrapperClassPath.addAll(defaultCompileClassPath)
// Filter out jars built by this build item from the compile
// and manifest classpaths.
def dist = getPathVariable('dist')
defaultCompileClassPath = defaultCompileClassPath.grep {
new File(it).parent != dist
}
defaultManifestClassPath = defaultManifestClassPath.grep {
new File(it).parent != dist
}
}
def compile(Map attributes)
{
def srcdirs = attributes.remove('srcdirs')
srcdirs.addAll(attributes.remove('extrasrcdirs'))
srcdirs = srcdirs.grep { dir -> new File(dir).isDirectory() }
if (! srcdirs)
{
return
}
// Remove attributes that are handled specially
def compileClassPath = attributes.remove('classpath')
def includes = attributes.remove('includes')
def excludes = attributes.remove('excludes')
def compilerargs = attributes.remove('compilerargs')
def javacAttrs = attributes
javacAttrs['classpath'] = compileClassPath.join(pathSep)
ant.mkdir('dir' : attributes['destdir'])
ant.javac(javacAttrs) {
srcdirs.each { dir -> src('path' : dir) }
compilerargs?.each { arg -> compilerarg('value' : arg) }
includes?.each { include('name' : it) }
excludes?.each { exclude('name' : it) }
}
}
def compileTarget()
{
def defaultAttrs = [
'srcdirs': ['src', 'generatedSrc'].collect {getPathVariable(it) },
'extrasrcdirs' : getPathListVariable('extraSrc'),
'destdir': getPathVariable('classes'),
'classpath': this.defaultCompileClassPath,
// Would be nice to turn path warnings back on
'compilerargs': ['-Xlint', '-Xlint:-path'],
'debug': 'true',
'deprecation': 'on',
'includeantruntime':
abuild.resolveAsString('java.includeAntRuntime')
]
abuild.runActions('java.compile', this.&compile, defaultAttrs)
}
def packageJarGeneral(Map attributes, String namekey)
{
// Remove keys that we will handle expicitly
def jarname = attributes.remove(namekey)
if (! jarname)
{
return
}
def distdir = attributes.remove('distdir')
def classesdir = attributes.remove('classesdir')
def resourcesdirs = attributes.remove('resourcesdirs')
resourcesdirs.addAll(attributes.remove('extraresourcesdirs'))
def metainfdirs = attributes.remove('metainfdirs')
metainfdirs.addAll(attributes.remove('extrametainfdirs'))
def mainclass = attributes.remove('mainclass')
def manifestClassPath = attributes.remove('manifestclasspath')
def extramanifestkeys = attributes.remove('extramanifestkeys')
def filesToPackage = attributes.remove('filestopackage')
// Take only last path element for each manifest class path
manifestClassPath = manifestClassPath.collect { new File(it).name }
// Filter out non-existent directories
def filesets = [classesdir, resourcesdirs].flatten().grep {
new File(it).isDirectory()
}
metainfdirs = metainfdirs.grep {
new File(it).isDirectory()
}
ant.mkdir('dir' : distdir)
def jarAttrs = attributes
jarAttrs['destfile'] = "${distdir}/${jarname}"
ant.jar(jarAttrs) {
metainfdirs.each { metainf('dir': it) }
filesets.each { fileset('dir': it) }
filesToPackage?.each {
File f = new File(it)
if (! f.isAbsolute())
{
f = new File(abuild.sourceDirectory, it)
}
if (f.absolutePath !=
new File("${distdir}/${jarname}").absolutePath)
{
fileset('file': f.absolutePath)
}
}
manifest {
if (manifestClassPath)
{
attribute('name' : 'Class-Path',
'value' : manifestClassPath.join(' '))
}
if (mainclass)
{
attribute('name' : 'Main-Class', 'value' : mainclass)
}
extramanifestkeys.each() {
key, value -> attribute('name' : key, 'value' : value)
}
}
}
}
def packageJar(Map attributes)
{
packageJarGeneral(attributes, 'jarname')
}
def packageJarTarget()
{
def defaultAttrs =
[
'jarname': abuild.resolveAsString('java.jarName'),
'mainclass' : abuild.resolveAsString('java.mainClass'),
'manifestclasspath' : defaultManifestClassPath,
]
archiveAttributes.each { k, v -> defaultAttrs[k] = v }
abuild.runActions('java.packageJar', this.&packageJar, defaultAttrs)
}
def signJars(Map attributes)
{
def alias = attributes.remove('alias')
def storepass = attributes.remove('storepass')
if (! (alias && storepass))
{
return
}
def jarsToSign = attributes.remove('jarstosign')
def signdir = new File(attributes.remove('signdir'))
if (! (jarsToSign || signdir.isDirectory()))
{
return
}
ant.mkdir('dir': signdir)
jarsToSign.each {
def src = new File(it)
if ((src.parent != signdir.absolutePath) &&
(src.name =~ /(?i:\.jar)$/))
{
def dest = new File(signdir, src.name)
ant.copy('file': src.absolutePath,
'tofile': dest.absolutePath)
}
}
def keystore = attributes.remove('keystore')
def keypass = attributes.remove('keypass')
if (keystore && (! new File(keystore).absolutePath))
{
keystore =
new File(abuild.sourceDirectory + "/$keystore").absolutePath
}
def includes = attributes.remove('includes')
def signjarAttrs = attributes
signjarAttrs['alias'] = alias
signjarAttrs['storepass'] = storepass
if (keystore)
{
signjarAttrs['keystore'] = keystore
}
if (keypass)
{
signjarAttrs['keypass'] = keypass
}
ant.signjar(signjarAttrs) {
fileset('dir': signdir.absolutePath, 'includes': includes)
}
}
def signJarsTarget()
{
def defaultAttrs = [
'includes': '*.jar',
'signdir': getPathVariable('signedJars'),
'jarstosign' : abuild.resolve('java.jarsToSign'),
'alias': abuild.resolve('java.sign.alias'),
'storepass': abuild.resolve('java.sign.storepass'),
'keystore': abuild.resolve('java.sign.keystore'),
'keypass': abuild.resolve('java.sign.keypass'),
'lazy': true
]
abuild.runActions('java.signJars', this.&signJars, defaultAttrs)
}
def packageHighLevelArchive(Map attributes)
{
packageJarGeneral(attributes, 'highlevelarchivename')
}
def packageHighLevelArchiveTarget()
{
def defaultAttrs = [
'highlevelarchivename':
abuild.resolveAsString('java.highLevelArchiveName'),
'filestopackage' : defaultPackageClassPath,
]
archiveAttributes.each { k, v -> defaultAttrs[k] = v }
abuild.runActions('java.packageHighLevelArchive',
this.&packageHighLevelArchive, defaultAttrs)
}
def packageWar(Map attributes)
{
// Remove keys that we will handle expicitly
def warname = attributes.remove('warname')
def webxml = attributes.remove('webxml')
if (! (warname && webxml))
{
return
}
if (! new File(webxml).isAbsolute())
{
webxml = new File(abuild.sourceDirectory, webxml).absolutePath
}
def distdir = attributes.remove('distdir')
def resourcesdirs = attributes.remove('resourcesdirs')
resourcesdirs.addAll(attributes.remove('extraresourcesdirs'))
resourcesdirs << attributes.remove('classesdir')
def webdirs = attributes.remove('webdirs')
webdirs.addAll(attributes.remove('extrawebdirs'))
webdirs << attributes.remove('signedjars')
def metainfdirs = attributes.remove('metainfdirs')
metainfdirs.addAll(attributes.remove('extrametainfdirs'))
def extramanifestkeys = attributes.remove('extramanifestkeys')
def webinfdirs = attributes.remove('webinfdirs')
webinfdirs.addAll(attributes.remove('extrawebinfdirs'))
def libfiles = attributes.remove('libfiles')
def filesToPackage = attributes.remove('filestopackage')
// Filter out non-existent directories
resourcesdirs = resourcesdirs.grep { new File(it).isDirectory() }
webdirs = webdirs.grep { new File(it).isDirectory() }
metainfdirs = metainfdirs.grep { new File(it).isDirectory() }
webinfdirs = webinfdirs.grep { new File(it).isDirectory() }
ant.mkdir('dir' : distdir)
def warAttrs = attributes
warAttrs['destfile'] = "${distdir}/${warname}"
warAttrs['webxml'] = webxml
ant.war(warAttrs) {
webinfdirs.each { webinf('dir': it) }
metainfdirs.each { metainf('dir': it) }
webdirs.each { fileset('dir': it) }
resourcesdirs.each { classes('dir': it) }
libfiles.each {
File f = new File(it)
if (f.absolutePath !=
new File("${distdir}/${warname}").absolutePath)
{
lib('file': f.absolutePath)
}
}
filesToPackage?.each {
File f = new File(it)
if (! f.isAbsolute())
{
f = new File(abuild.sourceDirectory, it)
}
if (f.absolutePath !=
new File("${distdir}/${warname}").absolutePath)
{
fileset('file': f.absolutePath)
}
}
manifest {
extramanifestkeys.each() {
key, value -> attribute('name' : key, 'value' : value)
}
}
}
}
def packageWarTarget()
{
def defaultAttrs = [
'warname': abuild.resolveAsString('java.warName'),
'webxml': abuild.resolveAsString('java.webxml'),
'webdirs': [getPathVariable('webContent'),
getPathVariable('generatedWebContent')],
'extrawebdirs' : getPathListVariable('extraWebContent'),
'webinfdirs' : [getPathVariable('webinf'),
getPathVariable('generatedWebinf')],
'extrawebinfdirs' : getPathListVariable('extraWebinf'),
'signedjars' : getPathVariable('signedJars'),
'libfiles' : abuild.resolveAsList('java.warLibJars')
]
archiveAttributes.each { k, v -> defaultAttrs[k] = v }
abuild.runActions('java.packageWar', this.&packageWar, defaultAttrs)
}
def packageEar(Map attributes)
{
// Remove keys that we will handle expicitly
def earname = attributes.remove('earname')
def appxml = attributes.remove('appxml')
if (! (earname && appxml))
{
return
}
if (! new File(appxml).isAbsolute())
{
appxml = new File(abuild.sourceDirectory, appxml).absolutePath
}
def distdir = attributes.remove('distdir')
def resourcesdirs = attributes.remove('resourcesdirs')
resourcesdirs.addAll(attributes.remove('extraresourcesdirs'))
def metainfdirs = attributes.remove('metainfdirs')
metainfdirs.addAll(attributes.remove('extrametainfdirs'))
def extramanifestkeys = attributes.remove('extramanifestkeys')
def filesToPackage = attributes.remove('filestopackage')
// Filter out non-existent directories
resourcesdirs = resourcesdirs.grep { new File(it).isDirectory() }
metainfdirs = metainfdirs.grep { new File(it).isDirectory() }
ant.mkdir('dir' : distdir)
def earAttrs = attributes
earAttrs['destfile'] = "${distdir}/${earname}"
earAttrs['appxml'] = appxml
ant.ear(earAttrs) {
metainfdirs.each { metainf('dir': it) }
resourcesdirs.each { fileset('dir': it) }
filesToPackage.each {
File f = new File(it)
if (! f.isAbsolute())
{
f = new File(abuild.sourceDirectory, it)
}
if (f.absolutePath !=
new File("${distdir}/${earname}").absolutePath)
{
fileset('file': f.absolutePath)
}
}
manifest {
extramanifestkeys.each() {
key, value -> attribute('name' : key, 'value' : value)
}
}
}
}
def packageEarTarget()
{
def defaultAttrs = [
'earname': abuild.resolveAsString('java.earName'),
'appxml': abuild.resolveAsString('java.appxml'),
'filestopackage' : defaultPackageClassPath,
]
archiveAttributes.each { k, v -> defaultAttrs[k] = v }
defaultAttrs.remove('classesdir')
abuild.runActions('java.packageEar', this.&packageEar, defaultAttrs)
}
def javadoc(Map attributes)
{
def srcdirs = attributes.remove('srcdirs')
srcdirs.addAll(attributes.remove('extrasrcdirs'))
srcdirs = srcdirs.grep { dir -> new File(dir).isDirectory() }
if (! srcdirs)
{
return
}
def javadocAttrs = attributes
javadocAttrs['sourcepath'] = srcdirs.join(pathSep)
javadocAttrs['classpath'] = attributes['classpath'].join(pathSep)
ant.javadoc(javadocAttrs)
}
def javadocTarget()
{
def title = abuild.resolveAsString('java.javadocTitle')
// case of Doctitle and Windowtitle are for consistency with
// ant task
def defaultAttrs = [
'Doctitle': title,
'Windowtitle': title,
'srcdirs': ['src', 'generatedSrc'].collect {getPathVariable(it) },
'classpath': this.defaultCompileClassPath,
'extrasrcdirs': getPathListVariable('extraSrc'),
'access': abuild.resolveAsString('java.doc.accessLevel',
'protected'),
'destdir': getPathVariable('generatedDoc')
]
abuild.runActions('java.javadoc', this.&javadoc, defaultAttrs)
}
def wrapper(Map attributes)
{
def wrapperName = attributes['name']
def mainClass = attributes['mainclass']
def jarName = attributes['jarname']
if (! (wrapperName && mainClass))
{
return
}
def wrapperDir = attributes['dir']
def wrapperPath = new File("$wrapperDir/$wrapperName").absolutePath
def distDir = attributes['distdir']
def wrapperClassPath = attributes['classpath']
if (jarName)
{
wrapperClassPath << new File("$distDir/$jarName").absolutePath
}
wrapperClassPath = wrapperClassPath.join(pathSep)
// The wrapper script has different contents on Windows and
// UNIX. This has the unfortunate side effect of making it
// impossible to run wrapper scripts in an OS other than the
// one on which they were generated. However, since wrapper
// scripts contain paths to things that may themselves be
// system dependent, this doesn't really add any new problems.
// As such, wrapper script generation is done unconditionally,
// so if you run abuild wrapper on two different systems,
// they'll each leave behind their own versions of the wrapper
// script.
if (Util.inWindows)
{
ant.echo('file' : "${wrapperPath}.bat", """@echo off
java -classpath ${wrapperClassPath} ${mainClass} %1 %2 %3 %4 %5 %6 %7 %8 %9
""")
// In case we're in Cygwin...
ant.echo('file' : wrapperPath, '''#!/bin/sh
exec `dirname $0`/`basename $0`.bat ${1+"$@"}
''')
}
else
{
ant.echo('file' : wrapperPath,
"""#!/bin/sh
exec java -classpath ${wrapperClassPath} ${mainClass} \${1+\"\$@\"}
""")
}
ant.chmod('file' : wrapperPath, 'perm' : 'a+x')
}
def wrapperTarget()
{
def defaultAttrs = [
'name': abuild.resolveAsString('java.wrapperName'),
'mainclass': abuild.resolveAsString('java.mainClass'),
'jarname': abuild.resolveAsString('java.jarName'),
'dir': abuild.buildDirectory.absolutePath,
'distdir': getPathVariable('dist'),
'classpath': defaultWrapperClassPath
]
abuild.runActions('java.wrapper', this.&wrapper, defaultAttrs)
}
def testJunit(Map attributes)
{
def testsuite = attributes.remove('testsuite')
def batchIncludes = attributes.remove('batchincludes')
def batchExcludes = attributes.remove('batchexcludes')
if (! (testsuite || batchIncludes))
{
return
}
def distdir = attributes.remove('distdir')
def classesdir = attributes.remove('classesdir')
def junitdir = attributes.remove('junitdir')
def reportdir = attributes.remove('reportdir')
def testClassPath = attributes.remove('classpath')
ant.mkdir('dir': junitdir)
def junitAttrs = attributes
// Make sure we run junitreport even if junit fails and
// haltonfailure is set.
try
{
ant.junit(junitAttrs) {
classpath {
testClassPath.each {
pathelement('location': it)
}
fileset('dir': distdir, 'includes': '*.jar')
}
if (testsuite)
{
test('name': testsuite,
'todir': junitdir) {
formatter('type': 'xml')
}
}
if (batchIncludes)
{
batchtest('todir': junitdir) {
fileset('dir': classesdir) {
include('name': batchIncludes)
if (batchExcludes)
{
exclude('name': batchExcludes)
}
}
formatter('type': 'xml')
}
}
}
}
finally
{
ant.junitreport('todir': junitdir) {
fileset('dir': junitdir, 'includes': 'TEST-*.xml')
report('format': 'frames', 'todir': reportdir)
}
}
}
def testJunitTarget()
{
def defaultAttrs = [
'testsuite': abuild.resolveAsString('java.junitTestsuite'),
'batchincludes': abuild.resolveAsString('java.junitBatchIncludes'),
'batchexcludes': abuild.resolveAsString('java.junitBatchExcludes'),
'classpath': defaultWrapperClassPath,
'classesdir': getPathVariable('classes'),
'distdir': getPathVariable('dist'),
'junitdir': getPathVariable('junit'),
'reportdir': getPathVariable('junitHtml'),
'printsummary': 'yes',
'haltonfailure': 'yes',
'fork': 'true'
]
abuild.runActions('java.junit', this.&testJunit, defaultAttrs)
}
}
def javaRules = new JavaRules(abuild, ant)
abuild.addTargetClosure('init', javaRules.&initTarget)
abuild.addTargetClosure('test-junit', javaRules.&testJunitTarget)
abuild.addTargetDependencies('all', ['package', 'wrapper'])
abuild.addTargetDependencies('package', ['package-ear'])
abuild.addTargetDependencies('generate', ['init'])
abuild.addTargetDependencies('doc', ['javadoc'])
abuild.addTargetDependencies('test-only', ['test-junit'])
abuild.configureTarget('compile', 'deps' : ['generate'],
javaRules.&compileTarget)
abuild.configureTarget('package-jar', 'deps' : ['compile'],
javaRules.&packageJarTarget)
abuild.configureTarget('sign-jars', 'deps' : ['package-jar'],
javaRules.&signJarsTarget)
abuild.configureTarget('package-high-level-archive', 'deps' : ['sign-jars'],
javaRules.&packageHighLevelArchiveTarget)
abuild.configureTarget('package-war', 'deps' : ['sign-jars'],
javaRules.&packageWarTarget)
abuild.configureTarget('package-ear', 'deps' : ['package-high-level-archive',
'package-war'],
javaRules.&packageEarTarget)
abuild.configureTarget('javadoc', 'deps' : ['compile'],
javaRules.&javadocTarget)
abuild.configureTarget('wrapper', 'deps' : ['package-jar'],
javaRules.&wrapperTarget)
import org.abuild.groovy.Util
class GroovyRules
{
def abuild
def ant
def pathSep
List<String> defaultCompileClassPath = []
GroovyRules(abuild, ant)
{
this.abuild = abuild
this.ant = ant
this.pathSep = ant.project.properties['path.separator']
}
def getPathVariable(String var, String prefix)
{
String result = abuild.resolveAsString("${prefix}.dir.${var}")
if (! new File(result).isAbsolute())
{
result = new File(abuild.sourceDirectory, result)
}
new File(result).absolutePath
}
def initTarget()
{
// We have three classpath interface variables that we combine
// in various ways to initialize our various classpath
// variables here. See java_help.txt for details. For
// groovy, we are concerned only with the compile classpath.
// We rely on the java rules for everything else.
defaultCompileClassPath.addAll(
abuild.resolve('abuild.classpath') ?: [])
defaultCompileClassPath.addAll(
abuild.resolve('abuild.classpath.external') ?: [])
// Filter out jars built by this build item from the compile
// classpath.
def dist = getPathVariable('dist', 'java')
defaultCompileClassPath = defaultCompileClassPath.grep {
dir -> new File(dir).parent != dist
}
}
def compile(Map attributes)
{
attributes['srcdirs'] = attributes['srcdirs'].grep {
dir -> new File(dir).isDirectory()
}
if (! attributes['srcdirs'])
{
return
}
// Remove attributes that are handled specially
def compileClassPath = attributes.remove('classpath')
def includes = attributes.remove('includes')
def excludes = attributes.remove('excludes')
def srcdirs = attributes.remove('srcdirs')
def groovycArgs = attributes
groovycArgs['classpath'] =
getPathVariable('classes', 'java') + pathSep +
compileClassPath.join(pathSep)
ant.mkdir('dir' : attributes['destdir'])
ant.groovyc(groovycArgs) {
srcdirs.each { dir -> src('path' : dir) }
includes?.each { include('name' : it) }
excludes?.each { exclude('name' : it) }
}
}
def compileTarget()
{
def defaultAttrs = [
'srcdirs': ['src', 'generatedSrc'].collect {
getPathVariable(it, 'groovy')
},
'destdir': getPathVariable('classes', 'java'),
'classpath': this.defaultCompileClassPath,
]
abuild.runActions('groovy.compile', this.&compile, defaultAttrs)
}
}
ant.taskdef('name': 'groovyc',
'classname': 'org.codehaus.groovy.ant.Groovyc')
def groovyRules = new GroovyRules(abuild, ant)
if (! abuild.resolve('abuild.rules').grep { it == 'java' })
{
abuild.fail('use of groovy rules requires use of java rules')
}
abuild.addTargetClosure('init', groovyRules.&initTarget)
abuild.addTargetClosure('compile', groovyRules.&compileTarget)
Table of Contents
Warning
This appendix briefly describes the deprecated xml-based ant
backend, which was the only mechanism for building Java code in
abuild 1.0. To ease the transition to the newer Groovy-based
framework, which still uses ant through Groovy's
AntBuilder object, the old xml-based ant
framework has been left largely intact. With one notable change,
it works just as it did in abuild 1.0. New code should not use
this framework. The rest of this appendix is mostly excerpts
from abuild 1.0's documentation with explicit examples removed.
The text may not be entirely coherent because of the omissions.
Although much of the text is written as if this is the supported
way to build Java code (which it was when the text was originally
written), in no way should anything in this appendix be taken as
a suggestion that this backend should be used for new code.
The one major difference is that abuild now invokes all Java
builds from a single JVM. This JVM runs one build per thread up
to the number of threads specified by abuild's
-j option. In abuild 1.0, abuild actually
ran an instance of the ant command, which it
started with its current directory set to the output directory.
Now, abuild launches ant through its Java API. Although the
basedir property is still set to the name of
the output file, certain poorly-behaved tasks that don't use that
for local paths may find themselves resolving local paths
relative to abuild's start directory instead of the output
directory. This seems like a small price to pay though given
that even the old ant framework runs many times faster using
abuild 1.1's java build launcher as it prevents creation of a
new JVM for each build.
Warning
There are two different build files that trigger use of the
deprecated xml-based ant framework:
Abuild-ant.properties for property-driven
builds, and Abuild-ant.xml for
build.xml-driven builds. The
build.xml-based approach was introduced as a
means to allow for greater flexibility in experimenting with
alternative Java build approaches. However, as use of ant
through XML files has been abandoned in abuild 1.1, it no
longer serves any purpose. The way it works is that, if your
build file is Abuild-ant.xml, abuild
launches ant from the output directory using the source
directory's Abuild-ant.xml as the build
file. Other than having to resolve paths relative to the output
directory rather than the directory containing
Abuild-ant.xml as well as having access to
the .ab-dynamic-ant.properties file, this
was essentially just using ant to do your builds. Nothing
further will be said about this method in this appendix. The
remainder of the appendix will focus only on the property-based
build method.
The Abuild-ant.properties file is the build
configuration file for Java build items. It serves the same
function for Java build items as Abuild.mk
serves for platform-independent and C/C++ build items.
Below is a list of supported properties. You can also see this list by running abuild properties-help from any Java build item.
- abuild.application-xml
The name of the
application.xmlto put into an EAR file. This must be set (along withabuild.ear-name) for an EAR file to be generated.- abuild.ear-name
The name of the EAR file, including the
.earsuffix, to be generated. This must be set for an EAR file to be generated. EAR files contain any archive files in theabuild.classpathproperty. They do not contain JAR files in theabuild.classpath.externalproperty.- abuild.hook-build-items
A comma-separated list of build items from which hooks should be loaded. For details about using hooks, see Section K.3, “Ant Hooks”.
- abuild.jar-name
The name of the JAR file, including the
.jaror other archive suffix, to be created by this build item. This must be set in order for a JAR file to be generated.- abuild.java-source-version
If specified, the value of this property will be used for the
sourceattribute of the javac task. Otherwise, the value will come from theabuild.java-target-versionif set or from the Java environment used to run ant if not.- abuild.java-target-version
If specified, the value of this property will be used for the
targetattribute of the javac task. Ifabuild.java-source-versionis not set and this property is, then this property's value will also be used to set thesourceattribute of the javac task.- abuild.junit.testsuite
This property contains the name of the class that implements this build item's junit test suite. It must be set in order for the
testtarget to attempt to run a junit test suite.- abuild.local-buildfile
The name of a local build file, specified relative to the build item's directory, that will be imported by ant. It may contain additional properties that can't be specified in a property file, resource collections, or even additional targets. If you are using this too often, please consider whether a build item hooks file should be used instead, or whether there is some functionality that is missing from the core abuild ant framework code.
- abuild.main-class
The name of a class, if any, that implements main. Setting this property causes the Main-Class attribute to be set in the manifest file. It also influences generation of the wrapper script if
abuild.wrapper-nameis set.- abuild.use-ant-runtime
If set, ant runtime libraries will be included in the compilation classpath. This can be useful for compiling custom ant tasks.
- abuild.use-local-hooks
If this and
abuild.local-buildfileare both set, abuild will attempt to run hooks from the local build file as well as from any hook build items.- abuild.war-name
The name of the WAR file, including the
.warsuffix, to be generated. This must be set for a WAR file to be generated. WAR files contain any JAR files in theabuild.classpathproperty. They do not contain JAR files in theabuild.classpath.externalproperty.- abuild.war-type
The type of the WAR file, which must be either
clientorserver. This property determines where items inabuild.classpathare copied. ForclientWAR files, classpath JAR files are copied into the root of the WAR file where the are accessible to clients' browsers. ForserverWAR files, they are copied into theWEB-INF/libdirectory of the WAR file.- abuild.web-xml
The name of the
web.xmlto put into a WAR file. This must be set (along withabuild.war-name) for a WAR file to be generated.- abuild.wrapper-name
If this property and
abuild.main-classare both set, a script by this name will be generated that will invoke the Java runtime environment to invoke this main. The script will include the classpath as determined by abuild. On Windows, the script is usable to invoke the application from a Cygwin environment, and a stand-alone batch file (that does not reference the script or require Cygwin) is generated as well.
Note that at most of one abuild.jar-name,
abuild.war-name, or
abuild.ear-name may be set for any given build
item.
Abuild's ant code assumes a
particular directory structure for Java-based build items. The
following table describes the directories abuild looks for and
what they mean. All paths are relative to the build item
directory. Note that abuild-java is the
abuild output directory for Java builds. All directories under
abuild-java are created automatically. All
other directories are optional: abuild will use them if they
exist but will not complain if they are missing. Note that the
clean target removes the entire abuild
output directory, which includes all the unused empty
directories.
src/javaThis directory contains java source code. Any files it contains will be compiled into class files and included in the JAR or WAR file.
src/resourcesAny files contained here will be copied to the JAR file named in the
abuild.jar-nameproperty or the EAR file named in theabuild.ear-nameproperty. Standard ant exclusions (for CM directories, editor backup files, etc.) are in effect. Files will be placed under the root of the JAR or EAR in the same relative location as they are tosrc/resourcesin the source tree.src/webAny files contained here will be copied to the WAR file named in the
abuild.war-nameproperty. Standard ant exclusions (for CM directories, editor backup files, etc.) are in effect. Files will be placed under the root of the WAR in the same relative location as they are tosrc/webin the source tree.src/confAny files contained here will be added to the
META-INFdirectory in the JAR or EAR file named in theabuild.jar-nameproperty orabuild.ear-nameproperty or theWEB-INFdirectory in the WAR file named in theabuild.war-nameproperty.qtestThis directory contains any qtest test suites. It must exist in order for the
testtarget to attempt to run any qtest-based test suites.abuild-java/src/javaThis directory contains any automatically generated java code. It is created automatically by abuild's ant rules and may be populated by a
generatehook from a local build file or build item hook file.abuild-java/src/resourcesThis directory is created automatically by abuild's ant rules. It should be populated with any automatically generated files that are to be added to the JAR.
abuild-java/classpathThis directory is created automatically if an EAR or WAR file is being generated. If an EAR file is generated, it is populated automatically with all files in the
abuild.classpathproperty. If a WAR file is being generated, it is populated with the jar-file versions of all the files in theabuild.classpathproperty. No action is required with this directory, but if necessary, a build item may create a pre-package hook to modify or rearrange the contents of that directory. This can be useful for certain EAR and WAR file construction cases. This mechanism may change in the future.abuild-java/classesThis directory contains class files that result from compiling files in both
src/javaandabuild-java/src/java.abuild-java/distThis directory is where abuild targets place files that are intended to be used outside of this build item. Among other things, generated archive files are placed into this directory.
abuild-java/junitThis directory contains the output of junit tests.
abuild-java/junit/htmlThis directory contains the HTML summary of junit test output. Loading
index.htmlfrom this directory into a browser will allow you to view the test results.abuild-java/emptyThis is an empty directory used to substitute in abuild's ant code for optional directories that don't exist. You should never put any files here. If you do, they will show up in generated archives in mysterious places. [66]
Most of these directory names are all made available to ant target authors through properties.
In order to make it possible for users to add additional steps to the build process, abuild's ant code makes extensive use of hooks.
Since hooks are called in separate projects from the main build, it is not useful to set properties from hook targets and expect them to be available to later targets not invoked directly by the hook.
We define several hooks whose names start with -pre- or -post-. These hooks are run before and after the corresponding target, and they are run even when the target itself is not being run. For example, the -post-package hook may be run even if the package target is not run. This makes it possible to implement packaging or compilation strategies, for example, that would be beyond abuild's ant code's ordinary purview. An example may be the implementation of a wrapper post-package hook that can create a wrapper around things in an item's classpath even if that item itself doesn't generate any new packages.
The following hooks are defined:
init: called from the init target after any internal initialization has been completed. Use this to perform any additional initialization.
generate: called from the generate target, which is a dependency of the compile target. Use this hook to automatically generate code to be compiled as part of the calling build item.
pre-compile: called right before compilation. Use this hook to perform any compilation tasks that should precede invocation of the Java compiler but follow automatic generation of any source files.
post-compile: called right after compilation. Use this hook to perform any operations that should follow invocation of the Java compiler and should be performed whether or not packaging is being done.
pre-package: called right before packaging. Use this hook to perform any operations that should be performed before packaging is performed but after all compilation steps have been completed.
post-package: called right after packaging. Use this hook to perform any operations that must follow packaging.
pre-test: called before any test suites are executed. Use this to perform any unconditional setup required for automated testing.
test: called after any internally supported test suites are run but after pre-test and before post-test. Use this hook to provide support for additional automated test frameworks beyond those supported directly by abuild.
post-test: called after any internally supported or externally provided test suites have been run.
deploy: called from the deploy target.
doc: called from the doc target.
other: called from the other target. This hook is provided as a mechanism for allowing build-item-specific or local targets to be defined that don't fit into the build in any other way. The expected mode of operation is that your -other target would depend upon various other targets that would be invoked conditionally upon the value of some user-provided property.
properties-help: called from the properties-help target. Use this hook to provide help to your users about any properties that may need to set to make use of the services provided by your hooks.
Any file that provides hooks must create an
ant-hooks.xml file. For each hook that it
wants to provide, it should create a target called
-hook where
hook is replaced by the hook name
above. For example, a hook file that provides a
generate hook would define a target called
-generate.
[67]
Abuild knows how to create JAR files, WAR files, and EAR files.
The names of the archives that abuild creates do not have to
end with the suffix corresponding to the type. In particular,
abuild is able to create JAR files that are not called
*.jar as is necessary in some instances.
When it does, it will also create a copy of that file whose name
does end in .jar for compilation purposes as
some versions of javac ignore classpath
elements that are not either directories or files whose names end
with .zip or .jar, a
behavior that is consistent with the documentation.
[68]
The structure of WAR files is slightly different from the
structure of ordinary JAR files. In particular, when
constructing a WAR file, the src/resources
directory is ignored and the src/web
directory is used instead. Anything in
src/web is added to the WAR file at its
root, just as with src/resources for a JAR
file. Other than the name, there is no difference between how
these directories are used. Additionally, the
src/conf directory is used to populate the
WEB-INF directory in the WAR rather than the
META-INF. At present, there is no way to
add files to META-INF other than manually
creating a META-INF directory under
src/web. (The
MANIFEST.MF file is created automatically by
the jar task.) Another difference is that
compiled classes go in WEB-INF/classes
instead of at the root as with a normal JAR file.
If the abuild.war-type property in
Abuild-ant.properties has the value
server, we copy all JAR files in the
abuild.classpath variable into the
WEB-INF/lib directory. If
abuild.war-type has the value
client, they are copied into the root of the
WAR file. Before copying the JAR files from the classpath into
the WAR file, abuild places them in the
abuild-java/classpath directory. If you
need to create a WAR file that includes files from
abuild.classpath both at the root and in the
WEB-INF/lib directory, create a
client WAR file and use a
pre-package hook to move some of the files
from classpath into
src/conf/lib (remember that both of these
paths are relative to the output directory, which is directory
from which ant is run) so that they
will end up in WEB-INF/lib.
The abuild.application-xml property has to be
set in Abuild-ant.properties in addition to
the abuild.ear-name property in order for an
EAR to be created.
Suppose you wanted to avoid inclusion of just the
jar-example.jar file from the EAR file. You
can do this by creating a local pre-package
hook that removes it from the classpath
directory. This same mechanism can be used to create hybrid
client/server WAR files. The main problem with this approach is
that it requires you to know the name of the archives you want to
move or remove, though this is not as bad as knowing their
locations. A comparable alternative would be to define custom
interface variables in your dependencies to name the actual
archives. These interface variables would be available as
ant properties from your local build
file.
As with a JAR file, anything in the src/conf
directory will appear under src/META-INF,
and anything in src/resources will appear in
the EAR file relative to its location in
src/resources.
[66]
If you really want to know why we do it this way, read the
comments in ant/abuild.xml in your
abuild distribution.
[67]
We use target names that start with a hyphen
(“-”) because
ant considers these to be private
targets. This prevents users from invoking them explicitly
from the command line but still allows them to be invoked as
dependencies of other targets.
[68] This behavior was based on a misunderstanding of how these archives might be used. This behavior is not present in the new Groovy-based framework.
The following sections within this document describe examples from
doc/example. Many of the files from the
example directory are included in the document, but not all of
them are. For the maximum benefit, you are encouraged to make a
copy of the doc/example directory so that you
can follow along and make modifications.
A
- Abuild-ant.properties, The Abuild-ant.properties File
- abuild.application-xml, The Abuild-ant.properties File
- Abuild.backing, The Abuild.backing File
- abuild.classpath, Interface Variables for Java Items
- abuild.classpath.external, Interface Variables for Java Items
- abuild.classpath.manifest, Interface Variables for Java Items
- Abuild.conf, Build Item Files, The Abuild.conf File
- abuild.ear-name, The Abuild-ant.properties File
- Abuild.groovy, Build Item Files
- abuild.hook-build-items, The Abuild-ant.properties File
- abuild.jar-name, The Abuild-ant.properties File
- abuild.java-source-version, The Abuild-ant.properties File
- abuild.java-target-version, The Abuild-ant.properties File
- abuild.junit.testsuite, The Abuild-ant.properties File
- abuild.local-buildfile, The Abuild-ant.properties File
- abuild.main-class, The Abuild-ant.properties File
- Abuild.mk, Build Item Files, The GNU Make backend
- abuild.use-ant-runtime, The Abuild-ant.properties File
- abuild.use-local-hooks, The Abuild-ant.properties File
- abuild.war-name, The Abuild-ant.properties File
- abuild.war-type, The Abuild-ant.properties File
- abuild.web-xml, The Abuild-ant.properties File
- abuild.wrapper-name, The Abuild-ant.properties File
- ABUILD_ITEM_NAME, Interface Variables Available to All Items
- ABUILD_OUTPUT_DIR, Interface Variables Available to All Items
- ABUILD_PLATFORM, Interface Variables Available to All Items
- ABUILD_PLATFORM_COMPILER, Interface Variables for Object-Code Items
- ABUILD_PLATFORM_CPU, Interface Variables for Object-Code Items
- ABUILD_PLATFORM_OPTION, Interface Variables for Object-Code Items
- ABUILD_PLATFORM_OS, Interface Variables for Object-Code Items
- ABUILD_PLATFORM_TOOLSET, Interface Variables for Object-Code Items
- ABUILD_PLATFORM_TYPE, Interface Variables Available to All Items
- ABUILD_STDOUT_IS_TTY, Interface Variables Available to All Items
- ABUILD_TARGET_TYPE, Interface Variables Available to All Items
- ABUILD_THIS, Interface Variables Available to All Items
- ABUILD_TREE_NAME, Interface Variables Available to All Items
- ant-hooks.xml, Ant Hooks
- attributes, Abuild.conf Syntax
- Autoconf, Autoconf: autoconf Rules
B
- backend, Design Features
- backing area, Backing Areas
- backing-areas, The Abuild.backing File
- build
- distributed, Design Features
- parallel, Design Features
- build file, Build Item Files
- build forest, Basic Terminology, Build Forests
- build item, Basic Terminology, Build Items as Objects
- current, Basic Terminology
- interface-only, Special Types of Build Items
- pass-through, Special Types of Build Items
- root, Special Types of Build Items
- scope, Build Item Name Scoping
- unnamed, Special Types of Build Items
- build sets, Build Sets
- build tree, Basic Terminology, Build Trees
- local, Multiple Build Trees
- build-also, Abuild.conf Syntax
C
- C code, C and C++: ccxx Rules
- C++ code, C and C++: ccxx Rules
- ccxx, C and C++: ccxx Rules
- CCXX_TOOLCHAIN, Object-Code Platforms
- child-dirs, Abuild.conf Syntax
- clean, Build Targets
- Cygwin, Additional Requirements for Windows Environments
D
- deleted-items, The Abuild.backing File
- deleted-trees, The Abuild.backing File
- dependencies
- reverse, Building Reverse Dependencies
- dependency, Build Item Dependencies
- circular, Direct and Indirect Dependencies
- cross-platform, Explicit Cross-Platform Dependencies
- direct, Direct and Indirect Dependencies
- indirect, Direct and Indirect Dependencies
- one-way gates, Increasing a Build Item's Visibility
- platform compatibility, Dependencies and Platform Compatibility
- transitive, Direct and Indirect Dependencies
- deps, Abuild.conf Syntax
- description, Abuild.conf Syntax
- DFLAGS, C and C++: ccxx Rules
- distributed build, Design Features
I
- INCLUDES, Interface Variables for Object-Code Items
- interface, The Abuild Interface System
- interface file, Build Item Files
- interface-only build item, Special Types of Build Items
L
- LIBDIRS, Interface Variables for Object-Code Items
- LIBS, Interface Variables for Object-Code Items
- local build tree, Multiple Build Trees
M
- mingw, Known Limitations
N
- name, Abuild.conf Syntax
- no-op, Build Targets
O
- OFLAGS, C and C++: ccxx Rules
- output directories, Output Directories
- output modes, Output Modes
P
- parallel build, Design Features
- pass-through build item, Special Types of Build Items
- dependencies, Dependencies and Pass-through Build Items
- platform, Platform Structure
- platform selectors, Platform Selection
- platform type, Platform Structure
- platform-types, Abuild.conf Syntax
- platforms
- compatibility for dependency, Dependencies and Platform Compatibility
- plugin, Enhancing Abuild with Plugins
- global, Global Plugins
- plugin.groovy, Plugin Functionality
- plugin.interface, Plugin Functionality
- plugin.mk, Plugin Functionality
- preplugin.groovy, Plugin Functionality
- preplugin.mk, Plugin Functionality
- private interfaces, Private Interface Example
R
- reverse dependencies, Building Reverse Dependencies
- root build item, Special Types of Build Items
- rules
- build item, Build Item Rules
S
- scope, Build Item Name Scoping
- ancestor, Build Item Name Scoping
- descendant, Build Item Name Scoping
- special targets, Build Targets
- supported-flags, Abuild.conf Syntax
- supported-traits, Abuild.conf Syntax
- SYSTEM_INCLUDES, Interface Variables for Object-Code Items
T
- target , Basic Terminology
- target type, Platform Structure
- top-level Abuild.conf, Multiple Build Trees
- traits, Traits, Abuild.conf Syntax
- tree dependency, Multiple Build Trees
- tree-deps, Abuild.conf Syntax
- tree-name, Abuild.conf Syntax
U
- unnamed build item, Special Types of Build Items
V
- visible-to, Abuild.conf Syntax
W
- WFLAGS, C and C++: ccxx Rules
- whole archive, Whole Library Example
- whole library, Whole Library Example
- Windows, Additional Requirements for Windows Environments